Table of Contents:
1. How to Format Treatment Note Templates for AI Use
2. How to Use Echo AI to Write a Treatment Note
3. How to Use Echo AI to Convert Voice Notes into Treatment Notes
4. How to Use Echo AI to Transcribe Patient Conversations in Treatment Notes
5. How to Use Echo AI to Generate Consultation Summaries
6. How to Use the Echo AI Content Agent for Service Descriptions
7. How to Use Echo AI's Drug Agent for Prescriptions
8. How to Use the Echo AI Letter Agent to Generate Letters
9. How to Use Echo AI to Respond to a Review
How to Format Treatment Note Templates for AI Use
In this guide, we'll show you how to format treatment note templates for AI use. A key requirement is to include a Long Answer form component, as it allows the AI tool to function properly within the treatment notes.
Step 1: Navigate to Setup
Start by logging into your Pabau account using your login credentials. Then, navigate to the Setup page by clicking the cogwheel icon in the left sidebar menu. In the Clinical section, find Medical Form Templates.
Step 2: Create a New Form Template
Once you're on the Medical Forms page, click the "Create Form" button at the top right corner of the screen to get started. You will be prompted to choose one of the templates we offer or create the form yourself. In this case, select Blank Template.
NOTE: It's not mandatory to create a completely new treatment note form to use the AI tool in treatment notes. Simply follow the form component addition steps below to add a Long Answer component to your existing treatment note template.
Step 3: Configure Form Settings
In the form builder, start adding all the necessary fields to your treatment form, such as patient name, date fields, and others, just as you would when creating any other medical form. This guide specifically highlights the Long Answer component, as it is essential for enabling the AI tool within treatment notes.
To include the Long answer component in a treatment note template, in the form builder, begin by expanding the General tab located at the top left of the screen. Here, you'll need to name your form and select Treatment Form as the form type.

Next, open the Components tab to start adding elements to your form. Either drag and drop or click on the Long Answer component to add it to the form—this is a key step, as the AI Care Agent will only work within a Long Answer component.

Once the Long Answer component is on the screen, hover over it to reveal an edit icon in the far-right corner.
Click the pen icon to edit the component and add a question that will help guide the AI tool's response in this section. Finally, click the "Save Component" button to confirm your changes.

Step 4: Save Changes
After you've configured the form, click the "Save" button at the top right corner to save the treatment note.

By following these steps, you can include the AI Care Agent in your treatment notes by ensuring the use of a Long Answer component, either by adding it to a new or existing template.
How to Use Echo AI to Write a Treatment Note
This article explains how you can use Echo AI to compose detailed treatment notes.
Step 1: Navigate to the Client Card
Start by logging into your Pabau account using your login credentials. Then, use the search bar located at the top of the page to find the client you wish to create a treatment note for.

Step 2: Write a Treatment Note
Once you're in the client card, navigate to the Create button, represented as a blue plus sign, at the bottom right corner of the screen. The option to write a treatment note will be revealed.

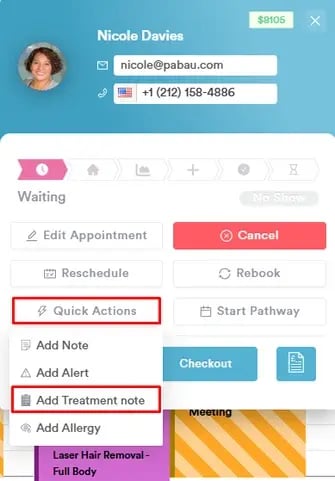
You can also create a treatment form directly from the appointment menu in the Calendar. Simply click on the appointment, select "Quick Actions," then choose "Add Treatment Note," and pick the relevant form from your list.

Step 3: Select the Form Template
Be sure to select a treatment note template that includes a Long Answer component, as the AI tool can only function within this type of component, which generates detailed responses. For more details on how to add a Long Answer component to your forms, please read this article.

Step 4: Include Medical History and Client Personal Details
Fill out all relevant fields in your treatment note. When you reach the Long Answer component, enter a brief version of your treatment note in the "Ask AI to write anything" field.
To the right of this field there are two purple icons. These icons include your client's medical history and personal details, respectively, based on the client card records.

If you prefer not to include the client's medical history and personal details in your treatment note, click on one or both of the purple icons to disable them.
Step 5: Compose a Note
After writing your note, press Enter on your keyboard to let the AI generate the text.

The AI tool will generate the text, taking into consideration any personal details or medical history of the client, if you've enabled those options. To finalize, click the "Save Form" button at the bottom.

NOTE: Each use of the AI tool for writing treatment notes will deduct 5 credits from your Pabau balance.
By following these steps, you can use the AI tool to generate a treatment note.
How to Use Echo AI to Convert Voice Notes into Treatment Notes
This guide explains how to use the Echo AI dictation tool to convert voice notes into treatment notes using AI.
The dictation tool lets you convert voice notes into treatment notes using AI by speaking directly into Pabau, whether during or after the treatment.
Step 1: Navigate to the Client Card
Start by logging into your Pabau account using your login credentials. Then, use the search bar at the top of the page to find the client for whom you wish to create a treatment note.

Step 2: Write a Treatment Note
Once you're in the client card, navigate to the Create button, represented as a blue plus sign, at the bottom right corner of the screen. The option to write a treatment note will be revealed.

You can also create a treatment form directly from the appointment menu in the Calendar. Simply click on the appointment, select "Quick Actions," then choose "Add Treatment Note," and pick the relevant form from your list.

Step 3: Select the Form Template
Be sure to select a treatment note template that includes a Long Answer component, as the AI tool can only function within this type of component, which generates detailed responses.
For more details on how to add a Long Answer component to your forms, please read this article.

Step 4: Select the Audio Input
To get started, click on the grey microphone icon located in the bottom right corner of the Long Answer field.

You’ll be prompted to choose your audio input and language. In the "Audio input" field, select the microphone you want to use for recording. In the "Output language" section, you can choose whether you’d like the audio to be translated into another language. In the "Save audio" field, choose if you wish to save the recorded audio.

NOTE: For the best experience, we recommend using a USB microphone to enhance clarity and ensure high-quality, reliable audio every time.
Click "Close" after you've completed the selection.
Step 5: Choose the Speech Mode
After setting up the audio input and output language settings, click the cogwheel icon to select your AI processing preference for the speech:
- Word-for-word: No AI processing will be applied to the dictated speech.
- Smart dictation: The AI will process the dictated speech to make it sound more professional.

Next, click the red microphone icon to select a speech mode—Dictation, Transcription, or Consultation. For this process, choose Dictation.

Step 6: Start Recording
By selecting the Dictation mode, the system will start recording. The AI tool will capture your voice note and convert it to text.
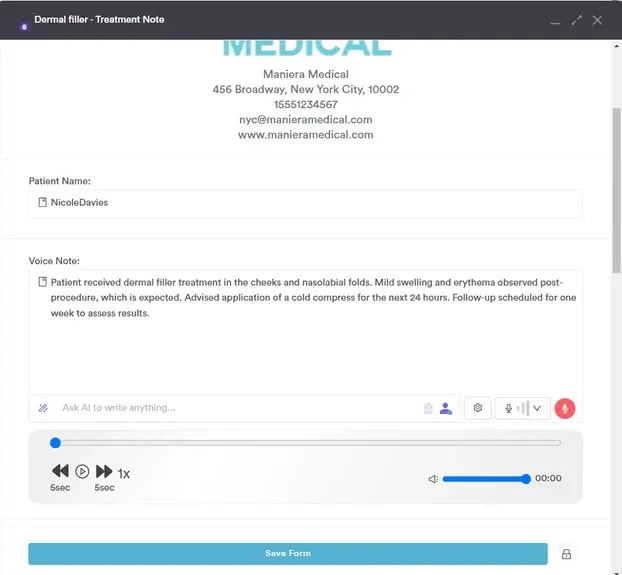
If you need to take a break while speaking, click the blue "Pause" button. When you're ready to continue recording, simply click "Play" again.
To replay the recording, click the Play button on the generated audio.

NOTE: Playback is only supported in the Chrome browser and is not available in Safari.
Click "Save Form" to save the form in the client card.
Step 7: Review the Treatment Note
To review the treatment note, expand the Chart/EMR section in the client card and switch to the Treatment notes tab. Your treatment note will be shown here.

NOTE: Each use of the AI tool for dictation will deduct 5 credits from your Pabau balance. Additionally, making edits to the generated text using the chatbox will incur an extra 5 credits per prompt.
By following these steps, you can use the dictation tool to create treatment notes in your Pabau account using AI.
How to Use Echo AI to Transcribe Patient Conversations in Treatment Notes
This article explains how to use the Echo AI transcription tool in treatment notes to capture and transcribe conversations between a practitioner and a patient.
Echo AI provides automatic transcriptions of conversations during consultations and treatments, capturing every word in real time. This transcription feature also includes timestamps and designates speakers as Speaker A and Speaker B for each sentence or paragraph.
Step 1: Navigate to the Client Card
Start by logging into your Pabau account using your login credentials. Then, use the search bar at the top of the page to find the client for whom you wish to create a treatment note.

Step 2: Write a Treatment Note
Once you're in the client card, navigate to the Create button, represented as a blue plus sign, at the bottom right corner of the screen. The option to write a treatment note will be revealed.

You can also create a treatment form directly from the appointment menu in the Calendar. Simply click on the appointment, select "Quick Actions," then choose "Add Treatment Note," and pick the relevant form from your list.
Step 3: Select the Form Template
Be sure to select a treatment note template that includes a Long Answer component, as the AI tool can only function within this type of component, which generates detailed responses.
For more details on how to add a Long Answer component to your forms, please read this article.

Step 4: Select the Audio Input
To get started, click on the grey microphone icon located in the bottom right corner of the Long Answer field.

You’ll be prompted to choose your audio input and language. In the "Audio input" field, select the microphone you want to use for recording. In the "Output language" section, you can choose whether you’d like the audio to be translated into another language. In the "Save audio" field, choose if you wish to save the recorded audio.

NOTE: For the best experience, we recommend using a USB microphone to enhance clarity and ensure high-quality, reliable audio every time.
Click "Close" after you've completed the selection.
Step 5: Choose the Speech Mode
After setting up the audio input and output language settings, click the red microphone icon to select a speech mode—Dictation, Transcription, or Consultation. For this process, choose Transcription.
Step 6: Start Recording
After selecting the speech mode, the system will start recording. The AI tool will record and convert your conversation to text.
Once you're done, click on "Stop" to stop recording.
If you need to make changes to the transcription, hover over the sentence you want to edit, click the pen icon, make your edits, and save your changes.


NOTE: Playback is only supported in the Chrome browser and is not available in Safari.
Click "Save Form" to save the form in the client card.
Step 7: Review the Treatment Note
To review the treatment note, expand the Chart/EMR section in the client card and switch to the Treatment Notes tab. Your treatment note will be shown here.

NOTE: Each use of the AI tool for transcription will deduct 5 credits from your Pabau balance. Additionally, making edits to the generated text using the chatbox will incur an extra 5 credits per prompt.
By following these steps, you can utilize the AI transcription tool to create treatment notes in Pabau.
How to Use Echo AI to Generate Consultation Summaries
In this guide, you'll learn how to use the AI-powered consultation summary tool in treatment notes to create concise and informative summaries of patient interactions.
The consultation summary mode captures the entire conversation between you and your client, ensuring that no important information is overlooked.
Once the conversation is recorded, the AI tool analyzes the dialogue to extract key details, such as symptoms, concerns, and recommendations. It then compiles this information into a concise and well-organized treatment note, making it easy for you to reference the most relevant points in your ongoing care.
This process not only streamlines documentation but also enhances the accuracy and efficiency of your patient records.
Step 1: Navigate to the Client Card
Start by logging into your Pabau account using your login credentials. Then, use the search bar at the top of the page to find the client for whom you wish to create a treatment note.

Step 2: Write a Treatment Note
Once you're in the client card, navigate to the Create button, represented as a blue plus sign, at the bottom right corner of the screen. The option to write a treatment note will be revealed.

You can also create a treatment form directly from the appointment menu in the Calendar. Simply click on the appointment, select "Quick Actions," then choose "Add Treatment Note," and pick the relevant form from your list.

Step 3: Select the Form Template
Be sure to select a treatment note template that includes a Long Answer component, as the AI tool can only function within this type of component, which generates detailed responses.
For more details on how to add a Long Answer component to your forms, please read this article.

Step 4: Select the Audio Input
To get started, click on the grey microphone icon located in the bottom right corner of the Long Answer field.

You’ll be prompted to choose your audio input and language. In the "Audio input" field, select the microphone you want to use for recording. In the "Output language" section, you can choose whether you’d like the audio to be translated into another language. In the "Save audio" field, choose if you wish to save the recorded audio.

NOTE: For the best experience, we recommend using a USB microphone to enhance clarity and ensure high-quality, reliable audio every time.
Click "Close" after you've completed the selection.
Step 5: Choose the Speech Mode
After setting up the audio input and output language settings, click the red microphone icon to select a speech mode—Dictation, Transcription, or Consultation. For this process, choose Consultation.
Step 6: Start Recording
After selecting the speech mode, the system will start recording. The AI tool will capture your conversation and generate a summary of what was discussed.

To replay the recording, click the Play button on the generated audio.

NOTE: Playback is only supported in the Chrome browser and is not available in Safari.
Click "Save Form" to save the form in the client card.
Step 7: Review the Treatment Note
To review the treatment note, expand the Chart/EMR section in the client card and switch to the Treatment Notes tab. Your treatment note will be shown here.

NOTE: Each use of the AI tool for consultation summaries will deduct 5 credits from your Pabau balance. Additionally, making edits to the generated text using the chatbox will incur an extra 5 credits per prompt.
By following these steps, you can use the Consultation Summary tool to create treatment notes in your Pabau account.
How to Use the Echo AI Content Agent for Service Descriptions
This article covers how you can use Echo AI to generate service descriptions.
Step 1: Navigate to Services
Start by logging in to your Pabau account using your login credentials. Then, navigate to the Setup page. You will find the "Services" tab under the Services section.
Step 2: Create/Edit a Service
Once you're on the Services page, you can generate a Pabau AI description when editing or creating a service.
NOTE: For more information about creating a service in Pabau, please refer to this article.
Step 3: Generate an AI Description
When you create or edit a service, click the "Online Booking" tab at the top left of the page to add a description.

This tab will reveal a button to generate a description based on the service name. The button is located below the description field.

If you like the description, you can click the "Save" button at the top right corner to update the changes and display the description in your online booking portal.
If necessary, you can also make changes to the description, then save it.
NOTE: To display service descriptions in your Online Booking portal, ensure that you have properly customized the portal by enabling service descriptions in the settings.

For more information, please refer to this article.
Step 4: Review the Service on Your Online Booking Portal
In your online booking portal, you can view the detailed description of services by clicking on the "Read More" button associated with each service.

Once clicked, the description you have saved will be displayed.

NOTE: Please note that using this functionality will deduct 5 credits from your Pabau credit balance per service description.
By following these steps, you can generate descriptions for your services using Echo AI.
How to Use Echo AI's Drug Agent for Prescriptions
This article covers how to utilize Pabau's Echo AI tool to generate relevant client information for your prescriptions.
Echo AI's Drug Agent generates recommendations for medications based on recorded conditions, highlights allergy-related risks, and flags medications to avoid. This tool streamlines the prescribing process, supports effective treatment planning, and enhances care quality.
Key Information Provided by Echo AI
In the case of prescriptions, the AI tool provides several key pieces of information:
- Suggested Medications: Recommendations suited to treat the client’s problems, as recorded in their client card.
- Drugs to Avoid: Information on medications that should be avoided based on the client’s listed allergies.
- Alerts: Notifications indicating medications that should be avoided based on the client card.
Step 1: Create a Prescription
Begin by creating a prescription as you normally would and select a drug in the 'Drugs' section.

Step 2: Select a Drug
After selecting the drug for the prescription, locate the "Generate" option on the right side of the screen.

Step 3: Generate Recommendations
Click on "Generate." Echo AI will provide detailed information about the suggested medication for the patient based on their allergies and conditions.

By following these steps, you can effectively use Echo AI to enhance your prescription process.
How to Use the Echo AI Letter Agent to Generate Letters
This article explains how you can use Echo AI to generate letters.
Step 1: Navigate to the Client Card
Start by logging in to your Pabau account using your login credentials. Then, navigate to the search bar and type at least three letters to search for a client. Click on the client name to open their client card.

Step 2: Create a Letter
To locate the option to write a letter, click on the Create button, which is represented by a blue plus sign at the bottom right side of the screen. The action will appear under "Communication."

Step 3: Generate a Letter Using Pabau's AI Tool
Start creating the letter as usual. The option to generate a letter using Echo AI's assistance is located at the bottom of the text builder.

NOTE: You can also create letters by using our dictation tool to record voice notes and then convert them into written letters with AI. For more details, check out this article.
Select the treatment note from the client card in Pabau AI that you want to use as the foundation for the letter. The tool will then extract the data in the note to create the letter.
You can also choose whether to address the letter to the patient directly or to their GP or primary care physician.
Once you've selected the form and the message is generated, select the "Save & Print" button at the bottom of the text builder to finalize. 
NOTE: Please note that using this functionality will deduct 5 credits from your Pabau credit balance.
By following these steps, you can use Echo AI to write letters.
How to Use the AI Tool to Respond to a Review
Step 1: Navigate to Reviews
Start by logging into your Pabau account using your login credentials. Then, navigate to the Marketing tab located in the left sidebar menu and click to expand it, then click on Reviews.

NOTE: For a detailed guide on how reviews work in Pabau, check out this article.
Step 2: Respond to a Review
On the Reviews page, you'll find a list of all the reviews you've received, along with the available actions for each:
- Report: Hide the review from your reviews page.
- Share: Post the review to your page or share it on Facebook, Twitter (X), or LinkedIn.
- Respond: Reply to the client who left the review.
- Star Icon: Mark a review as a favorite to ensure it appears at the top of the list when clients browse reviews or book online.
In this case, click the "Respond" button.

Step 3: Generate a Response Using AI
When replying to a review, you'll see a "Generate" button. Clicking it will trigger the AI tool to craft a response tailored to the review, making it easy to send a thoughtful reply to the client.
The AI generates responses based on the language set in your user profile. To learn how to check or update your language settings, refer to this article.

Another action is the toggle below that allows you to notify the client when you respond. Simply enable the toggle to send them a notification once your reply is live.
NOTE: You will be charged 2 credits per generated response when using the AI tool to reply to reviews.
Step 4: Send the Response
Once the AI generates the text, you can edit it if needed. If you're satisfied with the response, simply click the "Respond" button to send it.

The response will now be visible to everyone on the reviews page.

By following these steps, you can easily use the AI tool to generate a review response.
For more guides, refer to related articles below, select additional guides, or use the search bar at the top of the page. These guides will help you get the most out of your Pabau account.
Additionally, to help you fully utilize and understand your Pabau account, we recommend exploring additional guides and resources offered at the Pabau Academy. It offers in-depth video tutorials and lessons, offering a holistic learning experience that can equip you with the essential skills for achieving success with Pabau.