
In this article, you will learn how to choose which booking steps clients go through and in what order, which booking types they can pick, how the date and time step looks, and which availability rules apply.
Everything here is set in Pabau Studio: open Online Bookings and click Customise page, then click Edit (see Part 2).
Step 1: Choose the Booking Steps
- Click Manage at the end of the Booking pages strip. The Booking steps panel lists the steps in the order clients go through them.
- Use the up and down arrows to change the order.
- Use the switch to turn a step off.
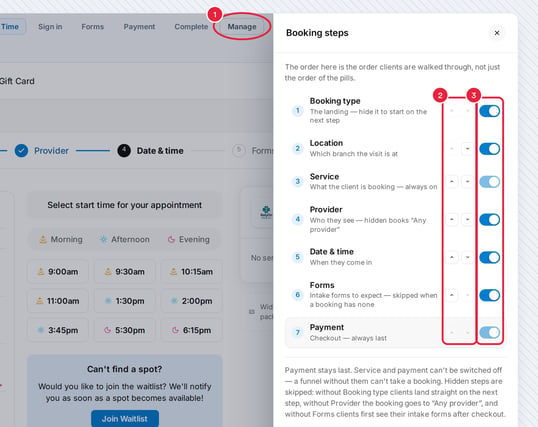
Manage (1) opens Booking steps: reorder (2) or switch off (3)
| Step | What it does | If you switch it off |
|---|---|---|
| Booking type | The landing page: what the client wants to book (see Step 2). It always comes first. | Clients start on the next step. |
| Location | Which branch the visit is at. | The step is skipped. |
| Service | What the client is booking. | Always on. |
| Provider | Who the client sees. | The booking goes to “Any professional”. |
| Date & time | When the client comes in. | The step is skipped. |
| Forms | Intake forms to complete. Skipped automatically when a booking has none. | Clients first see their intake forms after checkout. |
| Payment | Checkout. | Always on, and always last. |
NOTE: Steps with nothing to choose from are skipped for the client automatically — for example, a clinic with one location bookable online does not see the Location step. Before the Forms and Payment steps, clients sign in with their email address and a six-digit code, and fill in your Sign-up fields if they are new (see Part 2).
Why should the Provider step come after Service?
Keep Provider below Service in the Booking steps list. The providers a client can choose from are worked out from the service they picked: only staff who perform that service and work at the chosen location are listed.
If you move Provider above Service, clients reach the provider step before they have picked a service. There is nothing to work out the list from yet, so they are sent straight to Service instead. Once they choose a service they continue to the next step after it, so they never get to pick a provider and the booking goes to “Any professional”.
TIP: If clients aren't seeing your providers, click Manage, check that Provider sits below Service and is switched on, then click Publish. Location can go before or after Service.
Step 2: Choose the Booking Types
The first step asks clients what they want to book.
- Open the Book Type page, hover the section and click the Book Type label.
- UI style — Cards, Tiles or Hero split.
- Wording — the Eyebrow, Title and Subtitle above the options. Leave a field empty to use the standard wording.
- Show / hide options — Book an appointment is shown by default. Switch on Book a class if you run classes.
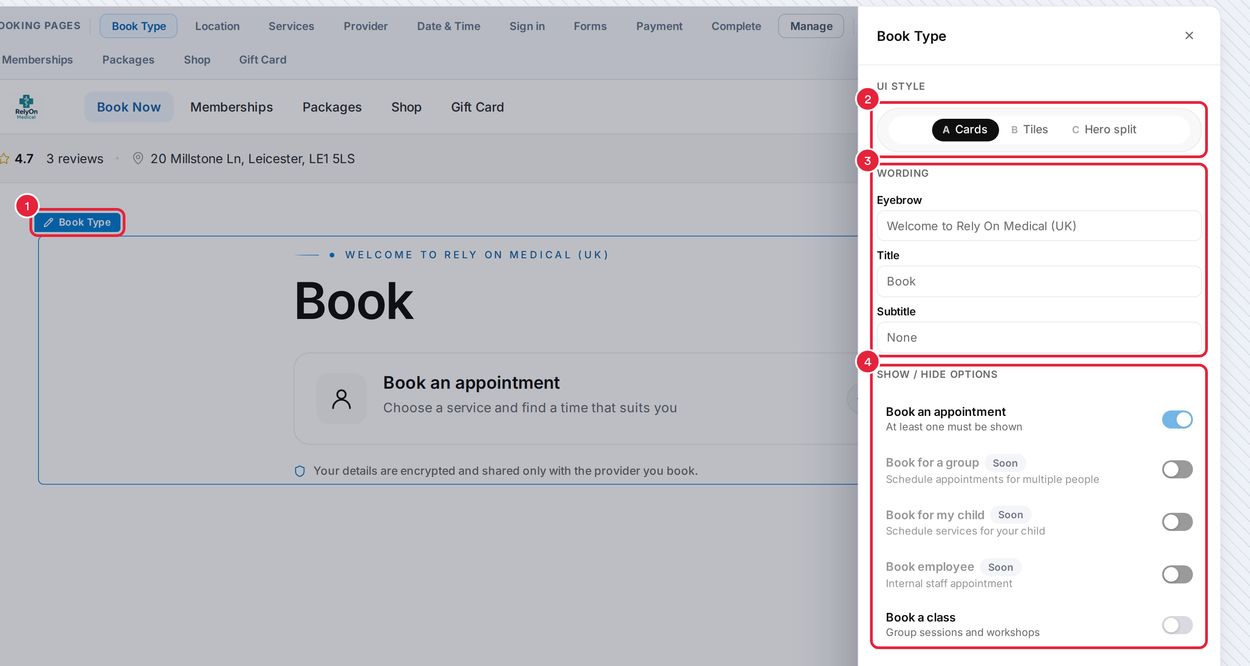
The Book Type settings
NOTE: Book for a group, Book for my child and Book employee are marked Soon because they are not ready for clinics yet. Leave them switched off.
Step 3: Set Up the Date and Time Step
Open the Date & Time page, hover the calendar and click the Date & Time label. The Date & time section panel has two tabs.
- Open the Layout tab.
- Choose Month view (a full-month calendar with availability stripes), Week (a week strip with grouped slots) or Minimal (a clean list of times with prices).
- Show waitlist adds a Can’t find a spot? banner with a Join Waitlist button. Clients must sign in to join, and their entry lands on your waitlist in Pabau, where you can book them in when a time frees up (see How to Book a Client from the Waitlist).
- Hide fully booked days skips days with no availability, and Show prices on slots shows the service price beside each time.
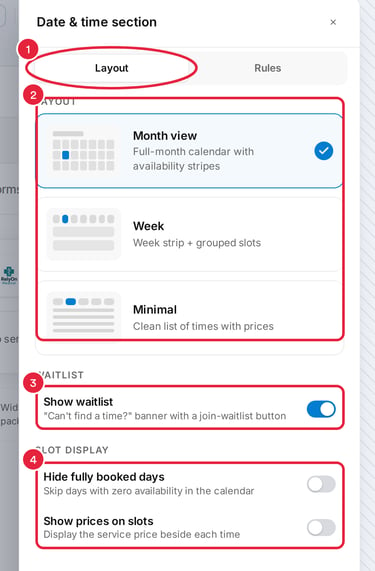
The Layout tab
Step 4: Set the Availability Rules
- Open the Rules tab. Until you set them here, Minimum notice and Don't allow booking if room in use follow your classic online booking settings. Every other rule is off until you turn it on.
- Time slots — Time interval sets how often an appointment can start (every 10, 15, 20, 25 or 30 minutes). Each service keeps its own length. By default it is the same as your online booking set-up.
- Booking window — Minimum notice and Maximum advance.
- Gap & time management — rules that keep your providers’ days tidy.
- Resource management — room and equipment checks.
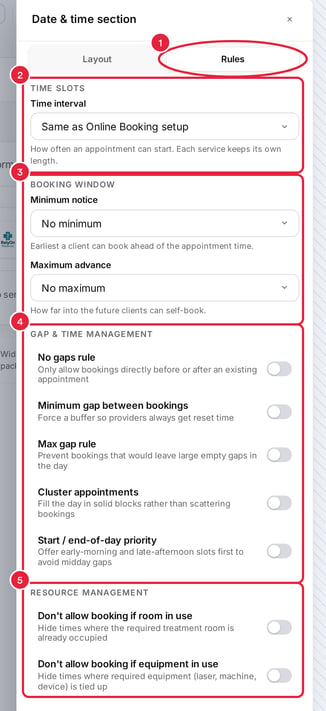
The Rules tab
| Rule | What it does |
|---|---|
| Minimum notice | The earliest a client can book ahead of the appointment: No minimum, 1, 2, 4, 24 or 48 hours. |
| Maximum advance | How far ahead clients can book: No maximum, 14, 30, 60, 90, 180 or 365 days. |
| No gaps rule | Only offers times directly before or after an existing appointment. |
| Minimum gap between bookings | Forces a buffer (the Gap size, 5 to 60 minutes) so providers always get reset time. |
| Max gap rule | Stops bookings that would leave a gap larger than the Largest acceptable gap (1 to 4 hours). |
| Cluster appointments | Fills the day in solid blocks rather than scattering bookings. |
| Start / end-of-day priority | Offers early-morning and late-afternoon times first, to avoid midday gaps. |
| Don't allow booking if room in use | Hides times when the treatment room the service needs is already taken. |
| Don't allow booking if equipment in use | Hides times when the equipment the service needs (a laser, machine or device) is already taken. |
NOTE: These rules apply on top of your rota. A client only ever sees a time when the provider is working, the service is available online and every rule that applies allows it.
Where the Services, Providers and Locations Come From
- Services — services available to book online in Setup ▸ Services. See How to Make a Service Bookable Online and How to Make a Service Bookable Online Only by Existing Clients. Add-ons on a service’s Addons tab appear in the service’s window when a client adds it, under the heading set in the option group’s Prompt for clients (for example, Customise your Hydrafacial), when the option group has the Online Booking channel (on by default) and is not Internal only — see How to Offer Add-ons When Clients Book Online and How to Add Addons to a Service.
- Providers — staff who perform the service and are not hidden from online bookings, with their photo and bio from their staff profile.
- Locations — your locations set as bookable online. On the Location page, click the Locations label and switch on Call button to show each location’s phone number (from Setup ▸ Locations) on its card. A location set as a Virtual or mobile location in Setup ▸ Locations shows no address, map pin or directions. If no location can be booked online, clients see No online availability right now with your clinic’s contact details.
How do I stop online bookings until we open on a set date?
There is no setting that opens bookings automatically on a future date. Use one of these instead:
- Close the booking page until you open — in Pabau Studio click Settings and switch off Enable online bookings. Clients then see Booking unavailable (“This clinic isn't currently accepting online bookings. Please reach out to the clinic directly to book.”) and cannot book or buy online. On your opening day, switch it back on. This is the same switch as Active in Setup → Online Booking, and it does not switch itself back on.
- Take bookings now for dates from your opening day — leave online bookings on and only rota your providers from your opening date. Clients only ever see times when a provider is working, so the calendar opens on the first day with free times.
NOTE: While Enable online bookings is off, the Client Portal stays available: clients can still see their appointments, packages and invoices, but the Book buttons are hidden.
How do clients book several treatments in one visit, at one time?
By default, each treatment in a client's basket gets its own time. To let clients pick one time for several treatments, switch on Can be booked with other services in one visit for each of those services:
- Go to Setup → Services and open the service.
- On the Online Booking tab, switch on Can be booked with other services in one visit, then click Save.
- Repeat for every service clients may combine.
When a client adds two or more of these services, they choose one time for the first and the rest are booked straight after it with the same practitioner. The booking page tells them: “Your … are booked back to back from the time you pick (… min in total).” Only times where the whole visit fits are offered.
NOTE: Only services that both have the switch on are joined. Classes, and sessions booked from a package or plan, always keep their own time.
Step 5: Publish
Click Publish to make your changes live.
What's next?
Set up deposits and online payment in Part 4: Take Payments and Deposits Online.
The complete New Online Bookings series:
- Getting Started with the New Online Bookings and Client Portal — start here
- New Online Bookings Part 1: Get Your Booking Page Ready — check your booking page is ready to take bookings
- New Online Bookings Part 2: Customise and Publish Your Booking Page in Pabau Studio — brand your page and publish it
- New Online Bookings Part 3: Set Booking Steps and Availability Rules (this article) — choose the booking steps and the availability rules
- New Online Bookings Part 4: Take Payments and Deposits Online — take payments, deposits and card details online
- New Online Bookings Part 5: Share Your Booking Page and Add It to Your Website — share your link and put booking on your website
Was this guide helpful? Let us know by voting below - your feedback helps us write clearer articles.
For more guides, browse the related articles below or use the search bar at the top of the page. You can also watch our video learning series, the Pabau Academy, or visit the Support page for additional help.