
In this article, we'll cover the simple steps to make the most of online bookings in Pabau. Learn how to set up your booking page, use promo codes, integrate it with your website, and ensure everything runs smoothly.
Table of Contents:
1. Introduction to Online Booking
2. How to Customize Your Online Booking Platform
3. How to Use Promo Codes When Booking Online
4. How to Implement Your Online Booking Platform on Your Website
5. Preconditions for Seamless Functionality in Your Online Bookings
6. How to Make Services Available Online
7. How to Enable Online Sale of Packages
Related Content: How to Integrate with Google Tag Manager; How to Integrate with Google Analytics; How to Integrate with Meta Pixel
Introduction to Online Booking
Welcome to the world of online booking with Pabau! In this article, we'll provide you with essential information on where to find and understand the key metrics for your online booking platform.
Why Online Booking Matters
Keeping up with the times is crucial, and today's clients prefer the convenience of booking appointments independently, often outside regular business hours. By embracing an online booking platform, you not only ensure a full calendar but also allow clients to book with you effortlessly, giving you more time to focus on managing your clinic.
Getting Started
To access your online booking settings, follow these steps:
Step 1: Navigate to Online Booking
Log in to your Pabau account and in the left sidebar menu, go to Setup, then click on "Online Booking" under Services.
Understanding Your Online Booking Dashboard
Once you're on the Online Booking page, you'll encounter several sections providing insights into your online bookings.
-
Platform Status: The page's title indicates whether your online booking platform is currently enabled or disabled. On the right, you can find your online booking link.

-
Online Bookings by Month: A graph offers a visual overview of your online bookings in recent months.
-
Location Metrics: You have the flexibility to change the location for which you view metrics.

-
Booking Activity: This section displays your most recent booking activities.
-
Source of Bookings: On the right side, discover where your bookings originate – online bookings feature, Facebook, Instagram, or Google business page.

-
Customization: Utilize the "Customize" button to tailor your online booking platform.
-
Trends and Tips: Explore Trends to identify areas for improvement, and don't miss our Pabau Tips to enhance your business further.

This article serves as an introduction to online booking. For more details on customization and promotion, refer to the respective articles.
NOTE: You can also learn about this topic by watching a lesson on Pabau Academy.
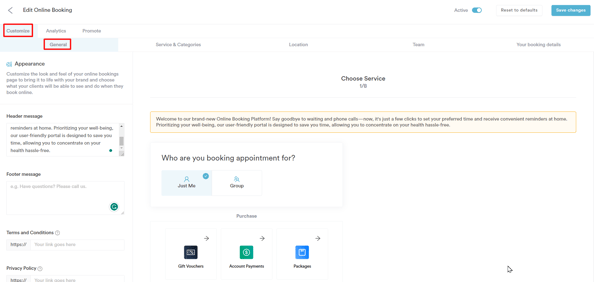
How to Customize Your Online Booking Platform
This article guides you through the process of customizing the behavior of your online booking platform in Pabau. The extensive customization options allow you to tailor the platform according to your preferences, and you can preview these changes in the center of the screen as you make them.
Step 1: Access Online Booking Customization
Log in to your Pabau account and in the left sidebar menu, go to Setup, then click on " Online Booking" under Services.
Click on "Customize" on the right side of the screen.
Toggle the Active switch in the upper right corner to enable or disable your online booking platform.
Step 2: General Customization
In the General tab, you can:
Add a header and footer message to personalize your online booking portal.
Should you choose not to add a custom footer message, the default message will be: "Do you have any questions? Please call [your business number set in Business Details]."
NOTE: If no links are added, the client registration page will feature links to Pabau's Privacy Policy and Terms and Conditions by default.
Require form to be completed as part of booking:
This option will enable you to request a medical form – such as a medical questionnaire – to be completed during the booking process. To learn more about medical forms, read this article.
Hide options for Gift Voucher Purchase, Account Payments, and Package Purchase:
Choose if you wish to enable or disable Gift Voucher Purchase, Account Payments, and Package Purchase.
NOTE: If you choose to display these three options, please note that Stripe will need to be integrated. For more information on integrating Stripe, please read this article.
Allow appointment cancellations and Allow appointment reschedule:
Choose whether clients can cancel or reschedule appointments online via the Client Portal. Tick or untick according to your preferences.
New Booking Notification:
Opt to receive notifications for each online booking, using the business email set in Business Details.
Time Interval:
Select the desired time slot size for your online bookings. For instance, if you opt for a 60-minute interval, clients booking online will encounter available times such as 10:00, followed by 11:00, and so forth.

Step 3: Service & Categories Customization
The Service & Categories tab features several checkboxes, split into two sections based on what they affect: Categories and Services.
Categories:
Select if you’d like to show category photos and service groups.
Services:
Select if you’d like to show service prices, duration, description, and reviews.
Decide if you want virtual consultations to be separate from in-clinic services.
Additionally, you can enable quick service. If enabled, clients will be automatically taken to the next step as soon as they choose a service. If disabled, clients will be able to select more than one service and they will need to proceed to the next step manually.
The "Minimum advance" dropdown menu enables you to specify the minimum amount of time in advance that clients can make a booking. In other words, it lets you set the minimum time gap between the current moment and the earliest time a client can book a service or appointment.

Step 4: Location Customization
In the Location tab, you have the option to allow clients to search for the location of your clinics by postcode, as well as to default them to their most visited location.NOTE: This tab will not be available if you have only one location.
Step 5: Team Customization
In the Team tab, you can choose to show or hide employee surnames, five-star reviews, employee photos, and job titles. Additionally, you can choose to skip the employee step, in which case the client will not be able to choose who they are going to see and will see the availability of all available employees.
You also have the option to display employee profiles. When enabled, clients can read the biographies of staff members, as configured in the Team feature.
Step 6: Booking Details Customization
In the last tab, Your booking details, you can choose whether to allow promo codes and preview the appointment details page.
Click on Save changes in the top right corner to confirm your customizations.
By following these comprehensive steps, you can efficiently tailor your online booking platform to meet your clinic's specific requirements.
How to Use Promo Codes When Booking Online
Clients have the flexibility to utilize both vouchers and promo codes as part of their payment when making online bookings, provided this feature is enabled by you.
Step 1: Allow Promo Codes
Log in to your Pabau account and in the left sidebar menu, go to Setup, then click on "Online Booking" under Services.
Click on "Customize" on the right side of the screen.
In the Customize tab, switch to the last sub-tab, "Your booking details".
In this section, locate the checkbox labeled "Allow promo codes". Tick the checkbox to enable clients to use promo codes when checking out.

Step 2: Applying Promo Codes
When clients reach the last step of the online booking process and promo codes are allowed, they will follow these steps:
On the left side of the screen, clients will find a designated field where they can input either a voucher code or a promo code.

They will need to enter the promo code in the provided field and proceed to complete the booking process.
NOTE: For detailed instructions on creating gift vouchers, refer to this article. If you're interested in creating discount codes, read this article.
By following these steps, clients can seamlessly apply promo codes during the online booking process, enhancing their experience and providing them with applicable discounts or benefits.
How to Implement Your Online Booking Platform on Your Website
Congratulations on customizing your Online Booking platform! Now, let's make it accessible to your clients by implementing a "Book now" button on your website. This button will seamlessly redirect clients to your online booking portal, contributing to a positive user experience.
Step 1: Get the Link to Your Online Booking Platform
Before adding the "Book now" button, you need to obtain the URL to your online booking platform:
Log in to your Pabau account and in the left sidebar menu, go to Setup, then click on " Online Booking" under Services.Click on Customize, go to the Promote tab, and open the "Booking portal" sub-tab.
Copy the URL displayed on this page; you'll use it for the button.
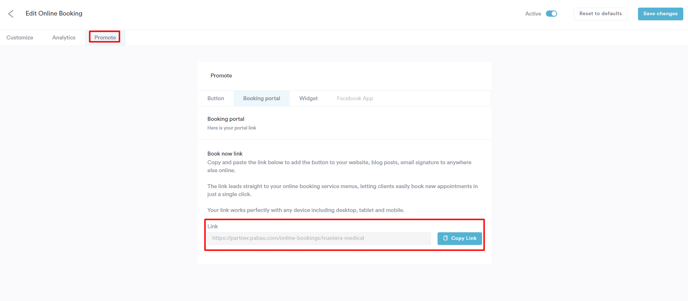
You can also use the URL to add it to communication templates or email newsletters.
Step 2: Implementing the "Book Now" Button
Depending on your website setup, there are two ways to proceed:
For Custom Code Websites: If your website is custom-built, you'll need to add a line of code to your website's body. Use the following code:
<button href="replace this piece of text with the link to your online booking portal">Book now</button>
This code creates a button that, when clicked, redirects clients to your online booking platform.
For Content Management System (CMS) Websites: If your website uses a CMS, implement a Button component with the link to your online booking platform as the directory.
Using Pabau's Custom Buttons
Pabau offers pre-styled buttons with additional customization options. Here's how to use them:
1. In the Promote tab of the Online Booking settings, go to the Button sub-tab.
2. Highlight the desired button and click on "View instructions" to adjust the behavior of the button if desired.

With that done, now it's time to implement the button itself. In the "Copy Embed Code" menu, you'll find the code for the button.
Start by copying the code from the second box. If your website is custom code, paste it where you'd like the button to be, or if your website is CSM, put it in an HTML component.
<div id="pabau-book-now"> </div>
Then, copy the content of the first box, and paste it after the "<div id="pabau-book-now">" in the first code. The final result should look like this:
<div id="pabau-book-now">
<script id="pabau-script" src="https://pabau.com/widgets/online-bookings/book-now-button.js?company_slug=cosmetic-clinic-demo&btnStyle=1"></script>
</div>
With these steps completed, you've successfully integrated the "Book now" button, providing a seamless booking experience for your clients.
Preconditions for Seamless Functionality in Your Online Bookings
Ensuring seamless functionality in your online bookings requires careful consideration of various elements within the Pabau system. Follow these preconditions to guarantee that online bookings work seamlessly, providing accurate availability to clients at all times.
Create Shifts for All Staff Members:
It's essential to have shifts created for all staff members to facilitate accurate scheduling.
For more information on creating shifts, read this article.
Set Up Shifts Properly in Terms of Services:
Verify that shifts are configured correctly in terms of the services included in them. If a service is not associated with any shift, clients won't see staff members' availability.
When introducing new services, ensure they are added to the relevant shifts.
Check Staff Permissions for Performing Services:
Confirm that staff members assigned to perform specific services have the necessary permissions.
Navigate to Team, select a staff member, go to the Services tab, and choose the services the employee can perform.

Ensure Online Booking for Services:
Make services bookable online by going to Setup, then clicking on "Services" in the Services section. Click on the service and access the Online Booking tab.
Enable online booking for the service and ensure the right locations and employees are assigned in the "Assign" tab.
For more information on setting up your services, read this article.
Verify Online Booking Status for Locations:
Confirm that locations where employees can be booked online are configured accordingly.
Navigate to Setup, then click on "Locations" under Business.
Click on "Edit" next to each location and check under "General" that "This location accepts online bookings" and "Show online" are enabled.

By adhering to these considerations, you'll establish the necessary conditions for your online bookings to function seamlessly, delivering accurate availability information to clients and optimizing their booking experience.
How to Make Services Available Online
Step 1: Navigate to Services
Log in to your Pabau account, go to Setup in the left sidebar menu, and click on the "Services" button under "Services."
Step 2: Access the Service for Online Booking
In the "Services" tab, locate and click on the service you want to make available for online booking. Once selected, switch to the "Online Booking" tab.
Step 3: Configure Online Booking Settings
In the "Settings" tab, enable the "Enable this service online" toggle.

You can also provide an alternative name and a description to make your service more understandable for online clients.
For added convenience, utilize our AI tool to automatically generate a service description with a simple click on the "Generate" button. This feature ensures that your service is effectively communicated and easily understood by prospective clients browsing online.
If there are additional requirements, such as a patch test, click on "Add Service Notice" and input the necessary information.
You can add both a short and a long notice, however, the long notice will only be displayed if clients click on the "More info" button.

Furthermore, from the "Restrict patient bookings to" section under "Advanced settings", you can limit patient bookings for the service to exclusively existing clients, solely new clients, or both new and existing clients.
Additionally, you can set restrictions to allow bookings only for clients who have previously received another service as specified by you.

Step 4: Save Changes
In the top right corner of the page, click on either "Save" or "Create," depending on whether you are editing an existing service or creating a new one. Your service is now available for online booking.
By following these steps, you ensure that your clients can conveniently book your services online, enhancing the accessibility and efficiency of your scheduling process.
How to Enable Online Sale of Packages
Step 1: Log in and Access Online Booking Settings
Log in to your Pabau account and navigate to Setup, then Online Booking under "Services", then click on the blue "Customize" button.
Step 2: Customize Online Booking Settings
In the "Customize" tab of the online booking settings, untick "Hide Package Purchase".
NOTE: Packages are available for online purchase only if your Pabau account is integrated with Stripe.
Step 3: Enable Packages for Online Purchase
In the left sidebar menu, go to Setup, then click on "Packages" under Services.
Click on the name of the package you want available online, then turn on the "Enable online purchase" option.

Make any additional changes if necessary, and finally, click on "Save" in the top right corner.
Now, the package will be displayed in your online booking portal. If you have created packages consisting of the same service but a different number of sessions in each package, clients will be able to select how many sessions they wish to purchase.

NOTE: You can also learn about this topic by watching a lesson on Pabau Academy.
In addition, we suggest reading our Packages article for a more in-depth exploration of this topic.
For more guides, refer to related articles below, select additional guides, or use the search bar at the top of the page. These guides will help you get the most out of your Pabau account.
Additionally, to help you fully utilize and understand your Pabau account, we recommend exploring additional guides and resources offered at the Pabau Academy. It offers in-depth video tutorials and lessons, offering a holistic learning experience that can equip you with the essential skills for achieving success with Pabau.