Table of Contents:
1. How to Create a Package
2. How to Edit a Package
3. How to Delete a Package
4. How to Sell a Package in the Point of Sale
5. How to Book an Appointment From a Package
6. How to Use a Package to Pay for an Appointment
7. How to Enable Online Sale of Packages
How to Create a Package
Packages in Pabau allow you to bundle multiple sessions of the same service, providing an opportunity for clients to enjoy a set of sessions, usually at a discounted price. Follow these steps to create a package:
Step 1: Navigate to Packages
Log in to your Pabau account, and in the left sidebar menu, go to Setup, then click on "Packages" under the Services section.
Step 2: Access New Package
On the "Packages" page, click the "New Package" button located in the top-right corner.

Step 3: Input Package Details
- Package Name: Provide a name for the package visible to clients.
- Description: Optionally, add a description for clients, especially if you plan to offer the package online.
- Select a Service: Choose the service from the dropdown menu that will be included in the package.
- Session Count: Specify the total number of appointments a client can book with this package.
- Duration: Select the duration for which the client can use this package from the dropdown menu.
- Enable Online Purchase: Use the toggle to decide if you want this package available for online purchase.
- Price: Set the total price of the package; Pabau will distribute it based on the number of sessions.
- Tax: Choose the applicable tax from the dropdown menu. To create a new tax, go to Setup, then click on Taxes under Financials.
Step 4: Activate the Package
Ensure the Active toggle in the top right corner is enabled, then click on "Create" to confirm.

NOTE: You can also learn about this topic by watching a lesson on Pabau Academy.
How to Edit a Package
In this article, we'll guide you through the steps to edit a package in Pabau.
Step 1: Navigate to Packages
Log in to your Pabau account, and in the left sidebar menu, go to Setup, then click on "Packages" under the Services section.
Step 2: Access the Package
On the "Packages" page, click on the name of the package you wish to edit.
Step 3: Make Desired Changes
You can now make any necessary adjustments to the package details, including:
- Package Name: Change the name of the package.
- Description: Update or add a description.
- Select a Service: Modify the service included in the package.
- Session Count: Adjust the total number of appointments permitted.
- Duration: Change how long the package is valid.
- Online Purchase: Toggle whether the package can be bought online.
- Price: Update the total price of the package.
- Tax: Change the relevant tax.
Step 4: Save Changes
Click on "Save" located in the top right corner to save the edited package.
How to Delete a Package
In this article, we'll walk you through the steps to delete a package in Pabau. If you no longer offer a specific package, follow these steps:
Step 1: Navigate to Packages
Log in to your Pabau account, and in the left sidebar menu, go to Setup, then click on "Packages" under the Services section.
Step 2: Access the Package
In the "Packages" page, locate and click on the package you want to delete.
Step 3: Disable the Active Toggle
In the top right corner, disable the Active toggle. This will reveal the Delete button.
Step 4: Delete the Package
Click on "Delete," and in the prompt, confirm your decision by clicking on "Yes, Delete."
NOTE: Deleting a package will remove it from your package list, however, any existing clients with this package will still be able to use their remaining sessions.
How to Sell a Package in the Point of Sale
Step 1: Log into Pabau and Access Point of Sale
Log in to your Pabau account, click on the "Create" button at the top of the page, and then select "Sale" from the dropdown menu to access the Point of Sale.
Alternatively, open the client card of the client you want to sell a package to, click on the plus sign in the bottom right corner, and choose "Sale". This will also lead you to the Point of Sale.

Step 2: Choose the Client and Access Packages
In the Point of Sale, select the client (automatically pre-populated if accessed from a client card). Click on "Packages" to view available packages.

Choose the desired package you want to sell to the client. Click on "Continue" in the bottom right corner to proceed.
Step 3: Complete the Transaction
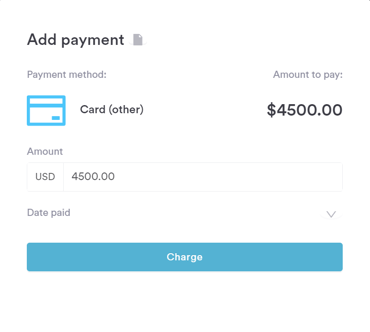
- Choose the preferred payment method.
- Click on "Charge" in the Add Payment menu.
- Confirm the payment by clicking on "Confirm Payment."
Step 4: Review in Client Card
The sold package will be visible in the client card under "Packages." From here, you can monitor the remaining sessions the client has left.

How to Book an Appointment From a Package
Step 1: Navigate to the Calendar
Log in to your Pabau account, and in the left sidebar menu, click on Calendar.
Step 2: Choose the Desired Timeslot
Select the timeslot where you intend to book an appointment, then search for the client to whom you've previously sold a package by using the client search bar.

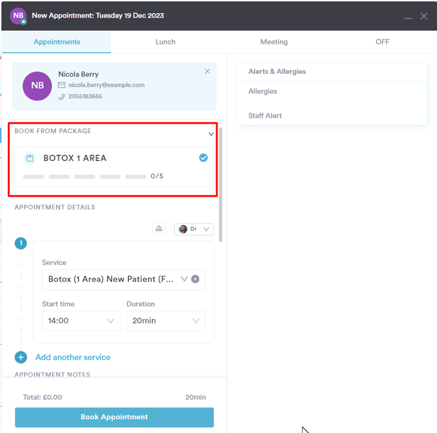
Step 3: Select the Package
After clicking on the client's name, a "Book from package" section will appear in the "Book appointment" window. Click on the name of the package. This action will automatically fill out the service name in the Service field.
Step 4: Add Appointment Details and Confirm the Booking
Input appointment notes and choose notification preferences and click on "Book Appointment" to complete the booking.
How to Use a Package to Pay for an Appointment
Step 1: Navigate to Calendar
Log in to your Pabau account, and in the left sidebar menu, click on Calendar.
Step 2: Access Appointment Checkout
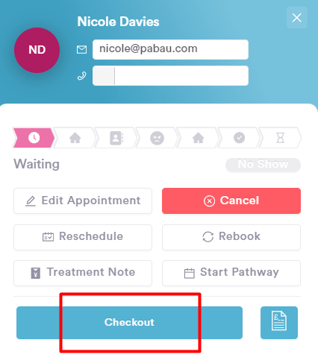
Click on the specific appointment you want to check out, then select "Checkout."
Step 3: Navigate through Point of Sale
In the Point of Sale screen, click "Continue" in the bottom-right corner to proceed.

Next, choose "Packages" from the available pre-paid payment methods.

NOTE: Packages will only appear as an option if the client has a valid, active package.
Step 4: Apply Package Session
By selecting the appropriate package, one of the client's package sessions will be applied to the invoice. Click "Confirm Payment" to complete the checkout process.

The appointment has now been successfully checked out using a package session. You can find detailed information by right-clicking on the appointment.

How to Enable Online Sale of Packages
Step 1: Log in and Access Online Booking Settings
Log in to your Pabau account and navigate to Setup, then Online Booking under "Services", then click on the blue "Customize" button.
Step 2: Customize Online Booking Settings
Within the "Customize" tab of your online booking settings, uncheck the box labeled "Hide Package Purchase."

NOTE: Packages are available for online purchase only if your Pabau account is integrated with Stripe.
Step 3: Enable Packages for Online Purchase
In the left sidebar menu, go to Setup, then click on "Packages" under Services.
Click on the name of the specific package you want to make available online. Then, turn on the "Enable online purchase" option.

Make any other necessary changes, and finally, click "Save" in the top-right corner.
Now, this package will be displayed in your online booking portal. If you've created multiple packages for the same service but with varying numbers of sessions, clients will have the option to choose how many sessions they wish to buy.

For more guides, refer to related articles below, select additional guides, or use the search bar at the top of the page. These guides will help you get the most out of your Pabau account.
Additionally, to help you fully utilize and understand your Pabau account, we recommend exploring additional guides and resources offered at the Pabau Academy. It offers in-depth video tutorials and lessons, offering a holistic learning experience that can equip you with the essential skills for achieving success with Pabau.