Table of Contents:
1. How to Create a Medical Form
2. How to Edit a Medical Form
3. How to Delete a Medical Form
4. How to Use a Medical Form Template
5. How to Clone a Medical Form
6. How to Set a Form to be Sent Before the Appointment
How to Create a Medical Form
Handling your medical forms through Pabau has many benefits. For starters, no more clutter from all those paper forms, and you even get to save some money while doing it. Additionally, all of your client forms will be available to you from anywhere, at any time.
Follow these instructions to create a medical form in your Pabau account:
Step 1: Accessing Medical Form Templates
Log into your Pabau account and navigate to Setup, then click on Forms under ''Clinical''.

Step 2: Creating a Blank Template
Click on "Create Form" in the top right corner and select "Blank Template."NOTE: You can also use Pabau's pre-built forms. For more information, refer to our "How to Use a Medical Form Template" article.
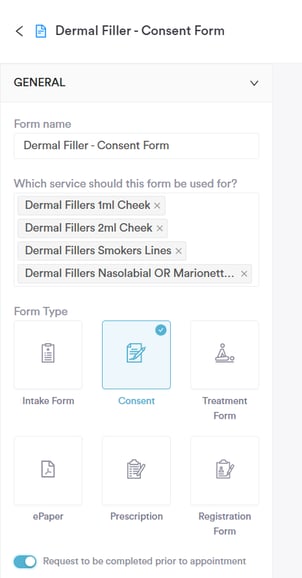
Step 3: General Form Details
In the "General" section at the top right corner, provide essential details for your medical form:Form Name: Input a descriptive name for your form.
Associated Services: Specify which services are linked to this form. This connection is crucial for automation and ensures that the form is preloaded on the patient journey in the Pabau app.
Form Type: Choose the appropriate form type from the following options:
- Medical History: This form provides a general overview of the patient's background. It is not required for every appointment but serves to gather comprehensive information.
- Consent: The consent form informs the patient about the treatment they are receiving, including potential risks. It is highly recommended to have patients sign a consent form before each treatment.
- Treatment Form: This form is intended to be completed by the practitioner and serves as a summary of the appointment. It may include information such as batch numbers and dosage, particularly for appointments involving injectables.
- Prescription: This form is utilized by prescribers to authorize patients for drug issuance.
- Lab Form: This form is designed for any type of blood test.
Once you've provided these details, you are ready to proceed with building the components of your medical form in the next steps.
Step 4: Adding Components to the Form
The "Components" section will become accessible after selecting a form type in the "General" section.
In this section, you will find various building blocks or components that form the structure of your medical form. Drag the desired element from the list onto the center of the screen to add it to your form.
The available components will vary based on the form type you selected. Each component comes with a brief description indicating its intended use.
Click on the added component in the center of the screen to edit it. This action will open a menu on the right side of your screen where you can modify the component, mark it as required, and delete it if necessary.
NOTE: By selecting "Show advanced settings" in the Component settings section, you have the option to establish a linked field, wherein the client's response to a question will be mirrored in the field specified under Linked field.
Additionally, setting a "Default value" means that the answer to the question will be prepopulated based on the merge tag used in the Default value field.
For instance, incorporating the "Client Full Name" merge tag as a default value for the Short answer component will automatically populate that field with the client's name.
When editing is complete, click on "Save component" to confirm your changes.
Using the Matrix Component
One of the available options is the Matrix component, which allows you to collect multiple related answers in a structured table format. Instead of adding several separate questions, the Matrix component lets you group them together under one label — making your form more concise and easier for patients to complete.
This is especially useful when you want patients to respond to a list of items using the same set of answer options. For example, you can ask patients to rate different symptoms — such as pain, fatigue, and nausea — using the same scale: None, Mild, Moderate, or Severe.

The Matrix component is made up of two elements:
Rows – the individual items or statements you want responses for (for example: Existing or recent illness, Hospitalisation or surgeries, Medications, Medication intolerance, Any known allergies)
Columns – the answer options patients can choose from (for example: Yes, No, or a custom scale)

When setting up a Matrix component, you can also choose the input type for the answer columns:
Text – patients type a short response for each row
Paragraph – patients enter a longer, multi-line response
Checkbox – patients tick one or more options per row


To configure the Matrix, add your questions one by one using the “+ Add question” button, and set up the answer options using “+ Add answer.” You can reorder both rows and columns by dragging the handle icon on the left. To remove an item, click the trash icon next to it.

Patients simply select or complete one option per row, making it quick and straightforward to respond — even when the form covers a long list of topics.

Once you have finished configuring the Matrix, click “Save component” to confirm your changes.
Tip: To ensure your medical forms reflect your clinic’s branding, you can customize their design by adding various elements.
Instead of manually uploading your clinic’s logo, you can insert the <-> Company Logo (company) merge tag inside a Text component, which will automatically pull the logo stored in your system.
Additionally, you can include your company name by adding a Text component and enhance personalization by inserting other merge tags that populate patient and clinic details dynamically.
You also have the option to customize text and formatting to match your brand identity, creating a cohesive and professional appearance.
Setting up branded medical forms not only strengthens brand recognition but also ensures consistency across all patient communications. A well-structured and visually appealing form improves readability, making it easier for both patients and staff to navigate while reinforcing trust in your clinic.

Step 5: Finalizing the Form
Continue adding questions and necessary information to your medical form. Repeat these steps as needed until your form is complete.- Use the Preview button (typically found at the top of the screen) to review the form's layout and content. Make sure you're satisfied with how it looks and reads.
- Once you've finished designing your medical form, click Create Form (usually located in the top right corner) to finalize and save it.
- Your medical form has now been successfully created.
NOTE: If you want to create a form that is similar to another one already in your system, you can clone that form instead of creating the second one from scratch.
You can also learn about this topic by watching a lesson on Pabau Academy.
How to Edit a Medical Form
Step 1: Navigate to Medical Form Templates
Log into your Pabau account and navigate to Setup, then click on "Forms" under Clinical.
Step 2: Access the Editing Options
Hover over the medical form you wish to edit. This action will reveal a three-dot button located on the far right side of the form.
Click on the three-dot button to open a menu, then select "Edit".

Step 3: Make Changes and Save
Once you are in the editing mode, make the desired changes to the medical form. The editing process mirrors the steps involved in creating a new form.
After implementing the necessary changes, click on Save Form located in the top right corner to confirm your edits.
By following these steps, you can efficiently edit medical forms in Pabau according to your evolving requirements.
How to Delete a Medical Form
Step 1: Navigate to Medical Form Templates
Log into your Pabau account and navigate to Setup, then click on "Forms" under Clinical.
Step 2: Access the Deletion Options
Hover over the medical form that you intend to delete. This action will reveal a three-dot button located on the far right side of the form.
Click on the three-dot icon to open the menu, then select "Delete".

Step 3: Confirm Deletion
A prompt will appear asking if you want to delete the form. To confirm the deletion, click on "Yes, Delete Form".By following these steps, you will successfully delete medical forms in Pabau. Please exercise caution while performing this action, as it permanently removes the selected form from your system.
How to Use a Medical Form Template
Step 1: Navigate to Medical Form Templates
Log into your Pabau account and navigate to Setup, then click on "Forms" under Clinical.
Step 2: Create a New Form from Templates
Click on "Create Form" in the top right corner, then select "Browse Templates".
Step 3: Clone the Desired Template
Hover over the template you wish to clone. This will reveal the "Use" button. Click on "Use" to clone the selected form into your account.

Additional Tips:
-
While browsing templates, utilize the filters on the left side for easy navigation.
-
Use the search bar on the upper right side to quickly find specific templates.
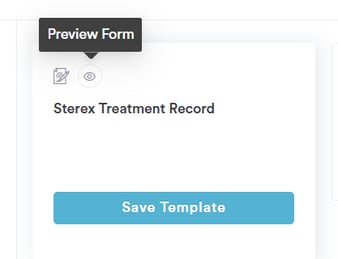
- To preview a form before cloning, hover over the form, revealing a "Preview" button in the upper left corner. Click on it to preview the form.
This way, you can clone pre-built templates into your account, saving you time and ensuring a seamless integration.
How to Clone a Medical Form
Sometimes, you may need to create a form that closely resembles an existing one. Rather than starting from scratch, it's more convenient to clone the existing form and then make necessary edits. Here's a guide on how to clone a medical form in Pabau:
Step 1: Navigate to Medical Form Templates
Log into your Pabau account and navigate to Setup, then click on "Forms" under Clinical.
Step 2: Clone the Desired Form
Hover over the medical form you want to clone. This will reveal the three-dot button on the far right of the form. Click on it and select "Clone".

Step 3: Edit the Cloned Form
The cloned form will be opened, allowing you to make changes. The process is similar to creating a new medical form.
When satisfied with the modifications, click on "Save Form" in the top right corner to finalize.
NOTE: Remember to rename the cloned form. All cloned forms are named "Copy Of + the name of the form you cloned."
How to Set a Form to be Sent Before the Appointment
Automating your medical forms will reduce your time on paperwork, and allow you to spend more time with your clients instead. Also, your clients will be able to complete the necessary forms at the convenience of their own homes, at the time when it suits them.
Step 1: Access Medical Form Templates
Log into your Pabau account and navigate to Setup, then click on "Forms" under Clinical.
Step 2: Open the Desired Medical Form
Identify the medical form you wish the client to complete before their appointment. Click to open the form for editing.
Step 3: Configure Form Settings
In the "General" tab situated in the top left corner of the medical form editing interface, select the services for which this form should be completed. Toggle the "Request to be completed prior to appointment" option.

Step 4: Configure Client Notifications
Next, navigate to Client Notifications by going back to Setup. Under "Marketing & Communication," find and click on "Communications", then on Client Notifications.
After you open Client Notifications, locate and open both the "New appointment is booked" and "Upcoming appointment reminder" email templates.
Ensure that the "Add complete form button" option is ticked in both the appointment confirmation and reminder email templates. You should see the "Complete Forms" button in the email preview.


By completing these steps, whenever an appointment is booked manually or online, they will receive the confirmation email. Within this email, clicking the "Complete Forms" button will redirect them to Pabau Connect. Here, clients can fill out any forms linked to the service they booked, streamlining the pre-appointment information collection process.
NOTE: For more ways to share medical forms, read this article.
For more guides, refer to related articles below, select additional guides, or use the search bar at the top of the page. These guides will help you get the most out of your Pabau account.
Additionally, to help you fully utilize and understand your Pabau account, we recommend exploring additional guides and resources offered at the Pabau Academy. It offers in-depth video tutorials and lessons, offering a holistic learning experience that can equip you with the essential skills for achieving success with Pabau.