Related content: How to Set Up Pabau Pay Card Terminal
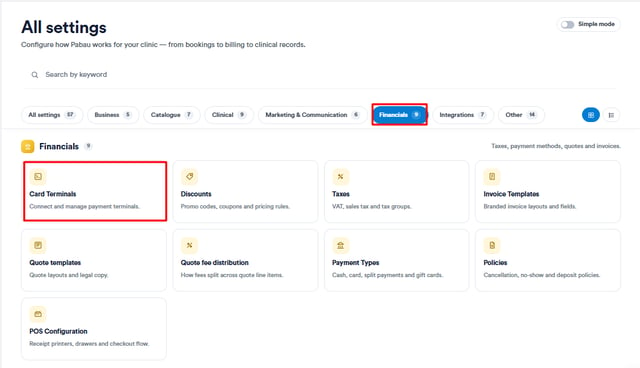
Step 1: Access Card Terminals Settings
Log in to your Pabau account, go to "Setup" in the left sidebar menu, then click on Card Terminals under the Financials.
In the Overview tab, you'll see an indicator of whether Stripe is connected (button says "Disconnect") or not connected (button says "Connect").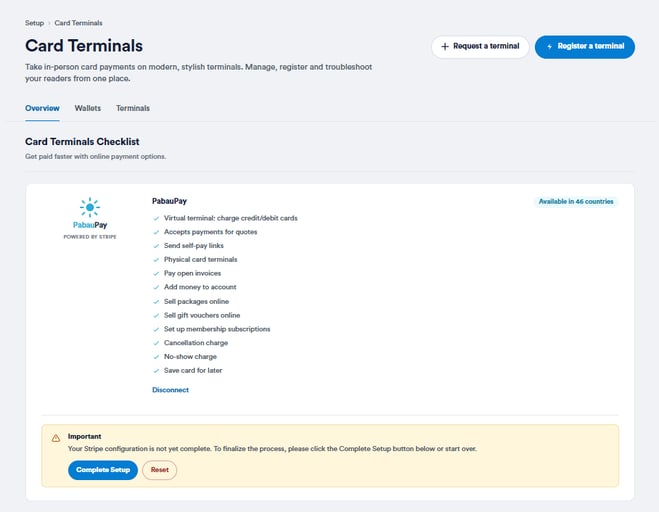
Reconnecting will ensure that all Pabau Pay terminal features function smoothly and will also unlock 12 additional payment processing options.
Step 2: Connect Stripe
Click the "Connect" button to start the integration. If you’ve recently upgraded from Pabau Classic to Pabau 2, click "Reconnect" instead.
Enter your email and click "Continue."

In the next step, the system will ask you to include your mobile number, upon which you will receive a 6-digit verification code, which you can include in the fields below the phone icon.

Additional information may be required such as country, type of business, and business structure. Once you've included that information, click on the "Continue" button at the bottom of the page.
On the next page, you may be required to complete information about the business such as legal business name, CRN, registered business address, etc.
NOTE: The required information will vary based on your specific country.
Once the information is provided and additional information such as business phone number, industry, and website, click on the "Continue" button at the bottom.
Include the additional information to verify the business, such as legal name, mobile number, and address.

Once the information is completed (including the percentage of ownership of the business and phone number), click the "Continue" button at the bottom to continue to the next step.
You will be able to see in the next step the business executives, from which you can click on "Add another executive". Click on the "done, continue" button to proceed to the next step.
Next, the system will ask you to include the bank account information, such as currency, country of bank account, sort code, and account number. Once done, click on the "Save" button at the bottom of the page.
At the very last step before the integration is complete, the system will provide the information included previously so that you would be able to review them. From the pen buttons, you can amend the professional details, personal details, and payout accounts. You can also include multiple different payout accounts on the button of the page by clicking on the "Add an account" button.
Once done, click on the "Agree and submit" button to save the information and complete the integration process.

Once generated, Pabau will let you know once the Stripe integration is ready to be used in your account.
Once you click on the "Proceed" button, you will arrive at the Card Terminals page and notice that PabauPay is connected.

Additional Configuration:
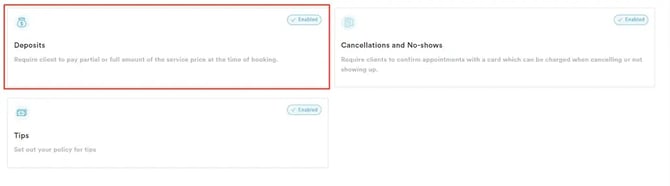
Once the Stripe integration is completed, you will be able to include a general deposit policy and service-specific deposit policies for specific services.
Set Company Deposit Policy
Click on Setup in the left sidebar menu, then click on the "Policies" button at the bottom of the Financials section (or use the search bar on the top right to search for a specific topic).
Select "Deposits" on the left.
First, select for which bookings would the deposit policy be applicable ("All" includes both manual and booking online, while "Online Bookings" includes only appointments booked from the online bookings).

Select the Deposit policy from the options available.

Once done, select the "Active" toggle and click on the "Save" button in the top right corner of the screen.
Set Service-Specific Policy (Optional)
You can also include service-specific deposits on top of the global deposit policy. This means that it will override the standard deposit policy and apply the service-specific one.
For example: If the service-specific deposit policy for the "Botox 1 area" service is $100 and the standard deposit policy is $75, when clients book the "Botox 1 area" service, the system will ask them to pay the $100 deposit.
To do this, go to "Setup" in the left sidebar menu, then click on "Services" in the Services section to access all of the services.
Select your preferred service, and proceed to the "Price" section to find the deposit feature.

From the Pricing for a specific service, we can select our preferred service-specific deposit, from the options available.

NOTE: You can also set "None" which means that the clients will not be required to pay a deposit when booking for the services with this option selected.
Once done, click on the "Save" button in the top right corner to save the changes for the specific service.
Once saved, the service-specific deposit will take effect.
Congratulations! You've successfully integrated Stripe with your account, allowing for seamless payment processing for online bookings.
For more guides, refer to related articles below, select additional guides, or use the search bar at the top of the page. These guides will help you get the most out of your Pabau account.
Additionally, to help you fully utilize and understand your Pabau account, we recommend exploring additional guides and resources offered at the Pabau Academy. It offers in-depth video tutorials and lessons, offering a holistic learning experience that can equip you with the essential skills for achieving success with Pabau.