Table of Contents:
2. How to Edit a Service
3. How to Delete a Service
4. How to Make a Service Available Online
5. How to Create a Service Category
6. How to Edit a Service Category
7. How to Delete a Service Category
8. How to Create a Service Group
9. How to Edit a Service Group
10. How to Delete a Service Group
How to Create a Service
Services are the core of your practice, and knowing how to set them up correctly ensures a smooth experience for both your team and clients.
It’s important to understand the service structure in Pabau. The hierarchy starts with service groups, followed by categories, and then individual services.
Example:
- Service group: Injectables
- Category: Botox
- Service: Botox Consultation
Step 1: Navigate to Services
Log in to your Pabau account, and in the left sidebar menu, go to Setup, then click on the "Services" button under "Services".
Step 2: Create New Service
Click New Service in the top right corner and choose the service type you want to create: In-person or Virtual.
The service creation page has five tabs:
- General
- Assign
- Pricing
- Online Booking
- Client Pathway
Step 3: Fill Service Details - General Tab
In the General tab, enter the service details. Here are the main fields you need to complete:
-
Service Name – This name will be visible to clients, so make sure it’s accurate.
-
Service Code – Optional.
-
Category – The category this service belongs to.
-
Appointment Color – Appointments for this service will show in the calendar with this color.
-
Image – This image appears at checkout. You can upload from your device or choose from the library.
.webp?width=374&height=416&name=image-png-Dec-18-2023-04-20-44-1160-PM-2%20(1).webp)
Under Advanced Settings, you can configure:
-
Automatic Consumption: This lets you link consumable or retail products to the service. When this service is sold, the system automatically deducts the specified product quantity from inventory. To set this up, click Add Product, select the items and quantities, and make sure to check Consumable Deduction to enable stock deduction on each sale.

In the Other Information section, you can add:
-
SKU (Stock Keeping Unit): Unique code for inventory tracking.
-
Procedure Code: Usually used for integrations, diagnostic codes, or reporting.
-
Invoice Item Name: Custom name for the service that will appear on invoices instead of the default name.
-
Display Text on Invoice: Extra text shown on invoices when this service is provided.
If the service can only be paid using a pre-paid package, check Use a package session to pay for the service.
For services that require a patch test, toggle Set if this service requires a patch test. This will prompt reminders during appointment booking.

Step 4: Assign Locations and Staff - Assign Tab
In the Assign tab, select which locations offer this service and which staff members can perform it. You can also specify the room and equipment needed for the service.
Step 5: Specify Pricing and Booking Details - Pricing Tab
In the Pricing tab:
-
Choose the service availability type:
-
Book & Sell: Available to book on the calendar and sell at checkout.
-
Book: Bookable only, not sold at checkout.
-
Sell: Sellable only, not bookable.
-

-
Enter the service price. The currency is based on your business settings.
-
Under Special Pricing, you can set different prices by employee or location.
-
Select the default appointment duration, which can be adjusted when booking.
-
Set applicable taxes by going to Setup > Taxes under Financials.
-
In Extra Time, enable additional buffer time after the appointment for preparation or cleanup.

You can also require a deposit or full payment during booking, which can apply to manual and/or online bookings.

Step 6: Set the Online Booking Settings
In the Online Booking tab, you can:
-
Enable or disable online booking for the service.
-
Add a description and service notice for clients booking online.


Restrict bookings to:
-
Existing clients only
-
New clients only
-
Both new and existing clients
New clients are those who haven’t had an appointment at your practice before.
Existing clients are those with at least one completed appointment in your calendar.
You can also restrict bookings to clients who have previously received a specific service you define.

Step 7: Confirm and Create
Make sure the Active toggle is turned on in the upper right corner, then click Create to save your new service.
NOTE: You can also learn about this topic by watching a lesson on Pabau Academy.
How to Edit a Service
Step 1: Navigate to Services
Log in to your Pabau account, and in the left sidebar menu, go to Setup, then click on the "Services" button under "Services".
Step 2: Access the Service to Edit
Find and click on the specific service you want to edit.
Step 3: Make Desired Changes
You’ll be taken to the service creation and editing page, where you can update various details.
Use the five tabs to navigate and make changes: General, Assign, Pricing, Online Booking, and Client Pathway.
-
In the General tab, update service details like the service name, code, category, appointment color, and image.
-
In the Assign tab, specify the locations where the service is offered and assign the staff members who can perform it.

-
In the Pricing tab, adjust the service type and pricing details. Choose if the service is:
-
Book & Sell — available to book on the calendar and sell at checkout.
-
Book — bookable only, not sold at checkout.
-
Sell — sellable only, not bookable.
-
-
Set the service duration and configure deposit or payment requirements if needed.
-
In the Online Booking tab, enable or disable online booking for the service, add a booking notice for clients, and restrict bookings to only new clients, existing clients, or both.
-
You can also limit bookings to clients who have previously received a specific service.
Step 4: Save Changes
When finished, click Save in the top right corner to apply your updates.
This ensures your service details are current and reflect your business offerings accurately.
How to Delete a Service
By following these steps, you can remove a service that is no longer needed, helping to keep your service offerings organized and up-to-date.
Step 1: Navigate to Services
Log in to your Pabau account, and in the left sidebar menu, go to Setup, then click on the "Services" button under "Services".
Step 2: Access the Service to Delete
In the Services list, find and click the service you want to delete.
Step 3: Deactivate and Confirm Deletion
In the top right corner, find the Active toggle and switch it off. Once the service is deactivated, the Delete button will appear. Click Delete, then confirm by selecting Yes, Delete Service in the prompt.

The service has been successfully removed from your Pabau account.
How to Make a Service Available Online
Step 1: Navigate to Services
Log in to your Pabau account, and in the left sidebar menu, go to Setup, then click on the "Services" button under "Services".
Step 2: Access the Service for Online Booking
In the Services list, find and click the service you want to make available for online booking. Then, switch to the Online Booking tab.

Step 3: Configure Online Booking Settings
In the "Settings" tab, enable the "Enable this service online" toggle.

You can also add an alternate service name and description to make your service clearer for online clients.
For convenience, use the AI tool by clicking the Generate button to automatically create a service description. This helps ensure your service is well communicated to potential clients browsing online.
If there are extra requirements like a patch test, click Add Service Notice and enter the necessary details.
You can add both a short notice and a longer notice—the longer notice will appear only if clients click the More info button.

Under Advanced Settings in the Restrict patient bookings to section, you can limit bookings to only existing clients, only new clients, or both.
You can also restrict bookings to clients who have previously received a specified service.

Step 4: Save Changes
In the top right corner, click Save (for editing an existing service) or Create (for a new service). Your service is now available for online booking.
Following these steps will make it easy for your clients to book your services online, improving the convenience and efficiency of your scheduling process.
How to Create a Service Category
Remember the service hierarchy in Pabau: it starts with service groups, then categories, and finally individual services.
Example:
- Service group: Injectables
- Category: Botox
- Service: Botox Consultation
Step 1: Navigate to Services
Log in to your Pabau account, and in the left sidebar menu, go to Setup, then click on the "Services" button under "Services".
Step 2: Access the Categories Tab
Once you’re in the Services section, switch to the Categories tab. Click New Category in the top right corner.

Step 3: Input Category Details
On the category creation page, fill in the following details:
-
Name: Enter the category name. This will show up in the point of sale and online booking portal.
-
Default Appointment Color: Pick a color for all appointments related to services in this category. This can be changed later per service if needed.
-
Image: Upload an image to display in the point of sale and online booking portal. You can upload from your device or select one from the library.
Step 4: Enable the Active Toggle and Create
Make sure the Active toggle is turned on to activate the category, then click Create.

NOTE: To assign a service to a category, you need to do this from within the service itself — either when creating a new service or editing an existing one. We suggest reading our Services article for a more in-depth exploration of this topic.
How to Edit a Service Category
Step 1: Navigate to Services
Log in to your Pabau account, and in the left sidebar menu, go to Setup, then click on the "Services" button under "Services".
Step 2: Access the Categories Tab
Once you're in the Services section, click on the Categories tab. This will display a list of all your existing service categories.

Step 3: Select the Category to Edit
Find and click on the category you want to update. This will open the category's details page.
Step 4: Make Desired Changes
You can now make any necessary changes — such as updating the category name, changing the default appointment color, or uploading a new image.
If you’ve already created service groups, you can also change the group that this category belongs to.

Step 5: Save Changes
Once you’ve finished editing, click the Save button to apply your changes.
NOTE: To assign a service to a category, this must be done within the service settings—either while creating a new service or by editing an existing one.
How to Delete a Service Category
Step 1: Navigate to Services
Log in to your Pabau account, and in the left sidebar menu, go to Setup, then click on the "Services" button under "Services".
Step 2: Access the Categories Tab
In the Services section, click on the Categories tab. You’ll see a list of your current service categories.

Step 3: Select the Category to Delete
Click on the category you want to remove. This will open the category's details page.
Step 4: Disable the Active Toggle
In the top-right corner of the category details, switch off the Active toggle. Once disabled, the Delete button will appear.

Step 5: Delete the Category
Click the Delete button. A confirmation message will appear — click Yes, Delete to permanently remove the category from your account.
NOTE: Deleting a service category removes it from your account, and it cannot be undone. Make sure that you want to permanently delete the category before confirming.
How to Create a Service Group
Service groups provide an additional layer of categorization within Pabau, allowing for efficient organization of services.
It’s important to be aware of the service categorization within Pabau. The hierarchy begins with service groups, followed by categories, and finally, individual services.
Example:
- Service group: Injectables
- Category: Botox
- Service: Botox Consultation
Step 1: Navigate to Services
Log in to your Pabau account, and in the left sidebar menu, go to Setup, then click on the "Services" button under "Services".
Step 2: Access the Groups Section
Within the Services section, locate the Groups panel on the left-hand side. Click the plus (+) icon next to the Groups heading to start creating a new service group.

Step 3: Add Group Details
In the newly opened creation window, add the essential details for the service group:
- Name: Provide a name for the group. This name will be visible in the Point of Sale and on your online booking portal.
- Service Categories: Choose the service categories you want to include in this group from the dropdown menu.
- Image: Upload an image that will appear in the Point of Sale. You can upload it from your device or select it from the library.

Step 4: Confirm Creation
After inputting the group details, click on "Apply" to confirm. The service group is now successfully created.
NOTE: While a service can belong to only one category, a single category can belong to multiple groups.
How to Edit a Service Group
Step 1: Navigate to Services
Log in to your Pabau account, and in the left sidebar menu, go to Setup, then click on the "Services" button under "Services".
Step 2: Locate the Service Group
In the Services section, find the specific service group you want to edit on the left side.
Step 3: Access Editing Options
Hover over the service group, and a pen icon (edit button) will appear. Click on this icon to access the editing options.

Once in the editing mode, you can make various changes to the service group. Update the group name, modify the categories included in the group, or change the image associated with it.
Step 4: Save Changes
After making the desired adjustments, click on the "Save" button to confirm and save the changes to the service group.
How to Delete a Service Group
Step 1: Navigate to Services
Log in to your Pabau account, and in the left sidebar menu, go to Setup, then click on the "Services" button under "Services".
Step 2: Find the Service Group
In the Groups section on the left, hover over the service group you want to delete. A trash can icon will appear.
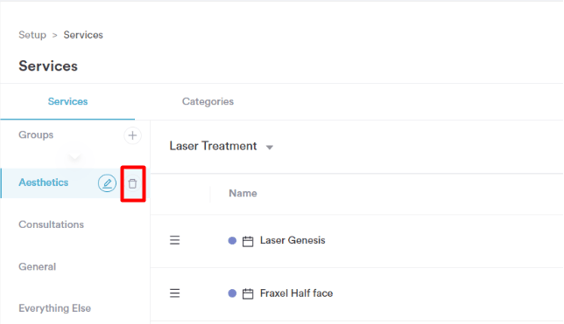
Step 3: Delete the Group
Click the trash can icon. A confirmation message will pop up. Click "Yes, Delete" to confirm that you want to delete the service group.
NOTE: Any service categories previously under the deleted group will automatically move to the "Everything Else" group.
For more guides, refer to related articles below, select additional guides, or use the search bar at the top of the page. These guides will help you get the most out of your Pabau account.
Additionally, to help you fully utilize and understand your Pabau account, we recommend exploring additional guides and resources offered at the Pabau Academy. It offers in-depth video tutorials and lessons, offering a holistic learning experience that can equip you with the essential skills for achieving success with Pabau.