
An IV infusion plan is a client's course of drips, built from one of your clinic's IV infusion templates. You personalise the formula for the client, set how often and how many treatments, then record each session as it's given, with the lot numbers of the products you used. The plan's progress, billing and printouts all live on the client's IV Infusions tab.
NOTE: NOTE: IV infusion plans are being rolled out to clinics in phases, and your clinic can switch each plan type on or off in Plans Settings. If you can't see it, it isn't switched on for your clinic yet.
Step 1: Start a New IV Infusion Plan
On the Plans page you can also click Build plan and choose IV infusion plan, then search for the client. From the client's card:
- On the client's card, click the + button at the bottom right.
- Click IV Infusion (“Plan an IV infusion using a saved clinic template”). You can also click New infusion on the client's IV Infusions tab.
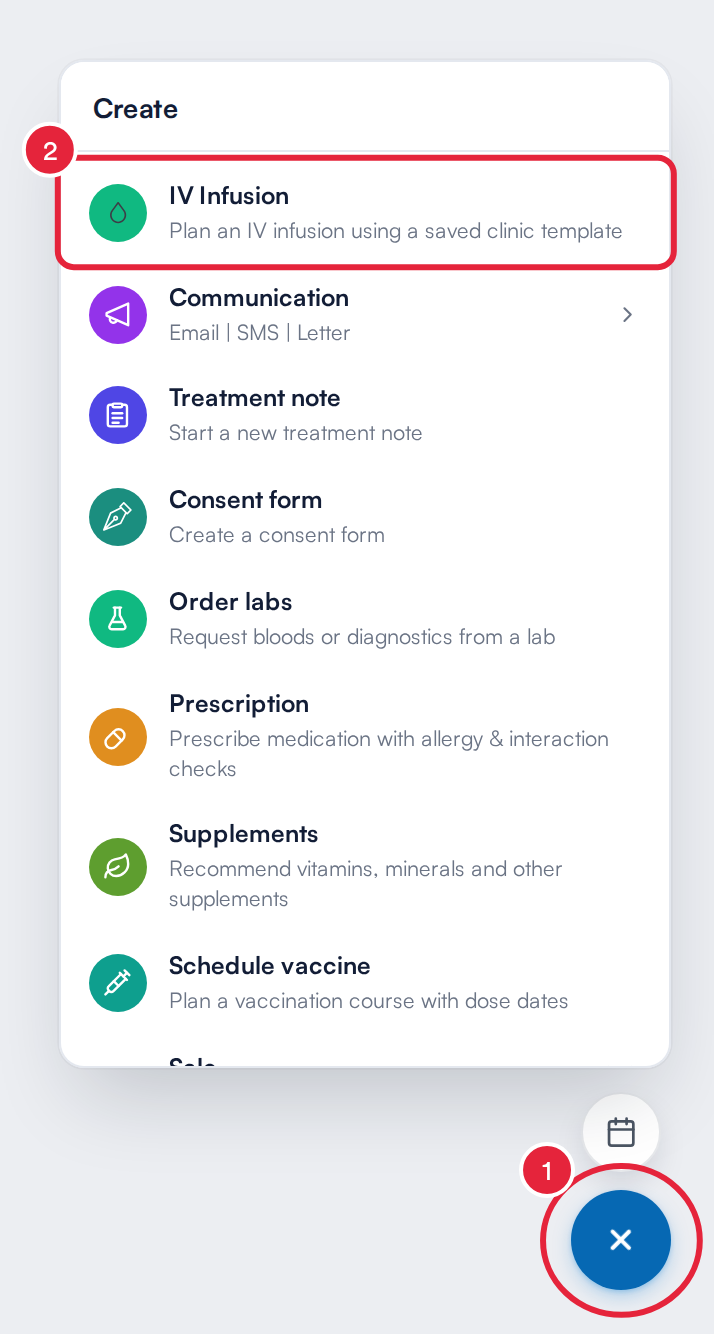
IV Infusion in the client card's Create menu
- Under Select an infusion, search your templates (“Search IV infusion templates…”). Archived templates aren't listed, and drafts are labelled.
- Click Select on the template you want.
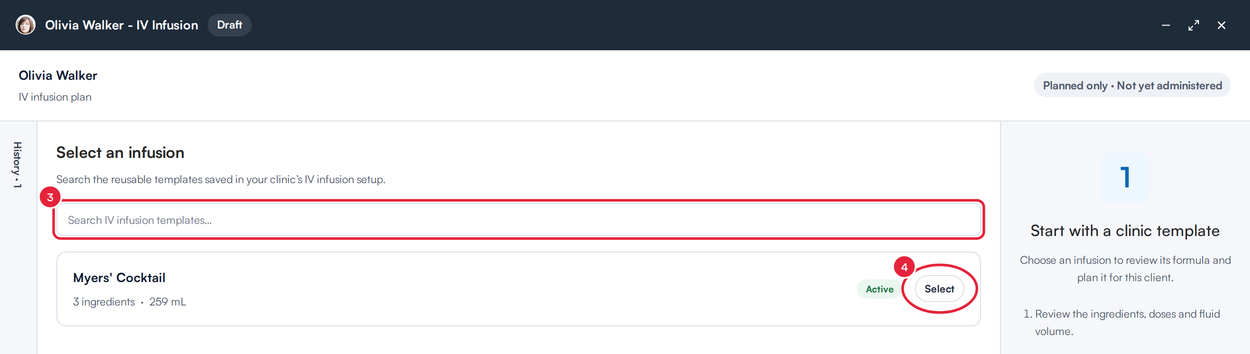
Choose one of your clinic's templates
Step 2: Personalise the Plan and Save It
Under Review and personalise, Pabau copies the template's formula into the plan. Any change you make here applies to this client's plan only. The clinic template stays unchanged.
- Check the appointment the plan is linked to. If the client has an appointment today, Pabau links the plan to it automatically. Click it to change or remove it.
- Under Treatment details, set the Date ordered, the Frequency (for example Weekly) and the Total treatments in the course. Below these, you can change the Linked service, the base fluid, the ingredients and doses, the timing and the instructions, just as in the template.
- Click Save draft to keep working on it later, or
- Click Finalize when the plan is ready, then
- Choose Save. Save & add another saves this plan and starts the next one, and Save & send to client saves it and opens a step to send it to the client. It's only greyed out when the plan has no client to send it to; hover over it to see why.
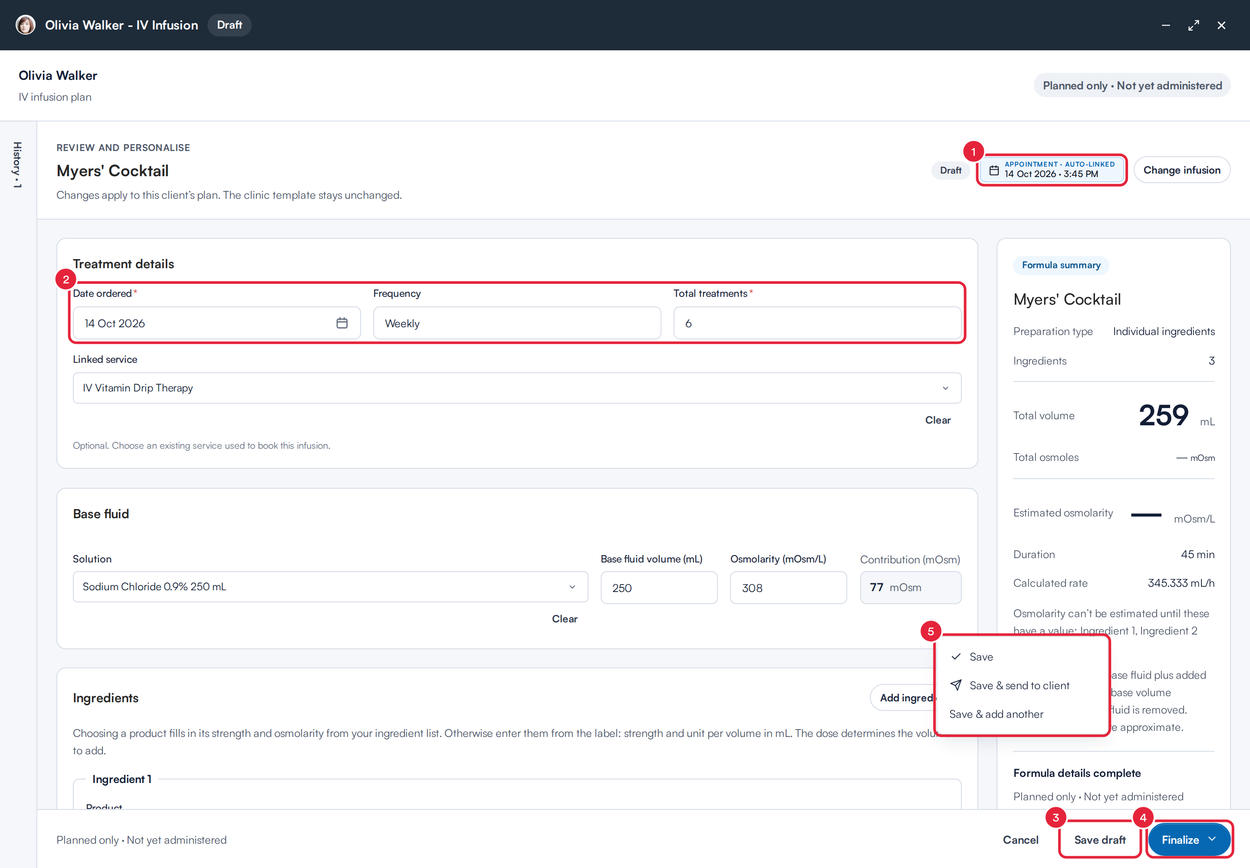
Set the order details, then save the plan
IMPORTANT: A plan saved as a draft can't be started or billed. Edit it and choose Finalize first.
Step 3: Record a Session
- On the client's card, go to EMR → IV Infusions (Chart in the United States). Each plan shows its progress, for example 4/6, and its status: Draft, Planned, In progress, Completed or Cancelled. Click Begin session on the plan. Begin session only shows on a finalised plan that is still open; draft, completed and cancelled plans show View instead.
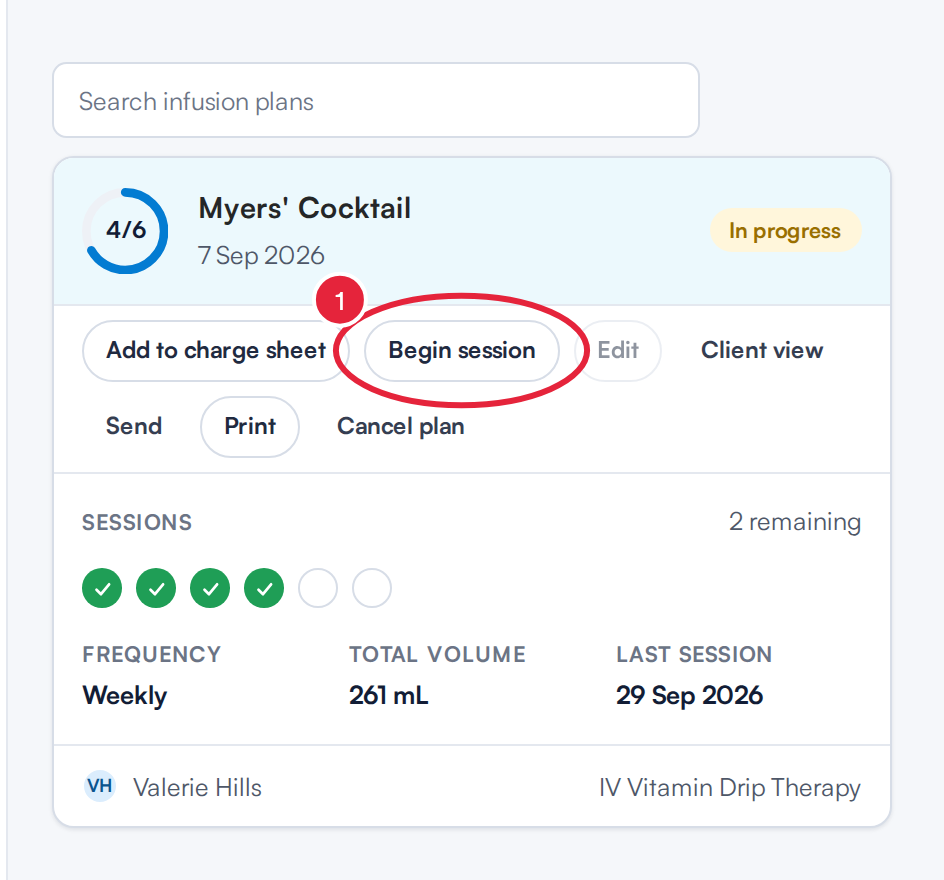
Begin session opens the plan's next session
- Check the appointment the session is linked to.
- Check the Session number. Pabau fills in the next one. Sessions are recorded in order.
- Under Lot numbers, check the Lot # and Expiry of each product. Pabau fills them in from the last time each product was used in your clinic (“From last use on…”), so check them against the vials in hand. Lot numbers are optional.
- Click Save & Begin. You'll see Session started, and the session is added to the plan's Previous sessions.
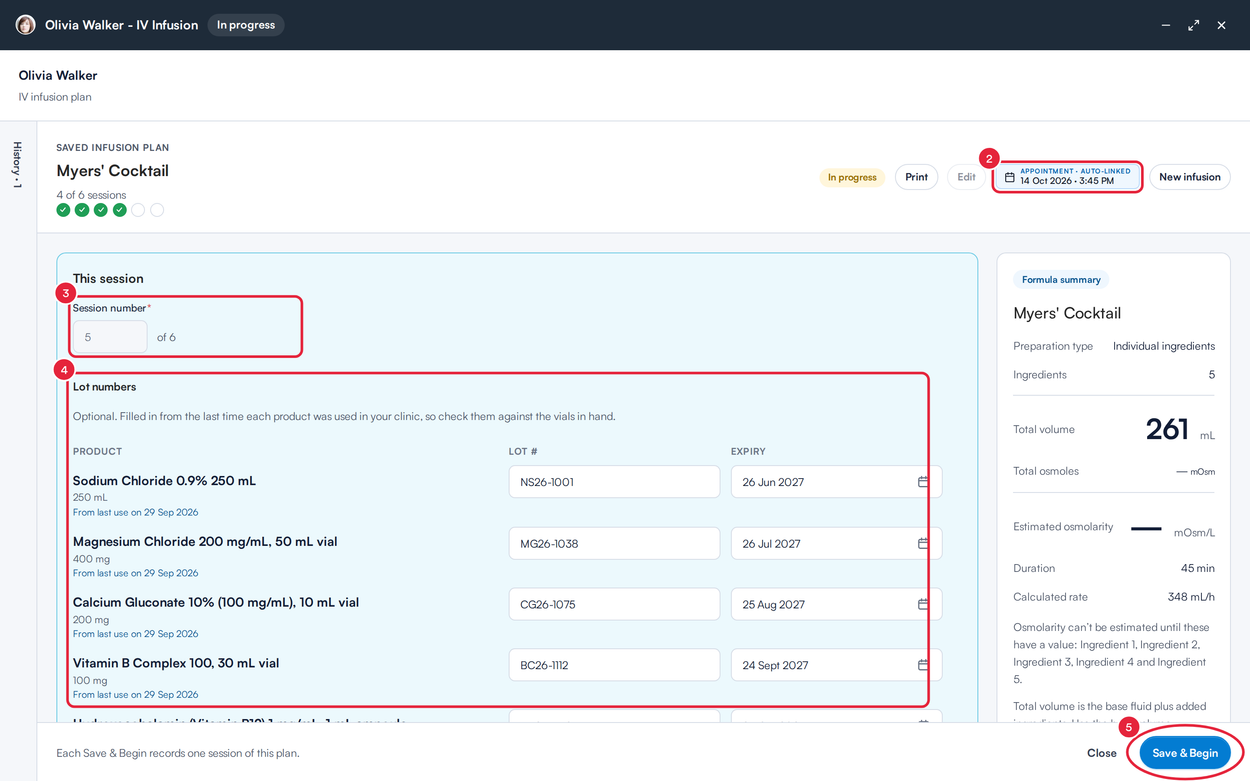
Check the session number and lot numbers, then Save & Begin
NOTE: An expired lot stops you starting the session (“This lot has expired. Use a different lot before you begin.”). When the last session in the course is recorded, the plan becomes Completed. To give more treatments, plan a new infusion. If you open the plan from a treatment note's Facts Sheet, Save & Begin also adds the session to that treatment note.
Step 4: Bill, Edit, View or Cancel a Plan
The same actions appear on each plan card and in the Table view:
- Use All, Open (draft, planned or in progress) and Closed (completed or cancelled) to filter the plans.
- Switch between Grid and Table. The table adds a Billing column that shows Charged once a plan is on an appointment's bill, and Paid once that bill is settled.
- Send opens Send plan to client, where you choose Email and/or SMS. It's greyed out only on a cancelled plan (“A withdrawn plan can’t be sent”). $1 and products on the bill of the appointment you choose. Nothing is charged until checkout.
- Edit changes the plan's formula and order details. It's greyed out once a session has been recorded, the plan has been paid for or it has been cancelled; hover over it to see why. A course that was billed upfront as part of a combined plan can't be edited either. Client view shows the plan as the client sees it.
- Print prints the IV infusion order (see Step 5).
- Cancel plan asks “Cancel this IV plan?”. Add a reason under Reason (optional) if you want, and click Cancel plan, or Keep plan to go back. If the course has already been paid for, choose Refund and cancel or Cancel and keep payment. The plan stays on the client's record as Cancelled, and no more sessions can be started or billed from it. Click Reopen to continue it later. A completed course can't be cancelled.

Filter the plans and manage each one from its actions
Step 5: Print the IV Infusion Order
Click Print on the plan (or inside the open plan). The IV infusion order window opens.
- Choose the Template: Default, or one of your own IV infusion order templates.
- Choose the Prescriber whose details and signature go on the order.
- Click Save to documents to file the order on the client's documents, or
- Click Print.
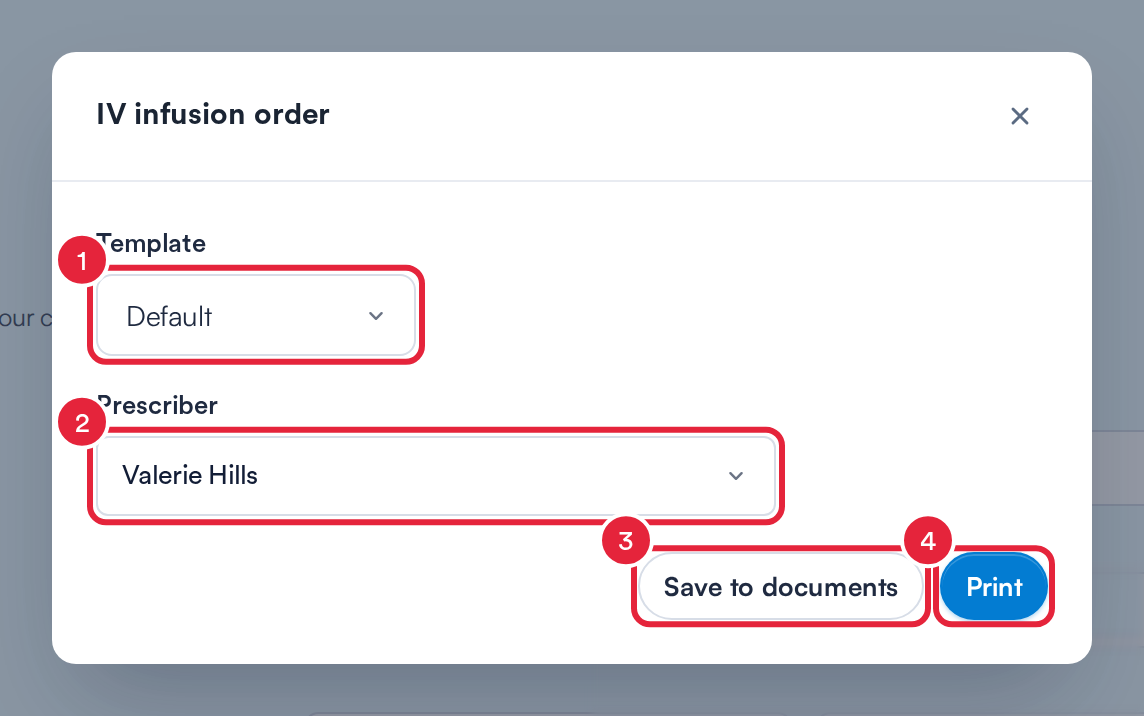
Choose the template and prescriber, then print or save
Customise the IV Infusion Order Printout
- Go to Setup. Under Clinical → Documentation, click Print Templates.
- Under Preview, click IV infusion order.
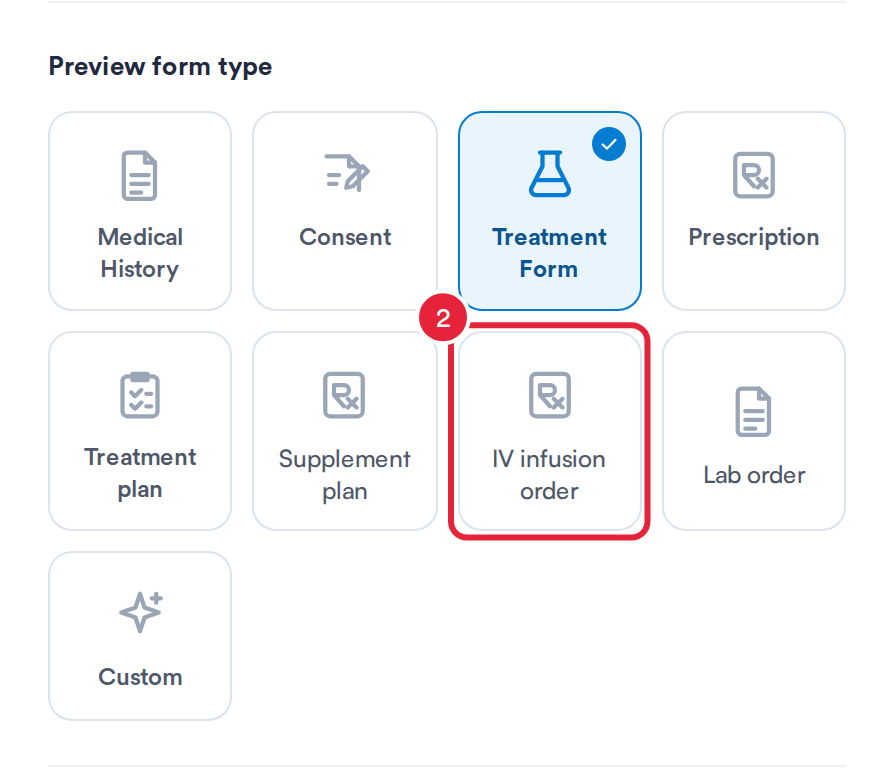
IV infusion order starts a new order template
- Drag the blocks you want onto the page: To / From, Patient details, Provider notes, Infusion and ingredients, Order details and Prescriber signature, plus headings, text and other layout blocks. Click a section in the preview to change its title and fields.
- Check the Live preview, which shows a sample IV infusion order, give the template a name at the top, and click Save template. It then appears under Template when you print an order.
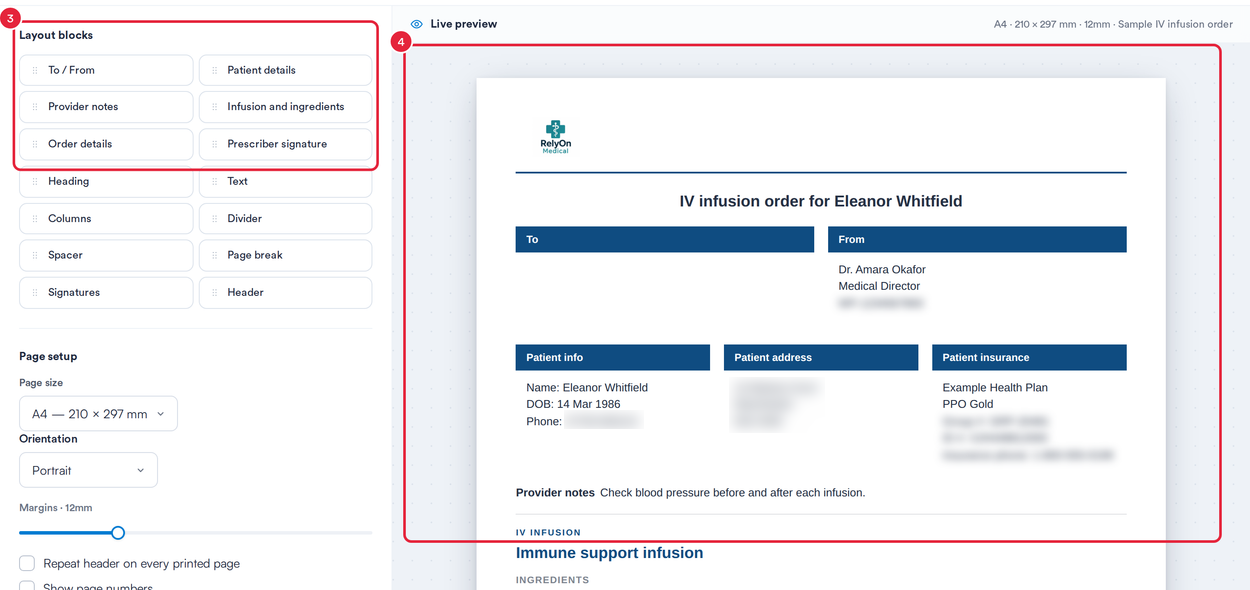
Arrange the order's sections and check the preview
What's next?
- How to Use the Plans Page
- How to View and Manage a Client's Plans on the Client Card
- How to Create IV Infusion Templates
- How to Build and Send a Supplement Plan
- How to Build and Send a Nutrition Plan
- How to Build and Send a Home Exercise Programme
- How to Use the Facts Sheet While Writing a Treatment Note
- How to Create a Custom Print Template
Was this guide helpful? Let us know by voting below - your feedback helps us write clearer articles.
For more guides, browse the related articles below or use the search bar at the top of the page. You can also watch our video learning series, the Pabau Academy, or visit the Support page for additional help.