
Custom print templates let you design a bespoke printed layout for one specific form. Instead of the standard, clinic-wide print template, you build a made-to-measure page — drag the form's own fields onto a canvas, add your own headings, text and key-value tiles, chart a measure over time, and style every element to match your branding. It's ideal for documents you hand to clients, such as a branded wellness or treatment report.
NOTE: This is different from the standard print template, which controls how every printed form looks across the clinic. A custom template applies only to the single form you build it for, and takes over that form's printout while every other form keeps using the standard template.
Step 1: Open Custom form templates
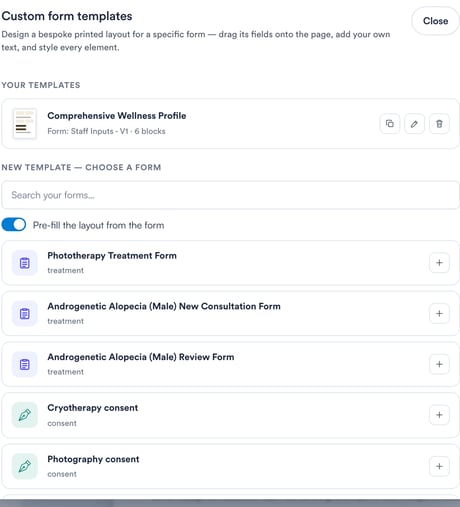
From the main dashboard, click Setup in the left-hand navigation, then select Print Templates under Clinical. In the Preview form type row, click the Custom card. The "Custom form templates" screen opens.
Step 2: Create a template for a form
Under New template — choose a form, search for and select the form you want a bespoke layout for. Leave Pre-fill the layout from the form switched on to start with the form's fields already placed on the page, or switch it off to begin from a blank page.
Any templates you've already built appear under Your templates, where you can reopen (pencil), duplicate, or delete them. Duplicating is a quick way to reuse a design — you can even copy it onto a different form, and Pabau re-binds the fields by matching their labels.
Step 3: Build the layout
The designer has two halves. On the left are the building blocks; on the right is a Live preview that fills with the form's latest real submission, so you always see exactly how the finished document will print.
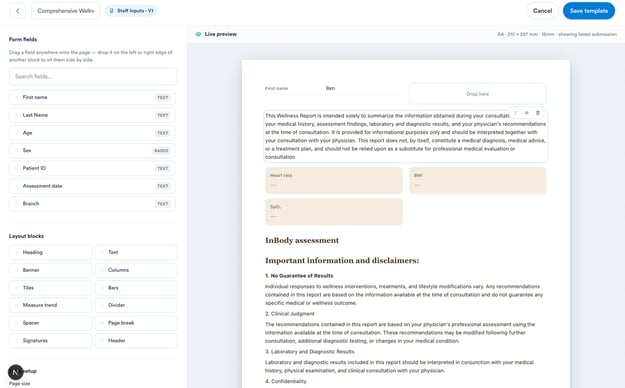
Drag any Form field onto the page — drop it on the left or right edge of another block to sit two fields side by side. Below the fields are the Layout blocks you can add:
Heading and Text — section titles and free text (the Text block supports rich formatting and merge tags such as the client's name, date of birth, or your clinic details).
Tiles and Columns — present key values as cards or arrange content into columns.
Banner, Divider and Spacer — visual structure and spacing.
Measure trend — a chart of a tracked measure (for example weight) over time.
Signatures, Page break and Header — a signature line, a forced new page, and a repeating page header.
Step 4: Style it
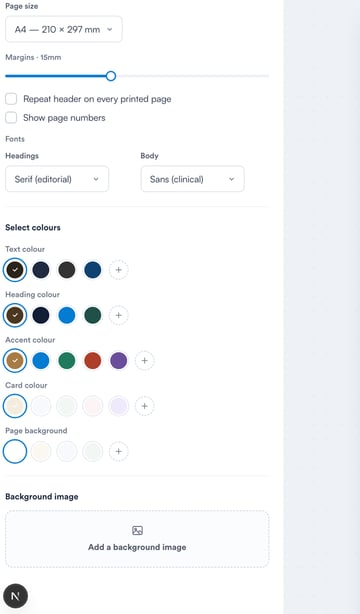
Open Page setup at the bottom of the left panel to control the look of the whole document:
Page size and Margins — the paper size and the white space around the page.
Repeat header on every printed page and Show page numbers — useful for longer, multi-page reports.
Fonts — pick a Headings and a Body typeface (for example Serif for an editorial feel, Sans for a clinical one).
Colours — set the Text, Heading, Accent, Card and Page background colours from the swatches or by entering your own.
Background image — add a letterhead or watermark, with an opacity slider to control how subtle it is.
Step 5: Save and print
Click Save template. From then on, whenever that form is printed, Pabau uses your custom layout in place of the standard template. Every other form continues to use the standard clinic-wide template. Click Cancel or the back arrow to leave without saving.
NOTE: If the same template is open and saved in two places at once, Pabau warns you before overwriting so a colleague's changes aren't lost — save again to confirm your version.
For more guides, refer to the related articles below or use the search bar at the top of the page. To style the printout for all of your forms at once, see How to Create a Print Template.