
Table of Contents:
1. Overview of Clients and Client Card
2. How to Create a Client
3. How to Edit a Client
4. How to Delete a Client
5. How to Assign a Label to a Client
6. How to Remove a Label from a Client
7. How to Add a Client Relationship
8. How to Remove a Client Relationship
9. How to Deactivate a Client
10. How to Configure the Summary View in the Client Card
This article covers the new Client Card, available to selected clinics from August 2026. If your Client Card looks different, see Clients (Classic) guide instead.
Overview of Clients and Client Card
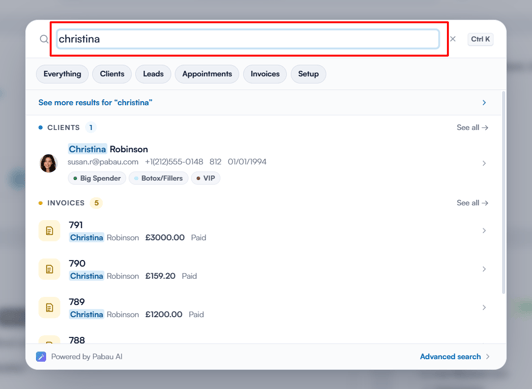
Searching for clients
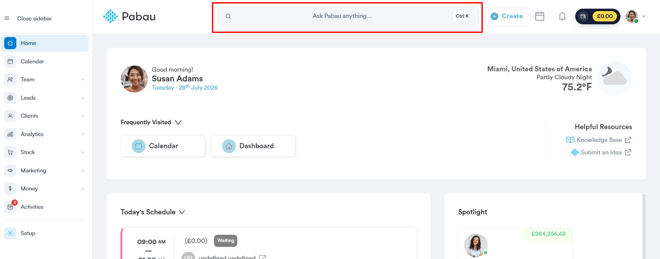
Type what you're looking for into the search field. The search bar can find:
- Clients — search by name, email, or other client details
- Leads — find leads in your pipeline
- Appointments — locate upcoming or past appointments
- Invoices — search for specific invoices
- Setup — find any settings page quickly
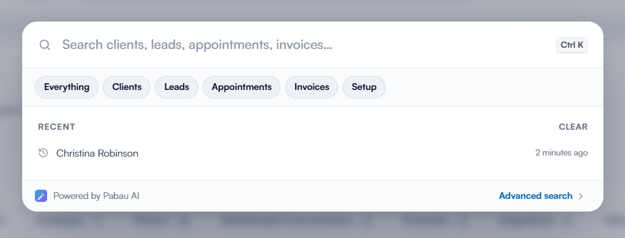
For advanced searches, click the advanced search button on the bottom right.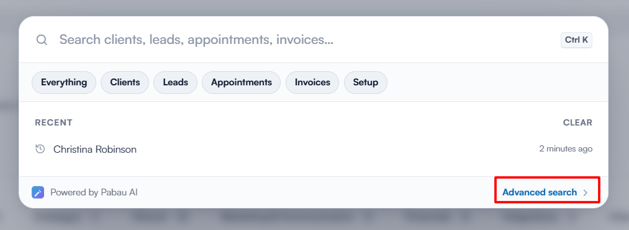
Click on the desired client card.
View all clients
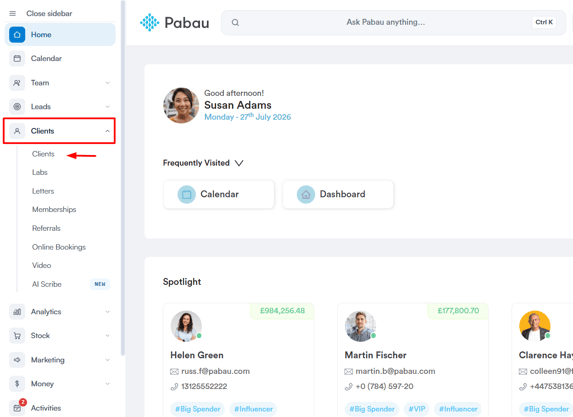
In the left sidebar menu, navigate to Clients, then choose Clients again, to see all of your clients in one place.
Customise the display of client information by rearranging and adding data fields by clicking on "Edit Columns".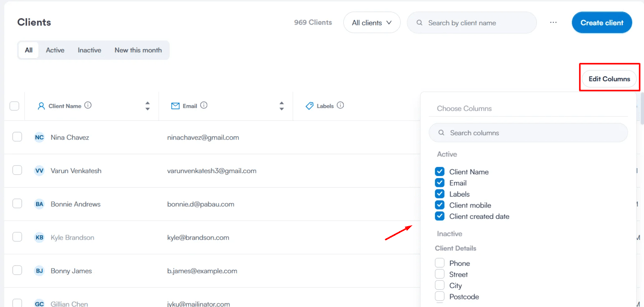
You can delete or email multiple clients by selecting the checkboxes to the left of each client row.
Use the Views dropdown to create client views, grouping clients who meet specific conditions.
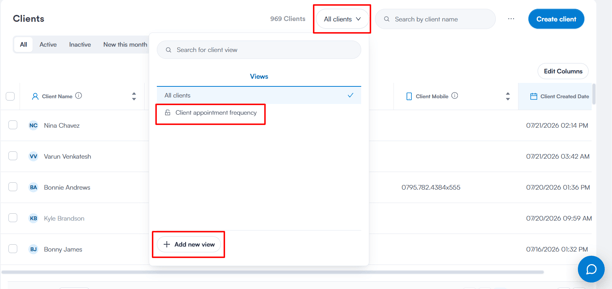
The search bar allows you to find clients based on the data included in the columns you've added to the client table.
Understanding the client card
The client card contains all client data and is divided into sections. Under the client's photo, it shows the client's name, DOB, age, gender, and client ID, along with their status (e.g. Active) and any labels applied to them (such as "Big Spender" or "VIP").
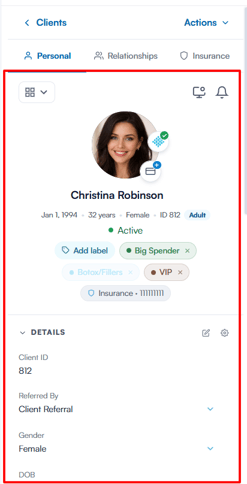
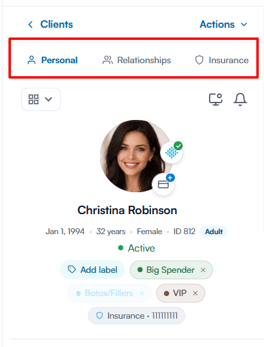
On the left, three tabs organise the client's core information:
- Personal: Shows the client’s status and labels, plus a Details section with fields such as Client ID, Referred By, Gender and DOB.
- Relationships: Lists the client’s linked contacts, such as family members, emergency contacts, GPs and pharmacies.
- Insurance: Holds the client’s insurance details (shown when insurance billing is enabled for your practice).
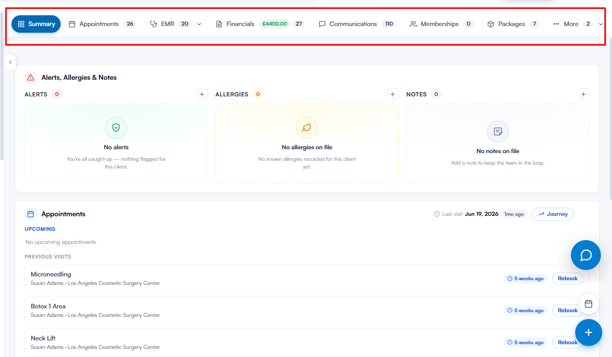
In the centre of the client card, multiple tabs categorise client data for convenient access and management, each displaying a live count where relevant:
- Summary: A customisable overview of crucial client information.
- Appointments: All appointments related to the client.
- EMR: Medical records — treatment notes, forms, prescriptions, documents and photos. For clinics based in the United States, this tab is labelled Chart.
- Financials: Invoices, quotes, payments and statements for the client.
- Communications: Messages sent to the client, such as emails, SMS and letters.
- Memberships: Membership plans purchased by the client.
- Packages: Packages bought by the client.
- More: Any tabs that don’t fit in the bar — such as Gift Cards and Activities — collapse into the More menu.
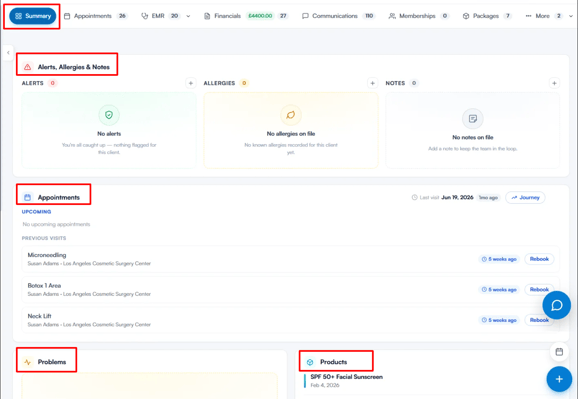
Summary
Within the Summary tab, information is organised into cards:
- Alerts, Allergies & Notes: Displays any alerts, allergies, or notes on file for the client, with a "+" button to add new ones directly from this view.
- Appointments: Shows the client's last visit date, a "Journey" link to view their full history, and lists upcoming appointments alongside previous visits — each with a quick "Rebook" option.
- Problems: Displays any active problems recorded for the client, flagging important medical conditions the team should be aware of.
- Products: Lists products associated with the client, along with the date each one was recorded.
- Saved Cards: Shows any payment cards saved on file for the client, with an option to add a new card directly from this view.
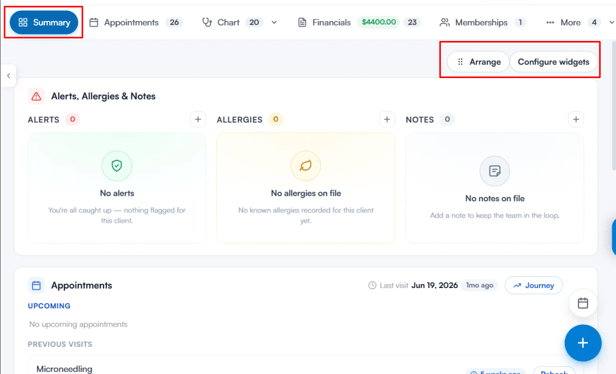
Depending on your practice’s configuration, you may also see widgets such as Medications, Medical history, Family history, Social history and Tests. Use the Arrange button in the top-right corner of the Summary tab to reorder widgets or hide the ones you don’t need.
Appointments
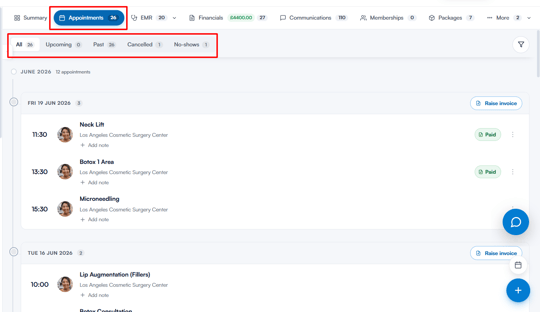
The Appointments tab displays all of the client's appointments, organised into a timeline grouped by month and date.
At the top, sub-tabs let you filter appointments by status:
- All: Shows every appointment on record.
- Upcoming: Shows only future appointments.
- Past: Shows appointments that have already taken place.
- Cancelled: Shows appointments that were cancelled.
- No-shows: Shows appointments the client didn't attend.
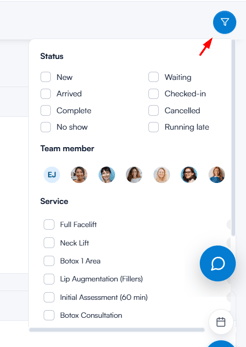
A filter icon on the right lets you narrow down the list further.
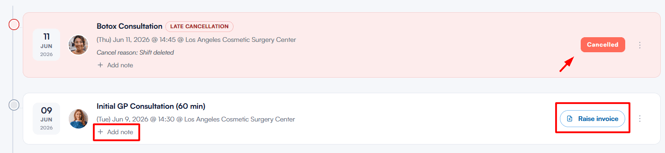
Each date groups the appointments booked that day, showing the time, treatment name, and location for each one. From here, you can:
- Add a note directly under any appointment.
- Raise an invoice for all appointments booked on that date.
- View the payment status of each appointment (e.g. "Paid") and access further options via the three-dot menu.
EMR
The EMR tab centralises all of the client’s medical and clinical records. For clinics based in the United States, this tab is labelled Chart.
At the top, a Medical History banner shows the client's intake form status, including when it was last updated, any allergies or active medications on file, and recorded conditions.
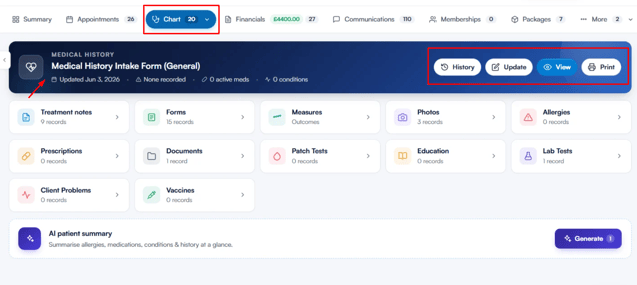
From here you can:
- History: View previous versions of the medical history form.
- Update: Edit the client's medical history.
- View: Open the form as the client would see it.
- Print: Print the medical history form.
Below the banner, records are organised into cards, each showing a live count:
- Treatment notes: Notes logged from the client's treatments.
- Forms: Medical or consent forms completed by the client.
- Measures: Tracked outcomes and measurements over time.
- Photos: Photos taken of the client, useful for before/after comparisons.
- Allergies: Any allergies recorded for the client.
- Prescriptions: Medications prescribed to the client.
- Documents: Files or documents uploaded for the client.
- Patch Tests: Results of any patch tests carried out.
- Education: Educational materials shared with the client.
- Lab Tests: Lab test records and results.
- Client Problems: Active problems or conditions flagged for the client.
- Vaccines: Vaccination records on file.
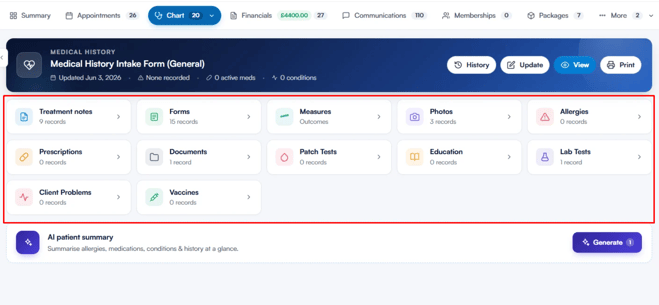
At the bottom, the AI patient summary card lets you generate an AI-written summary of the client's allergies, medications, conditions, and history at a glance.
Financials
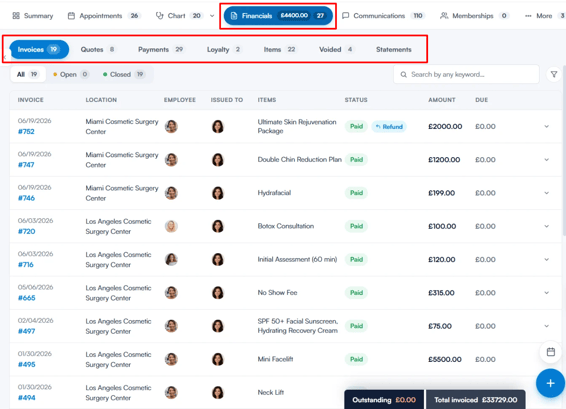
The Financials tab breaks down all payments and financial records related to the client, organised into sub-tabs:
- Invoices: All invoices raised for the client.
- Quotes: Quotes provided to the client.
- Payments: Payments received from the client.
- Loyalty: Loyalty points or rewards activity.
- Items: Individual items or services billed to the client.
- Voided: Invoices or transactions that were voided.
- Statements: Client account statements.
Some sub-tabs appear only when the matching feature is enabled for your practice (for example, Quotes and Loyalty) or when your user group has access to them.
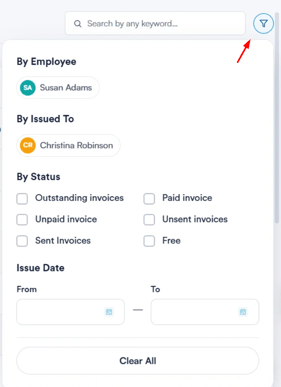
Within the Invoices sub-tab, invoices can be further filtered by status:
- All: Shows every invoice.
- Open: Shows unpaid or outstanding invoices.
- Closed: Shows invoices that have been fully paid.
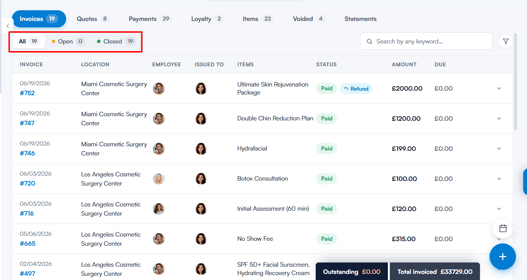
A search bar and filter icon let you narrow the list further by keyword or criteria.
Each invoice row displays the invoice number and date, location, employee, who it was issued to, the items billed, payment status (e.g. "Paid," with a "Refund" option where applicable), the amount, and any amount due.
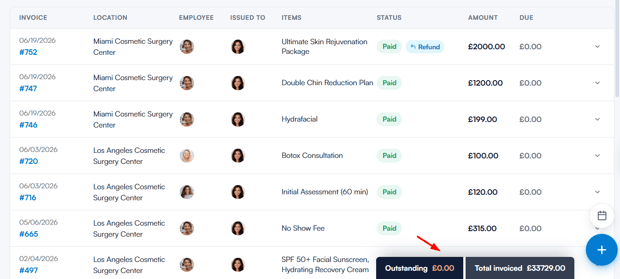
At the bottom of the tab, two summary totals are always visible: Outstanding (the total unpaid amount) and Total invoiced (the total value of all invoices for the client).
Communications
The Communications tab houses all messages sent to the client, organised into a timeline grouped by month and date.
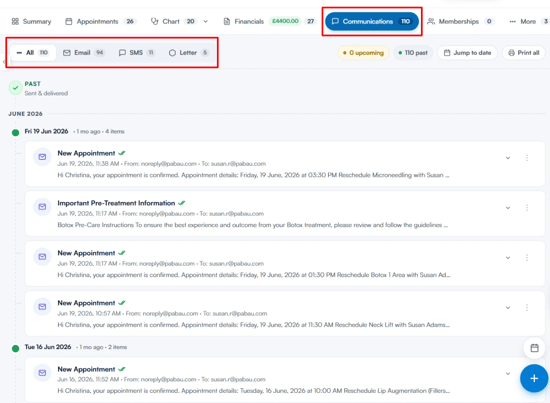
At the top, sub-tabs let you filter communications by channel:
- All: Shows every communication sent.
- Email: Shows only emails.
- SMS: Shows only text messages.
- Letter: Shows only letters.
Other channels the client has activity on — such as Call or WhatsApp — appear as extra filters automatically.
On the right, additional controls help you navigate:
- Upcoming / Past: Filter toggles showing counts of scheduled versus already-sent communications.
- Jump to date: Quickly navigate to a specific date in the timeline.
- Print all: Print the full communications history.
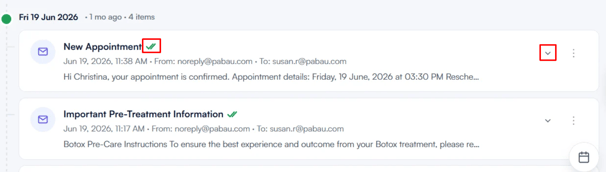
Each entry shows the message type (e.g. "New Appointment"), a checkmark confirming it was sent and delivered, the date and time it was sent, the sender and recipient, and a preview of the message content. A dropdown arrow and three-dot menu on each entry give access to further details and actions.
Memberships
The Memberships tab shows all membership plans purchased by the client, split into two sub-tabs:
- Your memberships: Displays the client's active membership plans.
- Transactions: Shows the transaction history related to the client's memberships.
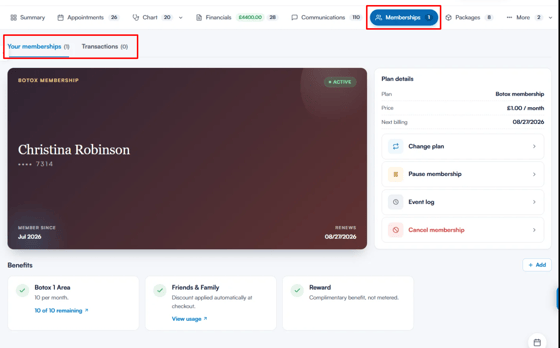
Each membership is displayed as a card, styled like a membership card, showing the plan name, client name, card number, "Member since" date, and renewal date, along with its current status (e.g. "Active").
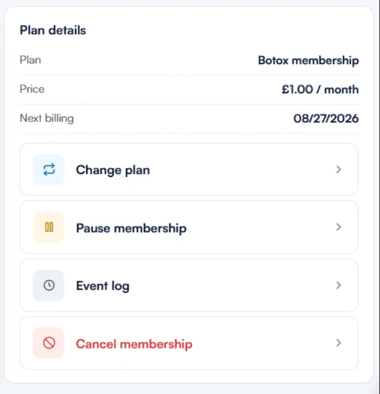
On the right, a Plan details panel shows the plan name, price, and next billing date, along with quick actions:
- Change plan: Switch the client to a different membership plan.
- Pause membership: Temporarily pause the membership.
- Event log: View a history of actions taken on the membership.
- Cancel membership: Cancel the membership entirely.
Below, the Benefits section lists everything included in the plan, such as treatment allowances (e.g. "Botox 1 Area — 10 per month," with usage tracked and a "View usage" link), automatic discounts (e.g. "Friends & Family"), and complimentary perks (e.g. "Reward").

An "Add" button lets you add further benefits to the plan.
For more information on memberships, please refer to the Memberships guide.
Packages
The Packages tab lists all packages purchased by the client, split into two sub-tabs:
- Active: Shows packages currently available for the client to use.
- Expired: Shows packages that have run out or passed their expiry date.
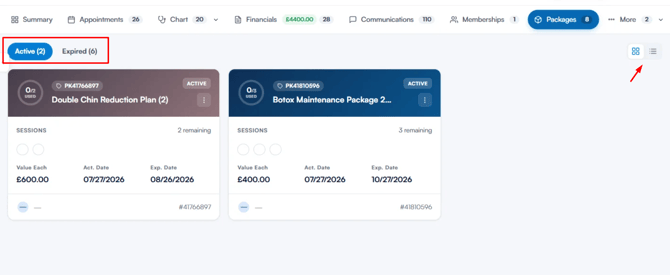
A view toggle on the right lets you switch between a grid or list layout.
Each package is displayed as a card showing the package name, unique code (e.g. "PK41766897"), and status (e.g. "Active"). It also shows the number of sessions used out of the total included, along with visual dots representing remaining sessions. Further details include:
- Each session’s value (e.g. “£50 each”).
- Activated: The date the package was activated.
- Expires: The date the package expires.
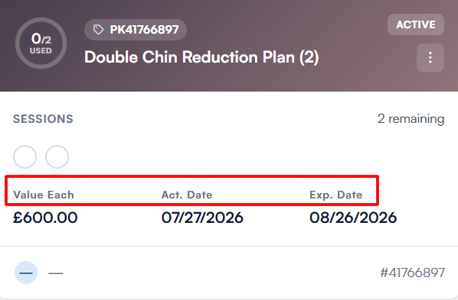
Each card also displays the package's unique reference number at the bottom, along with a three-dot menu for further actions.
For more information on packages, please refer to the Packages guide.
Gift Cards
The Gift Cards tab (under More when the tab bar is full) shows all gift cards linked to the client, split into two sub-tabs:
- Active: Shows gift cards that are still valid and have remaining value.
- Expired: Shows gift cards that have expired or been fully used.
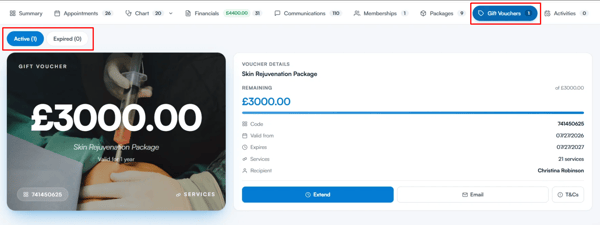
Each gift card shows its amount, name, validity period and unique code, along with a “Services” link.
On the right, a Gift Card details panel shows:
- Remaining: The remaining balance, shown against the original total value with a progress bar.
- Code: The gift card’s unique code.
- Valid from: The date the gift card became valid.
- Expires: The gift card’s expiry date.
- Services: The number of services the gift card can be redeemed against.
- Recipient: The client the gift card was issued to.
Three actions are available at the bottom:
- Extend: Extend the gift card’s validity period.
- Email: Email the gift card to the client.
- T&Cs: View the gift card’s terms and conditions.
For more information on gift vouchers, please refer to the Gift Vouchers guide.
Activities
The Activities tab (under More when the tab bar is full) records client-related tasks and activities, such as calls, emails, messages, meetings and dates of service.
At the top, sub-tabs let you filter activities by type:
- All: Shows every activity logged.
- Email: Shows only email activities.
- Call: Shows only call activities.
- Message: Shows only message activities.
- Meeting: Shows only meeting activities.
- Date of Service: Shows only date-of-service activities.
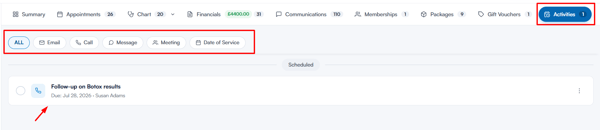
Activities are grouped by status (e.g. "Scheduled"), with each entry showing the activity name, type icon, due date, and assigned staff member. A checkbox lets you mark an activity as complete, and a three-dot menu gives access to further options.
For more information on activities, please refer to the Activities guide.
Quick actions
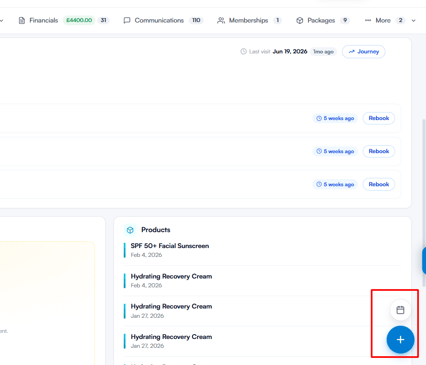
In the bottom right corner of the client card, two floating buttons give quick access to common actions:
- Calendar icon: Opens the calendar with this client pre-selected, so you can book their next appointment.
- Create button (blue "+" icon): Opens a menu of actions you can carry out for the client, such as sending a Communication, adding a Treatment note, creating a Consent form, submitting a Lab request, adding a Prescription, processing a Sale, creating a Quote, logging an Activity, sending Education material, or recording a Dictation.
With everything organised into these tabs and quick actions, the client card gives you a complete, all-in-one view for managing every aspect of a client's journey in Pabau.
How to Create a Client
This article guides you through the process of creating a client in Pabau. There are multiple methods available for client creation, ensuring flexibility in your workflow.
1. Create Button:
Log in to your Pabau account and navigate to the Create button at the top of the screen. Alternatively, use the hotkeys Shift + C.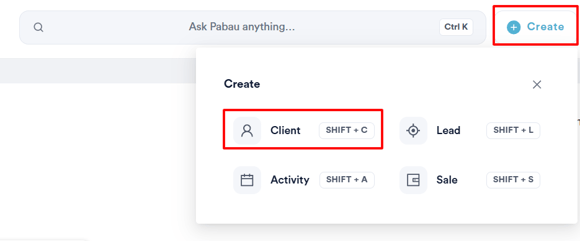
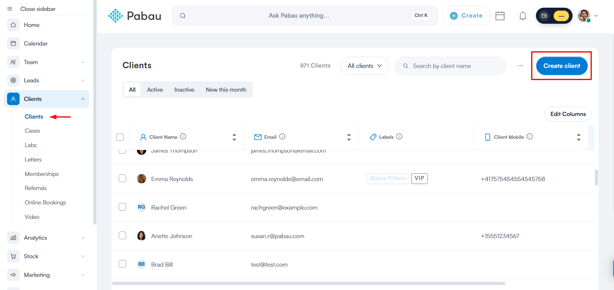
2. Clients Page:
On the Clients page, locate the "Create Client" button.
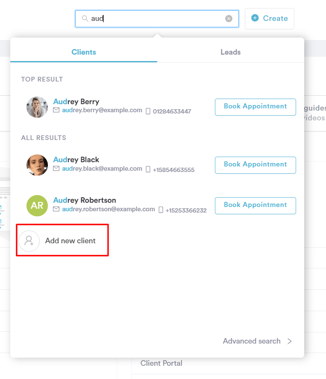
3. Search Bar:
Click "Add New" when using the search bar.
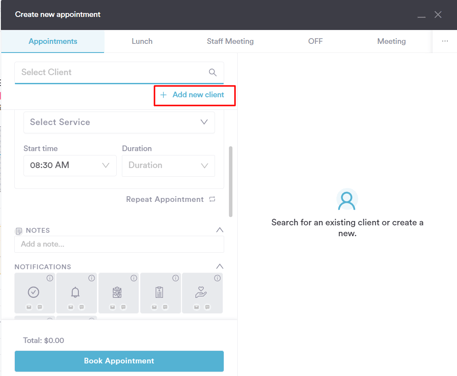
4. Calendar:
When booking an appointment, you can either search for an existing client or create a new one instantly.
Regardless of the method chosen, the client creation process remains the same.
General Section:
- Input basic client details, including preferred salutation, name, surname, gender, and date of birth.
- Assign a preferred language and apply labels from the top right corner.
- Add contact information such as email address and phone number.
More Section:
- If additional information, like the name of the client's GP, is needed, it can be added under the "More" section.
- Any extra fields created will also be stored under "More."
Final Steps:
- Click "Create" in the top right corner to complete the client creation process.
How to Edit a Client
This article provides a guide on how to edit client details in Pabau. There are two convenient methods to update client information – directly from the client card or through the client list.
1. Through the Client Card:
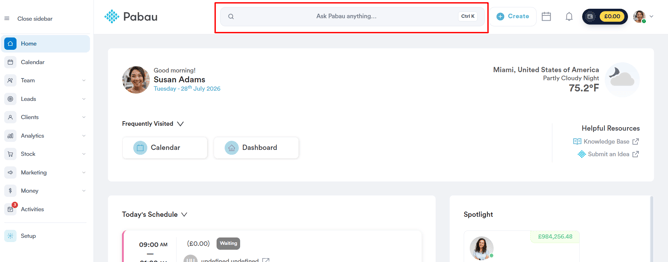
Log in to your Pabau account and navigate to the client card of the client whose information you want to edit by using the search bar at the top of the screen.
- Edit Specific Field:
In the Details section of the card, hover over the field you wish to edit, and the edit option will appear.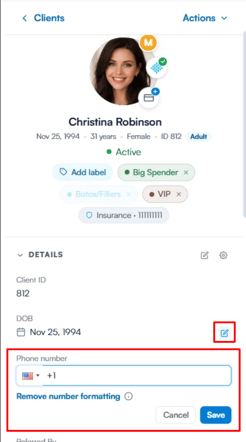
- Edit All Fields:
Hover over "Details" to reveal the option to edit all fields.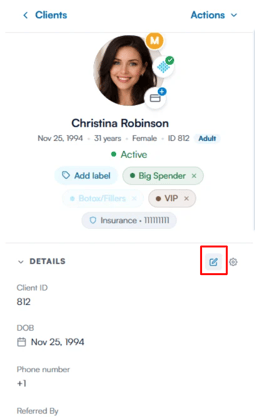
- Adjust Client Photo:
Click on the client’s avatar. In the pop-up, upload a new photo by clicking “Choose photo”.
2. Through the Client List:
In the left sidebar menu, go to Clients, then click on Clients again.- Edit Specific Field:
Select the checkbox next to the client(s) you want to edit, then click the pencil icon that appears next to "X Selected" above the list. This opens the Bulk Edit window.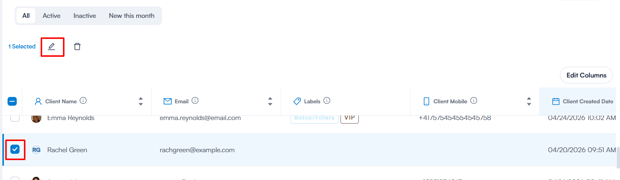
In the Bulk Edit window, each field defaults to "Keep current value." Click the dropdown next to the field you want to change (e.g. Labels, Client source, Gender, Client location, Active, Client owner) and select the new value.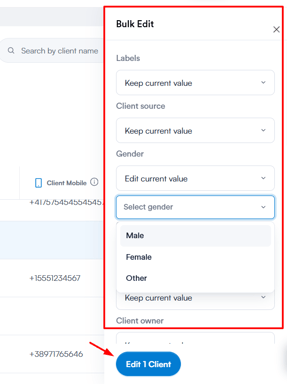
- Confirm Changes:
Click on "Edit Client" to confirm the changes.
NOTE: Not all fields can be edited from the client list. A field must be visible on the list for editing to be possible.
By following these steps, you can update and manage client information in Pabau, ensuring your records are always accurate and up to date.
How to Delete a Client
This article guides you through the process of deleting a client in Pabau. There are two straightforward methods to delete a client, either from the client card or directly from the client page.
1. From the Client Card:
Log in to your Pabau account and navigate to the client card of the client you want to delete by using the search bar at the top of the screen. 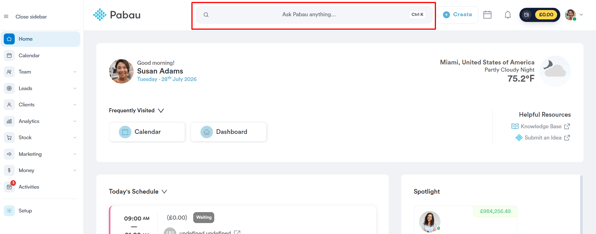
Open the Actions Menu:
Click the “Actions” dropdown at the top of the client details panel.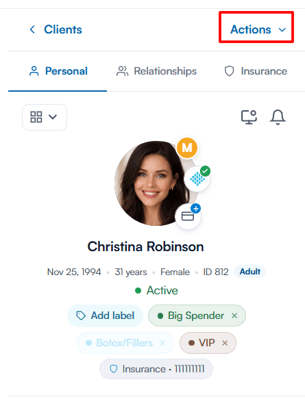
From the menu, select “Delete client”. A confirmation window summarises everything that will be removed — if the client has financial records, you can choose to delete them or transfer them to another client. Type DELETE into the confirmation field, then click “Delete client” to confirm.
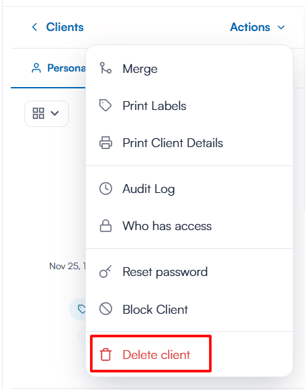
2. From the Clients Page:
In the left sidebar menu, go to Clients, then click on Clients again.
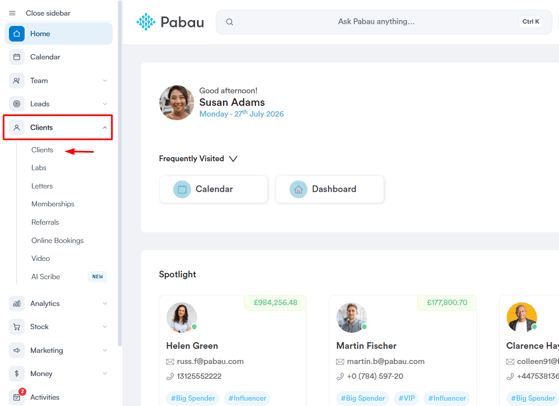
After selecting at least one client, options will appear above the client list. Click on the checkbox next to the client(s) you wish to delete, then click on the trash bin icon.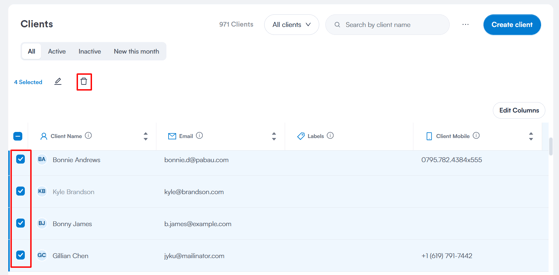
In the prompt, click "Yes, delete" to confirm.
By following these steps, you can efficiently manage your client database in Pabau, ensuring accurate and organised records. Be cautious while deleting clients, as this action is irreversible, and all associated data will be permanently removed.
How to Assign a Label to a Client
This article guides you through the process of assigning labels to clients in Pabau.
Labels help you categorise your clients and leads. You can also use labels to send targeted campaigns.
Here's how you can easily assign labels:
Step 1: Navigate to the Client Card
Log in to your Pabau account and navigate to the client card of the client you want to assign a label to by using the search bar at the top of the screen.
Step 2: Locate Labels Section
Look for the labels section right underneath the client avatar.
Assign a New Label: If your client doesn't have any labels assigned, click on "Add label" to assign a new label.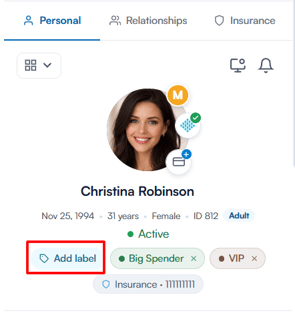
Assign Other Labels: If your client already has a label assigned, if you want to assign more, simply press the “Add label” icon and it will list all existing labels in the system.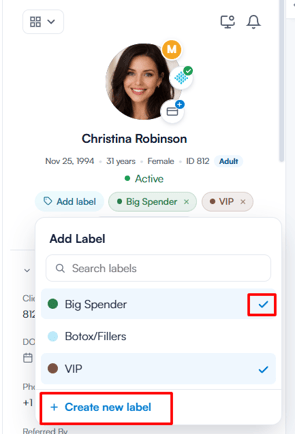
Alternatively, you can create a new label on the spot using the "Create new label" field (available to admin users only).
Create a New Label: While assigning labels, you can also create a new one on the spot if needed.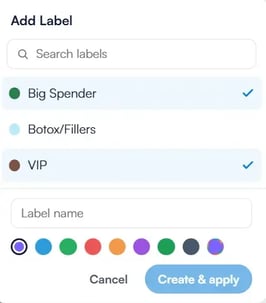
NOTE: Ensure to choose labels that best represent the characteristics or categories you want to associate with your clients.
You can also create new labels by following the steps in this article.
By following these steps, you can efficiently utilise labels to enhance your client management in Pabau, streamlining communication and marketing efforts.
How to Remove a Label from a Client
This article covers how you can remove labels from a client.
Step 1: Navigate to the Client Card
Log in to your Pabau account and navigate to the client card of the client from whom you want to remove a label using the search bar at the top of the screen.
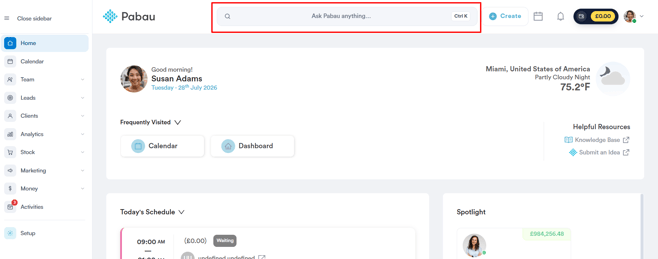
Step 2: Click the “Add label” Icon
Click on the “Add label” icon. Labels assigned to that client will have a tick on their far right. Click on the label you wish to remove.
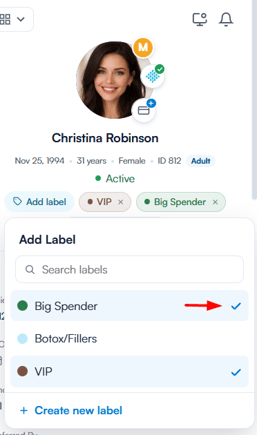
By following these steps, you can easily remove a client label from their client card.
How to Add a Client Relationship
Step 1: Navigate to the Client Card
Log in to your Pabau account and navigate to the client card of the client you want to add a relationship to by using the search bar at the top of the screen.
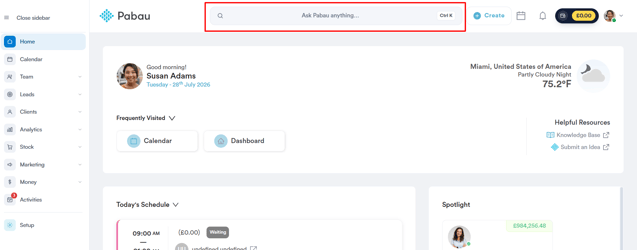
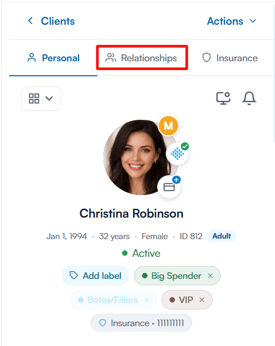
Step 2: Navigate to the Relationships Tab
At the top of the client card, click on the “Relationships” tab next to Personal to access and manage the client's linked contacts and connections.
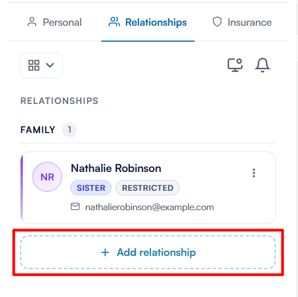
Step 3: Add Relationship
Click on the "Add relationship" button to initiate the process of adding a relationship.
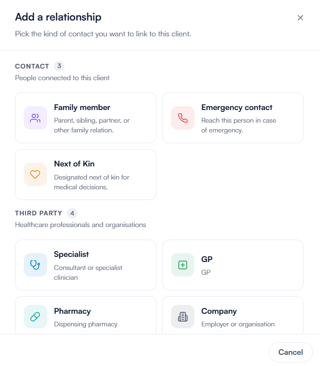
Relationship-Specific Steps
In the "Add a relationship" window, select the type of relationship you want to add. Based on your selection, the steps will vary from this point onward.
Family Member
Search for an existing client by name or email, or add a new one on the spot. Then select the specific relation, such as father, mother, sister, brother, wife, or husband (click "Load more" for additional options).
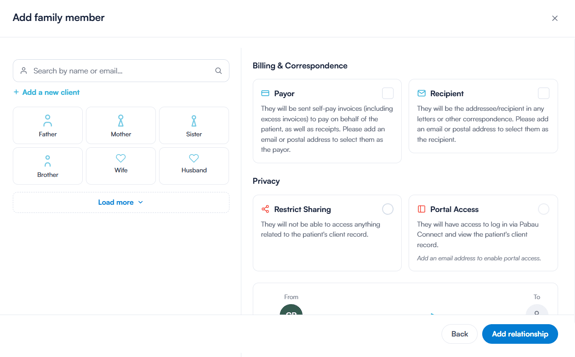
Next, you can configure a few additional settings. Under Billing & Correspondence, mark the contact as a payor if they'll be responsible for the client's self-pay invoices and receipts, or as a recipient if they should receive letters or other correspondence on the client's behalf — an email or postal address is required for either option.
Under Privacy, you can restrict sharing so the contact has no access to the client's record, or grant portal access so they can log in via Pabau Connect and view the client's information.
Once everything is set, click “Add relationship” to finalise.
Emergency Contact and Next of Kin
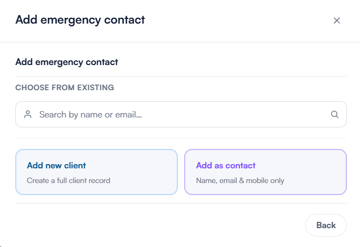
Search for an existing contact by name or email, or choose to add a new client (a full client record) or add them simply as a contact, with just a name, email, and mobile number.
Specialist
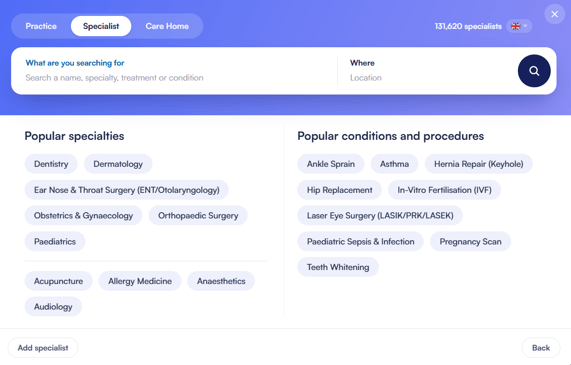
Search by name, specialty, treatment, or condition, and filter by location if needed. You can also browse popular specialties or popular conditions and procedures. Once you've found the right match, add them as the specialist.
GP
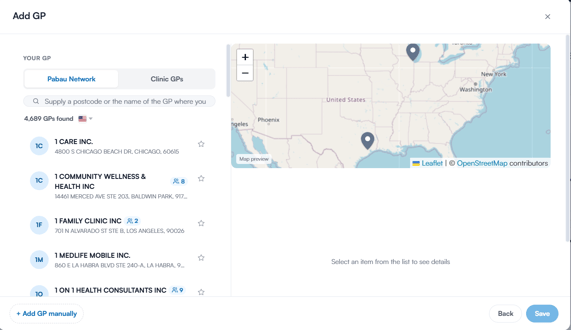
Choose between the Pabau Network or your Clinic GPs, then search by postcode or name. Select the correct GP from the results and save your selection. If the GP isn't listed, you can add one manually.
Pharmacy
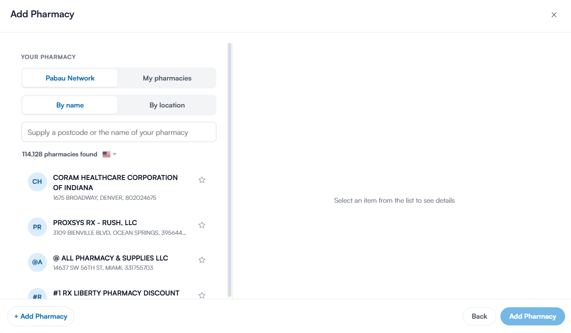
Choose between the Pabau Network or your saved pharmacies, and search by name or location. Select the correct pharmacy from the results to add it. If it isn't listed, you can add one manually.
Company
Search by name or postcode, then select the correct company. If it isn't listed, you can add one manually.
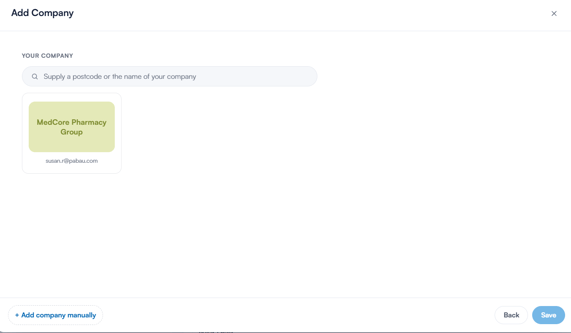
Once you've added the contact, insurer or organisation, the relationship will be saved directly in the client's profile under the Relationships section.
By following these steps, you can quickly add contacts or insurers to a client’s profile, keeping all relationships organised and easy to access
How to Remove a Client Relationship
Step 1: Navigate to the Client Card
Log in to your Pabau account and navigate to the client card of the client you want to remove a relationship from by using the search bar at the top of the screen.
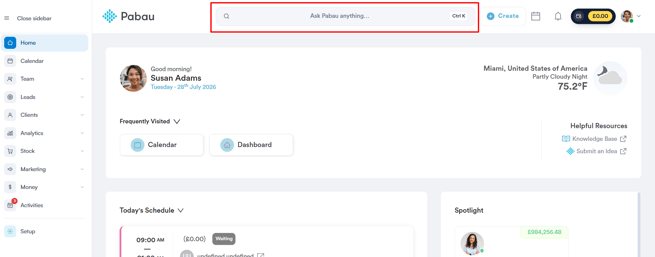
Step 2: Navigate to the Relationships Tab
At the top of the client card, click on the “Relationships” tab next to Personal to access and manage the client's linked contacts and connections.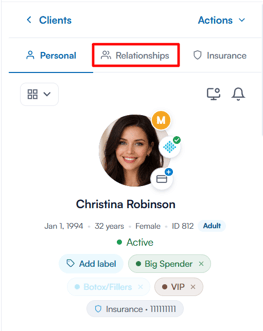
Step 3: Remove the Relationship
Once you open the "Relationships" tab, you'll see all contacts linked to the client. To remove a relationship, click the three-dot menu next to the contact and select "Remove relationship" from the dropdown.
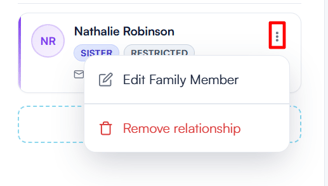
A prompt will appear to confirm the removal of the relationship. Click on “Remove” to finalise.
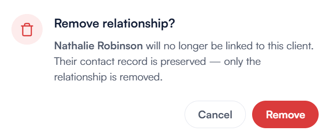
The relationship is now successfully removed from the client card.
By following these steps, you can successfully remove a client’s linked contact, keeping their Relationships section accurate and up to date.
How to Deactivate a Client
Step 1: Navigate to the Client Card
Log in to your Pabau account and navigate to the client card of the client you want to deactivate by using the search bar at the top of the screen.
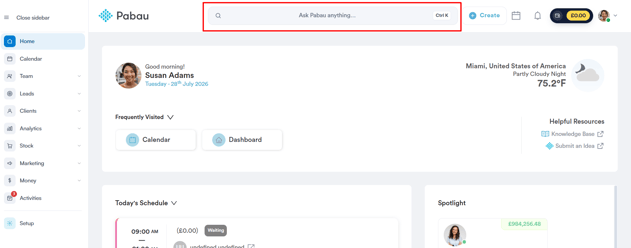
Step 2: Access Client Status Indicator
Below the client's avatar on the client card, find the indicator that shows whether the client is currently active or inactive. Click on this indicator to proceed.
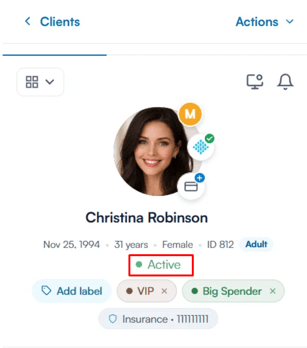
Step 3: Confirm Deactivation
A confirmation window titled “Deactivate client?” will appear. Click “Deactivate” to confirm.The client is now marked as inactive. You can reactivate them at any time by clicking on the indicator once more and confirming with “Reactivate”.
Inactive clients won't be displayed when using the search bar. To find them, perform an advanced search and tick the checkbox for "Show inactive clients."
In the Clients feature, both active and inactive clients will be visible. However, inactive clients will have a red border on their avatar, serving as an indicator of their inactive status.
How to Configure the Summary View in Client Card
Step 1: Navigate to the Client Card
Open any client card by using the search bar at the top of the screen.
Step 2: Access the Summary Controls
In the top-right corner of the Summary tab you’ll find the Arrange and Configure widgets buttons.
NOTE: Configure widgets is only visible to admin users — it controls which form questions feed each widget across your practice.
Step 3: Arrange Widgets
Click Arrange to reorder and manage your widgets. In this mode:
- Use the drag handle on the left of each widget to move it up or down.
- Use the eye icon on the right of each widget to toggle its visibility.
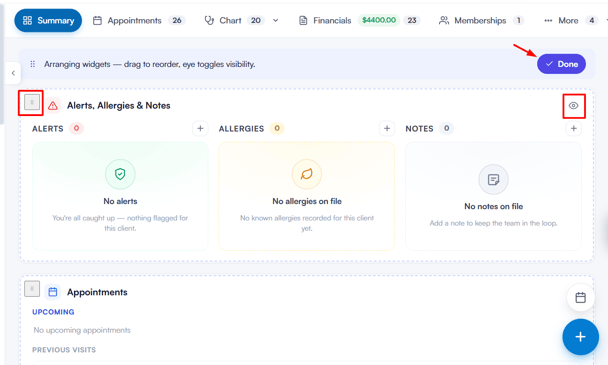
Click Done in the top-right corner once you're finished.
Step 4: Configure Widgets
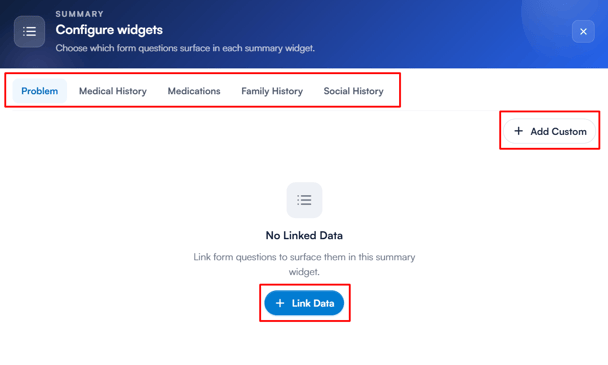
Click Configure widgets to link data to a widget or create a custom one.
- Select a category tab (Problem, Medical History, Medications, Family History, or Social History).
- Click Link Data to open the Add Field window, search for the form questions you want, tick them, then click Add to link them to the widget.
- Click Add Custom to create a new widget (available with the Care+ add-on). Enter a widget name and click Create.
This gives you full control over which data appears in your client Summary and how it’s organised.
By following the steps above, you'll be able to manage client records with confidence — from creation to ongoing updates.
Was this guide helpful? Let us know by voting below - your feedback helps us write clearer articles.
For more guides, browse the related articles below or use the search bar at the top of the page. You can also watch our video learning series, the Pabau Academy, or visit the Support page for additional help.