Table of Contents:
1. How to Create and Manage Activity Types
2. How to Create an Activity from the Client Card
3. How to Edit an Activity from the Client Card
4. How to Mark an Activity as Done from the Client Card
5. How to Delete an Activity from the Client Card
6. How to Manage Activities in the Calendar
7. Understanding the Activities Page
How to Create and Manage Activity Types
Step 1: Navigate to Activity Types
Start by logging into your Pabau account. Once you're in, click on Setup in the left sidebar menu, then click on Objects under "Developer and Other", and select Activity Types.
Step 2: Create an Activity Type
Once there, go to the ''Create Activity Type'' button in the top right.
A pop-up will appear where you'll view two tabs:
1. System
On the system tab, you have the following options:
- Name: Enter a clear, descriptive name for the activity (e.g., "Call Client", "Invoice Follow-Up", "Inventory Check").
- Default Duration: Set how long this activity usually takes (e.g., 15 minutes, 30 minutes, 1 hour).
- Icon: Choose an icon that visually represents the activity.

2. Notifications
The notifications tab, allows you to automate reminders when an activity is created, either for the client/lead or for a staff member.
You’ll find two toggles here:
-
Client/Lead Notification
Turn this on to notify the client or lead when this activity is created. Once enabled, you can select an email template that will be sent automatically to the recipient. -
Employee Notification
Enable this to send a notification to the assigned staff member. When switched on, a text editor will appear where you can customize the message.
By default, the message will read: You have an activity due for [ActivitySubject] for client [ClientName].

Step 3: Edit Activity Types
To edit an activity type, click on it, make the necessary changes, then click on "Save".
NOTE: To learn how to use activity types, refer to this article.
By following these steps, you can create and manage activity types in your Pabau account.
How to Create an Activity from the Client Card
Step 1: Navigate to the Client Card
Start by logging in to your Pabau account using your login credentials. Then, navigate to the Search bar at the top of the page and type at least three letters of the client's name. Pabau will filter the results as you type.
Step 2: Create an Activity
Once you view the client's profile, click the Create button, represented as a blue plus sign at the bottom right corner of the page, to reveal the option to create an activity.
NOTE: For instructions on creating and managing activity types, please refer to this article.

After clicking on "Activity," a window will pop up with several fields that you need to select. Start by selecting the Activity type. The activity type icons, including email, call, message, and meeting, are located at the top of the window, and you can choose the appropriate type for your activity.
In the Email field, you will need to add a title or subject for the activity that you'd like to log.
In the date and time field, you can add the designated timeframe for when this activity is to be performed, and if additional details are needed, you can include them in the activity notes field.

You can also specify which user this activity is for. By default, the user will be the one you are currently logged in to. However, you can change this if the activity is for a different user.
After filling out the fields, you can choose to save the activity to the client card, cancel it, or mark it as done if the task is completed and you want to log it.
You will be able to view the activity you have created in the client card under the Activities tab. 
Following these steps, will successfully log an activity in the client card.
How to Edit an Activity from the Client Card
Step 1: Navigate to the Client Card
Start by logging in to your Pabau account using your login credentials. Then, navigate to the Search bar at the top of the page and type at least three letters of the client's name. Pabau will filter the results as you type.
Step 2: Switch to the Activities Tab
Upon viewing the client card, navigate to the activities tab on the menu. 
Step 3: Edit Activity
Locate the activity you wish to edit and click on the three dots on the far right side of the activity.
Three actions will appear on the menu, including "Edit." 
You can also view and edit the activity by clicking the activity name.
The process of editing an activity is the same as creating an activity.
After making all the desired changes, click "Save" to update the changes.
Following these steps, you can edit any activity logged on the client card.
How to Mark an Activity as Done from the Client Card
Step 1: Navigate to the Client Card
Start by logging in to your Pabau account using your login credentials. Then, navigate to the Search bar at the top of the page and type at least three letters of the client's name. Pabau will filter the results as you type.

Step 2: Switch to the Activities Tab
When viewing the client card, navigate to the activities tab on the menu.
Step 3: Mark as Done
Locate the activity you wish to mark as done and click on the three dots on the far right side of the activity.
Three actions will appear on the menu, including "Mark as Done." 
You can also mark the activity as done if you edit the activity.
If you accidentally mark an activity as done, the action will state "Mark as To Do," allowing you to change the activity status back to incomplete.
By retracing these steps, you can mark an activity as done.
How to Delete an Activity from the Client Card
Step 1: Navigate to the Client Card
Start by logging in to your Pabau account using your login credentials. Then, navigate to the Search bar at the top of the page and type at least three letters of the client's name. Pabau will filter the results as you type.

Step 2: Switch to the Activities Tab
When viewing the client card, navigate to the activities tab on the menu.
Step 3: Delete Activity
Locate the activity you wish to delete and click on the three dots on the far right side of the activity.
Three actions will appear on the menu, one of which is "Delete." 
After selecting Delete, you will be prompted to confirm if you want to delete this activity permanently. Click on "Delete forever" to confirm.

By following these steps, you can delete an activity from the client card.
Step 1: Access Calendar
First, log in to your Pabau account, and in the left sidebar menu, click on ''Calendar''.

Step 2: Access the Activities Dashboard
On the far right-hand side of the calendar view, click the ''Activities'' button. This will open a dedicated view where you can manage all activities in one place.

Step 3: Overview of the Activities View
In the Activities view, tasks are grouped by employee and displayed based on the selected date. This layout gives you a clear and structured way to monitor workload and task progress across the team.
Here’s what the view includes:
-
Employee Columns
Each column represents a team member, showing their assigned tasks for the chosen date. If there are no tasks, a prompt to create a new activity will be available. -
Date Navigation
At the top of the page, use the arrows or the calendar icon to move between dates. This lets you view activities for previous or upcoming days. -
Employee Filter
Use the dropdown menu to filter activities by specific team members. This is useful for focusing on individual workloads or monitoring specific roles. -
Location Filter
Apply the location filter to view activities scheduled at a particular clinic or site. This is especially helpful for multi-location practices. -
Activity Cards
Each task displays its title, the assigned employee, description (if provided), and the due date and time. These cards can be clicked to view, edit, or update the activity details. -
Completed Section
At the bottom of each column, you’ll find a ‘Completed’ section. Once a task is marked as complete, it moves to this section with a timestamp, making it easy to track progress.

Step 4: Create a New Activity
To create a new activity, click the ''Create Activity'' button under the name of the staff member you want to assign the task to.

Once you click on Activity, a pop-up window will appear with several fields to complete. Start by selecting the activity type at the top - options include email, call, message, and meeting, each represented by an icon. Choose the one that best fits the task you're logging.

In the Subject field, enter the title or subject of the activity.

Next, use the date and time fields to specify when the activity should take place. If needed, you can provide additional context or instructions in the activity notes field.

The activity will automatically be assigned to the team member selected in the calendar view. If needed, you can change this and assign the activity to a different user before saving.

When creating or editing an activity, you can also add the lead or patient name so it’s clear who the task relates to - making it easier to track follow-ups and client interactions.

After filling out the fields, you can choose to save the activity to the client card, cancel it, or mark it as done if the task is completed and you want to log it.

Once saved, the activity will appear in the calendar under the selected staff member's name.

Step 5: Edit, Delete, or Complete an Activity
To edit or delete an activity, locate the activity in the calendar and click the three dots next to it.

To mark an activity as complete, simply tick the checkbox beside it. The activity will move to the "Completed" section with the completion time recorded, making it easy to track progress.

To unmark a completed activity, click on the completed task and untick the checkbox. This will move the activity back to the active list.

By following these steps, you can efficiently manage all activities in the calendar, keeping your team organised and on track.
Step 1: Navigate to the Activities Page
Log in to your Pabau account, then select ''Activities'' from the left sidebar to access the Activities page.
Step 2: Understanding the Activities Overview
The Activities page displays a detailed list of all activities assigned to staff members, with tools to filter, search, and manage each task.
Here’s a breakdown of the key elements on the Activities page:
Filter & Search Options
The Activities page offers several tools to help you refine and organise the tasks displayed in the table, ensuring you can quickly focus on what matters most.

Filter By
Use filters to narrow down activities by criteria such as date, client, task type, status, or assigned staff member. These filters can be saved as a custom view for easy access later, streamlining your workflow.
Search Field
The search bar at the top allows you to quickly locate specific activities by client name, subject, or other details, making it easier to find exactly what you need.
Create Activity
Click the Create Activity button in the top-right corner to add a new activity, ensuring all tasks are captured and tracked in Pabau.
Edit Columns
The Edit Columns option lets you customise the table by choosing which columns to show or hide, allowing you to tailor the view to your specific workflow.
Three Dots Menu
Clicking the three dots (⋯) in the top-right corner of the table provides additional viewing options. Here you can filter activities to show:
-
All Completed Activities
-
Overdue Activities
-
To-Do Activities Only
- Custom
-
Activities for a Specific Time Period, including:
-
Today
-
Tomorrow
-
This Week
-
Next Week
-
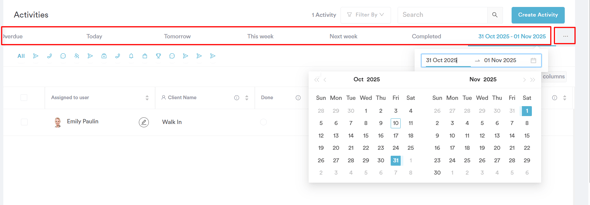
This menu gives you quick access to commonly used views, helping you manage tasks efficiently without needing to manually adjust filters each time.
What Each Column Means
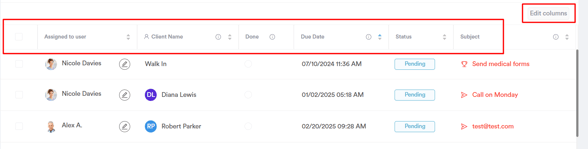
Each row in the table represents an individual activity. Key columns include:
-
Assigned to User – The staff member responsible for completing the activity.
-
Client Name – The name of the client associated with the activity.
-
Done – Indicates whether the activity has been completed.
-
Due Date – The date and time the activity is scheduled to be completed.
-
Status – Displays the current status of the activity, such as Pending or Awaiting.
-
Subject – A brief description or title of the activity.
If you’d like to display more information, click the ''Edit Columns'' button to add or remove columns and customise the table to your needs.
You can also reorder columns by hovering over a column header, clicking and holding the dots icon, and dragging the column to your preferred position.
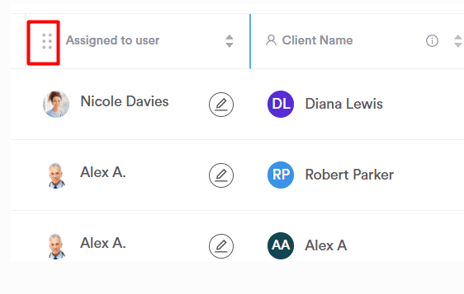
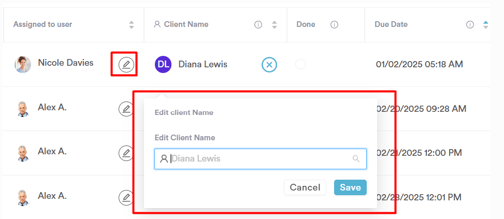
To make quick edits, simply hover over a field (such as the assigned user, client, or due date) and click the pencil icon to update it directly from the table.
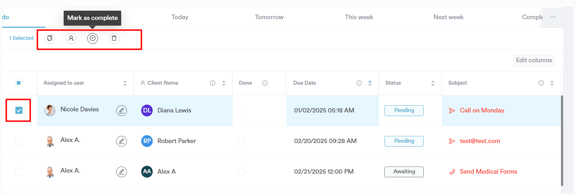
If you select one or more activities using the checkbox on the right-hand side, you can duplicate, assign, mark as complete, or delete them — making it easy to manage multiple activities at once.
Now that you know how to navigate and use the Activities page, you can manage all your tasks more efficiently in Pabau.
For more guides, refer to related articles below, select additional guides, or use the search bar at the top of the page. These guides will help you get the most out of your Pabau account.
Additionally, to help you fully utilize and understand your Pabau account, we recommend exploring additional guides and resources offered at the Pabau Academy. It offers in-depth video tutorials and lessons, offering a holistic learning experience that can equip you with the essential skills for achieving success with Pabau.