
The classic Customize → General tab no longer exists. In the new Online Bookings, each of its settings lives next to the part of the booking page it changes — most of them in Pabau Studio, and the client-facing rules in Setup → Online presence → Client Portal.
In this article, you will learn where each classic general setting lives now and how to change it.
Where Each General Setting Lives Now
| Classic setting | In the new version |
|---|---|
| Header message | Book Type section → Wording (Step 1). Your existing header message is also carried over as an Announcement bar in Widgets. |
| Footer message | Your footer message is carried over as a Text card in Widgets, shown on the Book Type and Services pages — see Part 2 |
| Terms and Conditions, Privacy Policy | Setup → Online presence → Client Portal → Content → Policies (Step 5) |
| Background colour | Studio → Branding → Background — see How to Customise Your Online Booking Page in Pabau Studio |
| Require form to be completed as part of booking | Studio → Manage → the Forms step. On: clients complete forms while booking. Off: they see their forms after checkout. |
| Hide Class Appointments | Book Type section → Book a class (Step 1) |
| Hide Gift Voucher Purchase, Hide Package Purchase | Header section → Storefront (Step 2) |
| Hide Account Payments | Not a setting in the new version. If you take card payments online, clients can add credit by card with Top up account on the Payments page of the client portal. |
| Allow appointment cancellations / reschedule | Setup → Online presence → Client Portal → Essentials → Appointments (Step 6) |
| Allow Waitlist | Date & time section → Show waitlist (Step 3) |
| Consider Room availability | Date & time section → Don’t allow booking if room in use (Step 4) |
| Time interval | Date & time section → Time interval (Step 4) |
| New Booking Notification | Each team member chooses their own alerts in their account settings, under Notifications. |
Step 1: Change Your Landing Page Wording and Booking Options
In Pabau Studio (More → Online Bookings → Customise page), open the Book Type page and click Edit.
- Hover over the booking options and click the Book Type label.
- Under Wording, change the Eyebrow, Title and Subtitle clients see at the top of the page. This replaces the classic header message.
- Under Show / hide options, switch Book a class on or off to show or hide classes. Book an appointment is the standard booking, and at least one option must be shown.
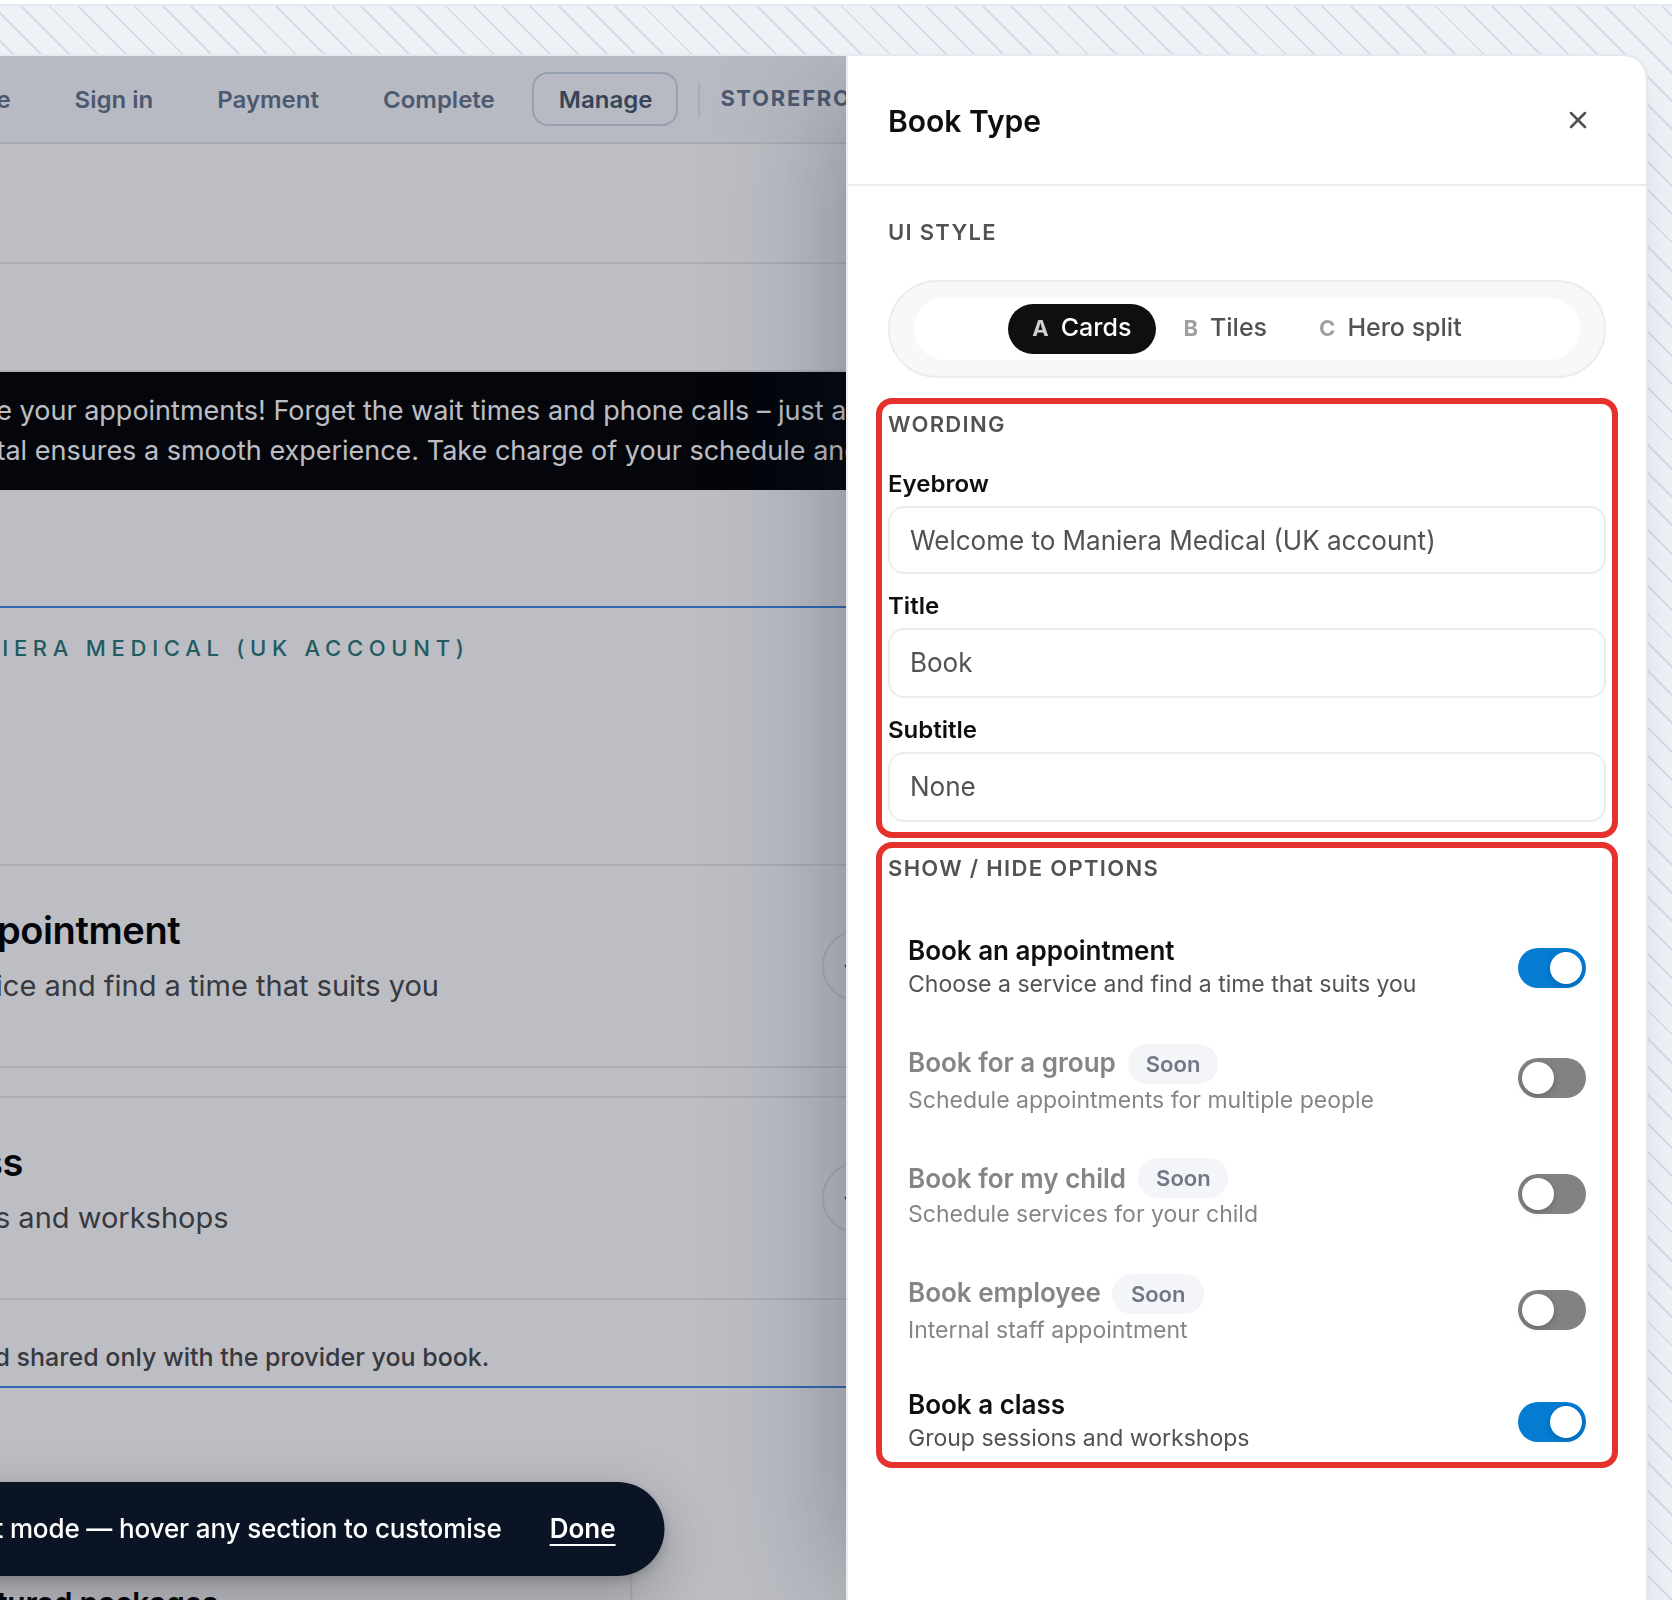
The Book Type section: wording and booking options
Step 2: Show or Hide Gift Cards, Packages and Other Store Pages
- With Desktop selected, hover over the menu at the top of the page and click the Header label.
- Under Storefront, switch Memberships, Packages, Shop or Gift Card off to remove that page from your site’s menu.
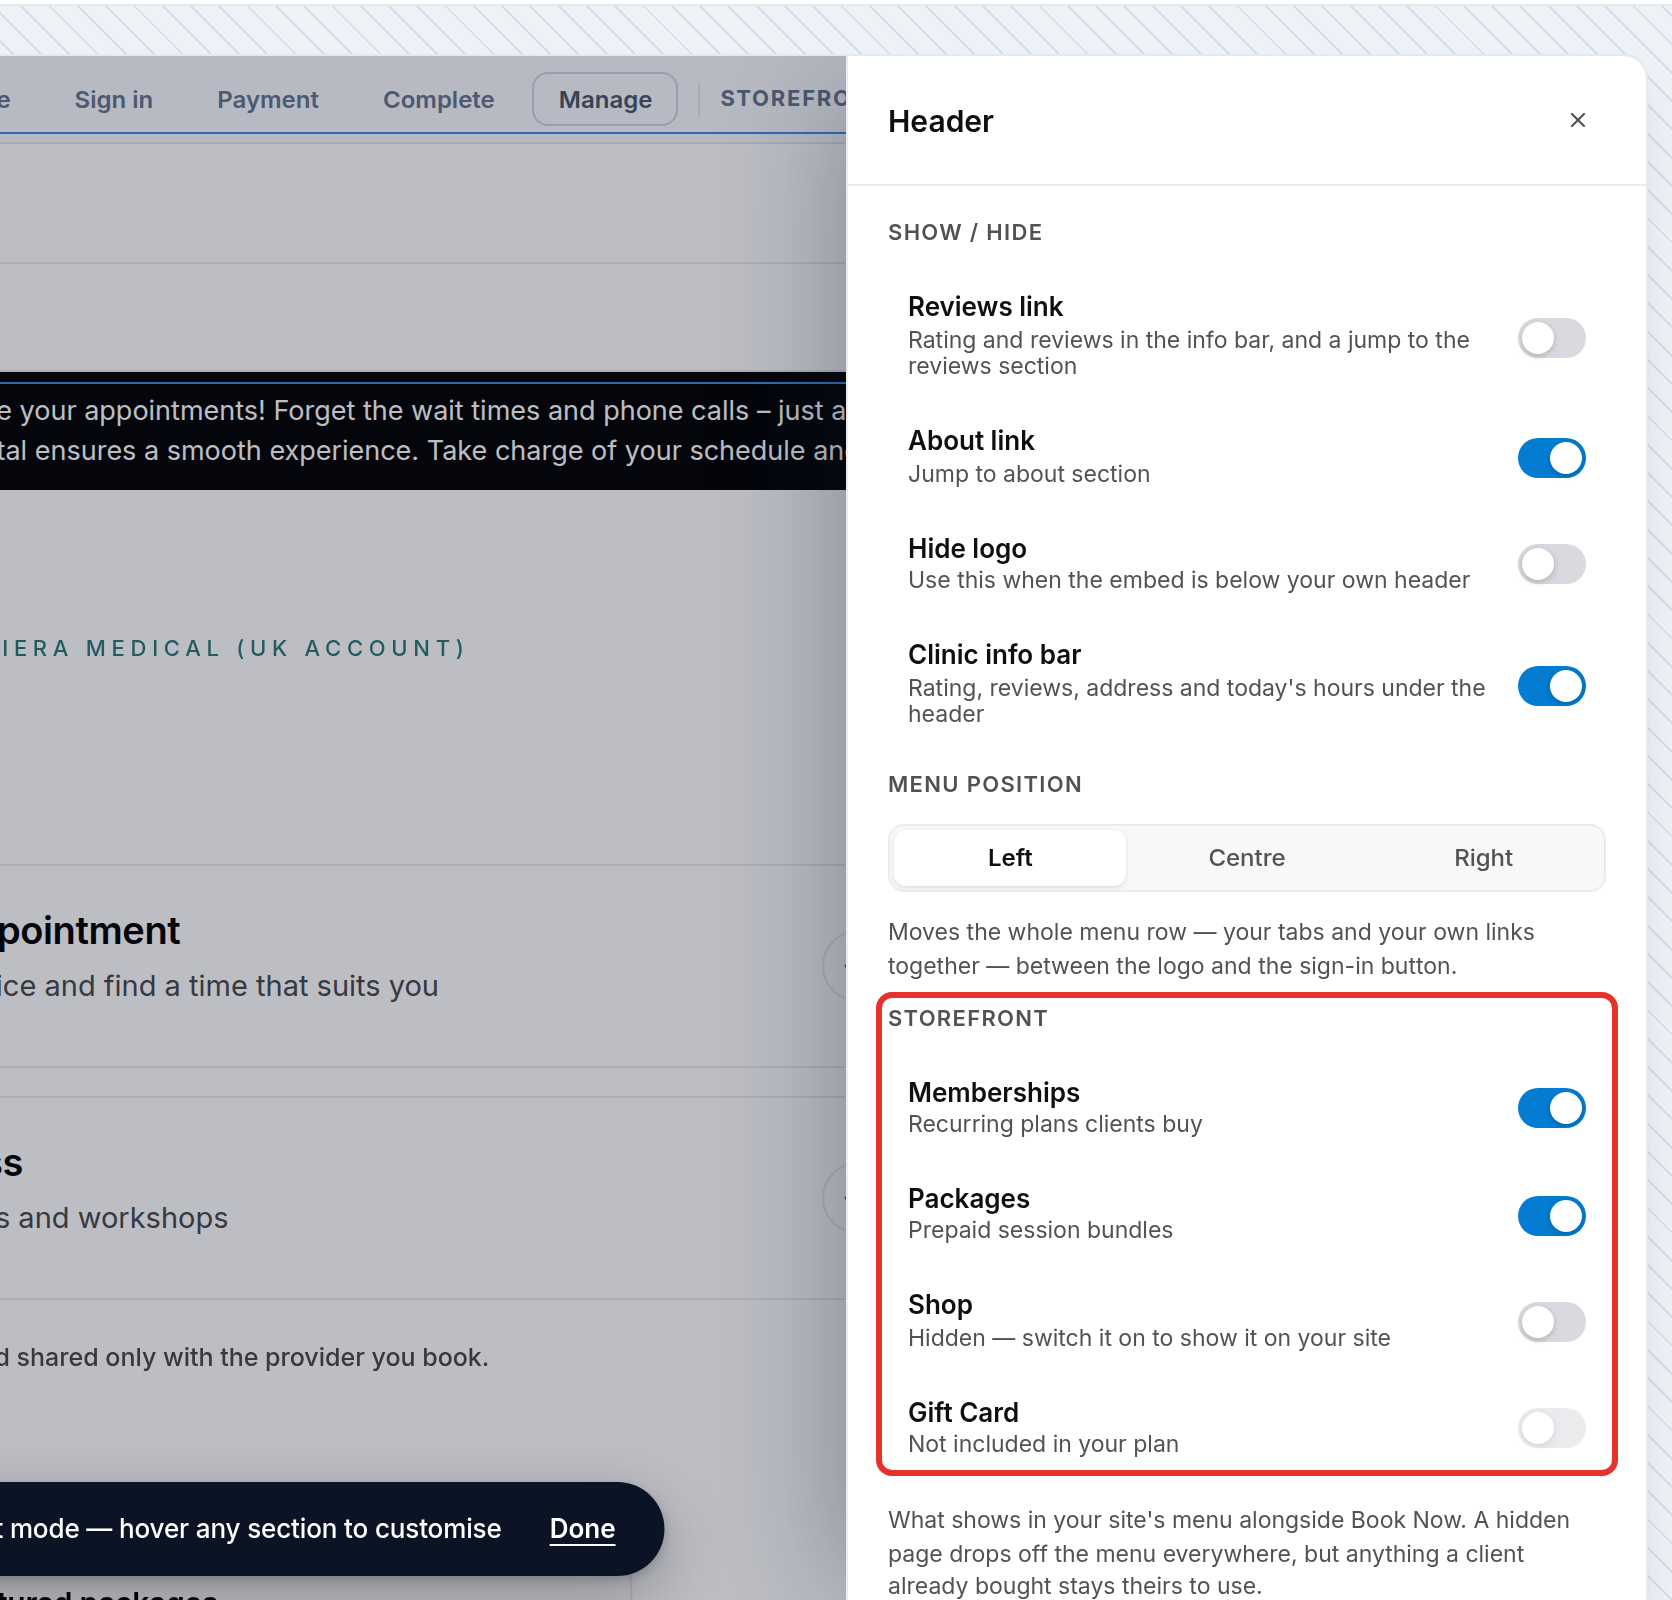
The Header section, with the Storefront switches
NOTE: On the Mobile preview the same switches are in the Book Type section, because phones show the store pages as cards on the landing page. Hiding a page does not take away anything a client has already bought. What appears on each store page is covered in How to Sell Memberships, Packages, Products and Gift Cards in Your Online Store.
Step 3: Turn On the Waitlist
Open the Date & Time page, hover over the calendar and click the Date & Time label.
- Stay on the Layout tab.
- Switch on Show waitlist. Clients who cannot find a time see a Join Waitlist button.
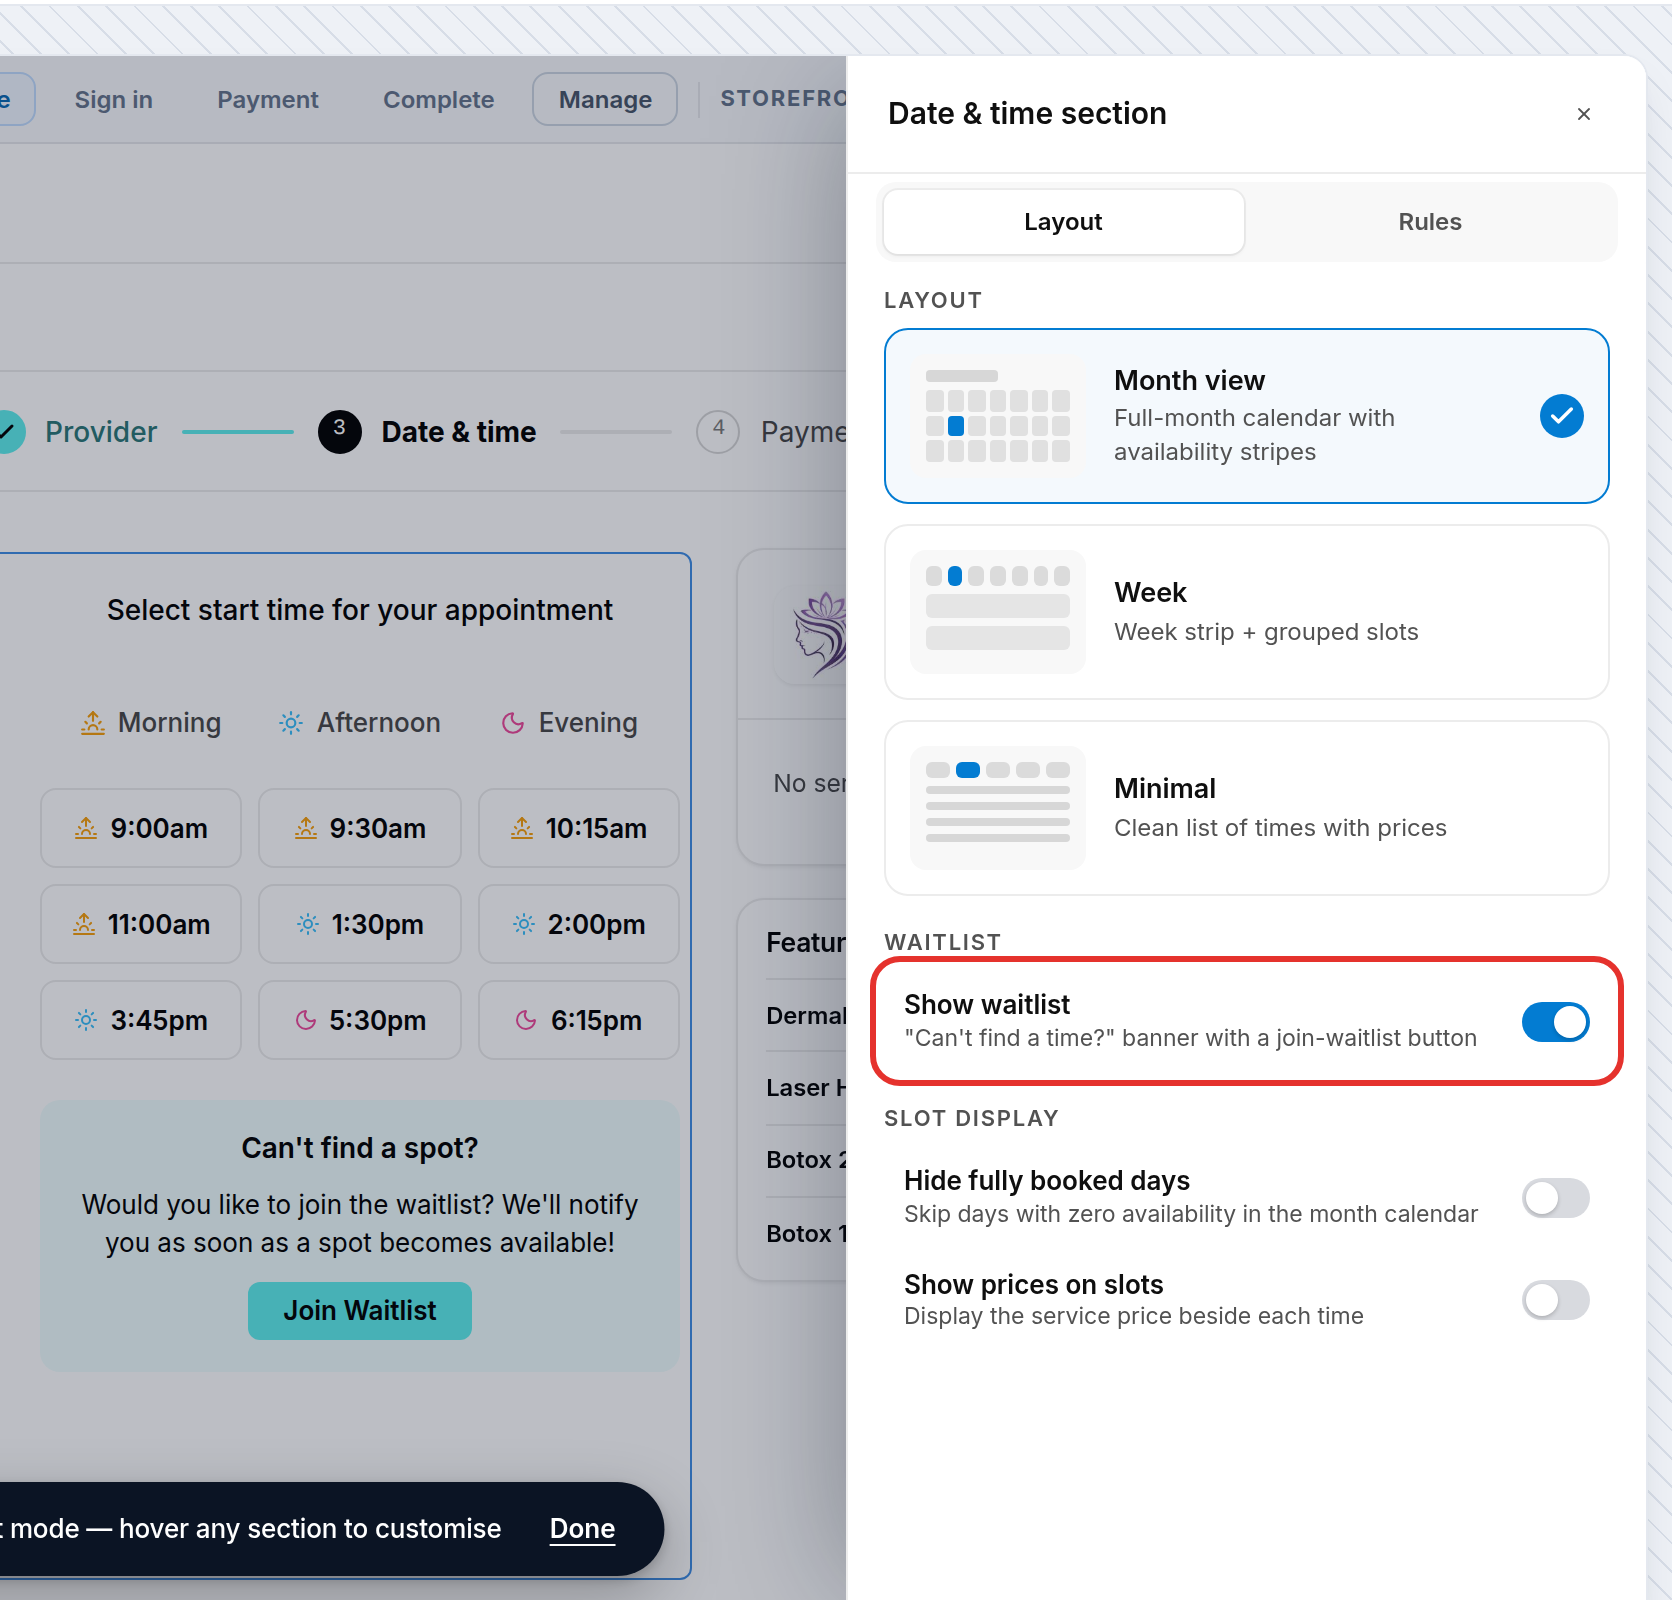
Show waitlist, on the Layout tab of the Date & time section
NOTE: Clients must sign in to join the waitlist. Their entry appears on your waitlist in Pabau, so you can contact them when a time becomes free.
Step 4: Set the Time Interval and Room Check
- In the same section, open the Rules tab.
- Choose the Time interval — how often an appointment can start, from every 10 minutes to every 2 hours. Same as Online Booking setup keeps your current interval. Each service keeps its own length.
- Under Booking window, set the Minimum notice and Maximum advance if you need them.
- Under Resource management, switch on Don’t allow booking if room in use to hide times when the treatment room the service needs is already taken. Don’t allow booking if equipment in use does the same for lasers, machines and devices.
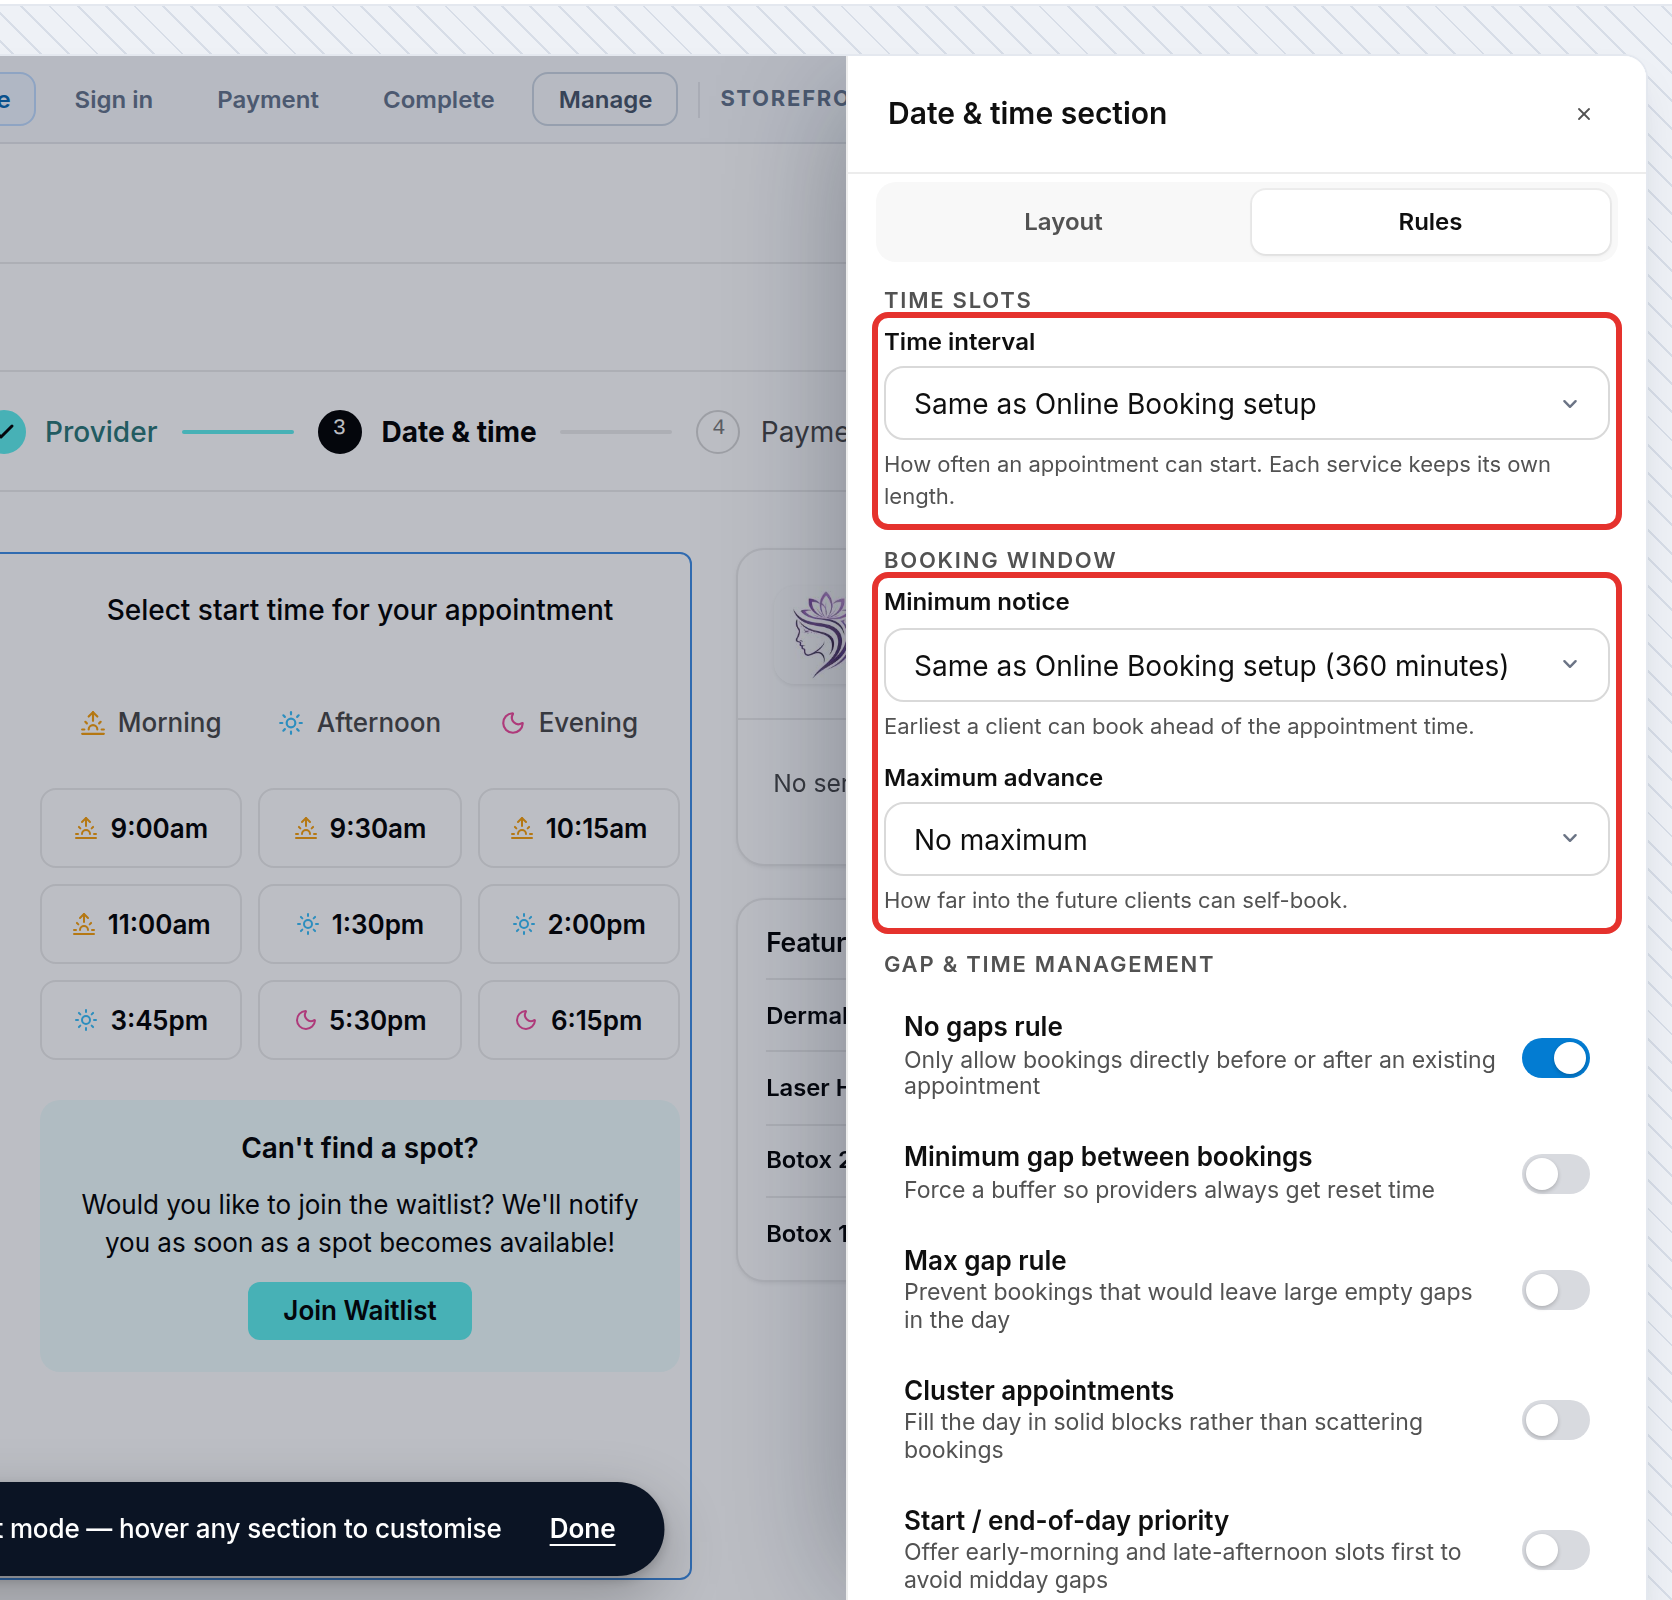
The Rules tab: time interval and booking window
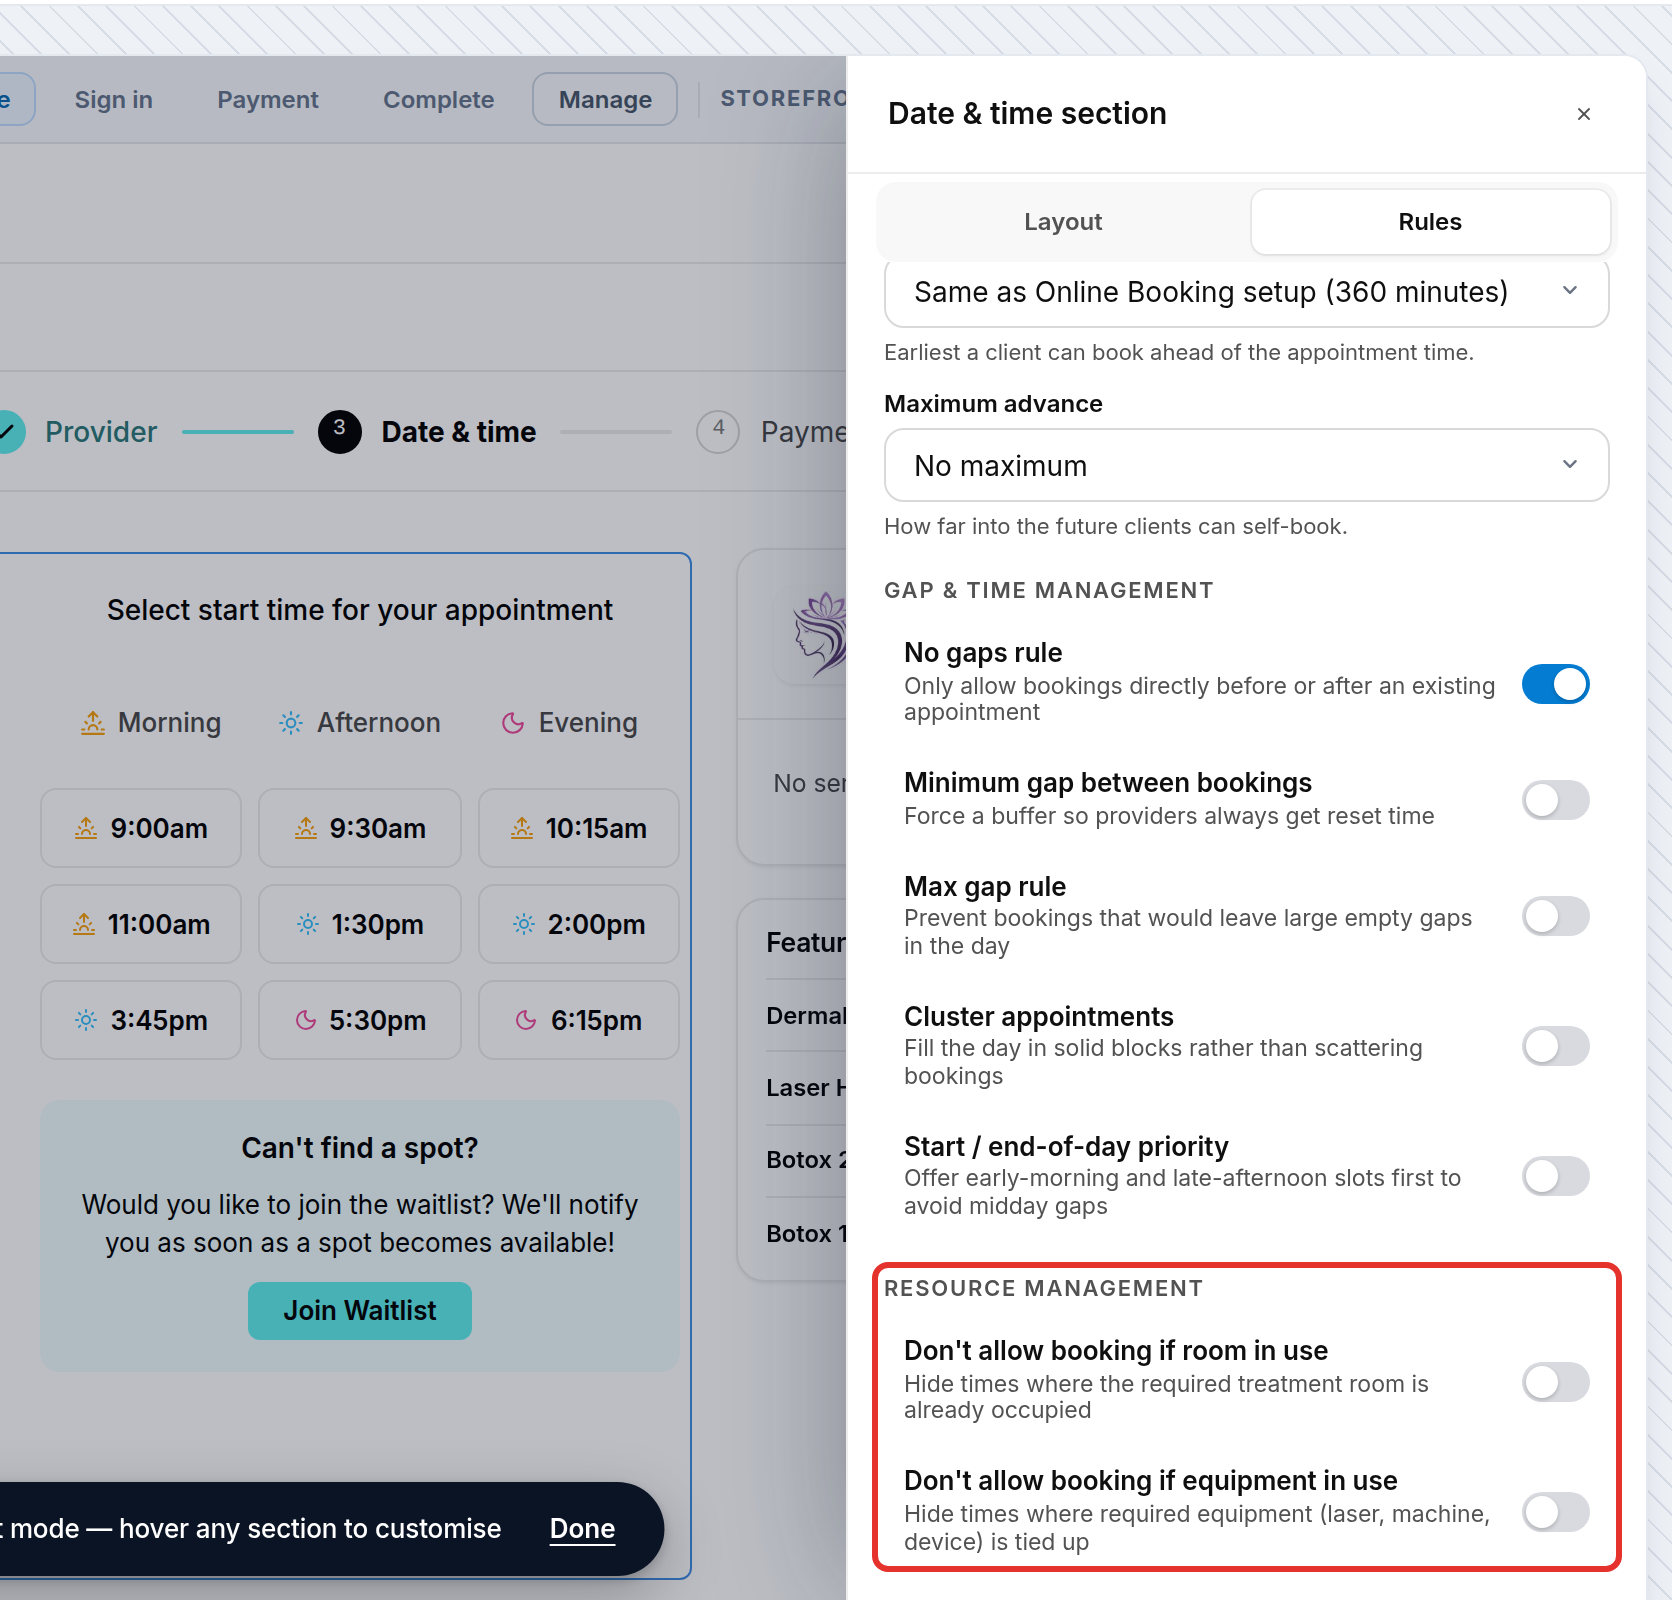
Resource management: room and equipment checks
How Are Start Times Worked Out?
The Time interval is how far apart start times are, counted from the moment a team member becomes free, not from the hour on the clock. A run of start times begins at the start of their shift, and again where a booked appointment (or a room or equipment block) ends. A time is offered only if the whole service fits before the next appointment or the end of that shift.
- A 09:00–17:00 shift, a 60-minute service and a 30-minute interval offer 09:00, 09:30, 10:00 and so on, up to 16:00.
- A shift starting at 09:10 on a 30-minute interval offers 09:10, 09:40, 10:10 and so on.
- If an appointment ends at 10:25, the next run starts at 10:25, even on a 60-minute interval.
NOTE: Back-to-back shifts are not joined into one. Each shift is its own window, so an appointment never runs from one shift into the next, even at the same location. For example, with shifts of 09:00–12:00 and 12:00–14:00, a 60-minute service can’t start at 11:30. If you set up a run of one-hour shifts for a one-hour service, clients are offered one start per shift.
Where this comes from: the spacing ← Time interval on the Rules tab; when that is left on Same as Online Booking setup, the time interval from your Online Booking setup is used. The service’s length decides only whether a start fits. Your Booking window and the service’s own restrictions can then remove some of these times.
The other rules on this tab are explained in Part 3: Set Booking Steps and Availability Rules. Click Publish when you have finished in Studio.
Step 5: Add Your Terms and Conditions and Privacy Policy
- Go to Setup → Online presence → Client Portal and open the Content tab.
- Under Policies, paste a link to each policy on your own website, or write it here and Pabau will host it. If you do both, the link is used; if you leave both empty, that footer link is hidden. Click Save content.
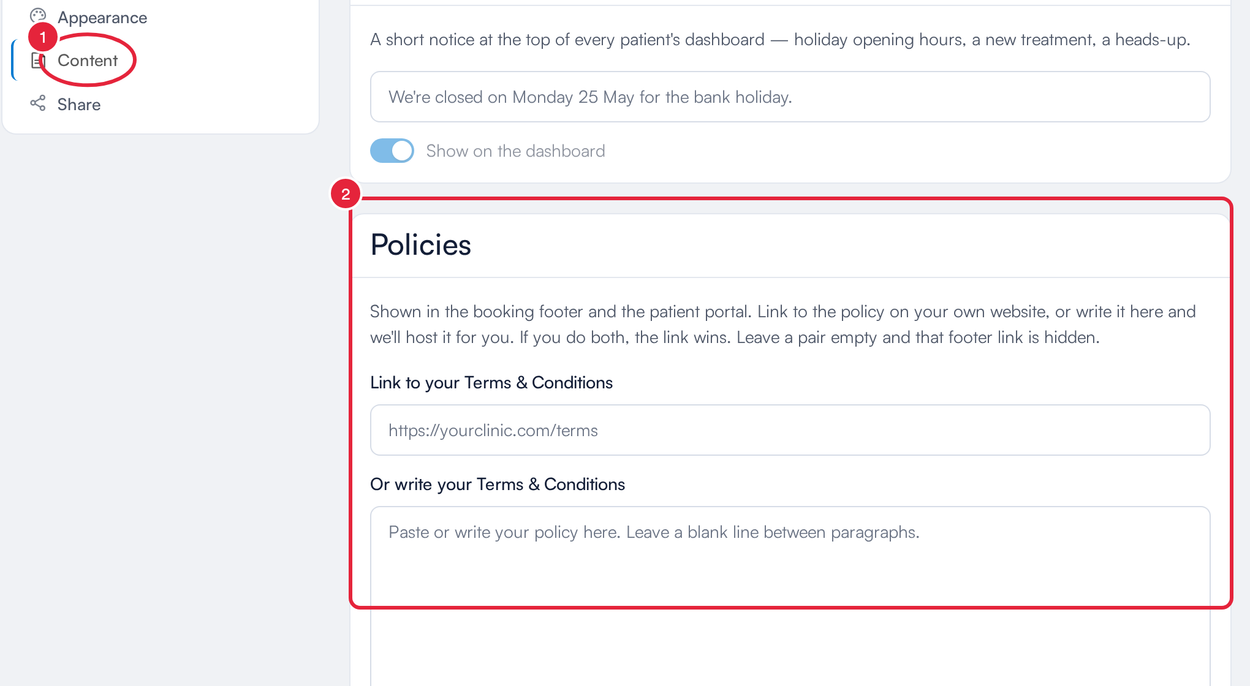
Policies, on the Content tab of Setup → Client Portal
Your policies show in the footer of your booking page and client portal.
Step 6: Let Clients Cancel or Reschedule
Go to Setup → Online presence → Client Portal, open the Essentials tab and click the Appointments card.
- Under Feature settings, switch on Allow cancellations and choose Follow cancellation policy (clients can cancel only outside your policy’s notice window) or Always allow.
- Do the same for Allow reschedules.
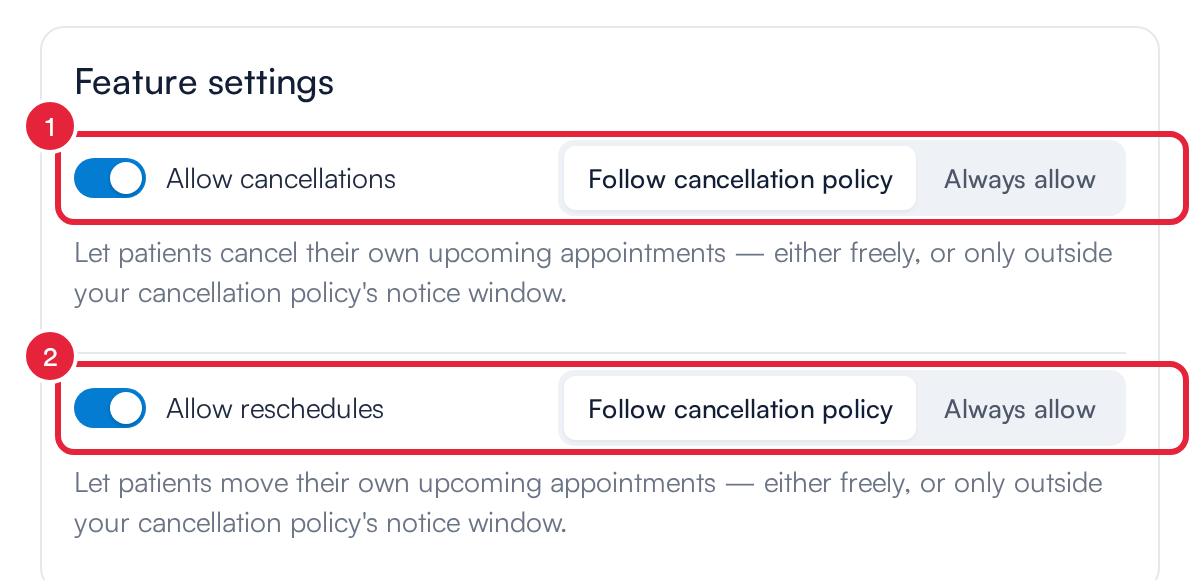
Allow cancellations and Allow reschedules, in the Appointments card
More on the client portal in How to Set Up the New Client Portal.
What’s next?
Continue with the other classic settings: Services and Categories, Location, Team and Booking Details.
Questions? Reach us any time via the in-app chat — we’re happy to help.
Was this guide helpful? Let us know by voting below - your feedback helps us write clearer articles.
For more guides, browse the related articles below or use the search bar at the top of the page. You can also watch our video learning series, the Pabau Academy, or visit the Support page for additional help.