
How to Create a Label
Step 1: Access Labels
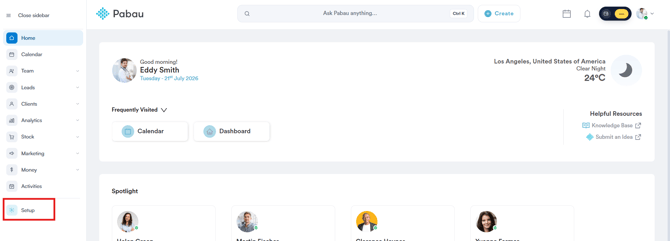
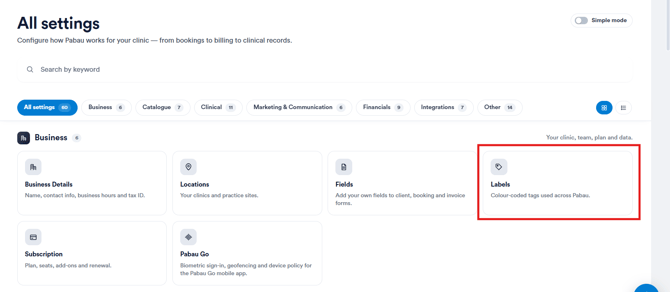
Log in to your Pabau account, navigate to the left sidebar menu, and click on Setup. From the "All settings" page, under the Business section, click on Labels.
 .
.
NOTE: You can also learn about this topic by watching a lesson on Pabau Academy.
Step 2: Initiating Label Creation
On the Labels page, choose whether you want to create a label for a client or a lead using the "Client Labels" or "Lead Labels" tab. Then click on the "Create" button located in the top right corner of the page.

Step 3: Label Details
Input the label name in the designated "Name" field and choose a color for the label from the color picker.
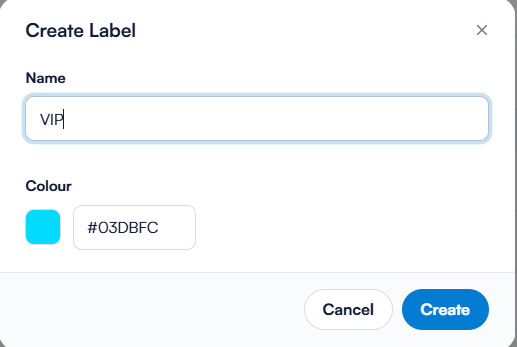
Optionally, you can use a custom color by entering the color's hex code directly into the "Color" field.
Once you've filled in the necessary details, click the "Create" button to confirm and finalize the creation of the label.
NOTE: For guidance on assigning labels to clients, please refer to the related article on assigning labels.
To learn how to use labels for targeted marketing campaigns, please refer to the related article on using labels for targeted marketing campaigns.
How to Edit a Label
Step 1: Access Labels
Log in to your Pabau account, navigate to the left sidebar menu, and click on Setup. From the "All settings" page, under the Business section, click on Labels.

Step 2: Selecting the Label to Edit
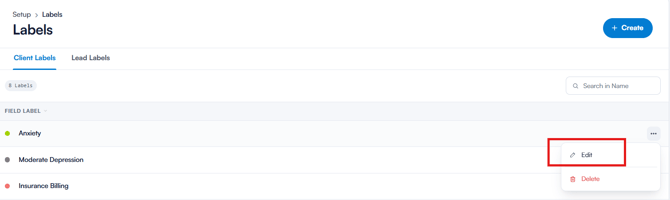
On the Labels page, choose the "Client Labels" or "Lead Labels" tab, then locate the label you wish to edit. Click on the three-dot menu (⋯) next to it and select "Edit" from the dropdown menu.
Step 3: Making Changes
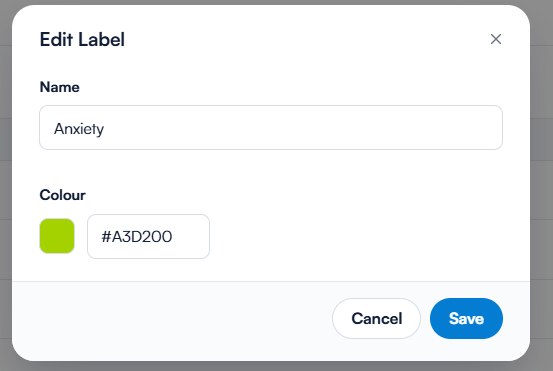
In the prompt that appears, make the desired changes to the label. The editing process resembles that of creating a label. Ensure you update the label name and color as needed.
Step 4: Confirming Changes
Click on "Save" to confirm and apply the modifications.
NOTE: If a label has a lock icon next to it, it indicates that it cannot be edited or deleted.
By following these steps, you can efficiently edit labels in your Pabau account, ensuring accurate client and lead categorization and organization.
How to Delete a Label
Step 1: Access Labels
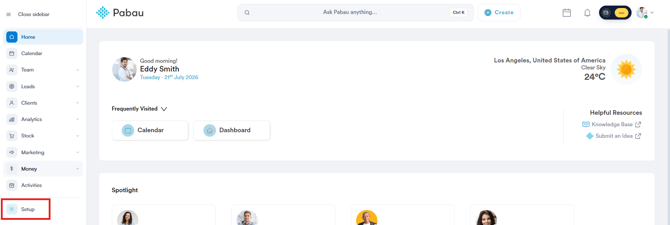
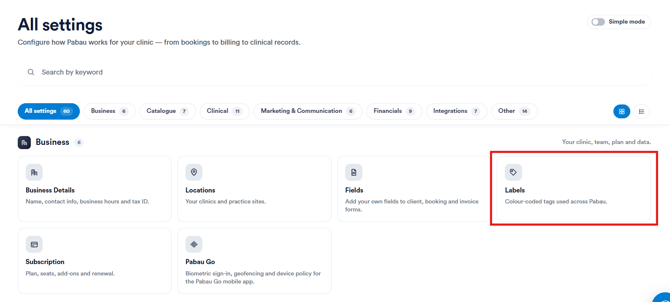
Log in to your Pabau account, navigate to the left sidebar menu, and click on Setup. From the "All settings" page, under the Business section, click on Labels.
NOTE: You can also learn about this topic by watching a lesson on Pabau Academy.
Step 2: Locate the Label
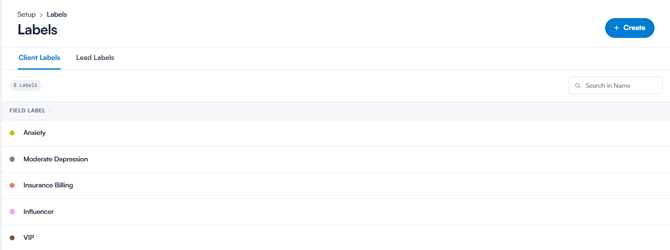
On the Labels page, choose whether you want to delete a client or a lead label using the "Client Labels" or "Lead Labels" tab. Use the search bar on the right, or scroll through the list, to find the label you want to delete.
Step 3: Delete the Label
Click on the three-dot menu (⋯) next to the label you want to remove, then select "Delete" from the dropdown menu.
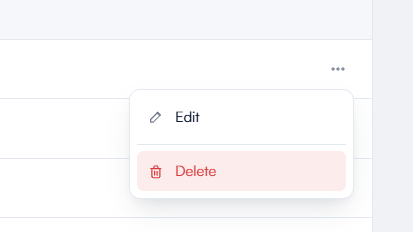
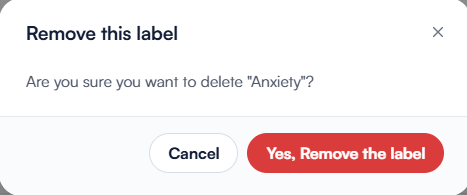
NOTE: Deleting a label is permanent and will remove it from any clients or leads it's currently assigned to.
How to Create a Client Label Report from Scratch
Step 1: Navigate to Reports
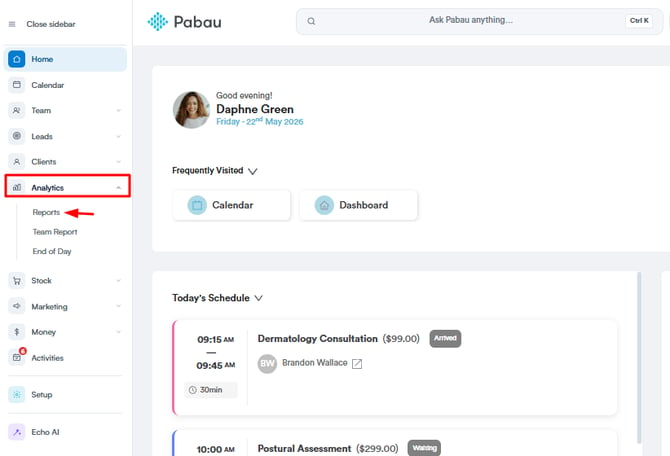
Start by logging into your Pabau account. Once you're in, locate the Analytics section in the left sidebar menu and click on Reports. Here, you will see a list of standard, pre-built reports.
Step 2: Create a Custom Report
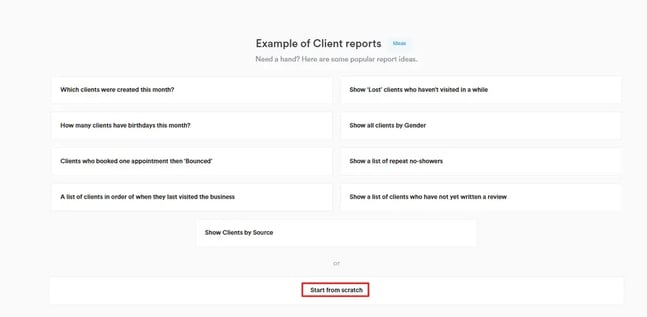
At the top right corner, click on "Create Custom Report". A new window will open, allowing you to build a report from scratch. In this window, select Clients from the Data Objects section, then click on "Start from Scratch" to begin customizing your report.
NOTE: If you want to adjust the labels for your Pabau account, you can refer to this article.
Step 3: Build Your Report
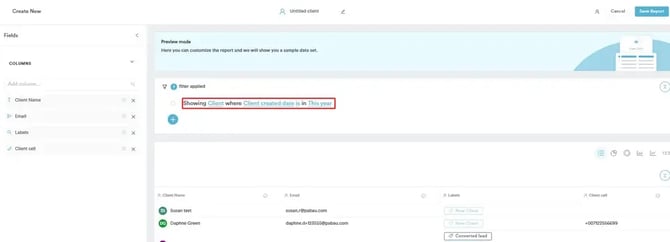
By default, the report may come with a predefined filter. You can modify this by clicking on the fields to adjust them.
For example, the default filter might be:
Showing Client where Client Created Date is in This Year.
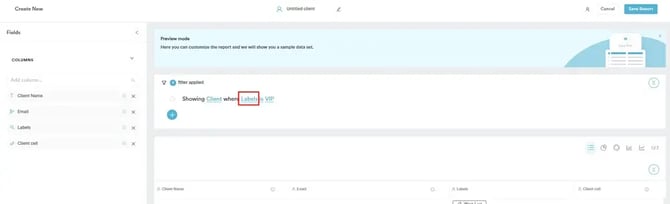
To filter by labels instead:
Click on "Client Created Date" to open a drop-down list, then select "Labels" from the options.
Step 4: Apply the Correct Filter
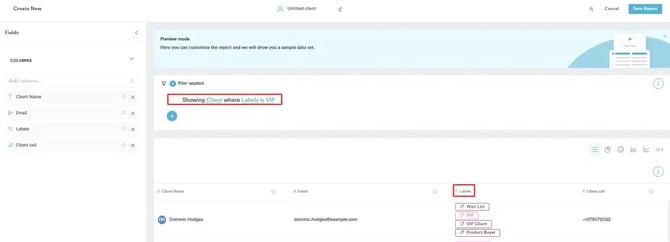
Now, you can refine your report by selecting the desired label.
For example, if you want to see VIP clients, update the filter to:
"Showing Clients where Labels is VIP"
Once selected, the filtered results will be displayed in the list view below.
Step 5: Save the Report for Future Use
Click on "Save Report" in the top-right corner, select a name that clearly describes the report, and once saved, you can find it under the My Reports section on the main Reports page.
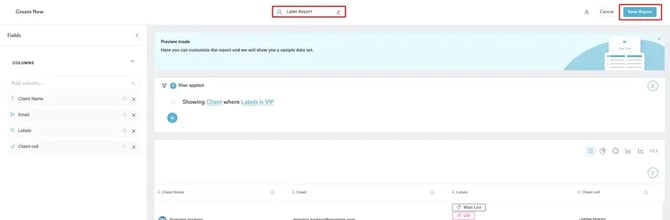
Now, you have a custom Label Report that helps you quickly filter and identify clients based on specific labels, making it easier to track and manage your client database efficiently.
How to Remove a Label from a Client
Step 1: Navigate to the Client Card
Log in to your Pabau account and navigate to the client card of the client from whom you want to remove a label using the search bar at the top of the screen.
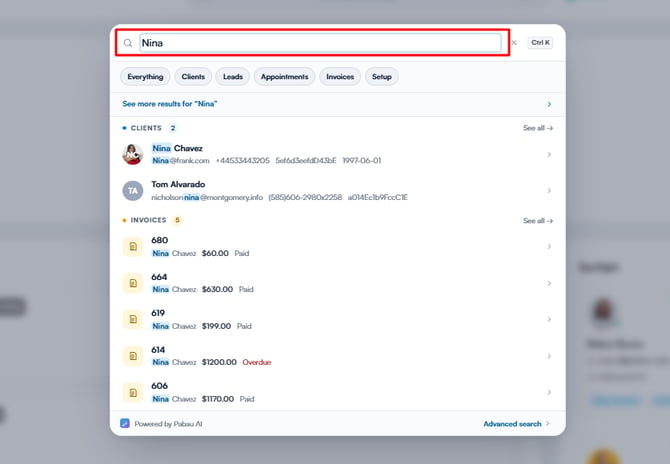
Step 2: Click Plus Icon
Click on the plus icon and it will reveal all the labels in the system. The ones assigned to that client will have a checkmark on their far right. Click on the label you wish to remove.
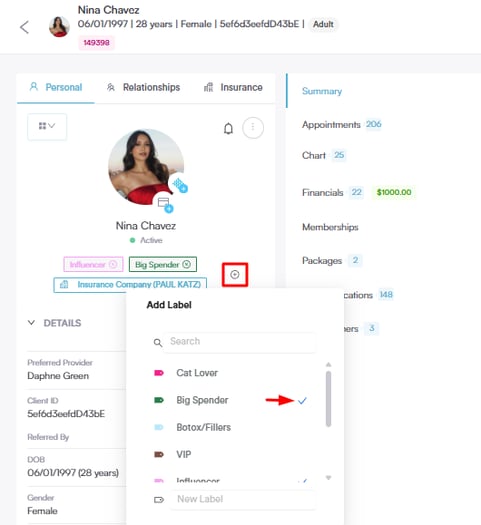
By following these steps, you can easily remove a client label from their client card.
NOTE: We suggest reading our Clients article for a more in-depth exploration of this topic.
How to Print Labels for Labs
NOTE: The Doctor’s Laboratory (TDL) integration is currently available only for UK clinics. Learn how to integrate TDL by reviewing this article.
Step 1: Navigate to Client Card
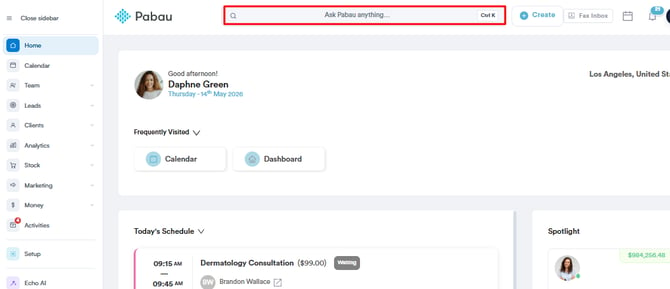
Start by logging into your Pabau account using your login credentials. Then, proceed to navigate to the search bar at the top of the page and type at least three letters of the client name for the client to pop up.
Step 2: Create a Lab Request
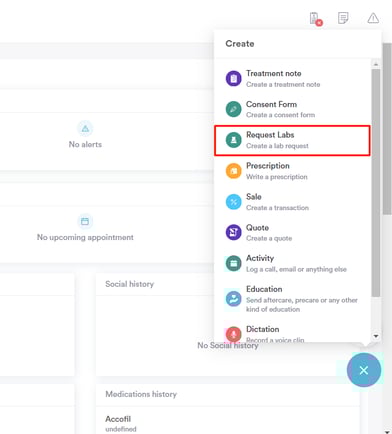
Once you're in the client card, proceed to create a lab request. Follow this article for more details on lab requests.
Step 3: Expand the EMR section
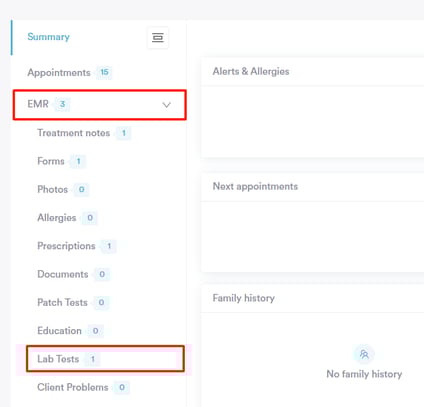
Once you've created the lab request, expand the EMR section in the client card, the 'Lab Tests' tab will be revealed. Click to view the lab request made.
Step 4: Print Lab Request
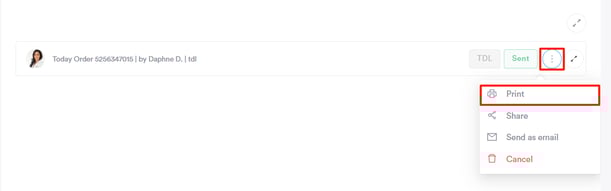
Upon selecting the Lab Tests tab, all lab requests created for the client will be listed. Locate the lab request you want to print the label for and click on the three dots. The 'Print' action will be revealed.
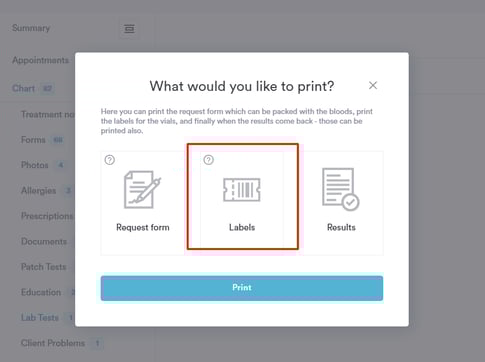
Upon clicking Print, a pop-up window will appear where you can choose to print the request as a label.
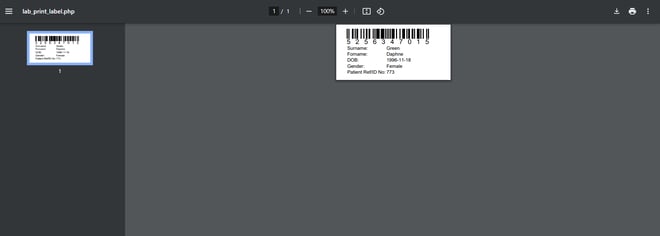
You will then be redirected to a new window where you can view the label and print it.
By following these steps, you'll be able to print labels for labs.
How to Assign a Label to a Client
Step 1: Navigate to the Client Card
Log in to your Pabau account and navigate to the client card of the client you want to assign a label to by using the search bar at the top of the screen.
Step 2: Locate Labels Section
Look for the labels section right underneath the client avatar.
-
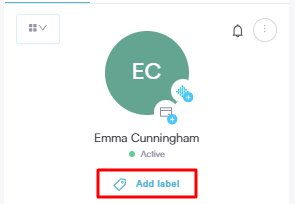
Assign a New Label: If your client doesn't have any labels assigned, click on "Add label" to get started.
-
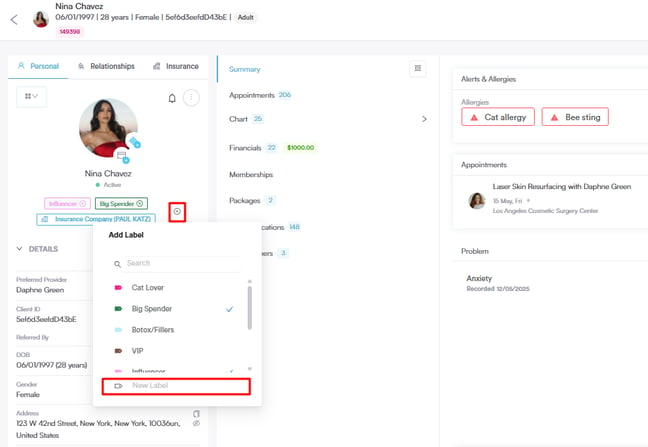
Assign Other Labels: If your client already has a label assigned, if you want to assign more simply press the plus icon and it will list all existing labels in the system. Alternatively, you can create a new label on the spot on the "New Label" field.
NOTE: Ensure to choose labels that best represent the characteristics or categories you want to associate with your clients.
How Labels Appear in Point of Sale
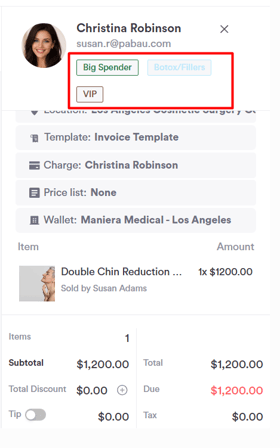
Labels assigned to clients are also visible in the Point of Sale (POS) search during appointments or transactions. This makes it easier for your staff to quickly identify clients based on categories, preferences, or membership types, enhancing workflow efficiency and improving client interactions.
You can also create new labels by following the steps in this article.
By following these steps, you can efficiently utilize labels to enhance your client management in Pabau, streamlining communication and marketing efforts.
NOTE: We suggest reading our Clients article for a more in-depth exploration of this topic.
Step 1: Navigate to the Client Card
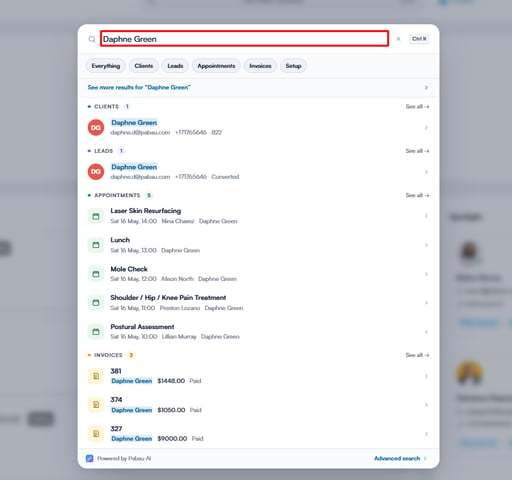
Start by logging into your Pabau account using your login credentials. Then, navigate to the search bar at the top of the screen to search for the client. Type at least three letters of the client's name for their client card to pull up.
Step 2: Locate the Print Labels Option
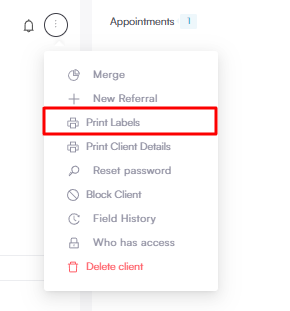
Once you open the client card, hover over the avatar icon on the left side. The three dots will automatically appear at the top right corner of the avatar, along with available options.
Click the “Print Labels” option to generate a printable label containing the client’s details.
Step 3: Choose Label Options
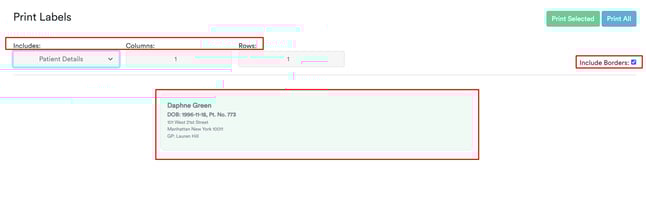
Once you select “Print Label” from the dropdown, a new window will open where you can customize the label settings. Here, you can:
-
Select the type of information to include:
-
Patient details
-
Address details
-
Patient details only
-
-
Choose the number of columns and rows
-
Decide whether to include borders on the label
After setting your preferences, click on the label you'd like to print, it will be highlighted in green once selected.
Step 4: Print the Label
Once you’ve selected the label and configured your settings, click “Print Selected” to print only the chosen label or “Print All” if multiple labels are visible.
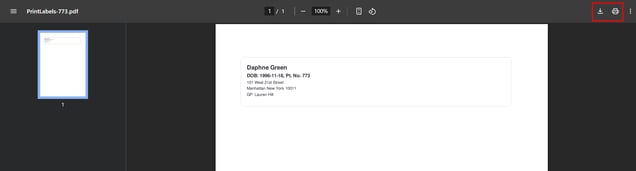
A final window will appear with the label preview. From here, use the icons in the top-right corner to either:
-
Print the label directly
-
Download it as a file for later use
By following these steps, you'll be able to quickly customize and print client labels directly from the client card, making it easy to keep records organized and professional.
Was this guide helpful? Let us know by voting below - your feedback helps us write clearer articles.
For more guides, browse the related articles below or use the search bar at the top of the page. You can also watch our video learning series, the Pabau Academy, or visit the Support page for additional help.