
NOTE: The Doctors Laboratory (TDL) integration is available exclusively for clinics in the United Kingdom.
Integrate The Doctors Laboratory
Step 1: Navigate to Setup
Start by logging in to your Pabau account using your login credentials. Then, navigate to the Setup page in the left sidebar menu. Under the Clinical section, you will find the Labs tab.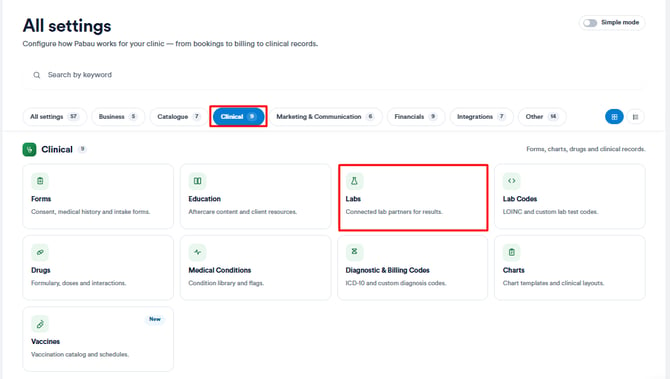
Step 2: Create Lab
On the Labs page, click on the "Create Lab" button at the top right corner of the page to get started.
-1.png?width=670&height=162&name=Screenshot%20(8)-1.png)
Proceed to fill out all the fields with The Doctor's Laboratory information, and then click on the Create button in the top right corner to finalize the process.
-1.png?width=670&height=399&name=Screenshot%20(9)-1.png)
Step 3: Navigate to the Labs & Pharmacies Tab
In the Setup page under the Integrations section, you can find the Labs & Pharmacies tab.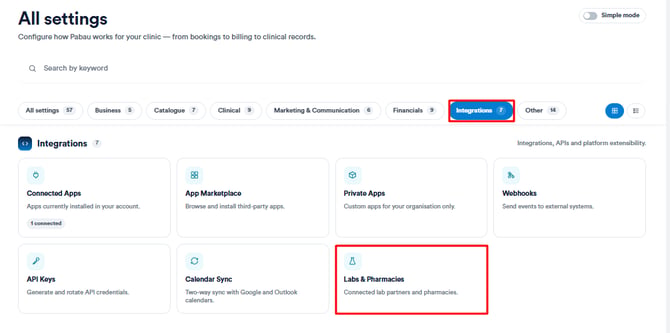
Step 4: Configure The Doctors Laboratory (TDL)
In the Labs & Pharmacies page, switch to the Labs tab to view the option to integrate TDL. Click the "Configure" button under The Doctors Laboratory to open the setup wizard. 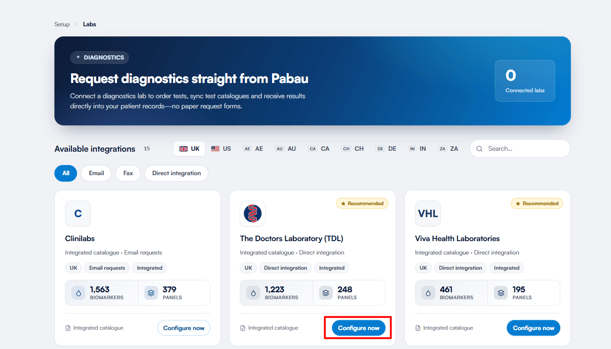
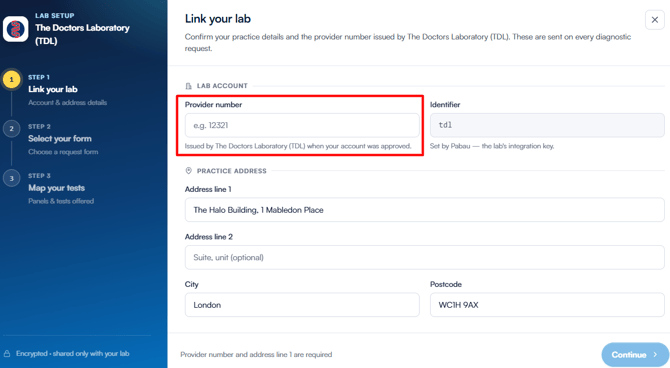
The setup walks you through three steps, shown in the left sidebar: Link your lab, Select a form, and Map your tests. 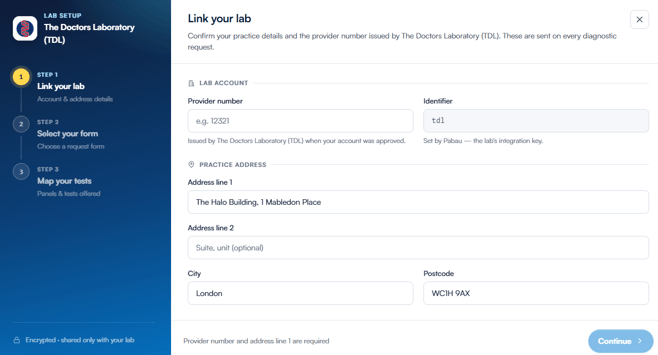
Step 5: Link Your Lab
On the Link your lab step, enter the Provider number (Account ID) issued by TDL, then confirm your practice address (address line 1, city, postcode). The Identifier field is set automatically by Pabau. Click "Continue" to get to the next step.
Step 6: Select a Form
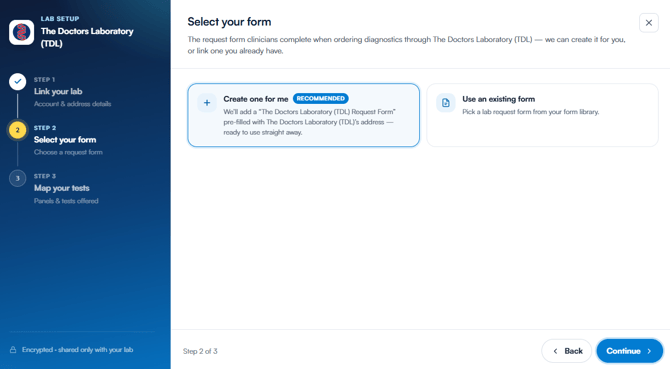
On the Select a form step, choose how you want to handle the lab request form:
- Create one for me (recommended) - Pabau creates a "The Doctors Laboratory (TDL) Request Form" for you - ready to use straight away.
- Use an existing form - If you've already built your own lab form, select this option and pick it from the Request form dropdown.
Then continue to the next step.
Step 7: Map Your Tests
On the Map your tests step, all the panels and individual tests TDL offers are listed, synced directly from its catalogue. Use the Search panels & tests bar to find a specific test, or use the Type dropdown to filter between Panels and Tests.
For each test you want available in Pabau, click "+ Map service" in the Pabau Service column and select the service you want to link it to.
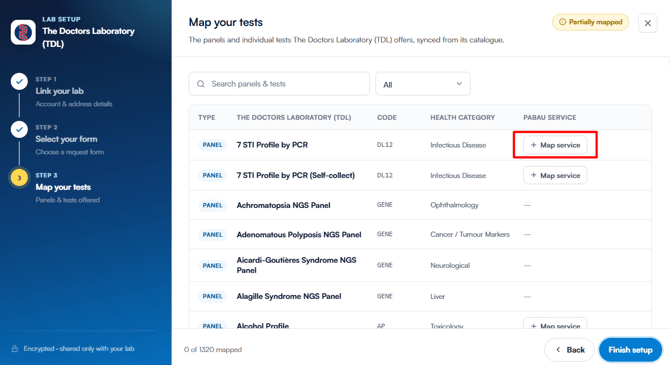
Once you've mapped the tests you need, click "Finish setup" to complete the integration.
Note: You need the matching services created in the system before linking TDL tests. When requesting labs from the client card, only the tests you've mapped will be displayed.
Step 4: Create Lab Form
Next, proceed to navigate to "Forms" in the Setup page and create a Lab form called "The Doctors Laboratory" that you can use when creating a lab request.
NOTE: This is a crucial step to ensure lab requests are properly linked and processed.
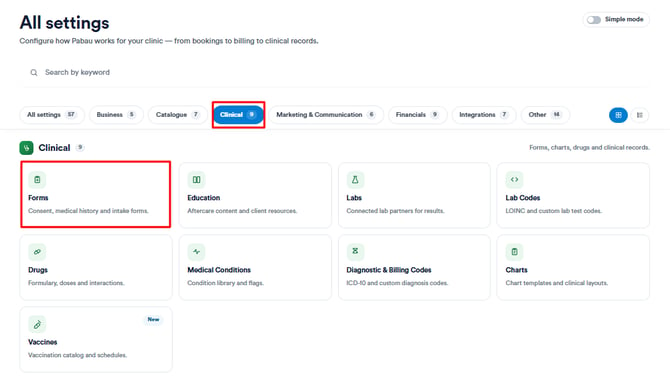
When creating a Lab form, select "Lab Form" as a form type.
-1.png?width=253&height=495&name=Screenshot%20(17)-1.png)
Ensure the following fields are included and properly configured:
-
ELECTRONIC ORDER NO:
-
A unique identifier for each lab request. Automatically links the form to the patient’s treatment record, making it easier to track samples and results.
- Component Type: Short answer (can use merge tag [TREATMENTID] )
-
-
TO
-
Specify the laboratory or department that will receive the request. This ensures the lab staff know exactly where to process the sample.
-
Component Type: Short answer or dropdown with lab names.
-
-
Requesting Doctor*
-
The doctor or clinician requesting the lab tests. Required to ensure accountability and proper communication of results.
-
Setup Tip: Use a single-choice component and list all staff member names so the requester can select one.
-
-
Request Date
-
The date when the lab request is created. Important for tracking turnaround times and ensuring timely sample processing.
-
Setup Tip: Use a short answer component with merge tag [DATE] to automatically populate the current date.
-
-
Lab Tests
-
List all tests to be performed (e.g., blood panel, urine analysis). This ensures the lab knows exactly which tests to run.
-
Setup Tip: Drag and drop the “Labs” component to include all test options.
-
-
Fasting
-
Indicates whether the patient needs to fast before sample collection.
-
Setup Tip: Use a single-choice component with options:-
Yes – fasting required
-
No – no fasting required
-
-
Helps avoid inaccurate test results.
-
-
Clinical Notes
-
Any additional instructions or information about the patient’s condition, previous results, or special considerations.
-
Setup Tip: Use a long answer component.
-
-
Date Sample Taken
-
The actual date the sample was collected. Important for lab tracking and reporting.
-
Setup Tip: Use a short answer component with merge tag [DATE].
-
-
Time Sample Taken
-
The exact time of sample collection, which can be critical for certain time-sensitive tests.
- Setup Tip: Use a short answer component with merge tag [TIME].
-
-
Fee to be Paid By
-
Specifies who is responsible for payment (e.g., patient, insurance, clinic). Ensures proper billing and avoids confusion.
- Setup Tip: Use a single choice component with options: Clinic, Patient, Insurance.
-
-1.png?width=670&height=440&name=Screenshot%20(19)-1.png)
To use the integration, you need to include the tests TDL provides in your Pabau account. If you want to include only certain tests, you will need to create a Lab Tests category and create the tests as services.
-1.png?width=452&height=561&name=Screenshot%20(20)-1.png)
Depending on whether you want to include all tests provided by TDL in your Pabau account or only select tests, the steps you need to follow will differ. Detailed instructions for each option are outlined below.
Include Selective TDL Tests - Map Catalogue
If you want to include only specific tests in your account, you can select the "Map Catalogue" button to choose from the tests you wish to link to your Pabau account.
You can search for the test from the search bar or scroll to find it and click "+choose service" to link the test. Once you click Choose Service, you can search for the service you want to link.
By following these steps, you can integrate TDL into your Pabau account successfully.
For more guides, refer to related articles below, select additional guides, or use the search bar at the top of the page. These guides will help you get the most out of your Pabau account.
Additionally, to help you fully utilize and understand your Pabau account, we recommend exploring additional guides and resources offered at the Pabau Academy. It offers in-depth video tutorials and lessons, offering a holistic learning experience that can equip you with the essential skills for achieving success with Pabau.