
NOTE: This article covers the classic Activities page. If your Activities menu also shows All boards and Table view, your account has Activities boards as well — see Getting Started with Activities Boards and Understanding the Activities Table View. Both work on the same activities; boards are a different way of organising them.
Step 1: Navigate to the Activities Page
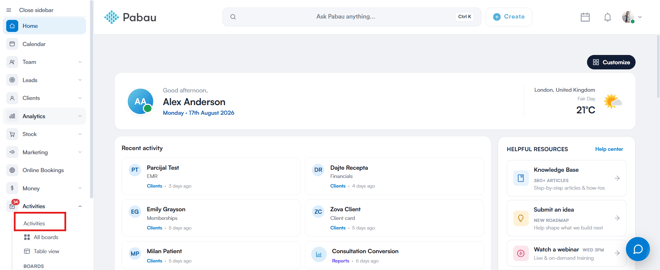
Log in to your Pabau account, then click Activities in the left sidebar and select Activities from the expanded list.
Step 2: Understanding the Activities Overview
The Activities page displays a detailed list of all activities assigned to staff members, with tools to filter, search, and manage each task.

Here's a breakdown of the key elements on the Activities page:
Filter & Search Options
The Activities page offers several tools to help you refine and organise the tasks displayed in the table, ensuring you can quickly focus on what matters most.
Search Field
The search bar at the top allows you to quickly locate specific activities by activity name, making it easier to find exactly what you need.
Create Activity
Click the Create activity button in the top-right corner to add a new activity, ensuring all tasks are captured and tracked in Pabau.
Edit Columns
The Edit Columns option, located above the table on the right, lets you customise the table by choosing which columns to show or hide, allowing you to tailor the view to your specific workflow.
Time Period Tabs
Instead of a filter menu, the Activities page now uses tabs across the top of the table to switch between the most commonly used views. Simply click a tab to filter the list:
- To do – all outstanding activities that still need to be completed.
- Overdue – activities whose due date has already passed.
- Today – activities scheduled for the current day.
- Tomorrow – activities scheduled for the next day.
- This week – activities due within the current week.
- Next week – activities due in the following week.
- Completed – activities that have already been marked as done.
- Select period – lets you choose your own custom date range.

These tabs give you quick access to commonly used views, helping you manage tasks efficiently without needing to manually adjust filters each time.
Filtering by Activity Type
Underneath the tabs you'll find a row of activity type icons, such as email, call, message, meeting, and idea. Click ALL to display every type, or click an individual icon to show only the activities of that type. Hover over an icon to see the name of the activity type it represents.

What Each Column Means
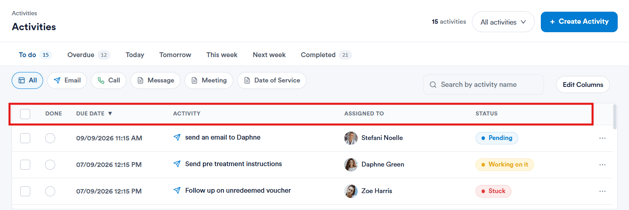
Each row in the table represents an individual activity. The default columns are:
- Done – a checkbox indicating whether the activity has been completed.
- Due Date – the date and time the activity is scheduled to be completed.
- Subject – a brief description or title of the activity, shown next to its activity type icon.
- Assigned to user – the staff member responsible for completing the activity.
- Status – displays the current status of the activity, such as Pending or Done.
Each column header includes an arrow control on the right, which you can use to sort the list by that column in ascending or descending order. Hovering over the information icon next to a column name displays a short description of what that column contains.
Customising Your Columns
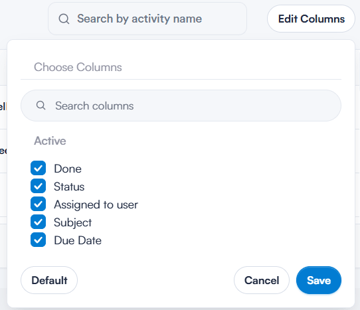
If you'd like to display more information, click the Edit Columns button. The Choose Columns panel will open on the side of the page, where you can search for a column by name or browse the available options.
The panel is split into two sections:
- Active – the columns currently displayed in your table. Untick any column here to remove it from the view.
- Inactive – the columns available to add, grouped under three tabs: Activity, Client, and Lead.
Under the Activity tab, the additional columns are grouped as follows:
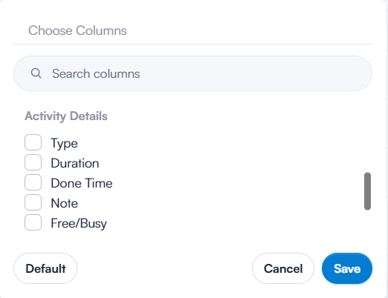
- Activity Details – Type, Duration, Done Time, Note, and Free/Busy.
- Other Details – Creator and Add Time.
Switch to the Client or Lead tab to add columns containing details of the client or lead linked to each activity.
Managing Multiple Activities at Once
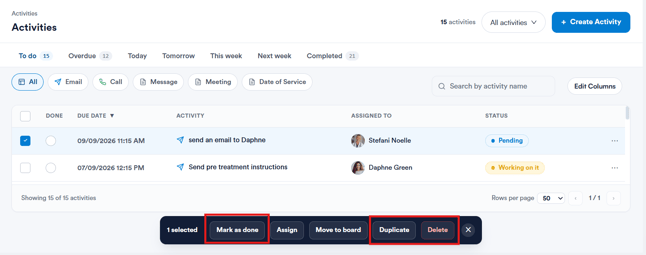
Select one or more activities using the checkboxes in the first column of the table. A toolbar will appear above the list showing how many activities are selected, along with the available bulk actions.
To reassign the selected activities, click the Assign icon. The Assign to panel will open, where you can search for a team member or scroll through the list and select the new owner.
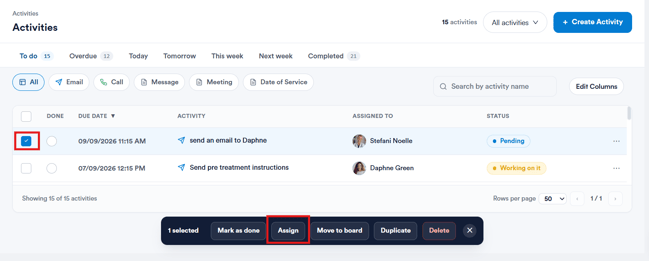
The remaining icons let you duplicate the selected activities, mark them as complete, or delete them — making it easy to manage several activities in one go.
To make a quick change to a single activity, you can also tick its checkbox in the Done column to mark it as complete directly from the table.
Now that you know how to navigate and use the Activities page, you can manage all your tasks more efficiently in Pabau.
Was this guide helpful? Let us know by voting below - your feedback helps us write clearer articles.
For more guides, browse the related articles below or use the search bar at the top of the page. You can also watch our video learning series, the Pabau Academy, or visit the Support page for additional help.