
AI Onboarding’s Catalogue optimisation reads your services, products, packages and team profiles, and your own website if you like, then suggests clearer names, better descriptions, the right forms and add-ons, and which items to show online. You review every suggestion one type at a time, and nothing changes until you apply the ones you approve.
NOTE: This guide covers the new Online Bookings and Client Portal, which are being rolled out to clinics in phases. If your screens look different, your account may still be on the classic version — message us via the in-app chat and we will help.
Step 1: Open AI Onboarding
- Go to More → Online Bookings (or Setup → Online presence → Online Bookings) and click AI Onboarding at the top right.

AI Onboarding sits beside Preview as a client and Customise page
TIP: You can also go to Setup → Services and click Service Optimizer, which opens Catalogue optimisation straight away. The button is greyed out until online booking is set up, because the suggestions link to your booking page.
Step 2: Choose Catalogue Optimisation
The AI Onboarding window offers two ways to improve booking with your clinic. Website optimisation works on your own website; Catalogue optimisation works on what you sell.
- On the Catalogue optimisation card, click Bring your catalogue to life.
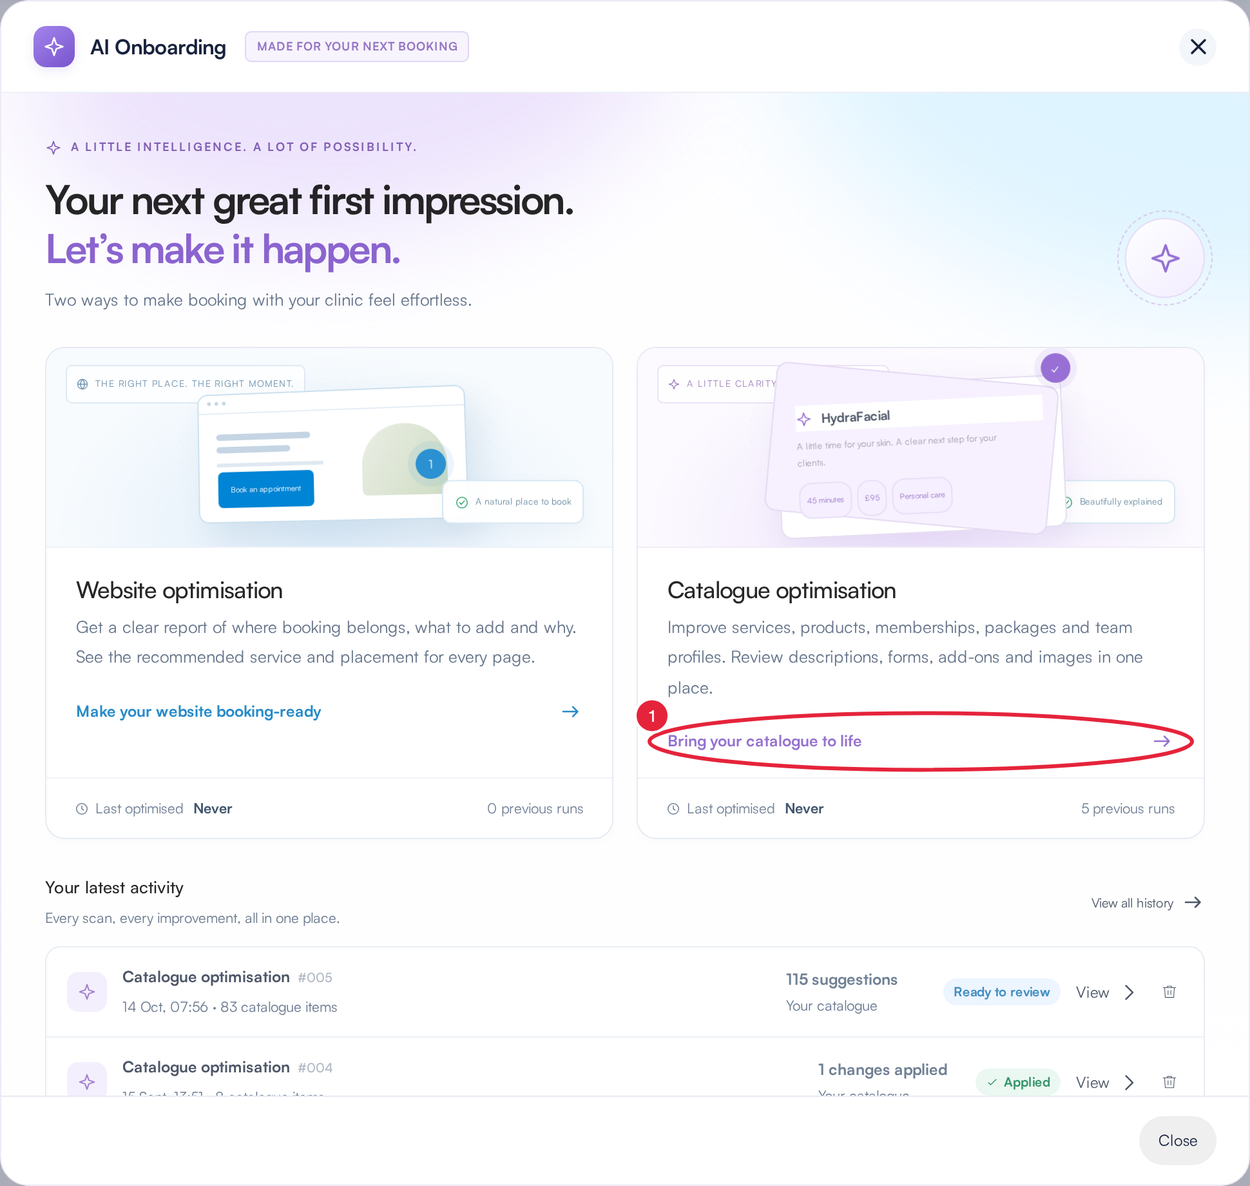
The AI Onboarding window, with your latest runs underneath
Step 3: Choose What to Optimise
- Under What would you like to optimise?, keep or untick Services, Products, Packages and Team. Each card shows how many items it holds, and all four are ticked to start with.
- If you have a large service list, tick Only services clients can book online. It skips lab tests, insurer codes, deposits and anything else clients never see, so the scan finishes much faster. It only appears while Services is ticked.
- Check Your clinic website. It is filled in from the website in Setup → Business Details. The scan reads your public pages for wording, team bios and photos. Clear the box to use only what is already in Pabau.
- Click Optimise catalogue.
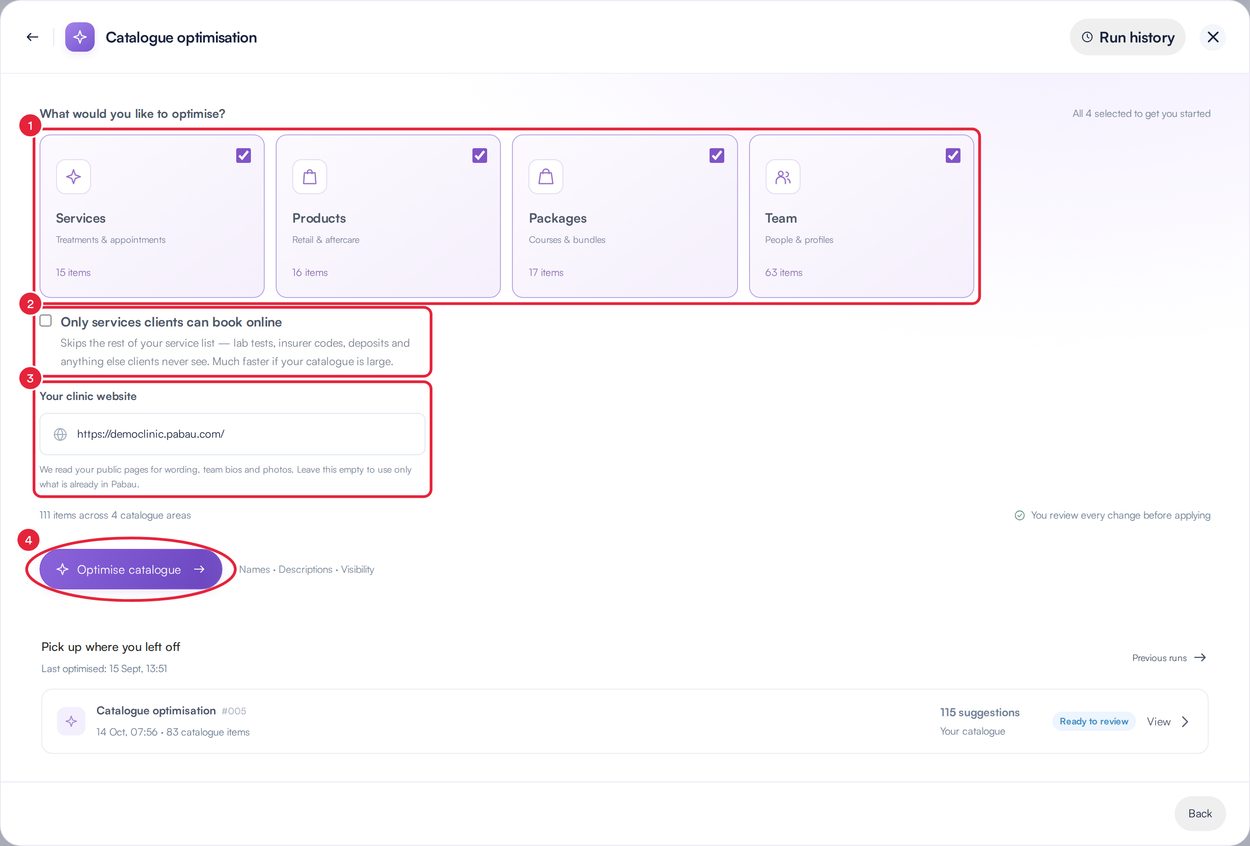
Pick the areas, then start the scan
Step 4: Let the Scan Run
The scan works through Reading your selected catalogue areas, Grouping suggestions by type, Checking your catalogue details and Preparing your recommendations. A small catalogue takes a few minutes; a large one takes longer.
- You don’t have to wait. Click Run in background: the scan keeps going if you close the window. To come back, open AI Onboarding and click Resume on the run under Your latest activity.
- Changed your mind? Click Cancel scan.
NOTE: Scanning never changes your catalogue, and it doesn’t use any AI credits. If your website blocks automated visits, the review tells you it could not read anything from your site, and the suggestions are based on your Pabau data only.
Step 5: Review the Suggestions
When the scan finishes, the review opens with every suggestion grouped by type.
- Pick a type in the SUGGESTION TYPE list on the left. Each type shows how many are left to review.
- Narrow the list with Search catalogue items…, the area filter (All catalogue areas) or the status filter (All statuses, Needs review, Approved, Applied, Skipped).
- Click an item. The panel on the right explains why it was suggested and shows Current beside Suggested. Where it says You can edit this, change the text or pick a different option (a different form, for example) before you approve it.
- Click Approve, or Skip this if you don’t want it. Changed your mind before applying? Undo approval and Bring back reverse those choices.
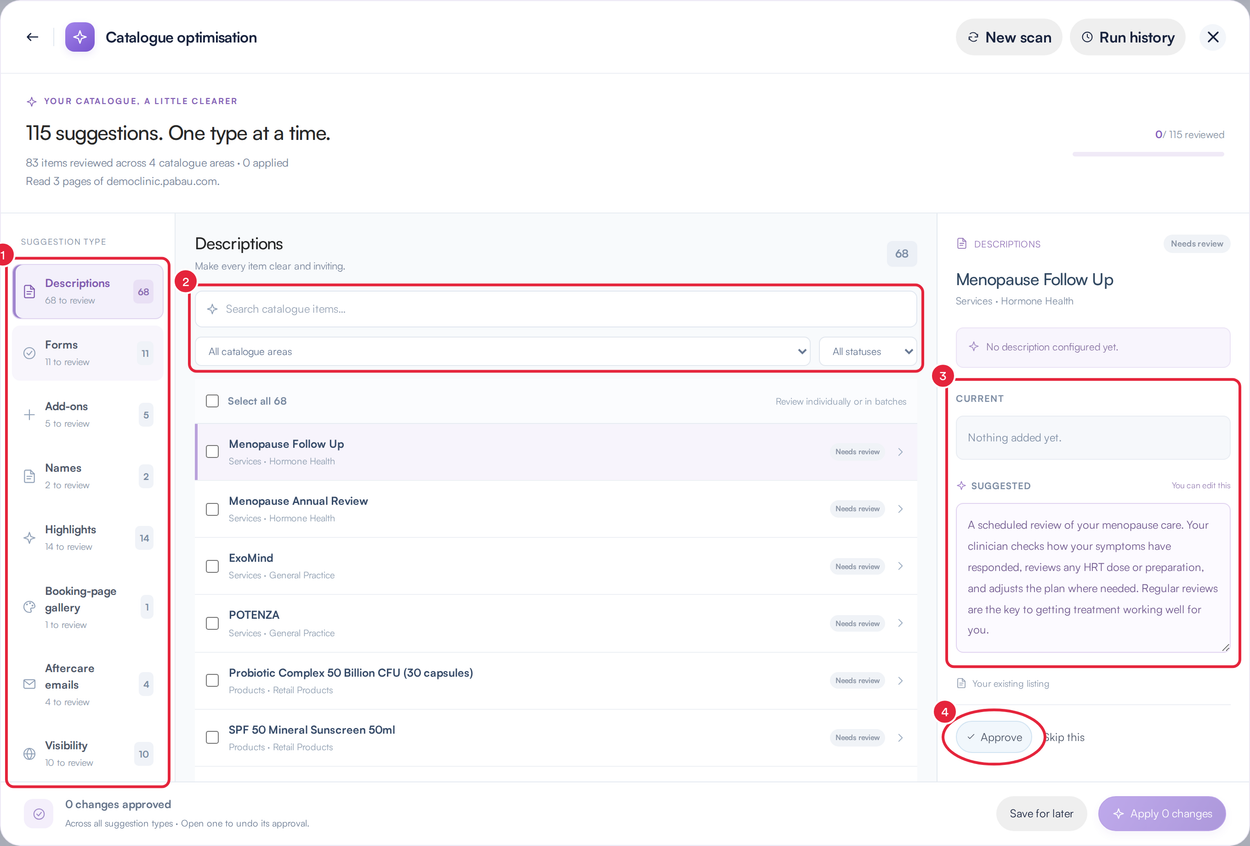
One type at a time: the list in the middle, the suggestion on the right
You only see the types the scan found something for. This is what each one changes when you apply it:
| Suggestion type | What it changes |
|---|---|
| Names | The name clients see online for a service, or a product’s name. Team members’ names are never changed. |
| Descriptions | The description of a service, product or package, or a team member’s bio. |
| Highlights | The short key facts on a service’s Online Booking tab. |
| Extended descriptions | The extended description on a service’s Online Booking tab. |
| Forms | Links one of your existing medical forms to a service. |
| Add-ons | Adds an extra, such as a related treatment, to a service’s add-ons. If no price or time is suggested, set them in the service’s add-ons afterwards. |
| Pack size | The size shown under a product in your online store. |
| Visibility | Puts a hidden product or package live in your online store. |
| Images | A photo for a team member’s profile, taken from your website. |
| Booking-page gallery | Photos from your website for the photo gallery on your booking page. |
You may also see an Aftercare emails type.
Step 6: Approve Several at Once and Apply
- To handle a whole list in one go, tick Select all above the list (or tick the items you want one by one).
- Click Approve selected. Clear unticks them again.
- When you have worked through the types you care about, click Apply at the bottom right. The button counts your changes, for example Apply 11 changes; anything still ticked is approved as it is applied. To finish later, click Save for later and reopen the run from Your latest activity.
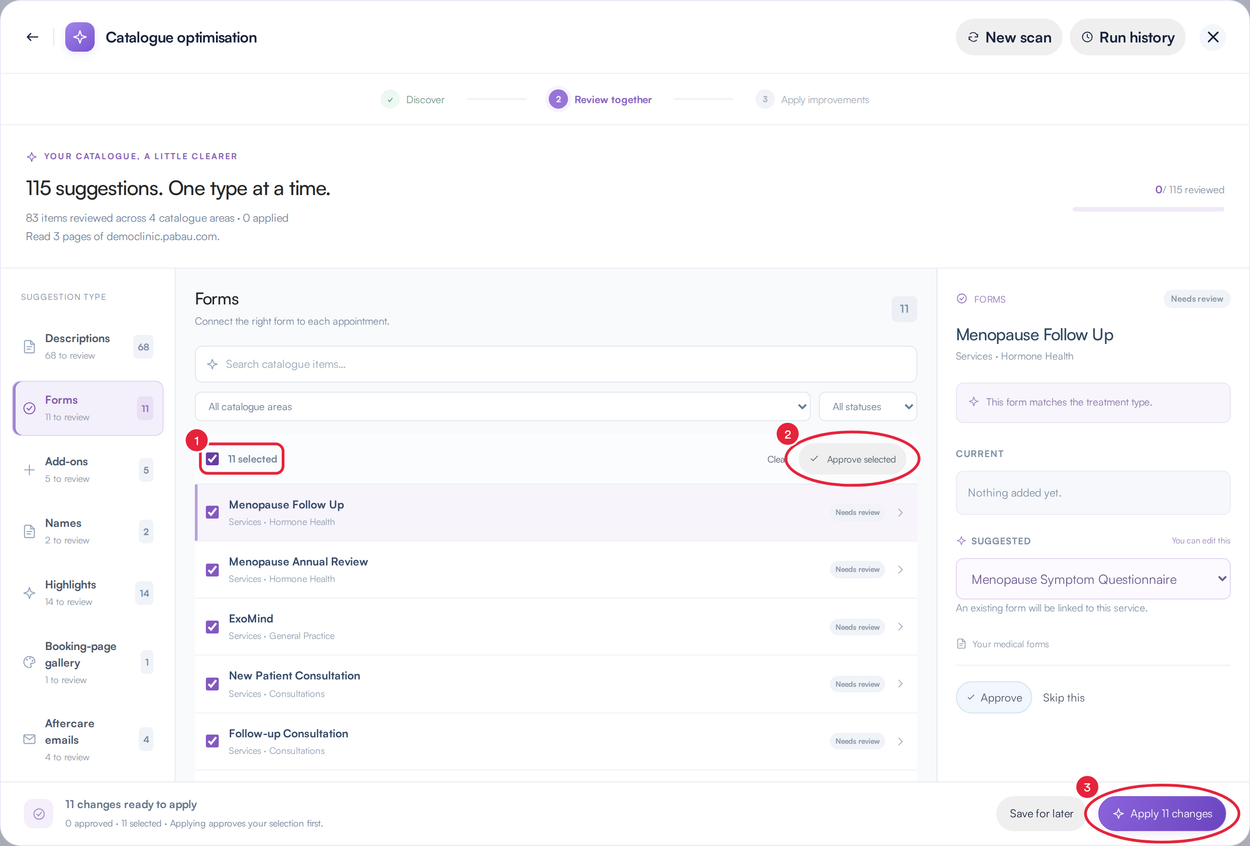
Select a whole list, approve it, then apply
IMPORTANT: Applied changes are saved straight to your services, products, packages and team profiles, and appear on your booking page and store. Read each suggestion before you apply it. To change something afterwards, edit the item itself, for example in Setup → Services.
Step 7: Check the Result
Pabau applies only the changes you approved. When it finishes, you see how many changes were applied and how many catalogue items were improved. Click Review changes to see them, or Back to AI Onboarding.
If a change could not be saved, your existing content is left unchanged and the item shows Try again in the review. Click Retry change on it, or Skip.
Step 8: See Your Past Runs
- In the AI Onboarding window, click View all history (or Run history inside a run). Filter by All runs, Website or Services; catalogue runs are under Services.
- Click View to reopen a run, or Resume on one that is still running.
- To clear a catalogue run, click its bin icon, then Remove in Remove this run from your history? (or Keep it). Removing a run also clears what it found, so the next scan looks at everything again from scratch.
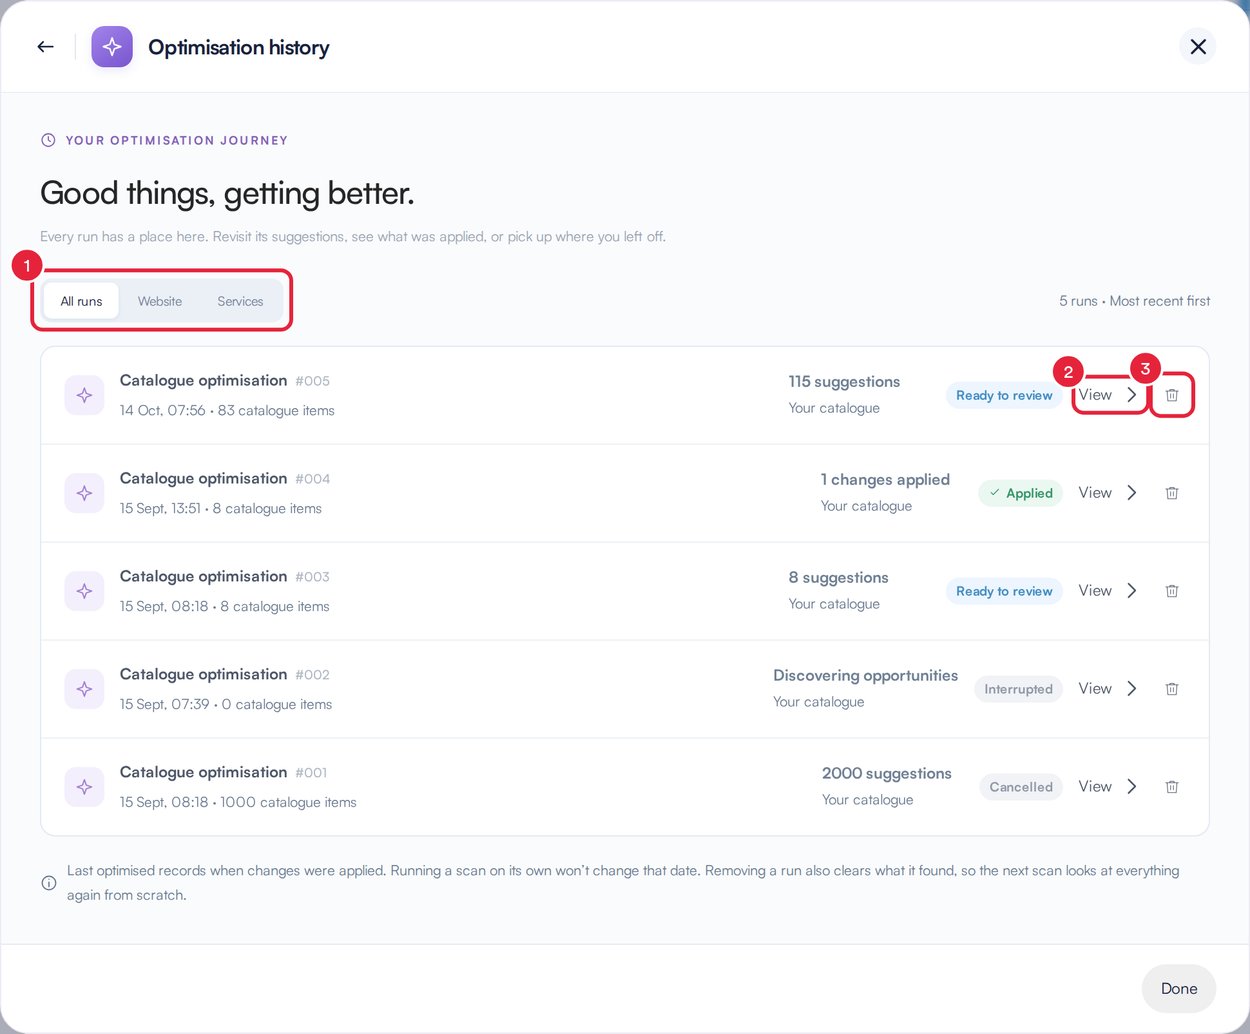
Optimisation history lists every run, newest first
Good to Know
- Memberships aren’t part of Catalogue optimisation yet.
- For team members, only the bio and profile photo are ever suggested.
- A run stops at 2,000 suggestions. If your catalogue is larger, apply what you have and run it again for the rest.
- To start again at any time, click New scan at the top of a run.
What's next?
- How to Add Highlights, an Extended Description and a Notice to a Service
- How to Offer Add-ons When Clients Book Online
- How to Customise the Header, Photo Gallery and Reviews on Your Booking Page
- New Online Bookings Part 1: Get Your Booking Page Ready
- Getting Started with the New Online Bookings and Client Portal
Was this guide helpful? Let us know by voting below - your feedback helps us write clearer articles.
For more guides, browse the related articles below or use the search bar at the top of the page. You can also watch our video learning series, the Pabau Academy, or visit the Support page for additional help.