
The new calendar brings all of its options into one Calendar Settings window. From there you can change how appointments look, how the day and month are laid out, what each staff column shows, the clinic's working hours and the messages ticked by default on new appointments.
NOTE: This feature is being rolled out to clinics gradually. If you don't see it in your account yet, message us via the in-app chat.
IMPORTANT: Most of these settings apply to everyone in your clinic, so only admins and owners can change them. Other staff can still open the window and change their own Calendar zoom and Month layout. For everything else they see the message "Only an admin can change workspace calendar settings."
Step 1: Open Calendar Settings
- In the calendar, click the gear icon (Calendar settings) in the bar at the top, just left of Day, Week and Month. The window opens on the General tab. Use the tabs on the left to move between General, Appearance, Configuration, Notification settings and Widgets.
- Under Calendar zoom, drag Minutes per row to 5, 10, 15 or 30 minutes. A smaller number gives each row less time, so appointments look taller. Your zoom is saved for you only, so colleagues keep their own.
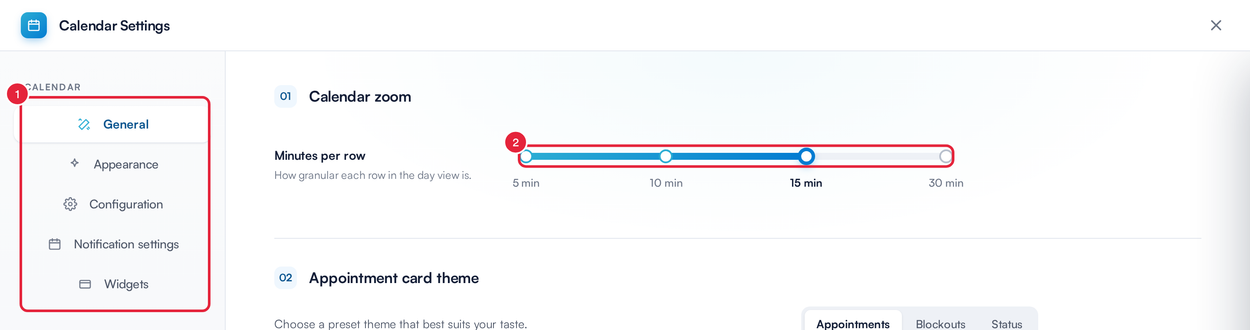
The General tab, starting with your calendar zoom
Step 2: Choose an Appointment Card Theme
- Under Appointment card theme, use the switch to choose what you are styling: Appointments, Blockouts or Status. For appointments and blockouts, pick Pastel, Bold or Minimal.
- With Status selected, choose how a completed appointment looks under Complete: Transparent (the card fades), Strike-through (diagonal lines) or Grey. If you choose Strike-through, also pick its Line colour.
- Under Arrived, choose how a client who has arrived stands out: Green ring, Green fill or Accent bar.
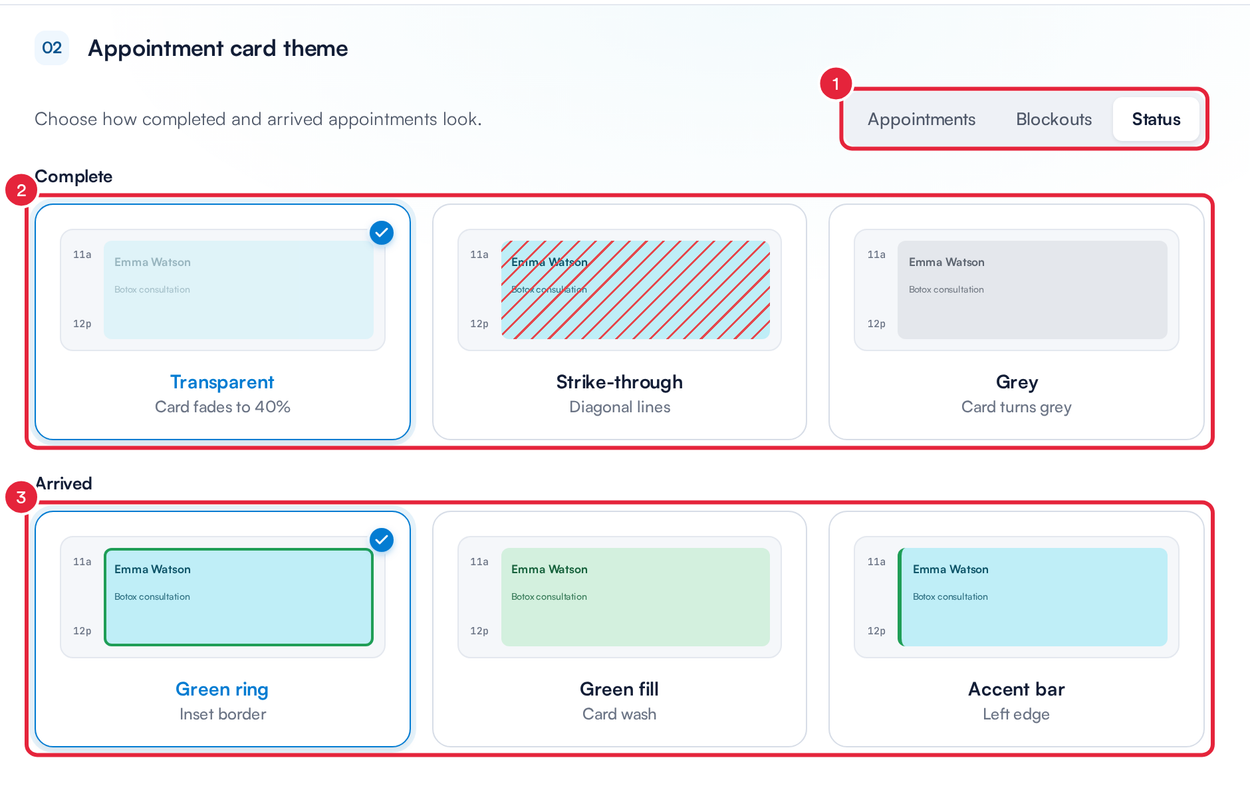
Status themes make finished and arrived appointments easy to spot
Step 3: Choose a Layout
- Under Layout, choose Day or Month with the switch.
- For Day, choose Vertical (providers across the top) or Horizontal (providers down the left). For Month, choose Detailed to show every appointment in each day, or Compact to show the first four with a link that expands the rest.
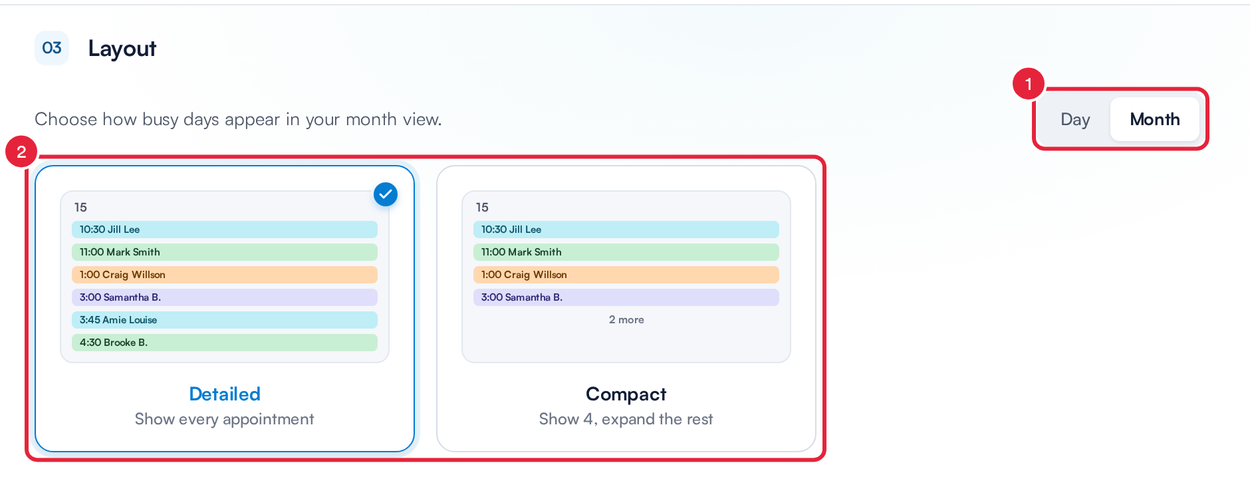
Choose how busy days look in Month view
NOTE: The card theme and the Day layout apply to everyone in your clinic. The Month choice (Detailed or Compact) is remembered for you on the computer you are using.
Step 4: Set Up the Staff Columns
Under Calendar contents, Column ordering opens a separate window where you drag your staff into the order you want across the calendar. It closes Calendar Settings, so save any other changes first. Under Staff column headers:
- Choose how much each staff member's header shows: Detailed (title, clinic and capacity), Compact (name and clinic) or Minimal (name only).
- Choose the Capacity indicator, which shows how booked each person is: Ring (around the photo), Bar or Off.
- Tick Hide employee titles or Hide clinic / location line to trim the header further. The Preview shows the result as you go.
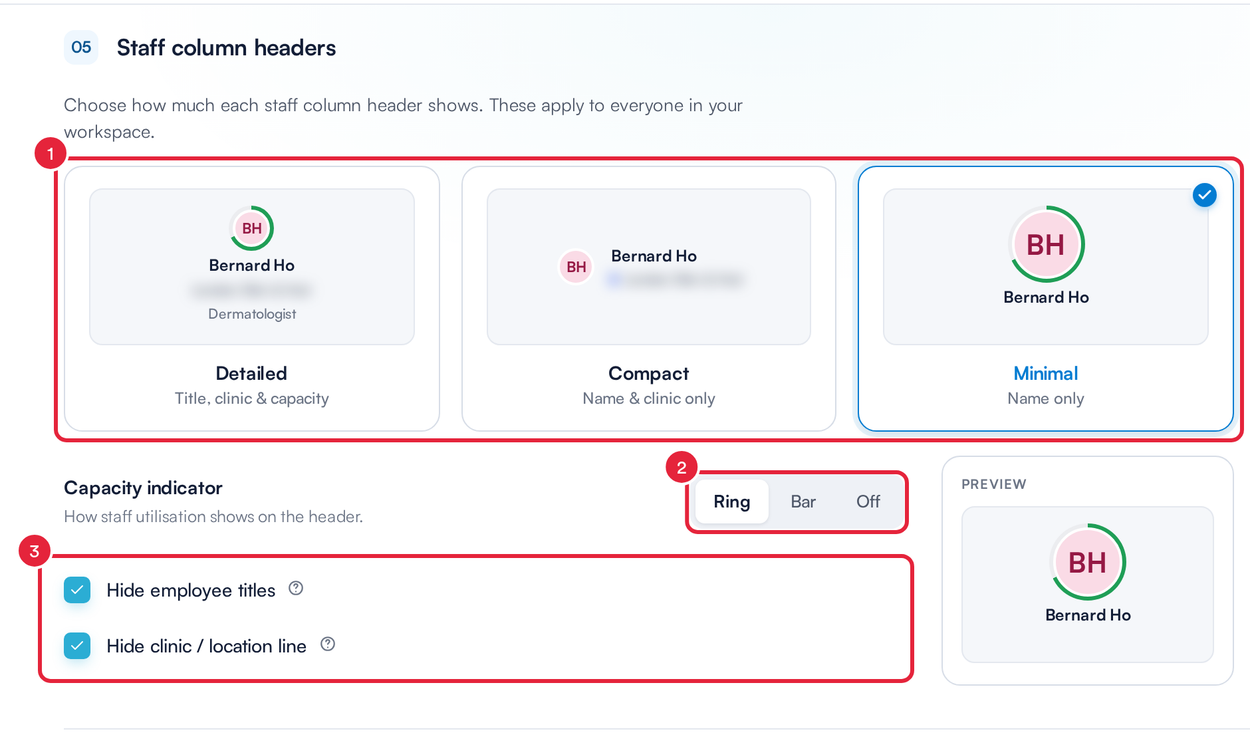
Staff column headers apply to everyone in your clinic
Step 5: Customise the Date Quick-Jumps
The date panel at the top of the calendar has buttons such as In 2 weeks and a More list such as In 6 months. Under Date quick-jumps:
- Week jumps: type up to six numbers of weeks. Leave it empty to use the default (1 to 5 weeks).
- Month jumps (More menu): type up to four numbers of months. Leave it empty to use the default (3, 6 and 12 months).
The preview beside the boxes shows the buttons your team will see.
Below the quick-jumps, admins can also set the AI Suggestion rules that decide which times Pabau highlights in purple when you reschedule an appointment from the new booking panel, for example a Minimum notice, a Maximum advance, or Don't allow booking if room in use.
Step 6: Change How Appointments Look
Open the Appearance tab:
- Under Display options, tick Enable staff initials, Hide client surnames or Hide appointment times.
- Under Card layout, choose a Font size from Tiny to X Large.
- Under Fields shown on card, drag fields into order, click the cross to remove one, or click Add field. Switch the live preview to Hover tooltip to choose what shows when someone hovers over an appointment instead. Fields with a padlock always show.
- Click Edit fields to choose from the full list of fields. Reset in that list goes back to the default fields.
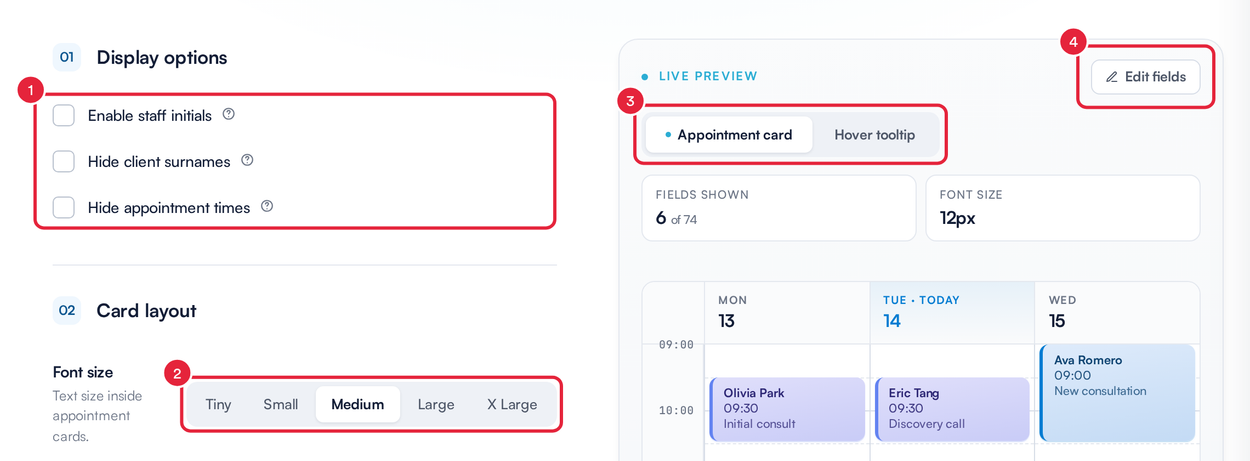
The live preview updates as you change things
The Quick Actions list further down the same tab controls the shortcuts in an appointment's Actions menu.
Step 7: Set the Calendar's Hours and Rules
Open the Configuration tab. These settings apply to everyone.
- Starting day: the first day of the week in Week view.
- Time slot size: how many minutes each row of the day represents.
- Working hours: the Start time and End time of the calendar grid. If the hours you pick would hide part of a staff rota, Pabau tells you when the rota starts or ends so you can widen them.
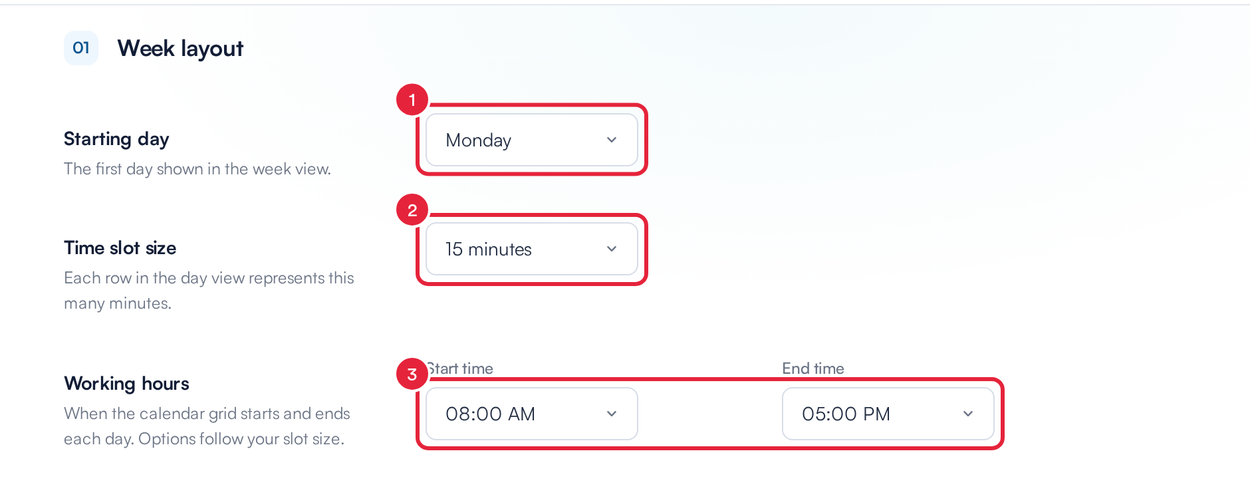
Week layout settings on the Configuration tab
Further down the same tab:
- Auto-lock locks the calendar screen after the time you choose (from 1 minute to 2 hours) with no activity. It only applies to staff who have a passcode, who then unlock it with that passcode. Choose Disabled to turn it off.
- Accept last user's passcode only: only the last person who used the calendar can unlock it.
- Auto-complete appointment status: Pabau marks an appointment as Complete when it is invoiced at checkout, or when a later payment pays its invoice in full. Classes are not completed this way.
- Allow appointment overlap: lets two appointments take the same time for the same staff member.
Step 8: Choose the Default Notifications and Save
- Open the Notification settings tab. Under Default communications, tick the messages that should be ticked already on every new appointment: Appointment Reminder, Appointment confirmation, Request feedback and Express Booking. Staff can still untick them on each booking.
- Under Rescheduling, leave Confirm before rescheduling ticked if Pabau should ask before moving an appointment you drag to a new time. Untick it to move appointments straight away, with an Undo option in case you dropped one in the wrong place.
- Click Save changes. You'll see Settings saved. Click Cancel instead to close without saving.
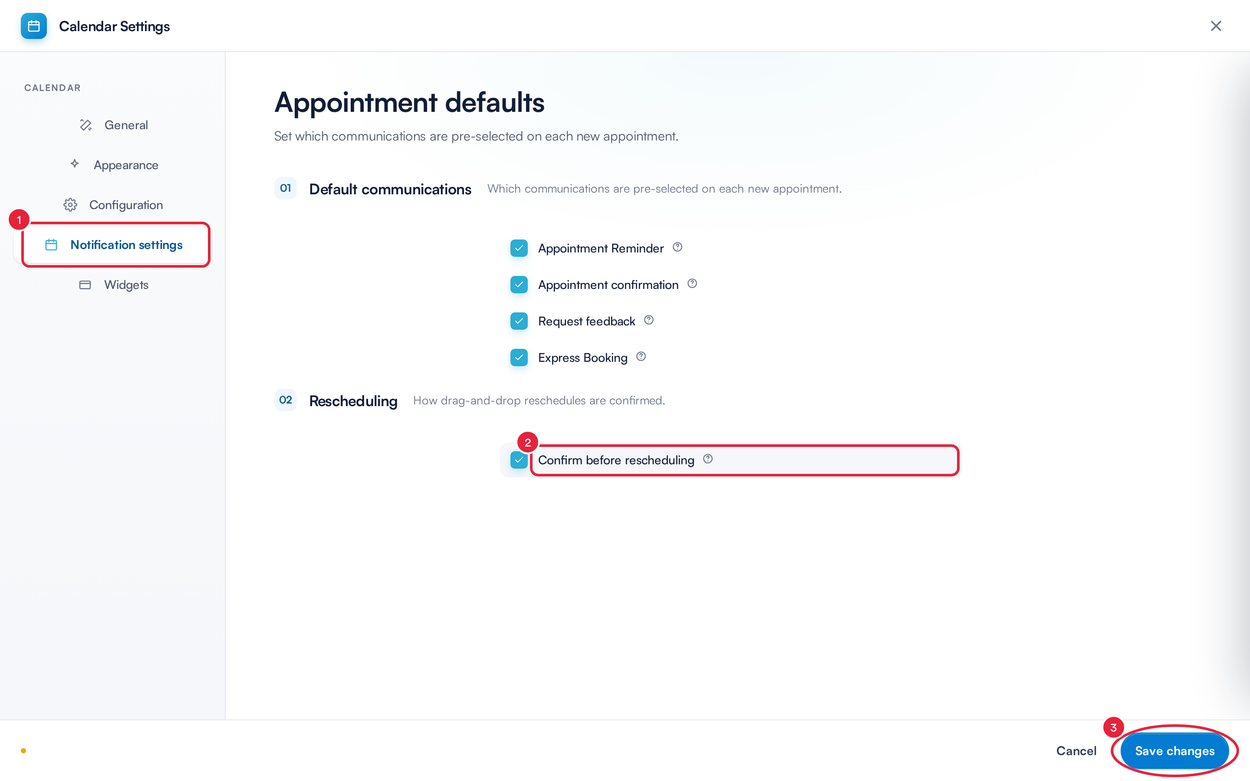
Save once for every tab you changed
TIP: You don't need to save each tab separately. Change what you need on any tab, then click Save changes once.
On a narrow screen, such as a tablet held upright, the gear opens a smaller Settings window instead.
What's next?
- How to Use Column Ordering in the Calendar
- How to Lock and Unlock Your Calendar Screen
- How to Set Up Calendar Filters
- How to Read Appointment Icons in the Calendar (Legend)
Was this guide helpful? Let us know by voting below - your feedback helps us write clearer articles.
For more guides, browse the related articles below or use the search bar at the top of the page. You can also watch our video learning series, the Pabau Academy, or visit the Support page for additional help.