
In this guide, you’ll learn how to integrate your Pabau account with Healthcode and submit invoices directly through it.
Table of Contents:
1. How to Integrate with Healthcode
2. How to Submit an Invoice to Healthcode
How to Integrate with Healthcode
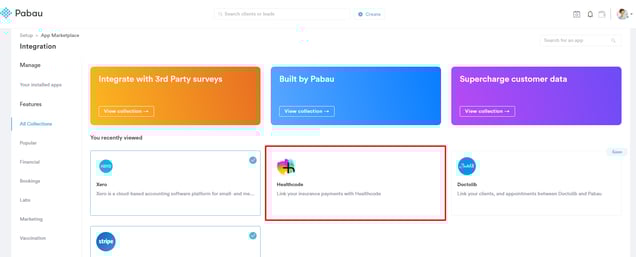
Step 1: Access the App Marketplace
Log into your Pabau account. Navigate to Setup from the left sidebar menu. Click on App Marketplace under the Developer & Other section. Select App Marketplace again.
Step 2: Install the Healthcode Integration
On the App Marketplace page, find the Healthcode banner and click on it. Click "Install" to open the Healthcode integration modal.
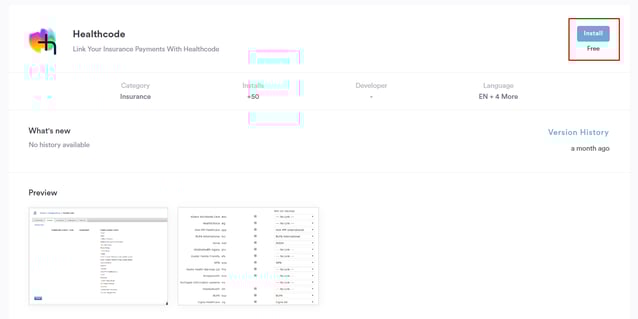
Step 3: Obtain and Enter Healthcode Credentials
Start by registering on the Healthcode website: Healthcode Registration. Make sure to select Pabau as your Practice Management System. Upon registration, you will receive your Site ID, Web Services ID, and Password.
NOTE: Your registration must be specific to Pabau. Registrations from previous providers are not valid.

Enter your Healthcode credentials in the Credentials tab of the Healthcode integration modal and click "Check credentials". The status should change to "Enabled." Proceed to the Insurers tab.
Step 4: Match Insurers
In the Insurers tab, you will see a list of insurers from your Healthcode account on the left and insurers from your Pabau account on the right.
Match each insurer by selecting the corresponding option from the dropdown menu.
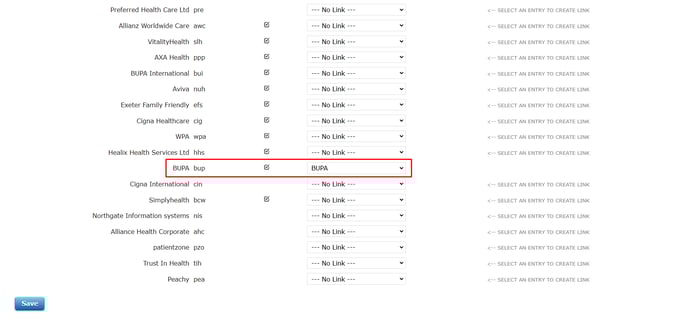
NOTE: To create insurance companies as third parties in Pabau, follow the steps in this article.
Click "Save" in the bottom left corner of the Insurers tab to confirm the configuration.
Step 5: Configure Locations
Go to the Locations tab. Open each location and enter the location-specific payee code for each insurer. Click "Save" to save the changes.
It is preferred that this step be completed but not mandatory.
Step 6: Configure Employees
Navigate to the Employees tab. Enter the payee code for each employee and insurer. The same payee code can be used for an employee across different insurers.
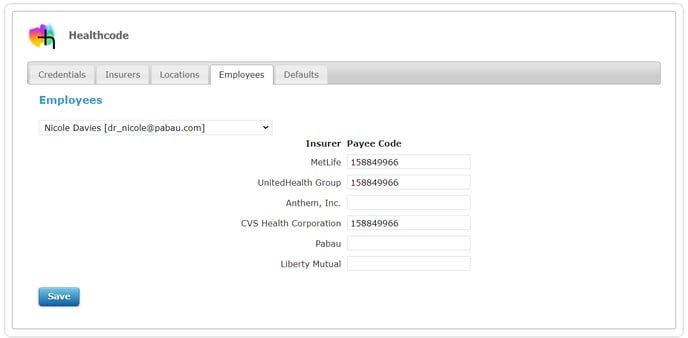
NOTE: Ensure each employee is registered with Healthcode to receive their payee code.
Click "Save" to save the configuration.
It is preferred that this step be completed but not mandatory.
Step 7: Set Default Values
In the Defaults tab, aside from certain components unique to your practice, such as PayeeProviderName and TreatingHospital, the rest should be set as follows:
- ControllingSpecialistSignatureIndicator: H
- ClaimFormSignatureIndicator: H
- ClaimSource: S
- DoubleInsuranceFlag: N
- EpisodeSetting: O
- PackageDealIndicator: N
- ThirdPartyInvolvementFlag: N
- Currency: GBP
- ServiceCode: @[sc]
- ServiceSetting: O
Click "Save" to apply these settings.
Step 8: Complete the Integration
After configuring all settings, click OK. Now, adjust your service settings to make them compatible with Healthcode.
Step 9: Adjust Service Settings
Go to Setup and select Services under Services. For each service that will be invoiced via Healthcode, click on the service name. In the General tab, input the Service Code under the Service settings. The service code field is located in the General tab, right below the service name field.
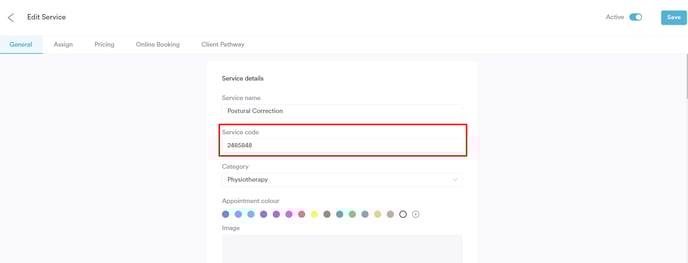
The service code is unique to each insurance company, which is why we recommend creating services specific to each company if your practice uses multiple insurers.
For example, you might have "BUPA Derm Initial Consultation," "AXA Derm Initial Consultation," and "WPA Derm Initial Consultation."
You can obtain these service codes from either Healthcode or the insurance company itself, as Pabau does not provide this information.
Step 10: Set Price Lists
Create price lists to enable raising invoices for specific companies under different contracts. Follow the steps provided in this article to create price lists.
Your Pabau account is now ready to send invoices to Healthcode.
How to Submit an Invoice to Healthcode
Step 1: Integrate Your Pabau Account with Healthcode
Start by integrating your Pabau account with Healthcode. Follow the steps outlined above.
Step 2: Prepare Your Account
It is recommended to have price lists configured before proceeding. You can do this by following the instructions in this guide. Additionally, it is mandatory to link your client's insurers in their client card using the client relationships feature. Detailed steps for this process are available in this guide.
Step 3: Raise an Invoice for Healthcode Submission
To raise an invoice for submission to Healthcode, navigate to the Calendar and book an appointment as usual. In the appointment creation modal, set the "Charge" field to the client's insurer instead of the client.

If necessary, select the appropriate price list in the "Price List" field. Make sure that the chosen price list includes the insurer set in the "Charge" field under its rules; otherwise, the invoice cannot be submitted to Healthcode. Once all the appointment details are filled out, confirm the booking.
After the appointment is completed, navigate to the calendar, locate the appointment, and click "Checkout."

In the Point of Sale, review the services added to the invoice and verify their prices. Then click "Continue" in the bottom right corner to proceed.
On the payment method step, leave the payment method unselected and click "Save unpaid" in the bottom right corner. This action finalizes the creation of the invoice.
Step 4: Submit the Invoice to Healthcode
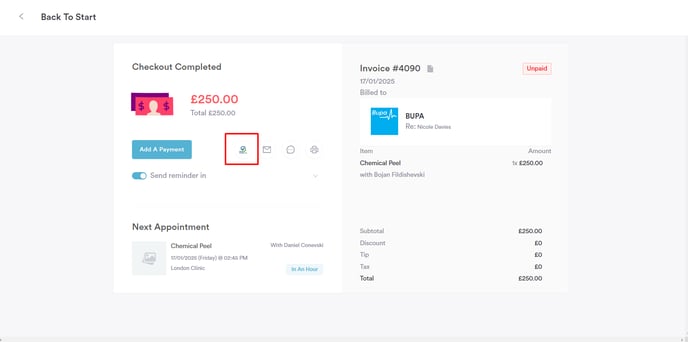
Once the invoice is created, the Checkout Completed screen will appear. Click the "Healthcode" button to access the Healthcode invoice submission page.
On this page, select the insurer to which the invoice will be sent in the "Insurer" field. Note that only insurers mapped to third parties of type Insurance during the initial integration setup will be displayed here.
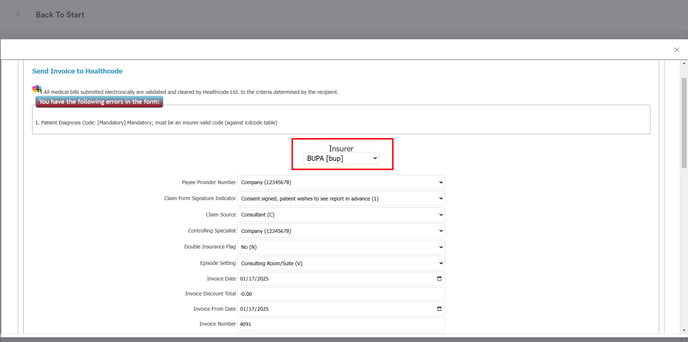
If there are any errors, they will be displayed at the top of the page, and the relevant fields will be highlighted in red. Ensure all required information is corrected.
Additionally, provide a Patient Diagnosis Code by entering the relevant ICD code in the designated field.

Once everything is complete, click "Submit" at the bottom of the screen. The invoice will then be submitted to Healthcode.

Step 5: Check Invoice Status
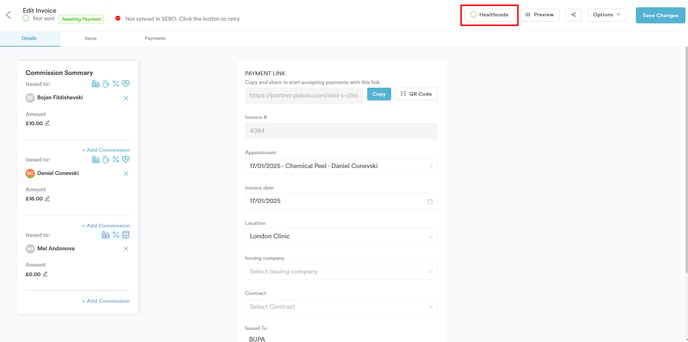
You can verify the status of the invoice in your Healthcode account. Alternatively, in Pabau, navigate to the client card, select the "Financials" tab, and click on the invoice number to open the editing modal. From there, click the "Healthcode" button located in the top right corner next to the "Preview" button.

If you need to submit an invoice to Healthcode after it has already been created, open the invoice editing modal and click the "Healthcode" button. The submission process remains the same as described above.
By following these steps, you can submit invoices to Healthcode.
For more guides, refer to related articles below, select additional guides, or use the search bar at the top of the page. These guides will help you get the most out of your Pabau account.
Additionally, to help you fully utilize and understand your Pabau account, we recommend exploring additional guides and resources offered at the Pabau Academy. It offers in-depth video tutorials and lessons, offering a holistic learning experience that can equip you with the essential skills for achieving success with Pabau.