
This feature is part of the new client card version and is currently available to select users only, starting August 2026. A wider rollout to all accounts is coming soon.
The Forms section in a client’s EMR tab displays all forms attached to that client - including consent forms, medical forms, treatment notes, and ePaper. You can view these forms in two ways: as a flat list showing all forms together, or grouped by appointment, which places each form under the specific appointment it belongs to. This makes it easy to see exactly which forms were completed or are still outstanding for each visit.
Step 1: Navigate to Forms
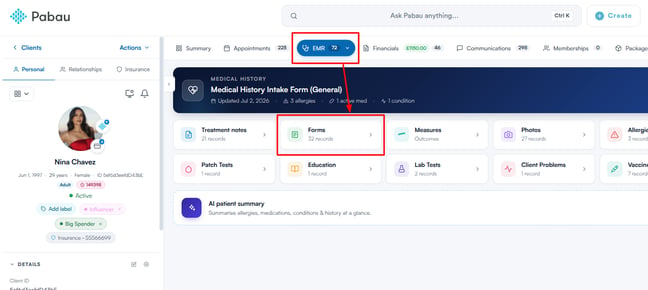
Log in to your Pabau account and open the relevant client’s card by searching for the client or clicking their name anywhere in Pabau. Click on the "EMR" tab in the tab menu at the top of the central area, then click on "Forms".
Step 2: Switch to the Appointments View
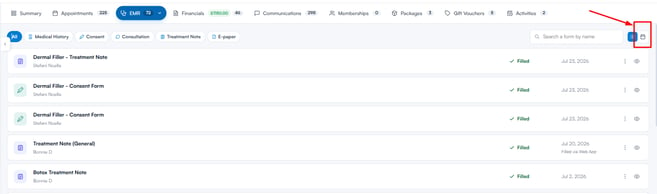
Once inside Forms, look for the view toggle at the top of the section and click the calendar icon ("Group by appointment") to switch from the flat list. The forms will now be grouped under the appointment they are linked to, split into "Upcoming" and "Past" sections. You can also use the "Expand all" / "Collapse all" button to open or close every appointment at once.
Step 3: Explore the Appointments View
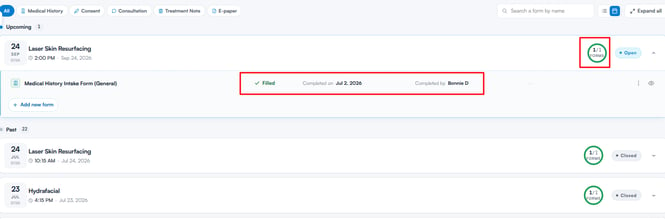
Each appointment appears as a collapsible card showing the appointment date and time, the service, an "Open" or "Closed" label, and a progress ring showing how many of its forms have been filled in (for example, 2/3). Click on an appointment to expand it and see the forms underneath.
Each form row shows:
- The form name and type (for example, Consent or Medical History).
- Its status - "Filled" or "Not filled". An envelope icon appears once the form has been sent to the client; hover over it to see when it was sent.
- Who completed it, when, and how it was filled in, if applicable.
TIP: The appointments view is particularly useful at the start of a visit to quickly check which forms a client still needs to complete before their appointment begins, without having to scroll through a long flat list of all forms.
Step 4: Manage Forms from the Appointments View
Click on a form to open it, or use the three-dot menu and the preview (eye) button on each form row to take the following actions:
-
Add new form: Click "Add new form" within an expanded appointment to attach one or more forms to that specific visit. You can also choose whether to notify the client by email or SMS.
-
Send to client / Resend to client: If a client-facing form hasn’t been filled in yet, you can send or resend it directly to the client from here.
-
Preview: View a form that hasn’t been filled in yet to see what it looks like.
-
View audit log: For forms that have been edited, view the form’s previous versions and who changed them.
-
Remove form: Detach a form from the appointment.
Completed forms also offer the same actions as the list view - print, share, send as an email attachment, pin, or delete the form. Deleting a form requires the delete permission.

NOTE: New forms can also be started at any time using the "+" Create button in the bottom right corner of the client card, regardless of which view you are in.
With the appointments view, you can keep track of all form activity on a visit-by-visit basis, making it easier to manage outstanding forms and maintain a clear clinical record for each appointment.
Was this guide helpful? Let us know by voting below - your feedback helps us write clearer articles.
For more guides, browse the related articles below or use the search bar at the top of the page. You can also watch our video learning series, the Pabau Academy, or visit the Support page for additional help.