Table of Contents:
1. How to Create Payment Types
2. How to Perform a Sale
2.1. How to Pay Manual Entry via Pabau
2.2 How to Pay with Card on File via POS
2.3. How to Process a Payment Using the Pabau Pay Card Terminal
2.4. How to Use Cash as a Payment Method
3. How to Take Partial Payments
3.1. How to Process Partial Payments via Stripe
4. How to Pay For a Booking
4.1. How to Pay an Unpaid Invoice via Connect
4.2. How to Pay Deposit via Online Bookings
How to Create Payment Types
Step 1: Navigate to Setup
Start by logging in to your Pabau account using your login credentials. Then, navigate to the Setup page. Locate "Payment Types" under the Financials section.

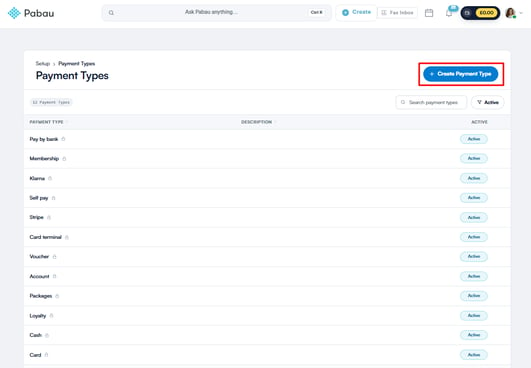
Step 2: Create Payment Type
Once you're on the Payment Types page, click the "+Create Payment Type" button on the top right corner to get started.
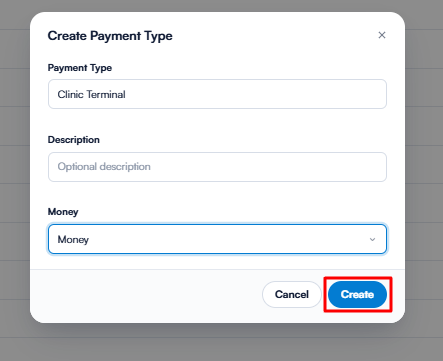
You will be prompted to complete the payment type details. Start by selecting whether the payment type is Money, Non-Money, or Account Credit.
Next, name the payment type and optionally add a description if desired.

Click the "Create" button to finalize the action.
How to Perform a Sale
Step 1: Navigate to the Point of Sale
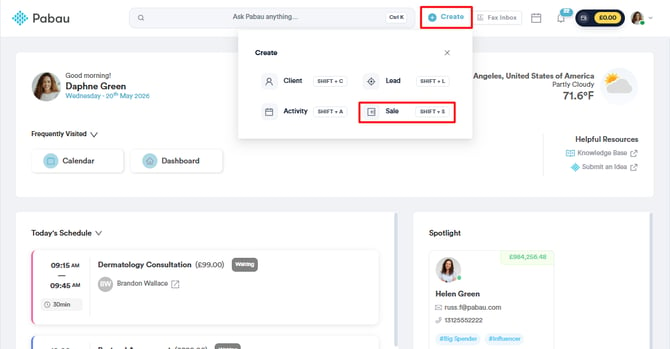
Once you've logged in to your Pabau account, navigate to the top of the page and find the "Create" button next to the search bar. From there click on it and select Sale. Alternatively, press the hotkeys Shift + S to open the Point of Sale.
Step 2: Select a Client
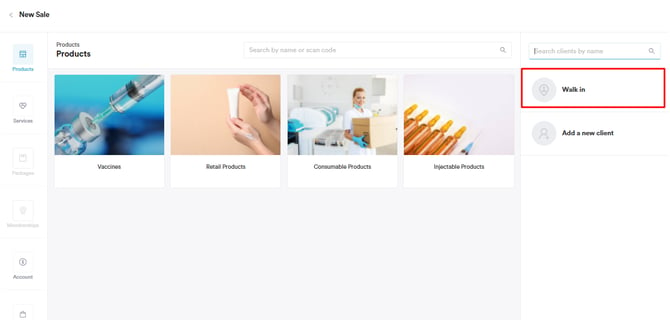
Start by selecting the client on the right side of the screen. You can also create a new client or create a sale for a walk-in client.
Step 3: Choose a Category
On the left-hand side of the screen, you'll find various categories to choose from based on what you want to sell:
- For retail sales, use "Products."
- Perform service-related sales with "Services."
- Sell courses and packages through "Packages."
- Allow clients to add funds to their client card for later use under "Account."
- Find gift vouchers under "Gifts."
-
Add the consumables used during appointments under "Consumable."
Clicking on any category will display the items associated with it in the center of the screen. To add any of them to the cart, click on them, and they'll appear on the right side of the screen.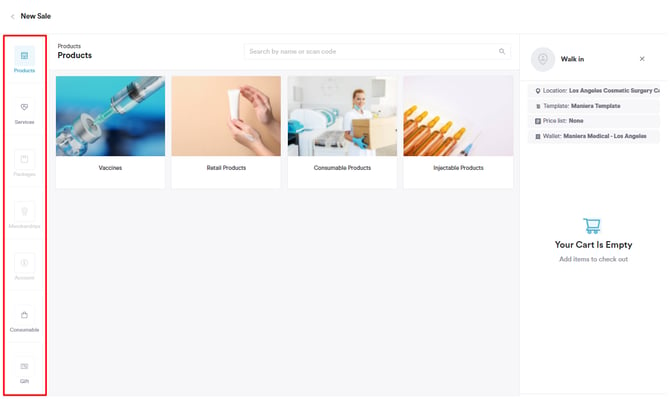
Step 4: Proceed with Payment
On the right side of the screen, we can preview everything added to the cart, and the total amount of the sale. Click on Continue to continue to the payment method step.
Choose the desired payment method, then on Collect or Charge, depending on the method, and click on Confirm Payment to complete the transaction.


NOTE: Payments can be partial, and split between different methods. If so, input the correct amount, and repeat the process if necessary. You can choose multiple different methods for the same sale. All added payments will be recorded on the bottom right side of the screen.
How to Pay Manual Entry via Pabau
Step 1: Access the Point of Sale
Start by logging into your Pabau account using your login credentials. You can access the point of sale in Pabau in three ways: by raising the invoice from the Create button, the Calendar, or the Client Card.
Step 2: Enter Details
After selecting the client and service when raising the invoice, click on the Continue button at the bottom right corner to proceed to the payment page.

To manually enter a client's card details for payment processing in Pabau, choose the Card (Phone) payment method.

NOTE: Pabau requires integration with Stripe for payment processing.
Reconnecting will ensure that all Pabau Pay terminal features function smoothly and will also unlock 12 additional payment processing options.
When selecting Card (Phone) a pop-up window will appear, allowing you to enter the client's card details. You can edit the amount if the client wants to only pay the deposit for example. In that case, the invoice will be saved as partly paid.

With the client's permission, you can save their card details for future use within the system.
Another way for clients to save their card information themselves in Pabau is when they pay online. They have the option to save the card information for future transactions in the online booking portal.
Step 3: Confirm Payment
After charging the client, proceed to click on the "Confirm Payment" button at the bottom right corner to finalize the process.

This action will direct you to the checkout page, where you can choose to email the invoice to the client, send it as an SMS, or print it. Additionally, you can review the invoice on the client card. A short cut to the client card from the checkout page is by clicking on the client's name.

To view the invoice, navigate to the Financials tab in the client card and you can find it under "Invoices."

Following these steps will allow you to manually process the payment using the client's details.
How to Pay with Card on File via POS
Clients can save their card information by themselves in the Online Booking portal or authorize you to add their card details to their client cards. To review how you can add a client's card details to their client card, refer to this article.
Step 1: Access the Point of Sale
Start by logging into your Pabau account using your login credentials. You can access the point of sale in Pabau in three ways: by raising the invoice from the Create button, the Calendar, or the Client Card.
Step 2: Enter Details
After selecting the client and service when raising the invoice, click on the Continue button at the bottom right corner to proceed to the payment page.

NOTE: Pabau requires integration with Stripe for payment processing.
Reconnecting will ensure that all Pabau Pay terminal features function smoothly and will also unlock 12 additional payment processing options.
If the client has a card saved on file, the "Card on File" payment method will appear on the payment page.

By clicking on the "Card on File" payment method, you will view a pop-up window where you can charge the client using the card they have on file.

Step 3: Confirm Payment
Click on the "Confirm Payment" button in the bottom right corner to finalize the process.

This action will direct you to the checkout page, where you can choose to email the invoice to the client, send it as an SMS, or print it. Additionally, you can review the invoice on the client card. A short cut to the client card from the checkout page is by clicking on the client's name.

To view the invoice, navigate to the Financials section in the client card and you can find it under the "Invoices" tab.

By following these steps, you can use a card saved on file to process a client's payment.
How to Process a Payment Using the Pabau Pay Card Terminal
Step 1: Access the Point of Sale (POS)
Log into your Pabau account and open the Point of Sale by clicking on the "Create" button at the top of the screen and selecting "Sale."
Alternatively, use the hotkeys Shift + S to access the Point of Sale.
You can also choose to check out an appointment from the calendar by clicking on the appointment and then selecting "Checkout", or perform a sale from a client card by clicking on the blue plus icon in the bottom right corner of the client card, then selecting "Sale."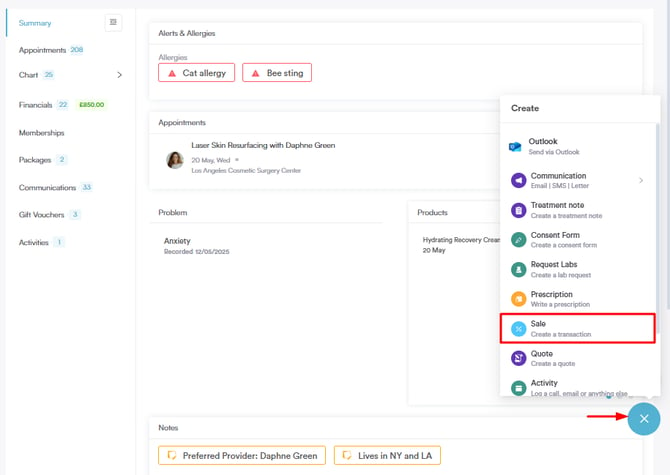
Step 2: Create the Invoice
Once in the Point of Sale, populate the client field in the top right corner of the screen with the name of the client. If raising the invoice from the calendar or the client card, this field will be prepopulated.

Select the client and proceed to choose the services and/or products to add to the invoice by using the appropriate icons on the left. If raising the invoice for an appointment through the calendar, prepopulated services and/or products can be modified as needed. After adding all items to the invoice, click on "Continue" in the bottom right corner.

Step 3: Choose Payment Method
In the payment options, select "Card Terminal" as the payment method.
Step 4: Process Payment
Processing payments at the Point of Sale will be restricted to the terminal's registered location.
Additionally, keep in mind that for the terminal to function properly, it must be connected to the same Wi-Fi network as the laptop used for processing payments.
If you have more than one terminal, select which one you want to process the transaction on by clicking on "Choose terminal".

Tap or insert the client card into the Pabau Pay card terminal. If using a chip-and-pin transaction, follow the prompts on the card terminal to complete the payment transaction. Once the payment is processed, you'll see the Checkout Completed screen containing the invoice and details regarding the payment.

By following these steps, you can process payments using the Pabau Pay card terminal, streamlining your transaction process and providing a seamless experience for both you and your clients.
How to Use Cash as a Payment Method
Step 1: Navigate to the Point of Sale
Once you've logged in to your Pabau account, navigate to the top of the page and find the "Create" button next to the search bar. From there click on it and select Sale. Alternatively, press the hotkeys Shift + S to open the Point of Sale.
Step 2: Select a Client
Step 3: Select a Category
On the left-hand side of the screen, you'll find various categories to choose from based on what you want to sell. Clicking on any category will display the items associated with it in the center of the screen. To add any of them to the cart, click on them, and they'll appear on the right side of the screen.

Step 4: Process Payment
After selecting the service or product, click "Continue" to proceed to the payment page where you'll see a list of all available payment methods. Select "Cash" to continue.

When selecting cash as the payment method, you'll need to enter the amount the client paid. Click "Collect" to confirm the payment.

The payment details and amount you've added will be visible in the bottom right corner of the screen. If everything looks correct, click "Confirm Payment" to finalize the transaction.

This action will direct you to the checkout page, where you can choose to email the invoice to the client, send it as an SMS, or print it. Additionally, you can review the invoice on the client card. A short cut to the client card from the checkout page is by clicking on the client's name.

The invoice has been successfully paid, and it will appear on the client card under the Financials tab.
How to Take Partial Payments
Step 1: Accessing Point of Sale
To initiate the process, log into your Pabau account, click on the "Create" button at the top of the screen, and then select "Sale."
Alternatively, if the client card is already open, click on the plus sign button in the bottom right corner, and choose "Sale" to open the Point of Sale with the client's name pre-populated.
Step 2: Selecting the Client
Once in the Point of Sale, use the search bar in the top right corner to find the client (skip this step if you opened the Point of Sale through the client's client card).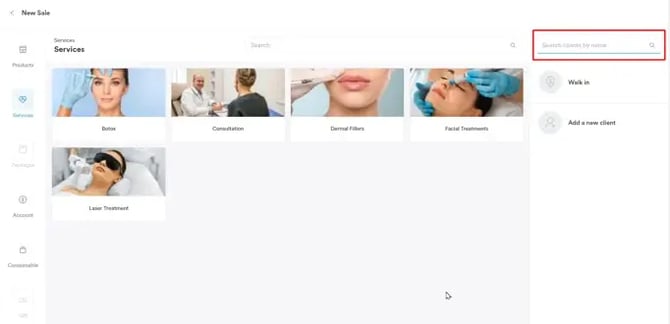
Step 3: Choosing Services and Products
After selecting the client, choose the services and/or products to add to the invoice. If raising the invoice for an appointment through the calendar, prepopulated services and/or products can be modified as needed.
After adding all items to the invoice, click on "Continue" in the bottom right corner.
Step 4: Processing the First Payment
Click on one of the payment methods and enter the amount to be paid with that method. For example, if processing a $600 invoice, you might enter $300 via card and the remaining $300 via cash.

Click on "Charge" or "Collect" based on the selected payment method. The amount paid with the first payment method and the remaining due amount will be visible in the bottom right corner.

Step 5: Choosing a Second Payment Method
At this point, you can either save the invoice as partly paid or choose a second payment method for the remaining amount. The process for the second payment method is the same as the first.
Once the full amount is covered, click on "Confirm Payment" in the bottom right corner to complete the transaction and generate the invoice.

Step 6: Managing Partly Paid Invoices
If you choose to save the invoice as partly paid, the outstanding amount will be visible in the client's client card. You can later edit the payment to process the outstanding amount.
By following these steps, you can efficiently handle partial payments, providing flexibility in managing client transactions.
How to Process Partial Payments via Stripe
Step 1: Accessing the Point of Sale
To begin, log into your Pabau account using your credentials. Once logged in, navigate to the top of the screen and click on the "Create" button. From the dropdown menu that appears, select "Sale" to access the Point of Sale feature.
NOTE: Pabau requires integration with Stripe for payment processing.
Step 2: Selecting Clients and Adding Items to Cart
Within the Point of Sale interface, start by selecting the client for whom you are processing the partial payment. This can be done by locating and clicking on the client's name in the top right corner of the screen. Next, on the left-hand side of the screen, you'll find various categories to choose from, such as products, services, packages, account balance, or gift vouchers.

Depending on how you accessed the Point of Sale, the client and services may already be pre-populated. If you are raising an invoice for an appointment from the Calendar, the client and services will be prepopulated.
When accessing the Point of Sale from a specific client card, only the client field will be pre-populated.
Proceed to add all desired items to the cart by selecting them from the available categories. Once all items are added, click on "Continue" in the bottom right corner of the screen to proceed.

Step 3: Adjusting Payment Amount and Completing Transaction
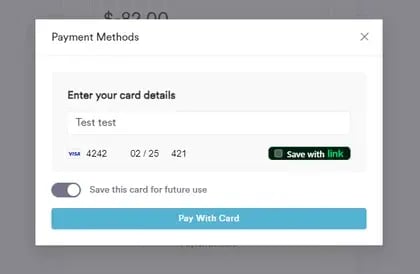
On the payment method step, you'll need to choose the "Card (Phone)" option to process the partial payment via Stripe.

Here, you have the option to modify the amount the client wishes to pay at the moment. Simply click inside the "Amount" field and update the price accordingly.

After adjusting the amount, proceed to enter the client's card details into the respective fields. If you wish to save the card for future use, toggle the "Save this card for future use" option. With all necessary details entered, click on the "Charge" button to process the payment. Then, to save the details of the partial payment, click on "Save Part Paid" located in the bottom right corner of the screen.
Step 4: Finalizing the Payment
Upon successful processing of the payment, the status of the invoice will be "Part-Paid" on the Checkout Completed screen. Additionally, in the client card, the invoice will have an "Awaiting Payment" status, indicating that a partial payment has been made.

How to Pay for a Booking
To enable client payments when booking online, make sure to integrate Stripe into your Pabau account. Additionally, you need to select the full payment option when setting up a company policy deposit or set a service-specific deposit if you have different policies for different services.
Step 1: Navigate to Your Online Booking Portal
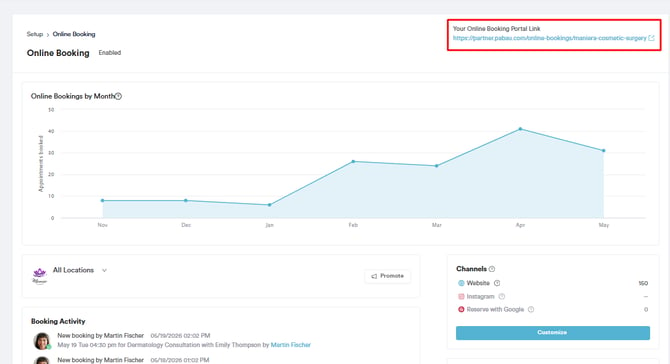
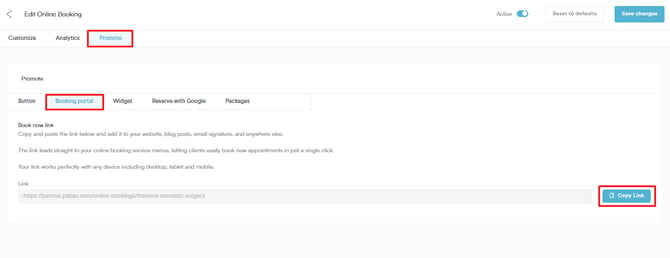
Access your online booking portal to get started with the process. You can either access it by clicking on the Book Now button from your website, or you will be able to locate the portal link in your Pabau account in the Online Booking tab.
On the Online Booking customization page, go to the 'Promote' tab at the top right corner and select the 'Booking Portal' sub-tab to reveal the link. Copy the link and paste it into a new window.
Step 2: Book an Appointment
When you access the online booking portal, you'll see the header message you've set, a list of categories, any created packages/courses, gift vouchers, and the option for clients to add money to their accounts. More details regarding your online booking portal customization are included in this article.

After selecting a category, all linked services will be displayed. Choosing a service will mark it with a checkmark on the far right, indicating your selection. Click "Next" in the bottom right corner to proceed to the next step.
The next step will display all available locations for selection if your clinic has multiple sites. If you only have one location, this step will be skipped.

After selecting a location, the next step is choosing a staff member to book with, unless this step has been disabled in your online booking portal customization. Clients can also choose "No preference," and the system will display all available time slots for all staff members. If you only have one staff member available on your online bookings, this step will be skipped.
In the next step, clients can choose from available time slots in the calendar. Select the date, and on the right side, all available time slots for that date will be displayed.

Step 3: Confirm Booking Details
Once you have selected the date and time you will view the booking details. You can always go back to make any changes. Clients can also leave any notes or comments regarding the booking.

If a client has an existing account, they can log in; if not, they can register below. All the fields that you have set up when customizing your client portal will appear for them to fill out and complete the registration by clicking "Create Account".

Step 4: Process Payment
When a client has created an account, the next step will show their client details and the amount the clients should pay to complete their booking. To go to the payment page, they need to click "Proceed To Payment."
NOTE: Pabau requires integration with Stripe for payment processing.

The payment page will show the total amount they need to pay for the service.
To enter their card details, they need to tick the "Pay with card" method and the fields to enter their card details will show. If they have a card saved already, it shows at the top of the page as a first option. They can also add a tip if you have enabled this option on the policies page.

After the amount has been successfully paid, clients will be directed to the confirmation page. Here, they will receive a summary of their booking details, including the selected services, date and time, and any relevant notes.

You can view the payment on the client card under the Financials tab. Also, it can be located in the invoices tab when expanding "Money" in the left sidebar menu. You can also filter it on the reports under the analytics tab on the left sidebar menu. 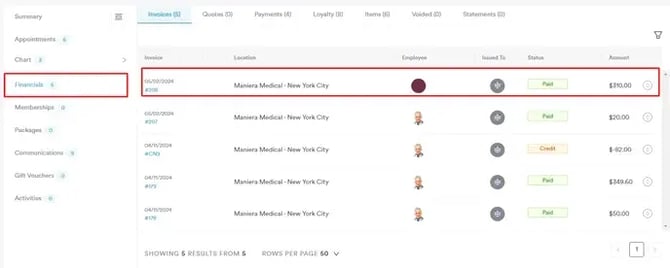
By following these steps, the clients will be able to pay for their appointments online.
How to Pay an Unpaid Invoice via Connect
To enable clients to pay unpaid invoices from their client portal, you will first need to make sure to integrate Stripe into your Pabau account. Additionally, you need to include the Payments feature for your clients, this can be done when configuring the client portal.
Step 1: Navigate to the Client Portal
Access your client portal to get started with the process. You can either access it from your online booking portal directly by clicking on your avatar at the top right corner of the page or you can locate the portal link in your Pabau account in the Client Portal tab.
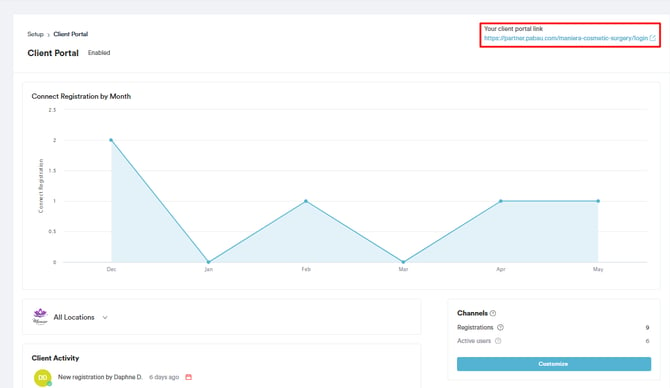
On the Client Portal customization page, go to the 'Promote' tab at the top right corner and select the 'Portal link' sub-tab to reveal the link. Copy the link and paste it into a new window.

Step 2: Navigate to Payments
Upon logging in to access the client portal, your clients can navigate to the avatar at the top right corner of the page, and a list of features will appear in the drop-down menu. Expand Payments and the Billing History tab will be revealed.

A list of invoices will appear when clicking on "Billing History." This feature offers an overview of their transaction history, helping to track and manage payments efficiently.

Step 3: Process Payment
NOTE: Pabau requires integration with Stripe for payment processing.
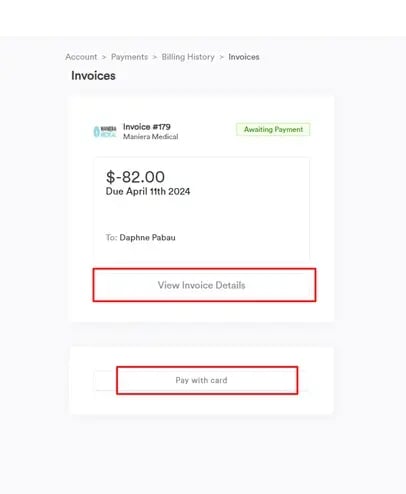
By clicking "Pay with card," a pop-up will appear where they can enter their card details. They can choose to save their card details and continue to click on the "Pay With Card" button to finalize.
After the invoice has been successfully paid, clients will be able to view that on the same page.
You can view the payment on the client card under the Financials tab. Also, it can be located in the invoices tab when expanding "Money" in the left sidebar menu. You can also filter it on the reports under the analytics tab on the left sidebar menu. 
By following these steps, your clients will be able to pay for their unpaid invoices via the connect portal.
How to Pay Deposit via Online Bookings
To enable deposit payments when booking online, make sure to integrate Stripe into your Pabau account. Additionally, you need to set up a company policy deposit or set a service-specific deposit if you have different deposit policies for different services.
Step 1: Navigate to your Online Booking Portal
Access your online booking portal to get started with the process. You can either access it by clicking on the Book Now button from your website, or you will be able to locate the portal link in your Pabau account in the Online Booking tab.
On the Online Booking customization page, go to the 'Promote' tab at the top right corner and select the 'Booking Portal' sub-tab to reveal the link. Copy the link and paste it into a new window.

Step 2: Book an Appointment
When you access the online booking portal, you'll see the header message you've set, a list of categories, any created packages/courses, gift vouchers, and the option for clients to add money to their accounts. More details regarding your online booking portal customization are included in this article.

After selecting a category, all linked services will be displayed. Choosing a service will mark it with a checkmark on the far right, indicating your selection. Click "Next" in the bottom right corner to proceed to the next step.
The next step will display all available locations for selection if your clinic has multiple sites. If you only have one location, this step will be skipped.

After selecting a location, the next step is choosing a staff member to book with, unless this step has been disabled in your online booking portal customization. Clients can also choose "No preference," and the system will display all available time slots for all staff members. If only one staff member is available, this step will be skipped.
In the next step, clients can choose from available time slots in the calendar. Select the date, and on the right side, all available time slots for that date will be displayed.

Step 3: Confirm Booking Details
Once you have selected the date and time you will view the booking details. You can always go back to make any changes. Clients can also leave any notes or comments regarding the booking.

If a client has an existing account, they can log in; if not, they can register below. All the fields that you have set up when customizing your client portal will appear for them to fill out and complete the registration by clicking "Create Account".

Step 4: Process Payment
When a client has created an account, the next step will show their client details and the amount the clients should pay to complete their booking. To go to the payment page, they need to click "Proceed To Payment."
NOTE: Pabau requires integration with Stripe for payment processing.

The payment page will show the total amount they need to pay for the service.
To enter their card details, they need to tick the "Pay with card" method and the fields to enter their card details will show. If they have a card saved already, it shows at the top of the page as a first option. They can also add a tip if you have enabled this option on the policies page.

After the amount has been successfully paid, clients will be directed to the confirmation page. Here, they will receive a summary of their booking details, including the selected services, date and time, and any relevant notes.

You can view the deposit payment on the client card under the Financials tab. Also, it can be located in the invoices tab when expanding "Money" in the left sidebar menu. You can also filter it on the reports under the analytics tab on the left sidebar menu. 
By following these steps, the clients will be able to pay a deposit for their appointments online.
For more guides, refer to related articles below, select additional guides, or use the search bar at the top of the page. These guides will help you get the most out of your Pabau account.
Additionally, to help you fully utilize and understand your Pabau account, we recommend exploring additional guides and resources offered at the Pabau Academy. It offers in-depth video tutorials and lessons, offering a holistic learning experience that can equip you with the essential skills for achieving success with Pabau.