
This first part of the UK insurance guide gets your account claim-ready: you'll switch on insurance billing, create your insurers, connect Pabau to your Healthcode account, and add the billing codes and price lists your claims will be built from.
NOTE: This guide is for practices in the United Kingdom. Claims are submitted electronically through the Healthcode clearing service, with additional tools for BUPA membership checks and insurer remittances.
1. Turn on insurance billing
- Go to Setup → Business Details and open the Features tab.
- Find Insurance Billing and switch the toggle on, then click Save Changes.
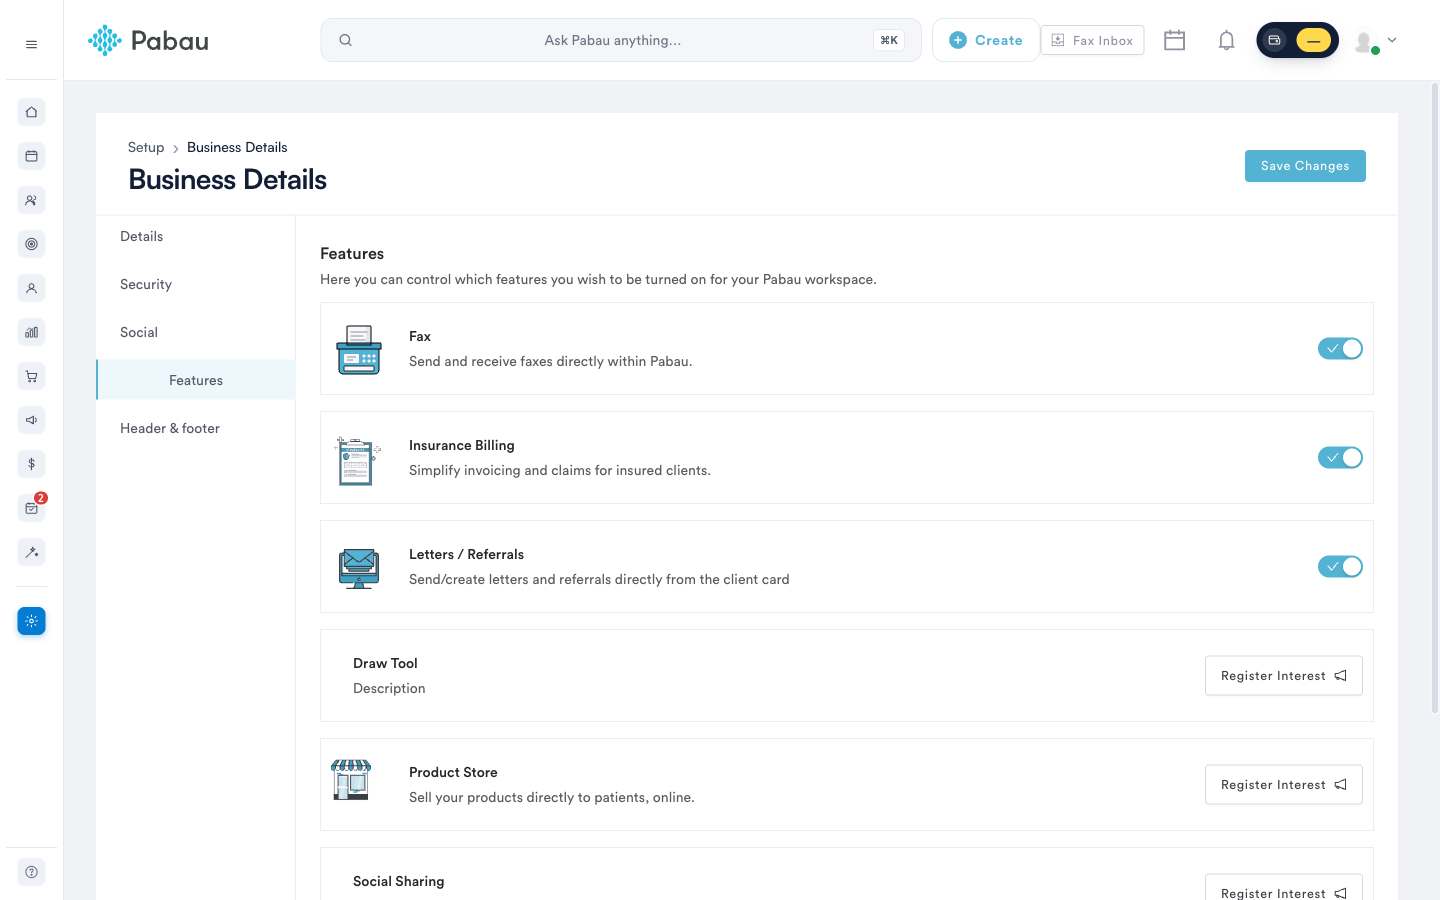
This unlocks the Insurance tab on client cards, the Money → Claims dashboard, and remittances.
2. Create your insurers
Each insurer you bill is a third party in Pabau:
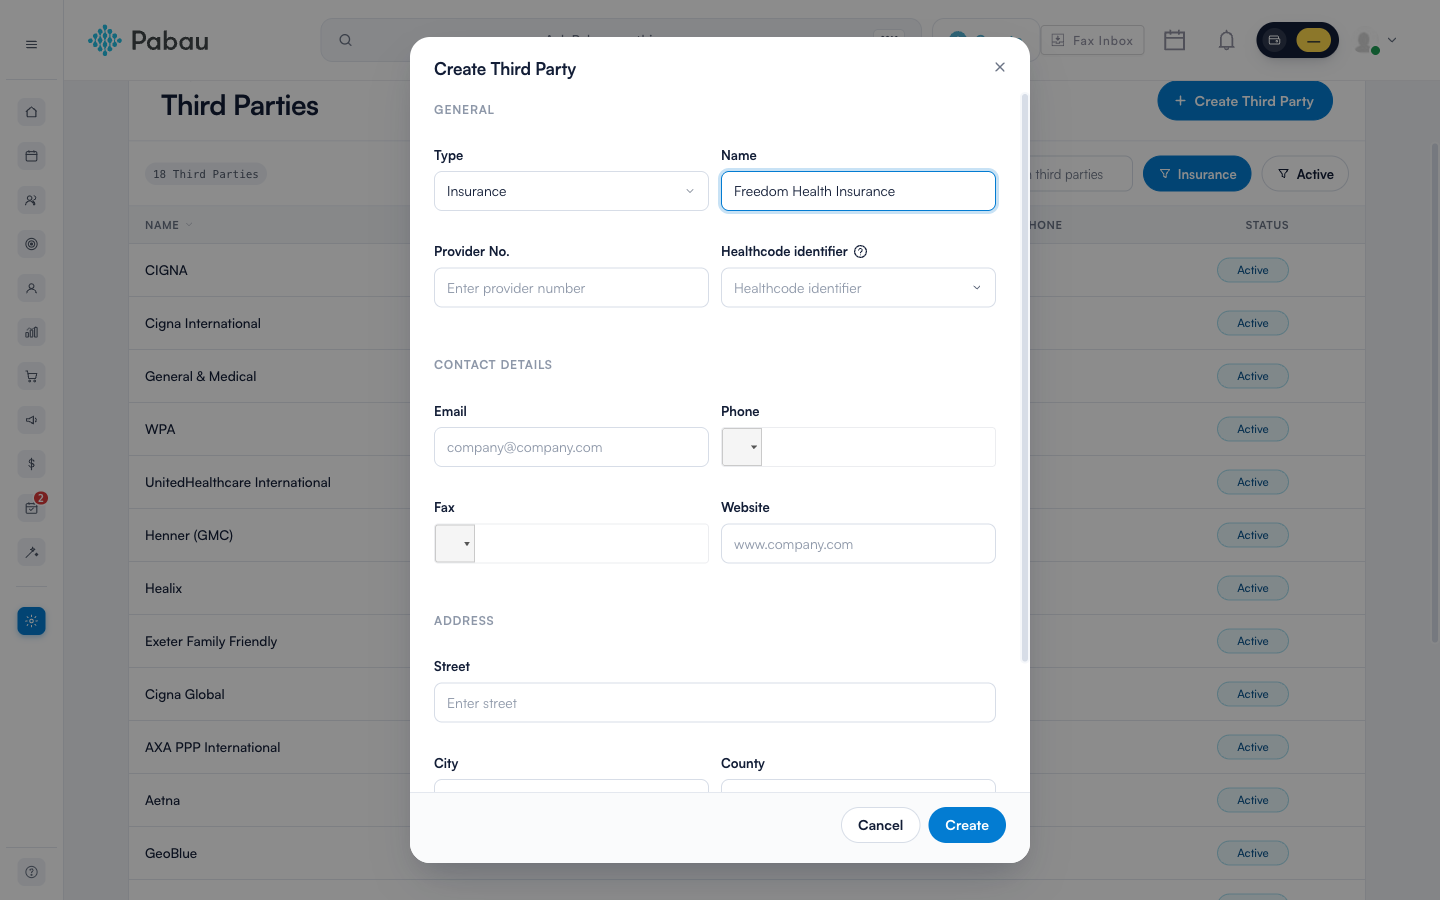
- Go to Setup → Third Parties and click Create Third Party.
- Set the Type to Insurance and enter the insurer's name and contact details.
- Once your Healthcode account is connected (next step), the Healthcode identifier dropdown lets you tie this insurer to its Healthcode counterpart.
3. Register with Healthcode
Healthcode is the clearing service that carries electronic claims to UK insurers - some insurers, including Vitality, only accept invoices submitted through it. Register on the Healthcode website and select Pabau as your practice management system. Healthcode will issue your Site ID, Webservices ID and password.
Your registration must be specific to Pabau - credentials issued for a previous software provider will not work. Healthcode can update an existing account for you over the phone (0330 900 4900).
4. Connect Healthcode to Pabau
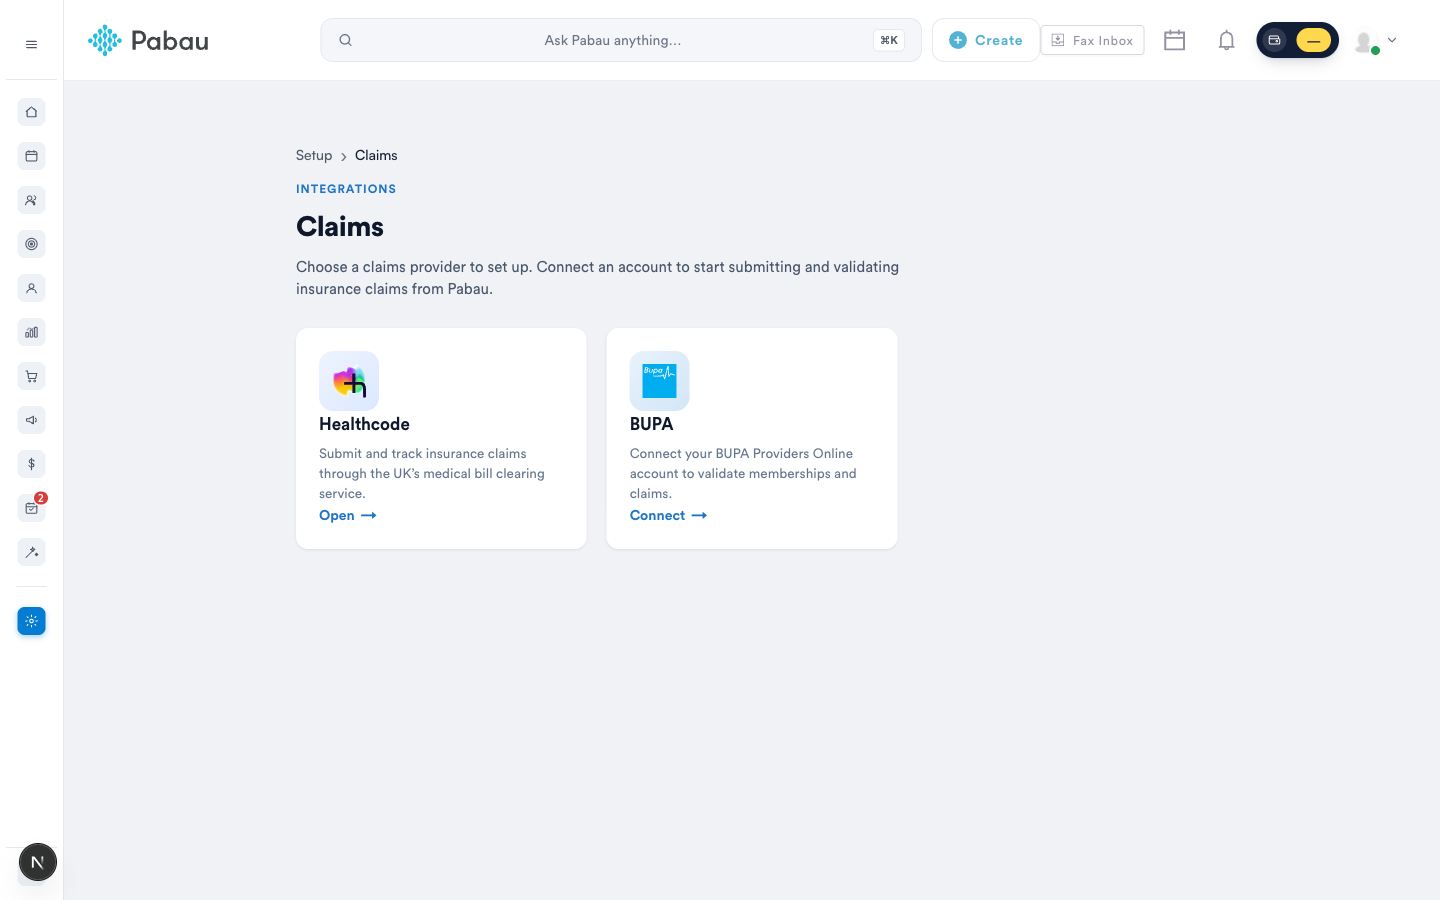
- Go to Money → Claims and click Configure in the top-right corner, then open the Healthcode tile.
- On the Credentials tab, enter your Site ID (it starts with "HC"), Webservices ID and password, then click Check Credentials.
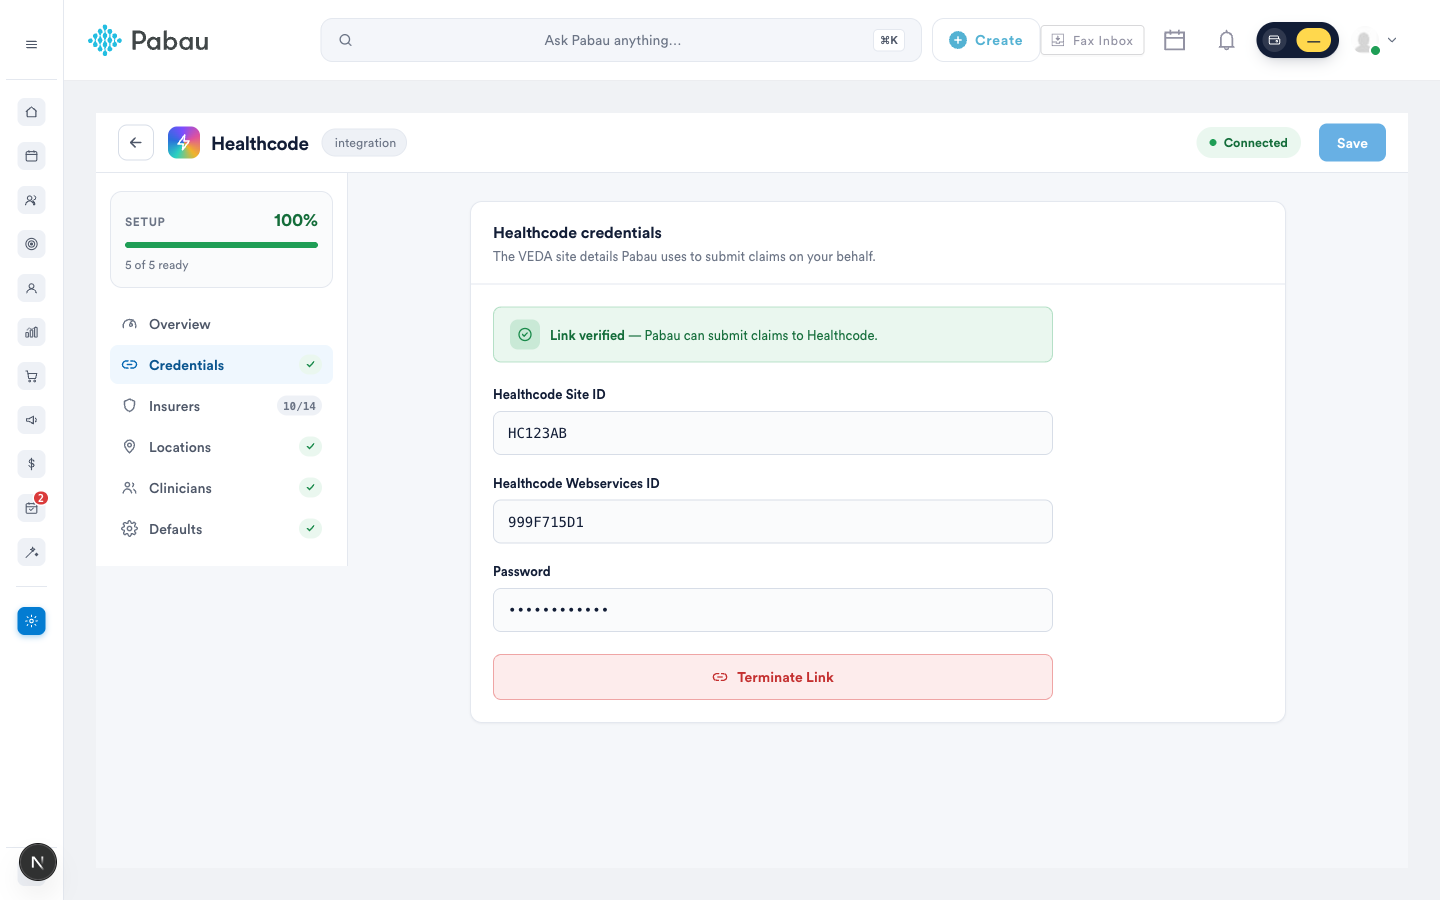
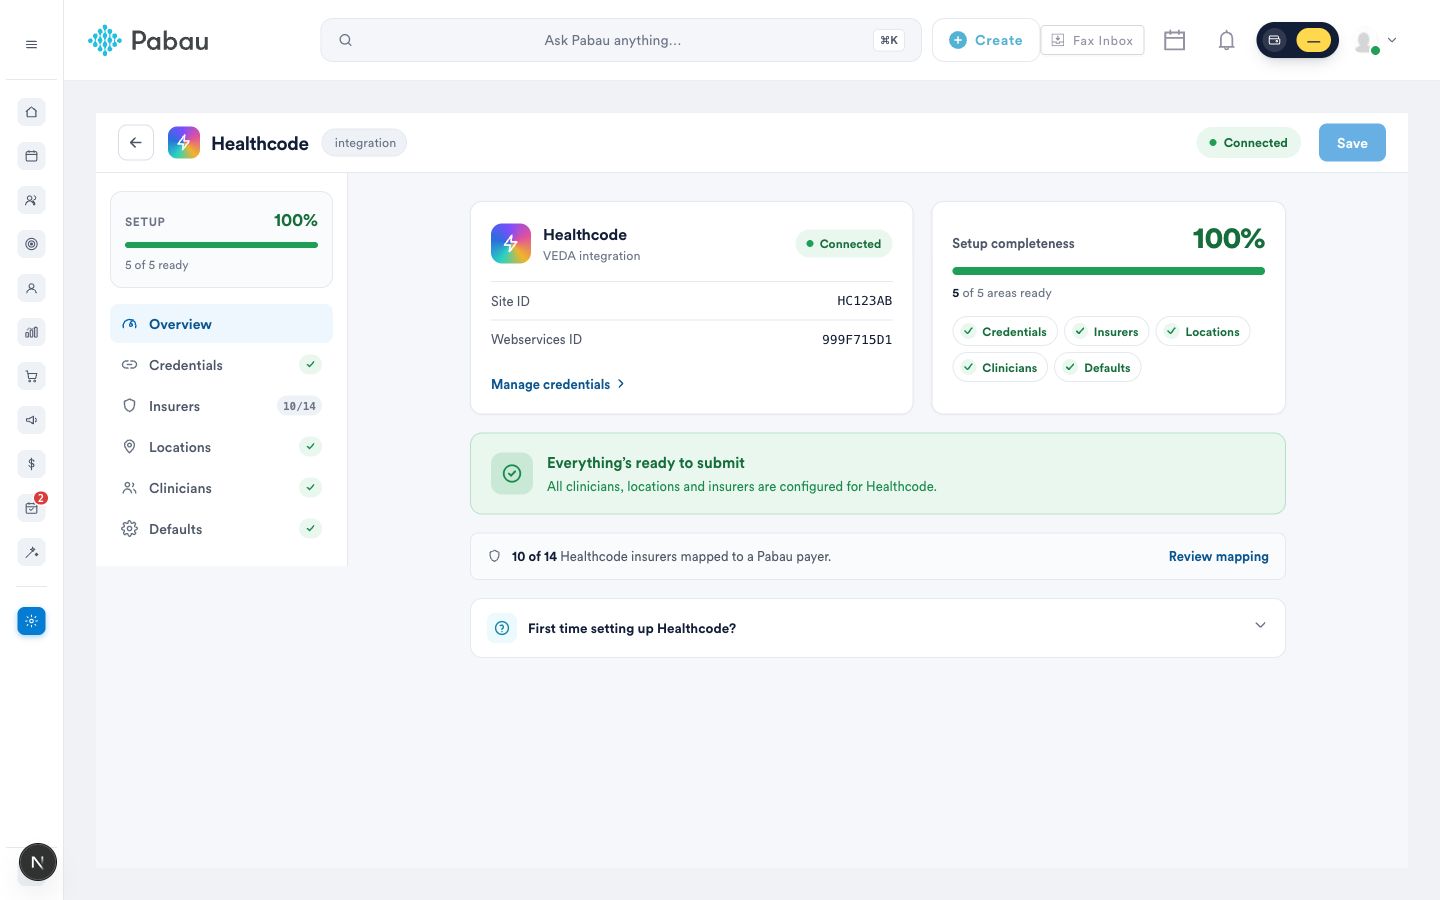
Once the link is verified, the Overview tab tracks your setup completeness and flags anything that would block a claim:
5. Map your insurers
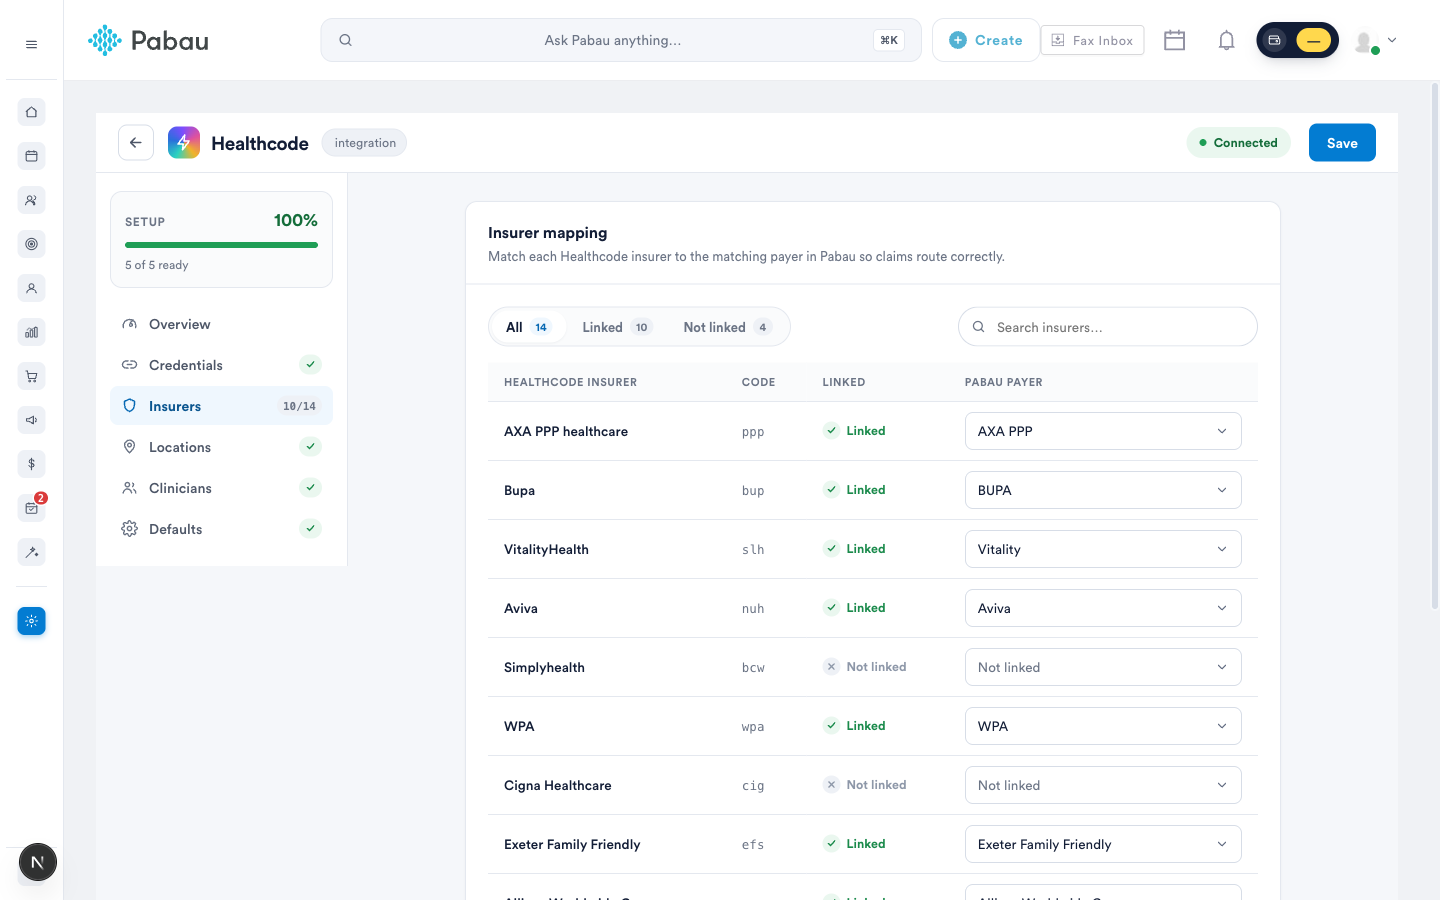
On the Insurers tab, match each insurer from your Healthcode account to the corresponding Pabau payer so claims route correctly. Anything left "Not linked" can't be claimed electronically.
Why does an insurer show "Not linked" when I set its Healthcode identifier?
These are two separate settings, and claims need both:
- Healthcode identifier on the insurer (Setup → Third Parties) tells Pabau which Healthcode insurer it is. On its own it does not link anything — it only makes the insurer available to choose on the Insurers tab.
- The Insurers tab (Money → Claims → Configure → Healthcode) is where the link is actually made. The Linked column only reads Linked once a Pabau payer is chosen there and saved.
To fix it:
- Open the Insurers tab and click the Not linked filter.
- For each Healthcode insurer you bill, choose your insurer from the Pabau payer dropdown.
- Click Save before you change tab.
NOTE: If your insurer is missing from the Pabau payer dropdown, open it in Setup → Third Parties and check that its Type is Insurance, it is active, and its Healthcode identifier is set. Only insurers with a Healthcode identifier appear in the list.
TIP: Where this comes from: Linked / Not linked on the Insurers tab shows whether one of your Pabau insurers has been matched to that Healthcode insurer on this tab. The Healthcode identifier you pick on the third party is not used for that check.
6. Add location payee codes
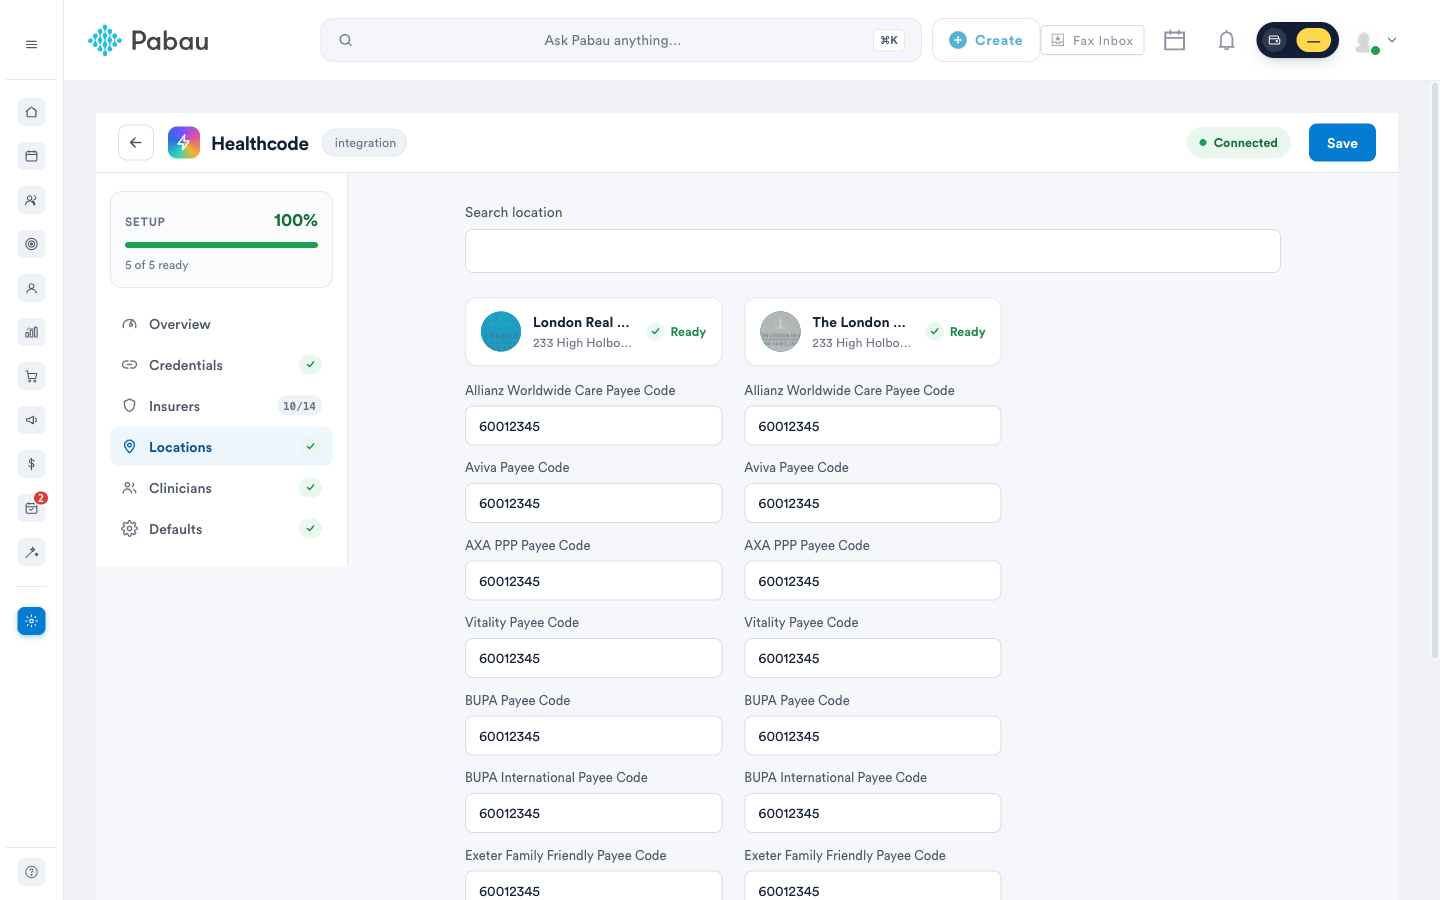
On the Locations tab, enter the Healthcode payee code for each insurer at each clinic location. Insurers use these to identify where treatment took place and who to pay.
7. Identify your clinicians
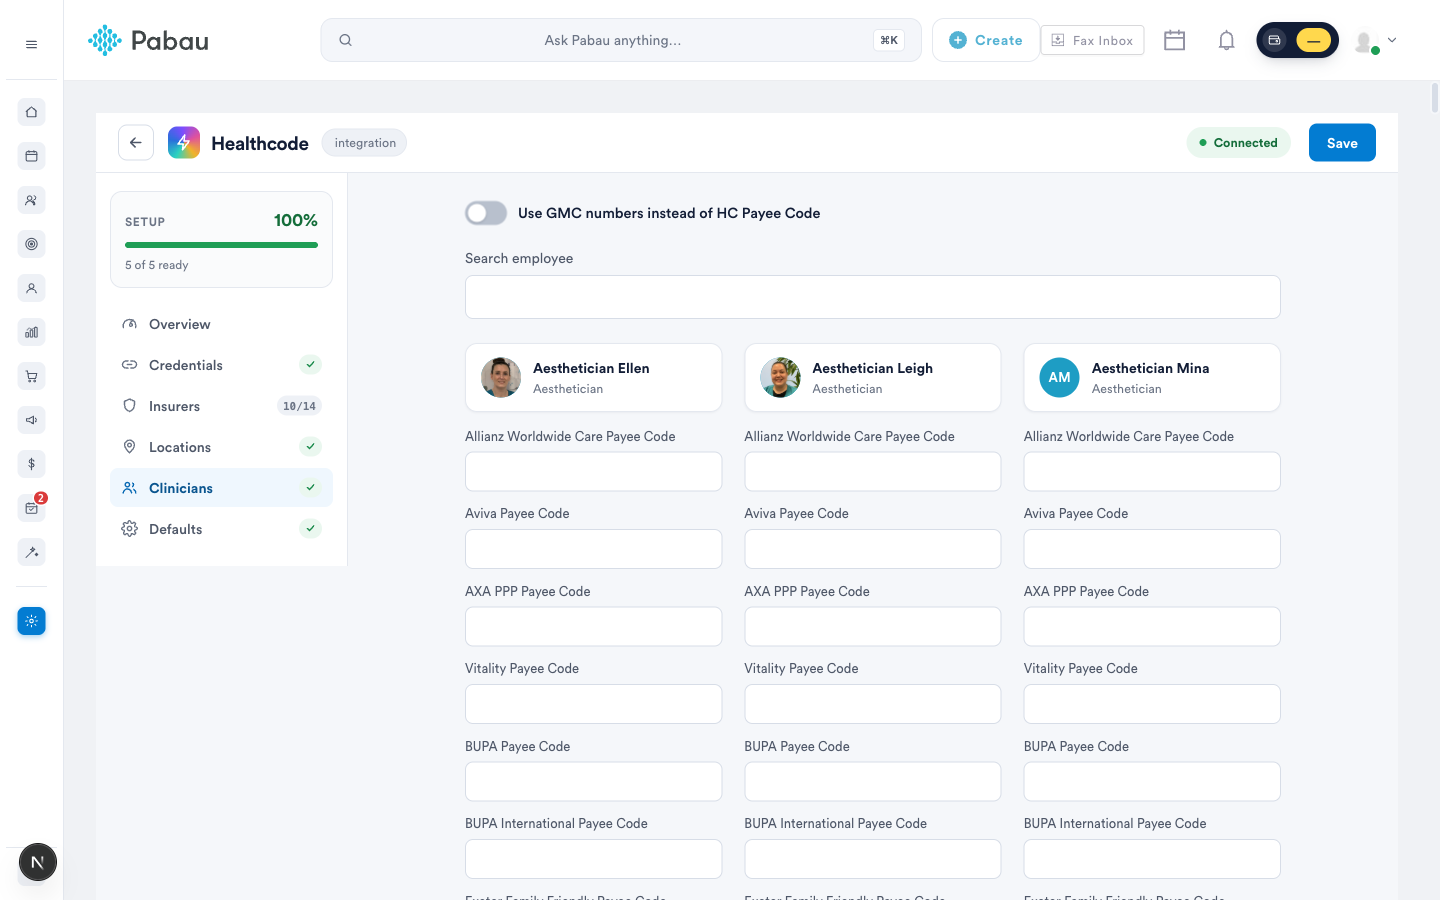
On the Clinicians tab, choose how Healthcode identifies each practitioner:
- Use GMC numbers — switch the toggle on and make sure each clinician's GMC number is recorded in Team → Personal Details. A different registration number (for example HCPC) can be used instead.
- Use payee codes — leave the toggle off and enter each clinician's per-insurer Healthcode payee code.
8. Review the claim defaults
The Defaults tab pre-fills every claim with your practice's standard values (claim source, episode setting, signature indicators, currency and so on) and controls whether each field is Editable, Read-only, Hidden or Exempt on the claim form. The shipped defaults suit most outpatient practices — adjust values unique to you, such as the payee provider name and treating hospital.
9. Add billing codes to your services
Insurers need to know what was done (a CCSD procedure code) and how to classify it (an ISC — Industry Standard Code):
- Go to Setup → Services and open a service you'll claim for.
- On the Pricing tab, expand Insurance Billing and click Add A Billing Code.
- Pick CCSD code or ISC code and search the built-in code books by code or description.
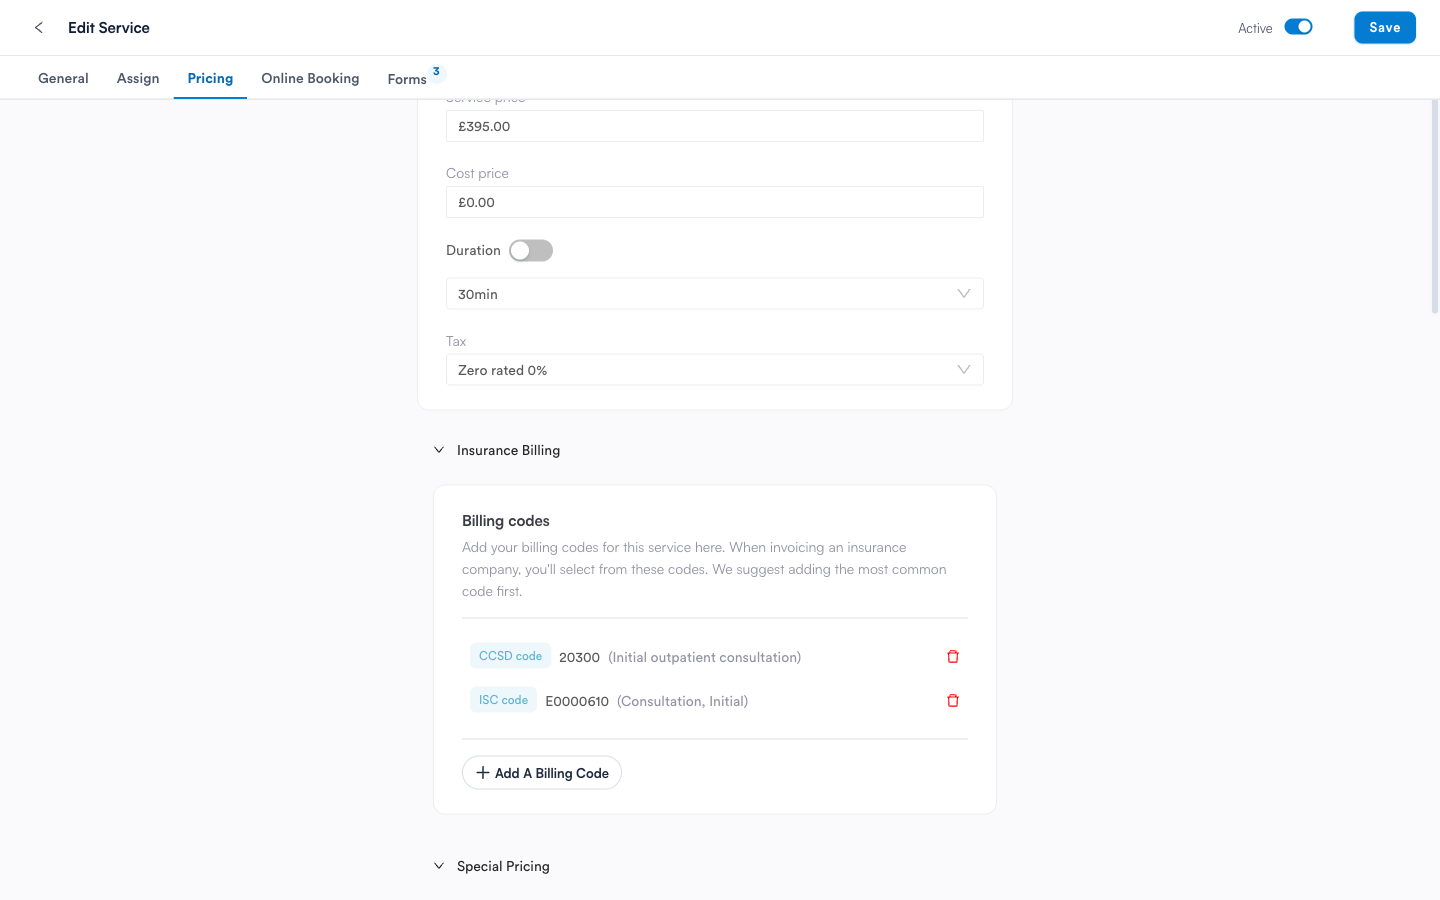
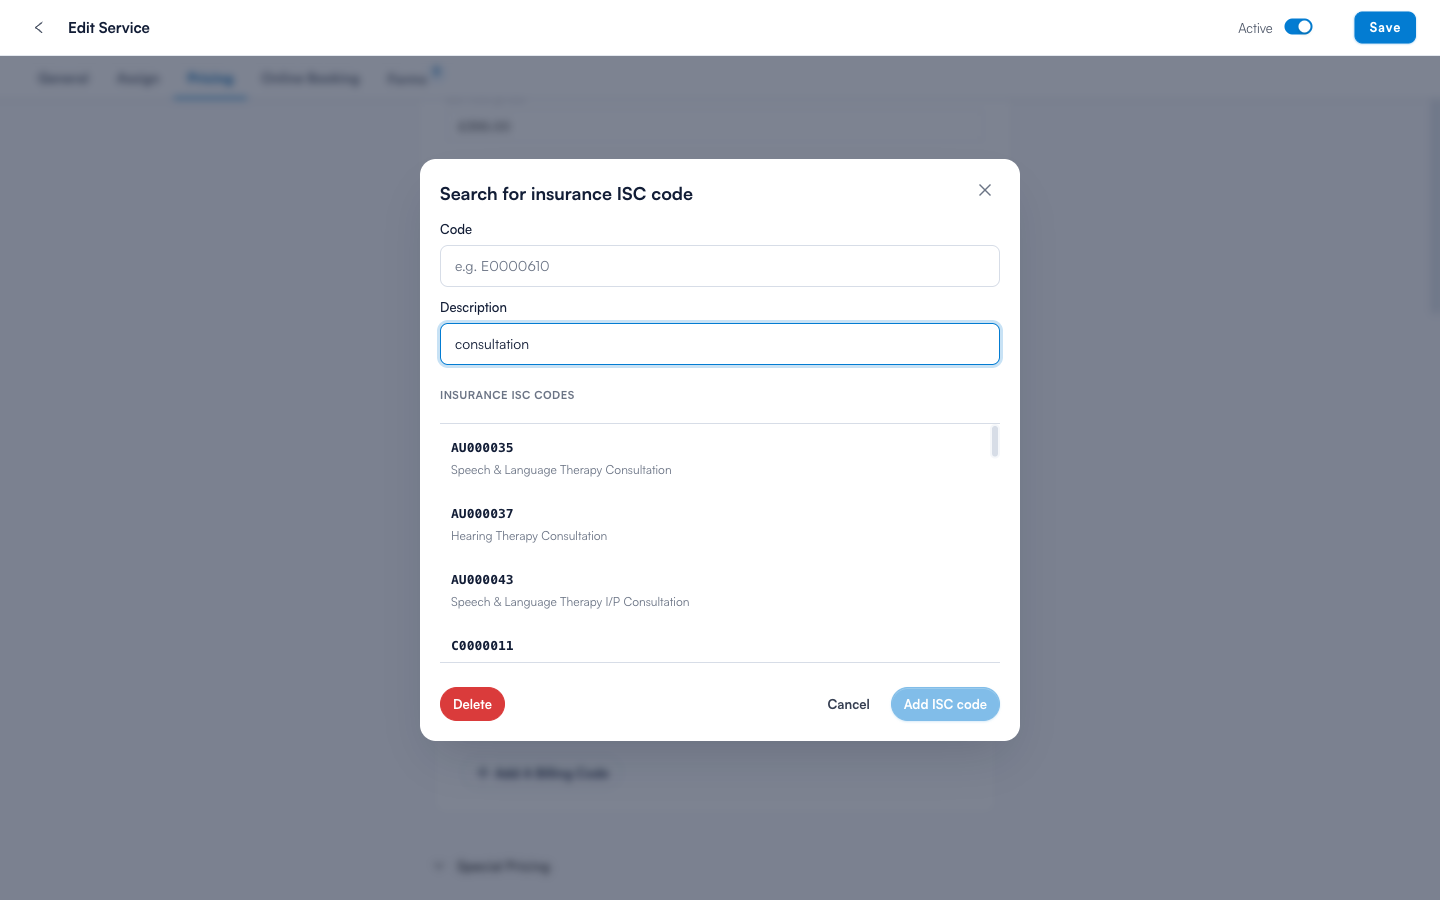
You can also browse the full CCSD and ISC code books under Setup → Diagnostic & Billing Codes, and add codes in bulk from the Services list.
10. Create per-insurer price lists
Insurers pay contract rates, not your standard prices. Go to Setup → Price Lists, create a price list per insurer (or contract), restrict it to that insurer under Rules, and set the agreed price per service under Pricing. When a booking is charged to that insurer, the right price list is applied automatically.
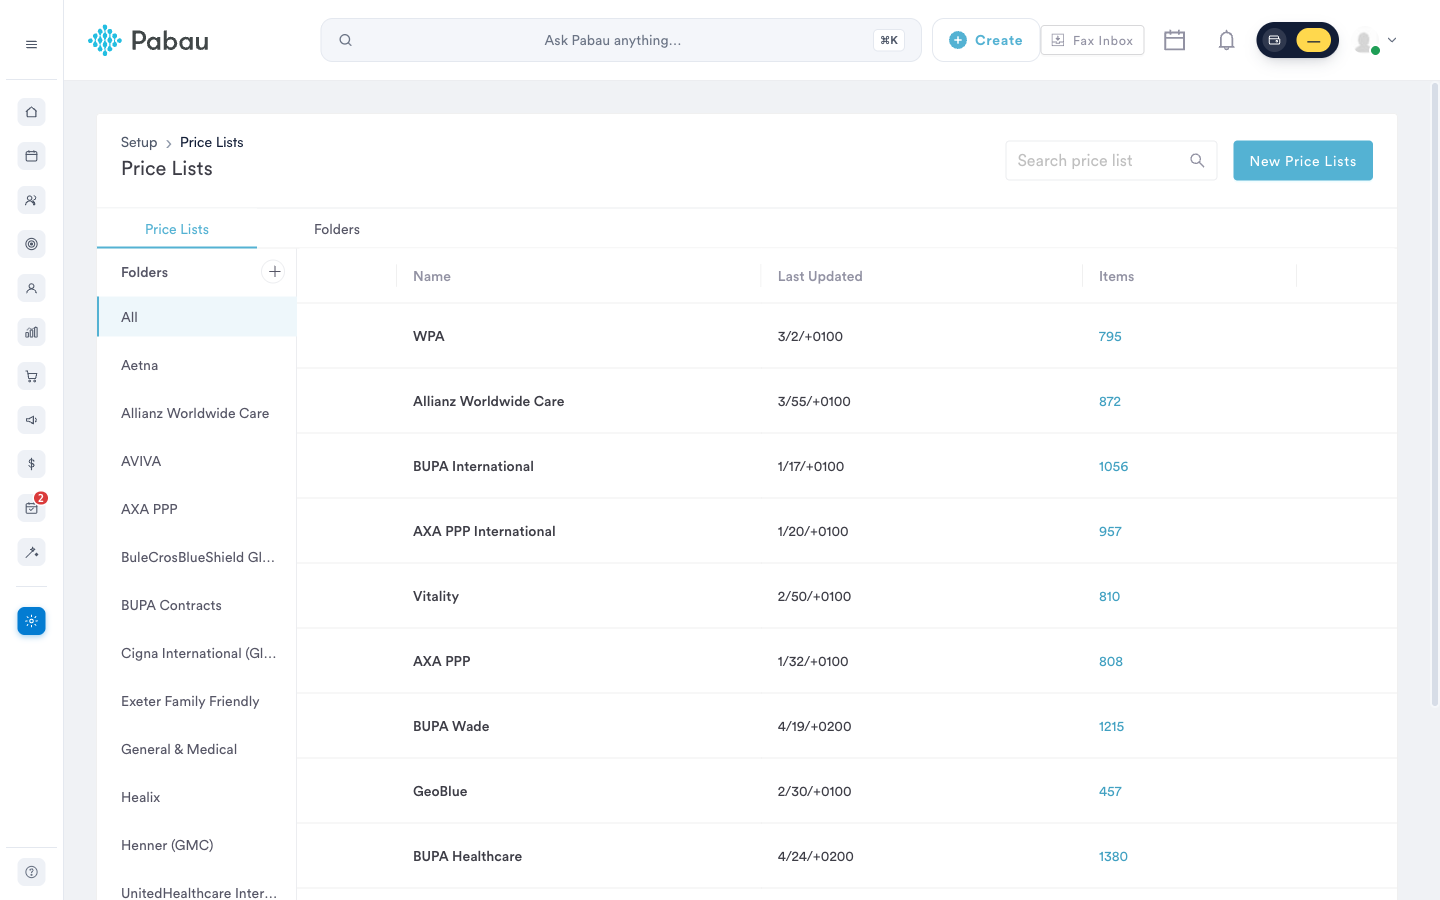
Your account is now ready to bill insurers. Next: add insurance details to your clients.
The UK insurance guide series
- Part 1: Set up the insurance essentials (this article)
- Part 2: Client insurance setup
- Part 3: Connect appointments to insurance
- Part 4: Submit and track claims with Healthcode
Questions? Reach us any time via the in-app chat - we're happy to help you get your first claims out the door.
Was this guide helpful? Let us know by voting below - your feedback helps us write clearer articles.
For more guides, browse the related articles below or use the search bar at the top of the page. You can also watch our video learning series, the Pabau Academy, or visit the Support page for additional help.