
This feature is part of the new client card version and is currently available to select users only, starting August 2026. A wider rollout to all accounts is coming soon.
The charge sheet lets you review and adjust what a client will be charged while you’re writing a treatment note, without leaving the note to open the point of sale. It sits beside the Select Appointment step and lists every service, product and package on the client’s bookings for that day, so you can confirm the charges while the visit is still fresh.
Anything you save on the charge sheet is carried straight through to checkout — when the appointment is checked out at reception, the sale opens already pre-filled with the charges you set. This guide covers where to find the charge sheet, how to add and edit charges, how they flow to checkout, and what happens once an appointment has been invoiced.
1. Open the charge sheet
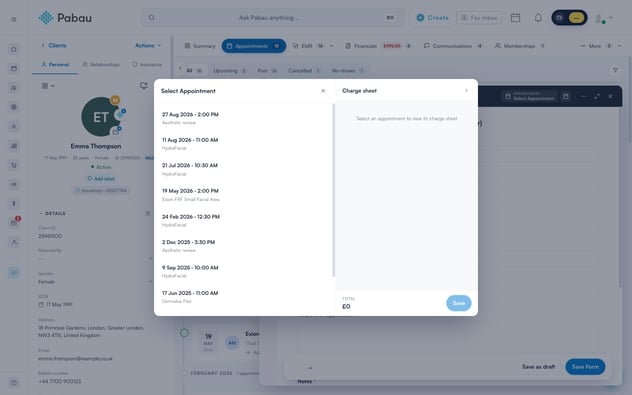
- Open the client’s card — for example, Emma Thompson’s.
- Click the Create button and choose Treatment note to start a new note, or open an existing note that hasn’t been locked.
- In the note’s header, click the Appointment pill. It reads Select Appointment until the note is linked to a booking; afterwards it shows the appointment’s date and time.
- The Select Appointment window opens with the client’s appointments listed on the left and the Charge sheet pane on the right.
Need more room for the appointment list? Click the arrow at the top of the pane to collapse the charge sheet into a slim rail — the rail still shows how many items are on the sheet, and clicking it brings the pane back.
2. Choose an appointment
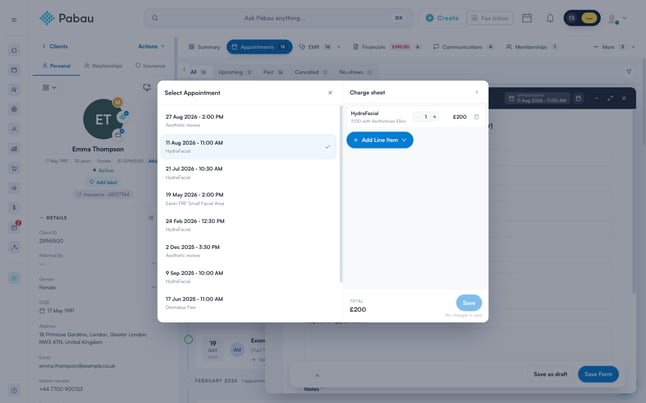
- If the note isn’t linked to an appointment yet, the pane prompts you to select one first.
- Click an appointment in the list on the left. The charge sheet loads every service, product and package from the client’s bookings on that day, each line showing the appointment time and practitioner.
- If there’s nothing chargeable on that day, the pane reads No services, products or packages for this day — you can still add items yourself (see below).
- The window stays open after you pick an appointment so you can adjust the charges straight away. Close it with the X, by clicking outside the window, or by pressing Escape.
The charge sheet covers the client’s whole day, not just the selected appointment. If Emma has a consultation in the morning and a treatment in the afternoon, both appear on the same sheet.
Choosing a different appointment reloads the sheet for that appointment’s day, and any unsaved edits are discarded — save your changes before switching.
3. Add items to the charge sheet
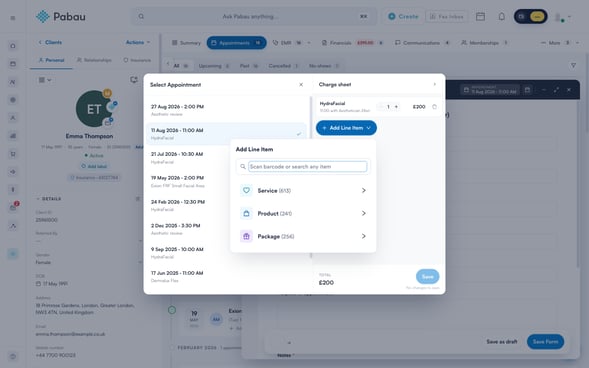
- Click Add Line Item beneath the list of charges.
- Pick a category — Service, Product or Package — and browse by category, or start typing in the search box to search everything at once.
- Click an item to add it. It appears on the sheet as a new line at its standard price, ready for you to adjust before saving.
This is a quick way to capture extras used during the visit — a consumable, a retail product the client is taking home, or an add-on service — so reception doesn’t have to remember to add them at checkout.
4. Edit or remove charges
- Quantity — use the − and + buttons on a line to change how many units are charged. The quantity can’t go below 1; to take the item off entirely, remove the line instead.
- Price — click the price on a line, type the new unit price, then press Enter or click away to confirm. Press Escape to cancel the edit.
- Remove — click the bin icon at the end of a line to take it off the sheet.
The price you edit is the unit price — the line contributes unit price × quantity to the total. The Total at the bottom of the pane updates as you edit.
5. Save the charge sheet
- Check the Total at the bottom of the pane.
- Click Save. A confirmation appears: Charge sheet saved to the Point of Sale.
- Once everything is on file, the button greys out and a note beneath it reads All changes saved. If you haven’t changed anything since the sheet loaded, the note reads No changes to save.
Save only lights up when the sheet actually differs from what’s already on file — if you nudge a price and then put it back, there’s nothing to save.
6. How charges flow to checkout
The charge sheet exists so nothing has to be typed twice:
- When the appointment is checked out in the point of sale, the cart opens pre-filled with exactly the lines you saved — the edited prices, quantities and any items you added.
- Because the sheet covers the whole day, your saved charges follow whichever of that day’s appointments reception checks out, so the client is only charged once.
- If you remove every line and save, the saved sheet is cleared and checkout goes back to the standard charges from the day’s bookings.
7. Already-invoiced appointments
Once an invoice has been raised for the appointment, the charge sheet becomes read-only and shows the notice Already invoiced — edit this in the Point of Sale or Financials. The add, edit and remove controls are hidden, and the lines are shown for reference only.
To change billing after an invoice exists, amend the invoice itself from the client’s Financials section or in the point of sale — changes made on the charge sheet can no longer affect it.
The charge sheet keeps the clinic room and the front desk in step: you record what was actually done and used while it’s in front of you, and reception checks the client out in seconds with a bill that’s already right.
Was this guide helpful? Let us know by voting below - your feedback helps us write clearer articles.
For more guides, browse the related articles below or use the search bar at the top of the page. You can also watch our video learning series, the Pabau Academy, or visit the Support page for additional help.