
Some treatments need more than one person in the room: a surgeon and an anaesthetist, or a practitioner and an assistant. A service's Attendee structure describes that team as named roles, so everyone can see who a service needs and the new booking panel can ask for each role when the appointment is booked.
Step 1: Open the Service's Employees Tab
Go to Setup > Services and click the service (or click New Service to create one).
- Open the Assign tab.
- Select Employees. The Attendee structure card sits beside the list of employees who can do the service.
- Click Set up roles.
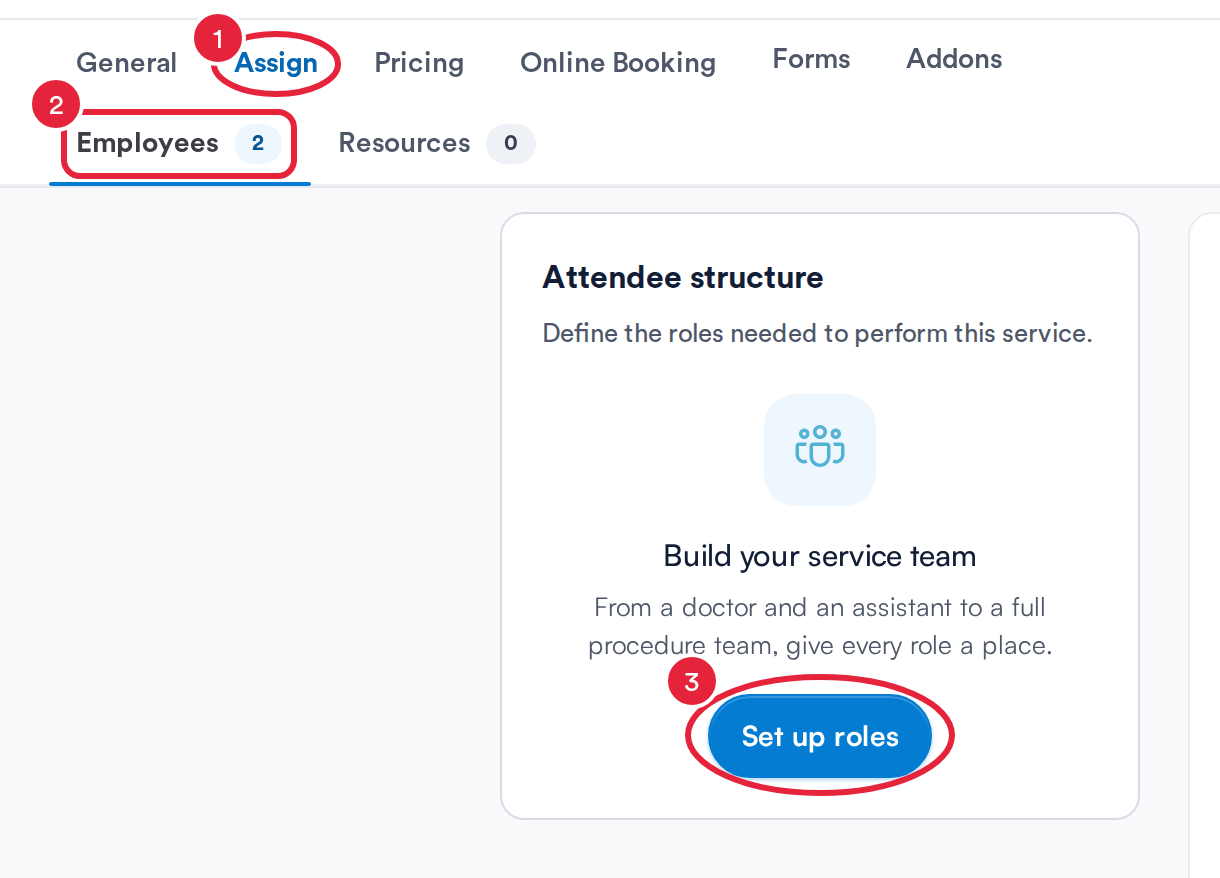
The Attendee structure card on the Employees tab
Step 2: Add the Roles
The Attendee structure window opens with one role ready to fill in. The Service team box at the top adds up how many people the service needs.
- Enter a Role name, for example Surgeon, and the number of People needed.
- Leave Required role switched on if the appointment can't go ahead without this role. Switch it off for an optional role, such as an assistant who joins when available.
- Under Who can fill this role?, keep Any employee or choose specific staff or teams (see Step 3). Use Gender preference (No preference, Female or Male) if the role must be filled by someone of a particular gender.
- Click + Add role for each extra role.
- One role is the Lead role: the main practitioner for the appointment. To make another role the lead, click Set as lead on it (only a role that needs one person can be the lead).
- Click Save structure.
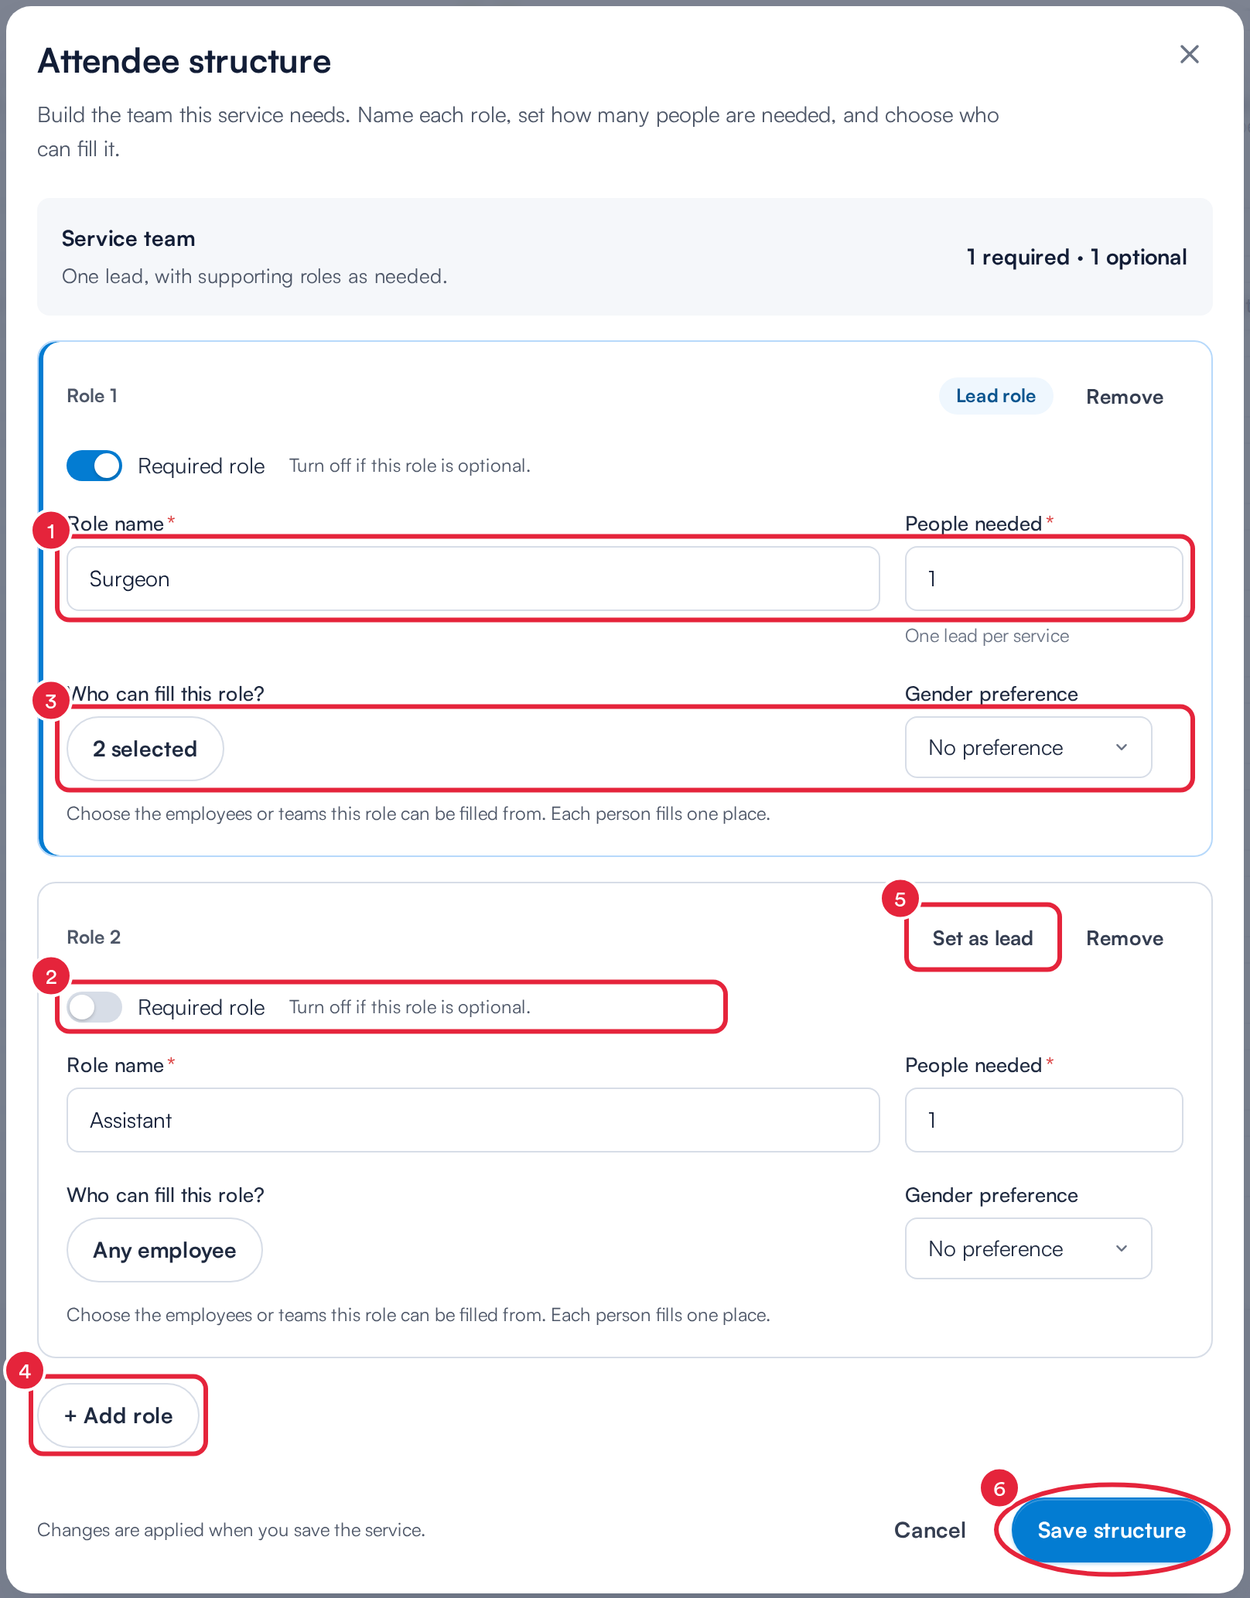
A service team with a lead Surgeon and an optional Assistant
NOTE: A service has one lead, and the lead role always needs exactly one person ("One lead per service"). Supporting roles can need more than one person, up to 99. Each role needs a different name.
Step 3: Choose Who Can Fill a Role
Click the button under Who can fill this role? (it reads Any employee until you choose someone).
- Type in the search box to find a staff member or team.
- Tick everyone who can fill the role. They are alternatives, not extra places: a role that needs one person can be filled by any one of them. The button shows how many you have chosen, for example 2 selected. If you choose specific people rather than a team, choose at least as many as the role needs.
- Click Done. Tick Any employee to go back to allowing anyone.
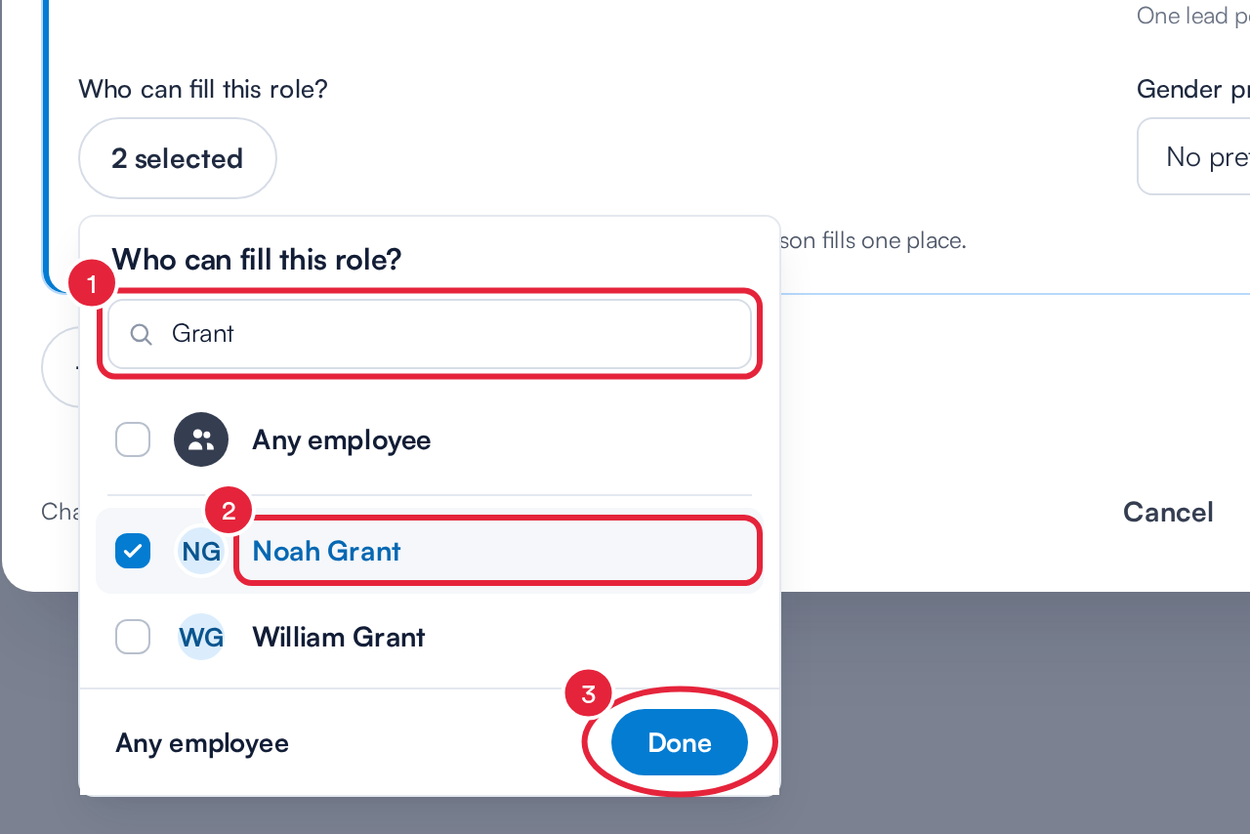
Choose the staff or teams who can fill the role
Step 4: Save the Service
Back on the Employees tab, the card now lists each role:
- The summary shows how many people are required and how many are optional, for example 1 required · 1 optional. Each role shows who can fill it, with a Lead or Optional tag.
- Click Edit structure to make changes.
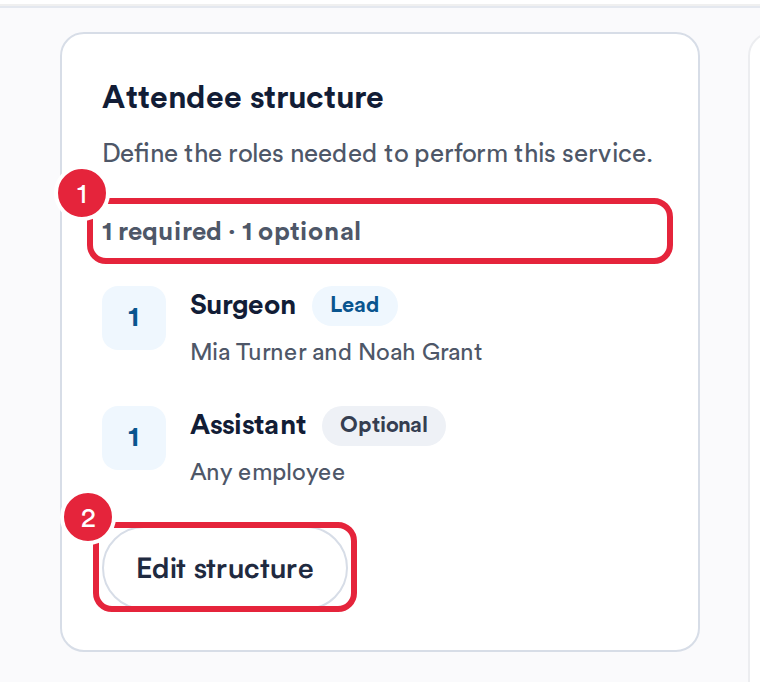
The service team, ready to save with the service
IMPORTANT: The roles are only stored when you click Save (Create for a new service) at the top right of the service. If you close the service without saving, your roles are lost. To remove the team later, click Edit structure, Remove every role, click Save structure and save the service.
Step 5: Check a Service's Booking Requirements
- In Setup > Services, hover over the staff photos in the Staff assigned column.
- Beside the list of assigned staff, Booking requirements shows the team the service needs and who can fill each role.
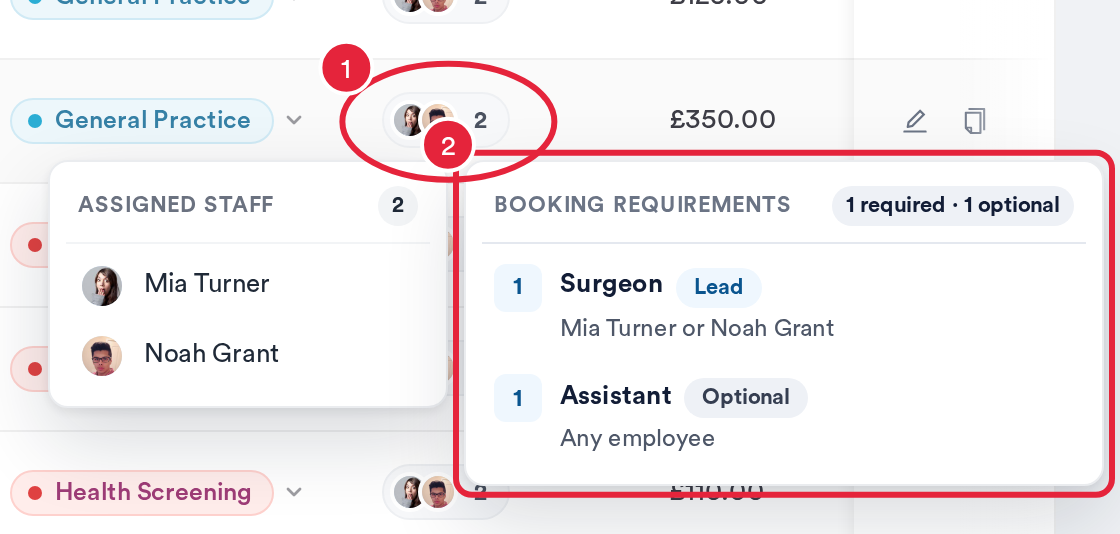
Booking requirements at a glance in the Services list
The Booking requirements card only appears for services that have at least one staff member assigned.
What Happens When You Book the Service
NOTE: Pabau asks for each role when you book in the new booking panel, which is being rolled out to clinics gradually. If you don't see it in your account yet, message us via the in-app chat.
When you add a service with roles to an appointment in the new booking panel, Pabau asks for each role in turn, starting with the lead:
- Each step reads Choose followed by the role name (for example Choose Surgeon) and lists the staff who can fill it, marked Available, Busy or Outside working hours for the time you picked. If you started the booking from a staff member's column and they can fill the lead role, they are already chosen and Pabau goes straight to the next role.
- Tick the number of people the role needs, then click Continue (Done on the last role). Each person can fill only one place in the team.
- Required roles must be filled before you can continue. Optional roles have Skip role.
- If not enough of the right people are working at that time, Pabau says so and offers Later, so you can book now and add the rest of the team afterwards.
- Cancel service takes the service back off the booking.
The chosen team shows on the service in the booking, where Edit service team lets you change it.
What's next?
Was this guide helpful? Let us know by voting below - your feedback helps us write clearer articles.
For more guides, browse the related articles below or use the search bar at the top of the page. You can also watch our video learning series, the Pabau Academy, or visit the Support page for additional help.