
This article covers the new Client Card. Posting letters by mail is available to clinics in the UK.
Pabau can put a client letter in the real post for you. Once you have written a letter, choose Post Letter and our postal partner, Stannp, prints it, folds it into an envelope, franks it and mails it — so you never have to print, stuff and stamp anything yourself. Postage comes out of your Pabau credit balance, and the letter keeps its delivery status on the client's timeline.
Before You Start
- The client needs a complete postal address on their record, including a valid UK postcode.
- Your account needs enough credits to cover the postage. You can see your balance in the posting window before you commit.
- Letters must be enabled for your clinic. See How to Enable Letters.
Step 1: Write the Letter
Open the client's record and create a letter as you normally would — click the blue plus button, choose "Communication", then "Letter". Write the letter, then click Send & complete.
For a full walkthrough of writing letters, see How to Create a Letter (New Client Card).
TIP: Do not type the recipient's address into the body of the letter. Pabau positions the address for you so it shows through the envelope window — adding it to the text as well means it prints twice.
Step 2: Choose "Post Letter"
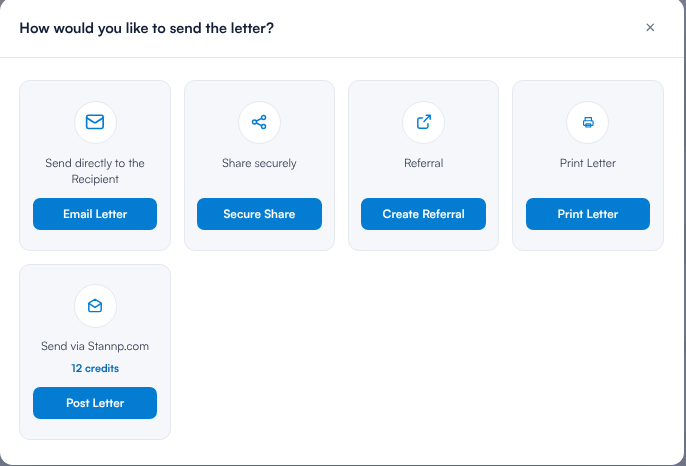
After you complete the letter, Pabau asks how you would like to send it. Choose Post Letter under "Send via Stannp.com". The card shows the postage price in credits before you open it, so you can see the cost at a glance.
Step 3: Check the Print Preview and Address
The posting window opens with a preview of exactly how your letter will print, including your clinic's letterhead and the recipient's address block. The address shown here is the one that will appear through the envelope window.
On the right you will see the delivery option, the price in credits with the equivalent postage cost, your remaining balance, and the full recipient address.
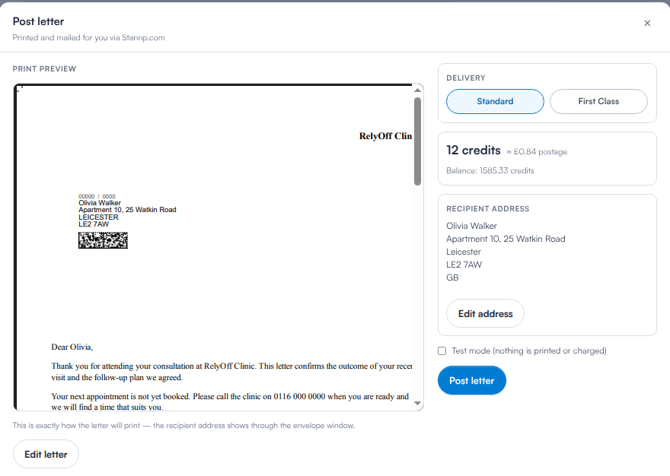
NOTE: If the address needs correcting, click Edit address. Changes apply to this letter only unless you tick the option to save them back to the client's record. Click Edit letter to return to the composer if the content needs changing.
Step 4: Pick Standard or First Class
Switch between Standard and First Class to compare. The price and the expected delivery date update each time you switch, so you can see exactly what the faster option costs before you decide.
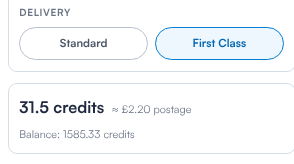
TIP: Nothing is charged and nothing is reserved while you are comparing options. Credits only leave your balance when you click Post letter.
Step 5: Post the Letter
When the preview, address and delivery option all look right, click Post letter. The postage is taken from your credit balance and the letter is handed to Stannp for printing and mailing.
IMPORTANT: Once a letter is posted it goes into the print queue quickly, so check the preview and the address carefully before you click. Posting cannot be undone once the letter has been dispatched.
Step 6: Track the Delivery
A posted letter keeps an envelope badge on its row in the client's Communications tab. Hover over the badge to see the date it was posted and the expected delivery date. The status updates automatically as the letter makes its way through the postal system.

You can also see posted letters across the whole clinic on the Letters page, where the Posted tile counts everything currently in the post.
Turning Letter Posting Off
Posting by mail is switched on by default for clinics using Letters. If your clinic never posts letters and you would rather not see the option, go to the App Marketplace, open the Stannp app and turn it off. The Post Letter option then disappears from the send window for everyone at your clinic.
TIP: Running low on credits? Top up your balance from your account settings so letters are never held up at the point of posting.