
Before your clinic sends patient records to the live NABIDH platform, Pabau asks you to prove that your setup works. The readiness check puts one of your own patients through to DHA’s NABIDH test endpoint and shows you DHA’s answer for every type of message. When every check passes and nothing in your setup checklist is blocking, you can switch the connection to Production.
NOTE: This guide is for clinics in Dubai with a NABIDH connection, and you need access to the Data Hub. It follows on from the NABIDH guide series: set up the connection (Part 2), map your data (Part 3) and check your triggers (Part 4) first.
Step 1: Check the Setup Checklist
- Go to Data Hub → Data Sync and click Manage on your NABIDH connection, then open 4. Review. The card at the top shows the environment the connection is using (Dummy, Test or Production) and holds the Go live button.
- Read the Setup checklist underneath. It covers the parts of your setup that one test patient can’t prove. A red dot marks an item that blocks going live, and the yellow banner counts them.
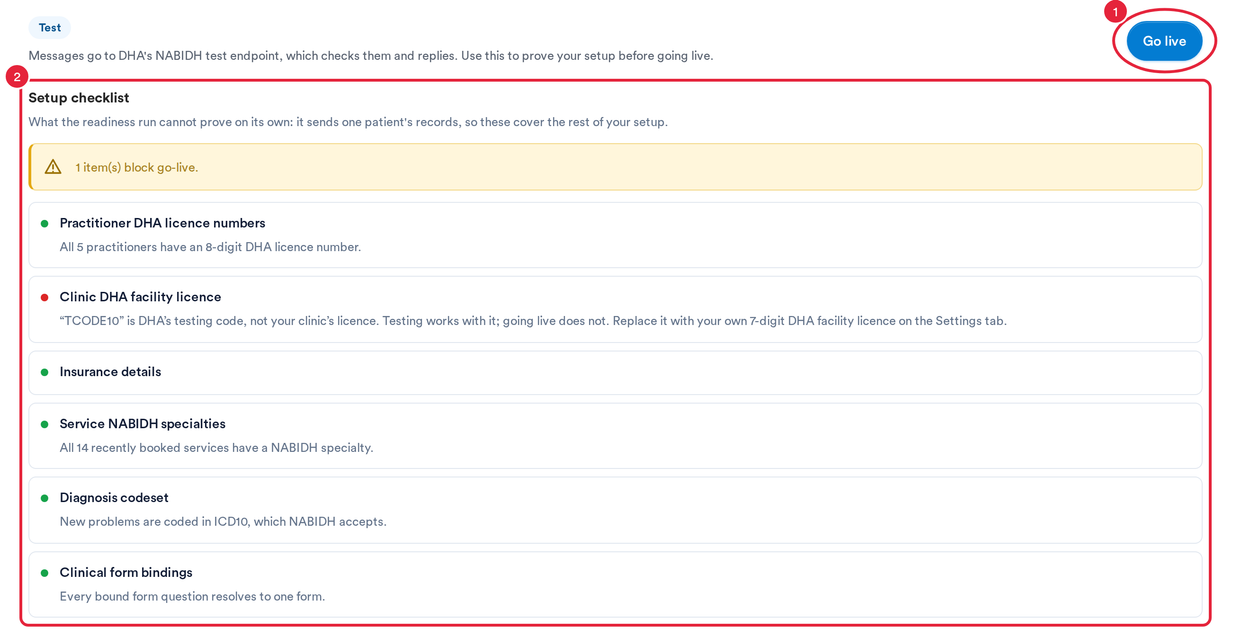
The Review tab: Go live and the setup checklist
| Checklist item | What it checks and where to fix it | Blocks go-live? |
|---|---|---|
| Practitioner DHA licence numbers | Every team member marked as a healthcare provider has an 8-digit DHA licence number. It also blocks if nobody is marked as a healthcare provider; if you see that message, contact us via the in-app chat. Add the numbers under 1. Settings → Your team → Staff Sheryan provider IDs. | Yes |
| Clinic DHA facility licence | The Sheryan facility ID on 1. Settings is your clinic’s own 7-digit DHA facility licence. The testing code DHA gives you (such as TCODE10) works for testing but not for going live. | Yes |
| Insurance details | The insurance plan ID and payer code are mapped on 3. Mapping. If they aren’t, your patients’ insurance is left out of the messages and everything else is still sent. | No, it’s a warning |
| Service NABIDH specialties | Every service booked in the last 90 days has a NABIDH specialty. Set them under 1. Settings → Your services. | Yes |
| Diagnosis codeset | New problems are coded in ICD-10 or SNOMED, the only codesets NABIDH accepts. If not, click Set ICD-10 as default under 1. Settings → Your services → Diagnosis codeset. | Yes |
| Clinical form bindings | Each vitals, social history and family history row on 3. Mapping points to one form and question. Re-pick any binding it lists, for example after renaming a form. | No, it’s a warning |
IMPORTANT: Run the readiness check while the connection is on Test. A connection can only move to Production from Test. If yours shows Dummy, click Move to test on the Review tab first.
Step 2: Choose a Test Patient and Run the Check
- Click Go live. The Readiness check opens. Any setup item that blocks going live is repeated at the top.
- Search for a patient by name or email and pick one whose record is complete: Emirates ID, nationality and insurance filled in, an appointment, recorded allergies and coded problems.
- Click Run check.
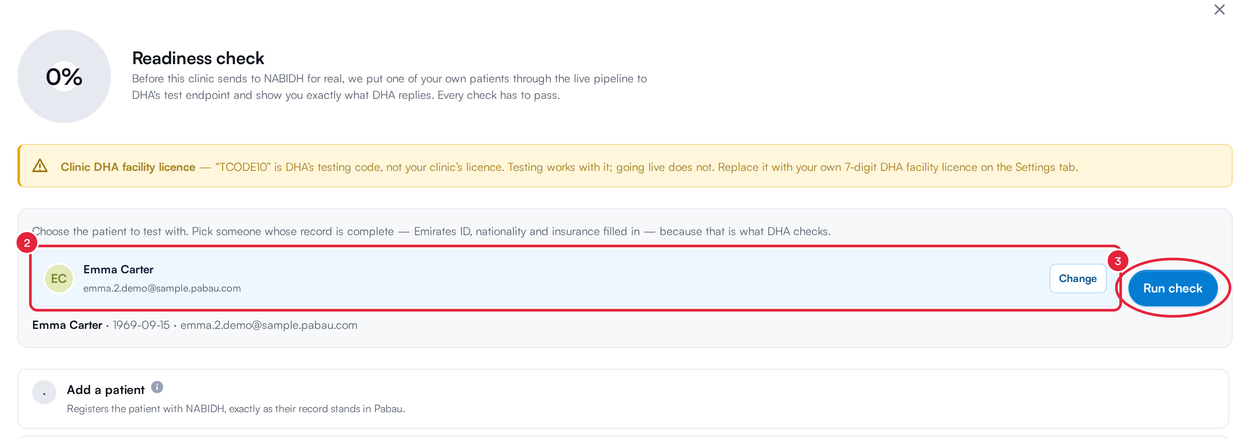
Pick a patient with a complete record, then run the check
The checks run one at a time, from adding the patient through to their appointment, prescriptions, documents and forms. Each one sends a real message built from that patient’s record to DHA’s test endpoint and waits for DHA’s reply. The rows for prescriptions, letters and form answers only appear when those triggers are switched on (see Part 4).
NOTE: The appointment checks use one of the patient’s existing appointments. Nothing is booked or changed in your calendar, and the cancellation check is only reported to DHA’s test endpoint.
Step 3: Read the Results
- Passed means DHA accepted that message.
- A Failed check says in plain words what DHA rejected and where in Pabau to fix it.
- Technical details shows the message that was sent and DHA’s reply, word for word. Quote it if you contact Pabau support.
- Hover the i next to any check to see what it needs to pass.
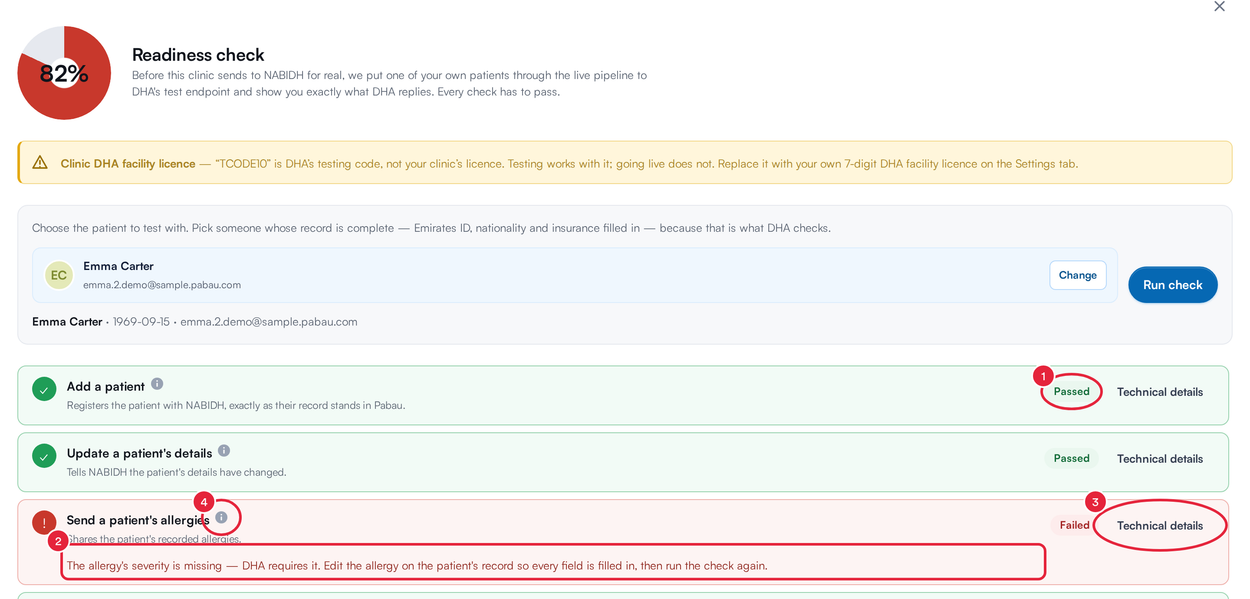
Each check shows DHA’s verdict
The circle at the top shows the share of checks that passed.
Step 4: Fix What’s Missing and Run It Again
- Not run means the patient doesn’t have that kind of record, such as a prescription, a PDF document, a letter they’ve been sent or a completed form. A check that didn’t run doesn’t count as a pass: add the record, or click Change and pick a patient who has one.
- The line at the bottom sums up the run and tells you what to do next.
- Go live stays greyed out until every check has passed and nothing in the setup checklist is blocking.

Fix what DHA reported, then click Run check again
Once you’ve corrected the record or setting, click Run check again. The whole run repeats.
TIP: If a check says NABIDH didn’t reply in time, the message keeps retrying on its own. Wait a few minutes, then run the check again.
Step 5: Switch the Connection to Production
When every check passes and the checklist is clear, the line at the bottom reads Every check passed.
- Click Go live at the bottom of the readiness check. Pabau takes you to 1. Settings.
- Enter the production details from DHA. Check that Sheryan facility ID holds your 7-digit facility licence, and replace the Endpoint URL with the production URL. If DHA gave you a separate application key for production, click Replace credentials in the Credentials card and paste it.
- Open Environment and choose Production. It stays greyed out until DHA has accepted every message type; hover it to see which ones are still unproven.
- Open 4. Review and click Save.
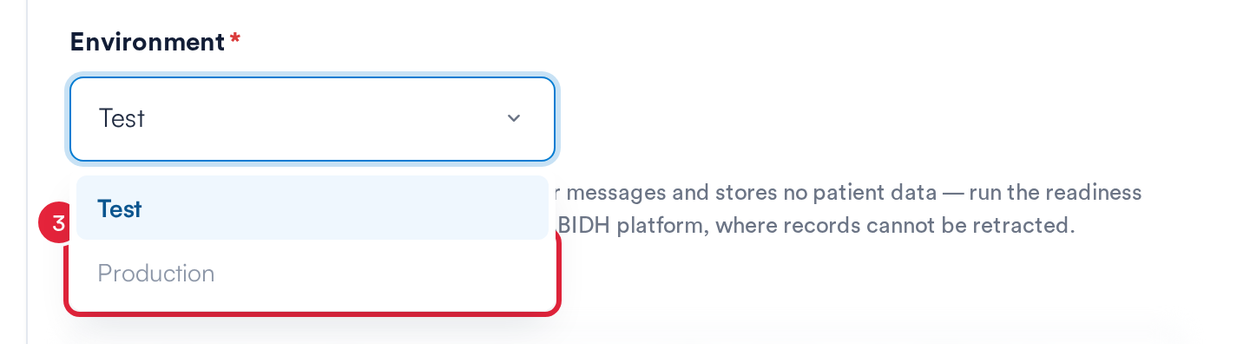
Production unlocks once DHA has accepted every message type
WARNING: In Production, every message goes into your patients’ Dubai health records, and NABIDH records can’t be taken back. Only switch when you’re ready to report for real.
NOTE: Passes count for 30 days. Pabau checks again when you save: if a pass is older than that, the switch is refused and you’re asked to run the check again, and if a practitioner has no DHA licence number, you’re asked to add it first.
Step 6: Step Back to Test
On the Review tab, a connection in Production shows Back to test. One click switches it back to Test, with no check needed.
Back to test changes the environment only. Messages still go to the Endpoint URL on the Settings tab, so put your test endpoint back there and save. To stop sending to NABIDH altogether, click Pause instead.
What's next?
- NABIDH Guide Part 5: Test, Monitor and Troubleshoot NABIDH Deliveries
- NABIDH Guide Part 6: NABIDH Error Codes and Delivery Statuses
- NABIDH Guide Part 3: Map Your Data for NABIDH
Was this guide helpful? Let us know by voting below - your feedback helps us write clearer articles.
For more guides, browse the related articles below or use the search bar at the top of the page. You can also watch our video learning series, the Pabau Academy, or visit the Support page for additional help.