
When your clinic has connected Quest Diagnostics, you can order Quest tests without leaving the client’s record. Pabau checks the patient is in your Quest account, sends the order straight to Quest from the lab request, prints Quest’s requisition or patient letter, and brings the results back onto the same request when they are ready.
NOTE: Quest Diagnostics is available for clinics in the United States, and must be connected under Setup ▸ Labs first. See How to Connect Quest Diagnostics to Pabau.
Step 1: Start a Lab Request and Choose Quest
- On the client’s card, click + and choose Order labs.
- Click Quest Diagnostics, then tick the tests and panels you need in the catalogue and click Continue.
Each test you pick is listed under Quest order codes with the code Quest will receive. A test marked No Quest code can’t be ordered from Quest yet: remove it, or ask us to add the code. For the rest of the catalogue (searching, past requests, Repeat), see How to Create a Lab Request (New Client Card).
IMPORTANT: Quest needs the patient’s date of birth and sex, so the client needs both on their record. If either is missing, Pabau asks you to add a date of birth and gender before ordering from Quest.
Step 2: Add the Diagnosis Codes
On Diagnosis codes, add the ICD-10-CM codes that explain why the tests are ordered. At least one code is needed before the order can be sent.
- Search by code or diagnosis in Search diagnosis codes.
- Click a result to add it.
- Check Diagnoses for this request. It starts pre-filled from the client’s active diagnoses, if they have any.
- Click Save and continue.
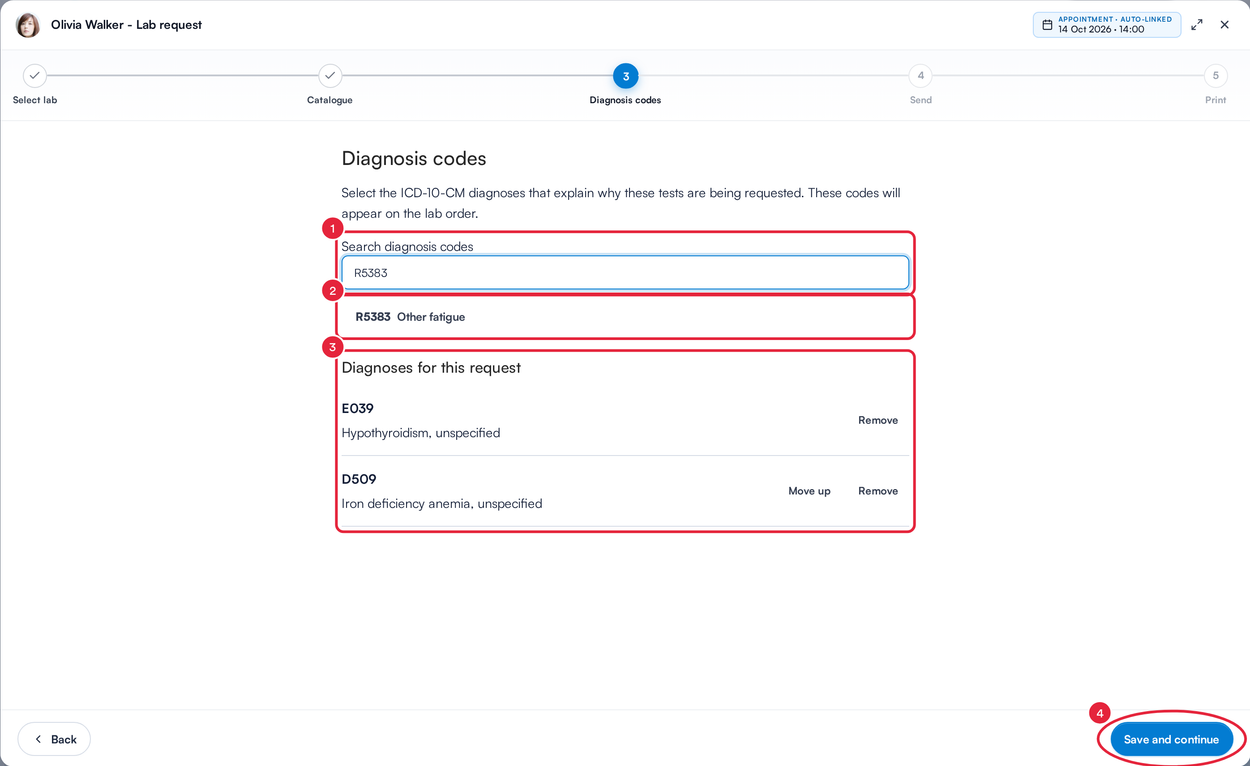
Add the ICD-10-CM codes for the order
Step 3: Check the Patient Is in Quest
The Send step shows the tests in the request, and Pabau checks your Quest account for the patient (Checking this client is in Quest…). It matches on the exact name and date of birth, so a near miss is never treated as the same person.
- Check Tests in this request.
- If you see This client is in Quest., carry on. If you see This client isn’t in Quest yet. Add them before ordering., click Create in Quest: Pabau adds the patient to your Quest account from their Pabau details, so nobody retypes them.
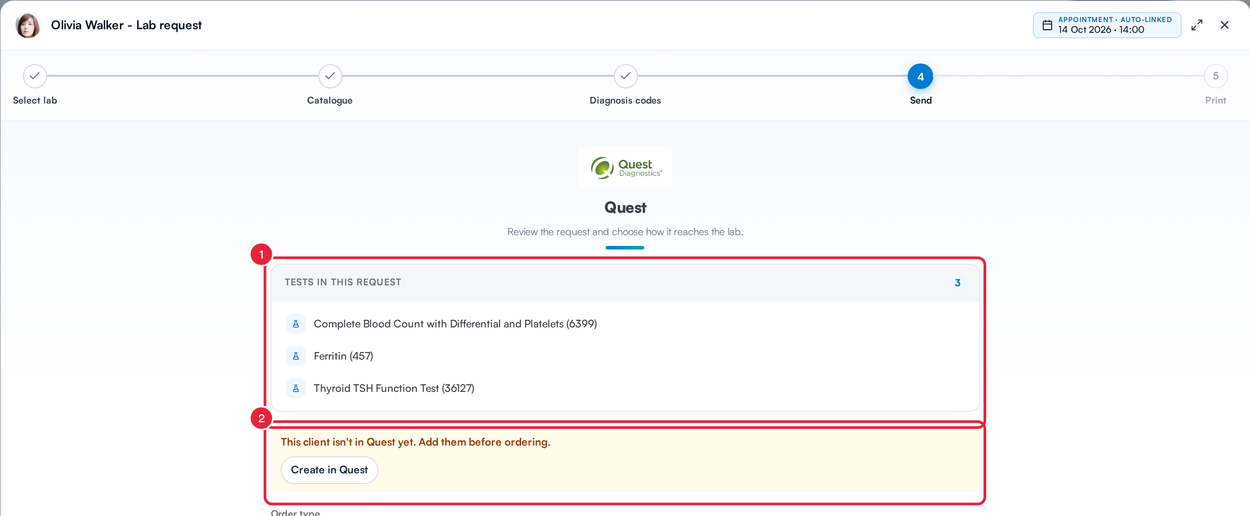
The Send step checks the client is in Quest before you order
NOTE: If Quest thinks a patient with similar details already exists, nothing is created. Click Open Quest patients to review the list in Quest, then Check again.
Step 4: Choose How the Order Goes to Quest
- Under Order type, choose:
- Save as draft in Quest: nothing goes to the lab yet. A clinician finishes and e-signs the draft in Quest.
- PSC Hold — patient goes to a Quest centre: the patient has their sample taken at a Quest Patient Service Center, and you get a letter to give them.
- Collected in clinic: the sample was taken at your clinic. Enter the Collection date and Collection time (they can’t be in the future), and you get a requisition to send with the specimen.
- Under Bill to, choose Patient or Insurance.
- Choose the Requesting doctor: the doctor this order is placed under in Quest. The list comes from your Quest account.
- Click Place order in Quest, or Save draft in Quest for a draft.
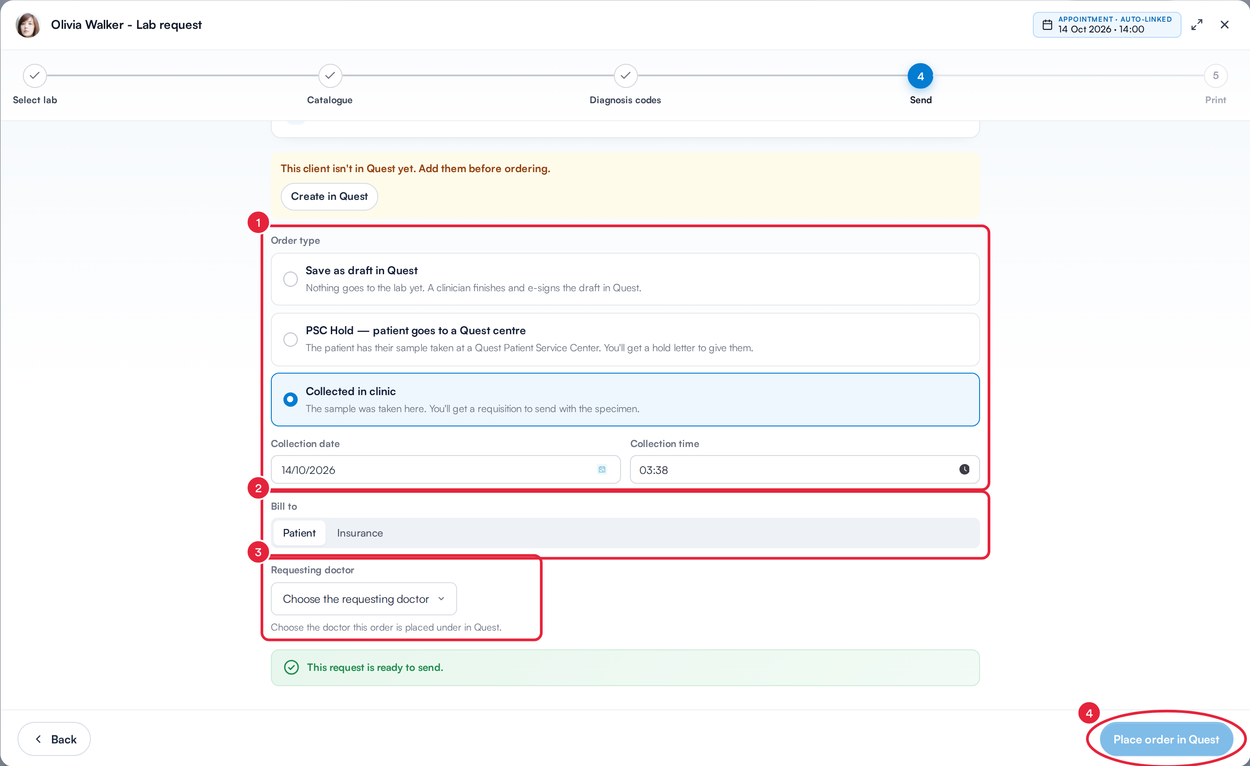
Order type, Bill to and Requesting doctor
When you bill Insurance, Pabau checks the client’s insurance with Quest first and shows what Pabau, Quest and the insurer each hold. If they disagree, choose the right value, and pick the matching Quest carrier if asked. Save to Quest updates the client’s record in Quest only; nothing changes in Pabau. When the check is done you’ll see Insurance checked. Quest will bill it with this order.
Step 5: Read Quest’s Reply
Placing the order can take up to a minute. When Quest answers, you’ll see Order placed in Quest, PSC Hold order placed in Quest or Draft saved in Quest, with the Requisition number, Order type, Quest status, Ordering physician and the Tests. Anything Quest raised is listed under Quest flagged.
- For a draft, click Finish and e-sign the draft in Quest to complete it in Quest, then Done. For a placed order, Open in Quest opens it in Quest.
- If Quest didn’t accept the order, read the reason and click Try again. Trying again is safe, because Quest never files the same order twice.
Step 6: Print Quest’s Documents
For a placed order, click Continue to print and print Print lab requisition (for a sample collected in clinic) or Print patient letter (for a PSC Hold). Pabau also saves a copy to the client’s documents.
TIP: To reprint later, open the request’s menu on the client’s Lab Tests tab, click Print and choose Quest lab requisition or Quest patient letter. Quest only returns requisitions for orders placed in the last 3 days, so for an older order print it from Quest.
Canceling a Quest Order
Open the request’s menu on the Lab Tests tab and click Cancel. Choose Quest’s reason under Reason for cancelling and click Cancel at Quest: Pabau cancels the requisition at Quest, then marks the request canceled. If Quest doesn’t confirm, you can still click Cancel in Pabau only, but the requisition stays open at Quest until you cancel it there.
If You Order in Quest Instead
If Quest can’t take the order from Pabau, Open in Quest instead opens Quest on the right patient so you can build the order there. Then come back to Pabau, click Retrieve order, choose Last hour, Today or Last 3 days, tick the requisition marked This client and click Import to Pabau. The order is added to the client’s record as a lab request. Orders that are Already in Pabau or that Doesn’t match this client aren’t imported.
What Happens Next
When Quest releases the results, the scheduled Quest sync brings them back onto the same lab request, so there is no duplicate to tidy up. To pull in results yourself, or to check the sync, see How to Sync Quest Diagnostics Results into Pabau.
What's next?
- How to Connect Quest Diagnostics to Pabau
- How to Sync Quest Diagnostics Results into Pabau
- How to Create a Lab Request (New Client Card)
Was this guide helpful? Let us know by voting below - your feedback helps us write clearer articles.
For more guides, browse the related articles below or use the search bar at the top of the page. You can also watch our video learning series, the Pabau Academy, or visit the Support page for additional help.