Table of Contents:
1.How to Operate a Waitlist2.How to Add a Client to the Waitlist
3.How to Book a Client from the Waitlist
4.How to Remove a Client from the Waitlist
5.How to Send Waitlist Notifications for Self-Booking
6.How to Edit the Waitlist Notification
7.How to Enable Waitlist in Online Bookings
8.How to Join the Waitlist via Online Bookings
How to Operate a Waitlist
In this article, we’ll walk you through the steps to set up and effectively manage the Waitlist feature in Pabau to maximize your clinic's productivity.
The waitlist feature in Pabau allows you to automatically fill last-minute cancellations and gaps in your schedule with clients who are waiting for their preferred time slots. This simple but powerful tool automatically notifies clients when a spot opens up, helping you boost your clinic’s revenue and improve client satisfaction.
Step 1: Navigate to Calendar
Log into your Pabau account and navigate to the Calendar where you manage your appointments.

NOTE: To learn more about managing your calendar, please refer to the this article.
Step 2: Access Waitlist
After opening the Calendar, click the "Waitlist" button on the right-hand side of the screen. The Waitlist panel will then slide open, allowing you to manage the waitlist.
Step 3: Add a Client to Waitlist
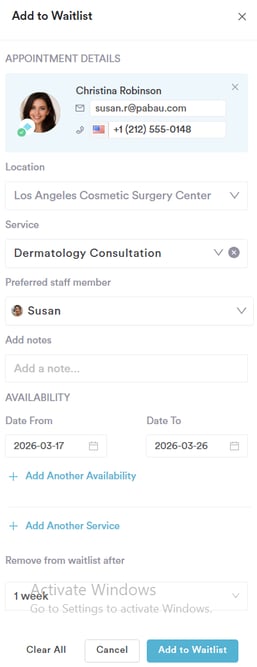
In the new window, click the "Add to Waitlist" button. This will open an appointment menu where you need to enter the client’s details:
Client Name – Type the client's name.
Service – Select the service the client is requesting.
Preferred Staff Member – Choose the staff member the client prefers (if applicable).
Availability – Specify the client’s preferred time and availability.
Remove After Time – Set the time when the client will automatically be removed from the waitlist if the appointment is not booked in time.
Step 4: Book a Client In or Send a Notification
When an appointment slot becomes available:
Book the Client In: If the client is available and a match is found, you can immediately book the client into the available time slot.
Send a Notification: If the client prefers to self-book, you can send them a notification (email/SMS) allowing them to book the slot on their own.
Step 5: Waitlist Notifications
You can customize the waitlist notifications to ensure your clients receive the appropriate alerts when an appointment becomes available. To configure waitlist-specific notifications, please refer to the client notifications.
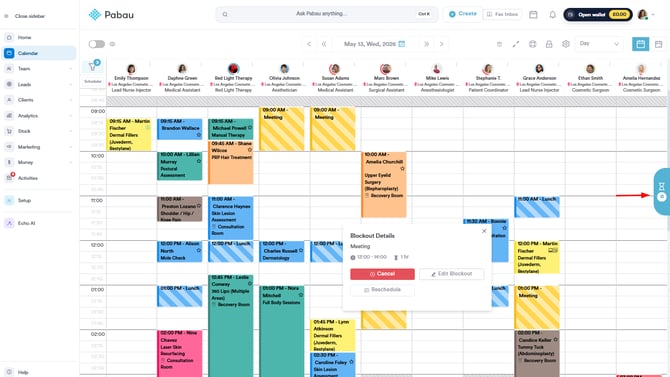
Additionally, when an appointment is canceled, Pabau now automatically checks the waitlist for matching entries. If a match is found, the system will display the entry in the following ways:
If the waitlist is open (meaning you are actively viewing the list or have it open on your screen): Any matching waitlist entry will be highlighted in green to draw attention, until the waitlist is manually closed.
If the waitlist is closed (meaning you are not actively viewing or have closed the waitlist):
A number will appear on the waitlist button itself to notify the user of the matching entry.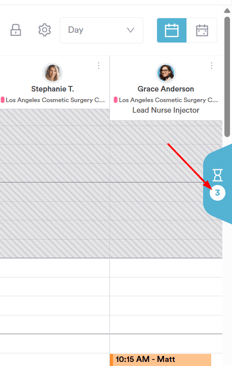
How to Add a Client to the Waitlist
In this guide, we'll show you how to add a client to the Pabau waitlist, helping you manage cancellations and fill schedule gaps by allowing clients to wait for their preferred time slots.
Step 1: Navigate to Calendar
Log into your Pabau account and navigate to the Calendar where you manage your appointments.
NOTE: To learn more about managing your calendar, please refer to the this article.
Step 2: Access the Waitlist Feature
Once you open Calendar, click the "Waitlist" button on the right-hand side of the screen. The Waitlist panel will then slide open, allowing you to manage the waitlist.
Step 3: Add a Client to the Waitlist
In the new window, click the "Add to Waitlist" button. This will open an appointment menu where you need to enter the client’s details:
Client Name – Type the client's name.
Service – Select the service the client is requesting.
Preferred Staff Member – Choose the staff member the client prefers (if applicable).
Availability – Specify the client’s preferred time and availability.
Remove After Time – Set the time when the client will automatically be removed from the waitlist if the appointment is not booked in time.

Step 4: Save the Changes
Once all the details are entered, click on "Add to Waitlist" at the bottom-right corner to save the changes and add the client to your waitlist.
Now that you know how to add a client to the waitlist, you can easily manage cancellations and keep your schedule full, ensuring better productivity and client satisfaction.
How to Book a Client from the Waitlist
In this guide, we’ll show you how to quickly book a client from the waitlist when an appointment becomes available. This process helps you efficiently fill last-minute cancellations and ensure your schedule stays full.
Step 1: Navigate to Calendar
Log into your Pabau account and navigate to the Calendar where you manage your appointments.
Step 2: Check for Available Slots
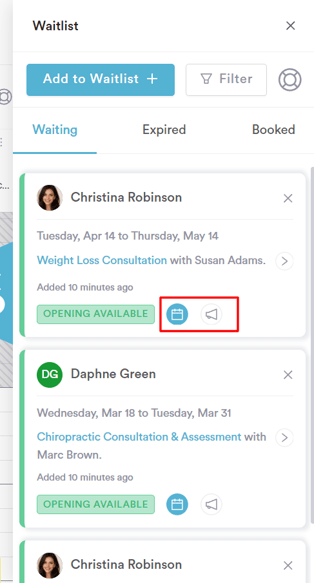
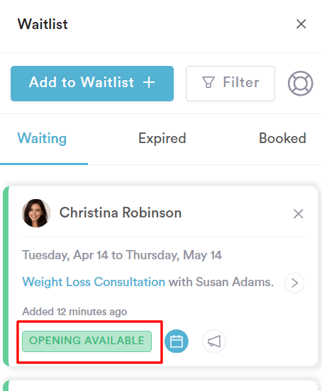
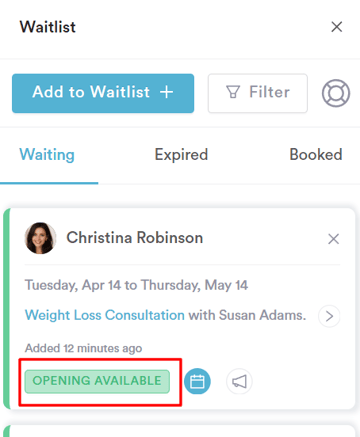
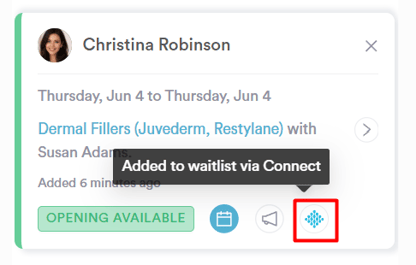
When an appointment is cancelled, the system will automatically check the waitlist to see if any clients are waiting for that same timeslot. If a match is found, the Waitlist button will display a number indicating how many clients are waiting for that specific time. Additionally, a notification will appear next to the waitlist entry saying “Opening Available” to alert you to the new available slot.
NOTE: In addition to manually booking clients, you can also send them a message in one click to inform them that a slot has opened up by following the steps in this article.
Step 3: Book an Appointment with the Client
In the waitlist modal, you’ll see a calendar icon next to the “Opening Available” notification. Click on this icon, and you’ll be redirected to the calendar.
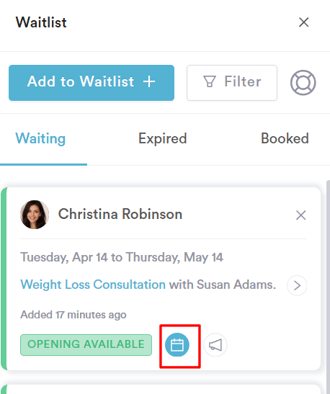
Note: Before finalizing the booking, we recommend reaching out to the client to confirm their interest in the service. This helps avoid booking an appointment if they have since changed their mind.
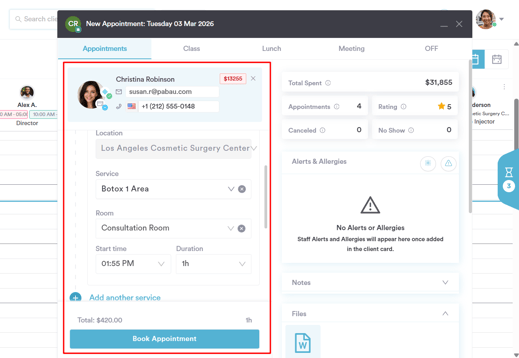
Step 4: Choose an Available Time Slot
Once redirected to the calendar, choose the matching date and time for the client. Then, add the service, set the duration, and fill in any other necessary details. After completing the information, proceed with booking the appointment for the client.
Once the appointment is booked, the client will receive your default email/or SMS confirmation, which you can customize by following these steps.
Now that you know how to book a client from the waitlist, you can easily manage your appointments and ensure a smooth scheduling process.
How to Remove a Client from the Waitlist
In this article, you will learn how to remove a client from the waitlist if their appointment is no longer needed.
Step 1: Navigate to Calendar
Log into your Pabau account and navigate to the Calendar where you manage your appointments.
NOTE: For more information on managing the waitlist, please refer to this article.
Step 2: Access the Waitlist Feature
Once you open Calendar, click the "Waitlist" button on the right-hand side of the screen. A panel will then appear on the right side of your screen, allowing you to manage the waitlist.
Step 3: Locate the Client
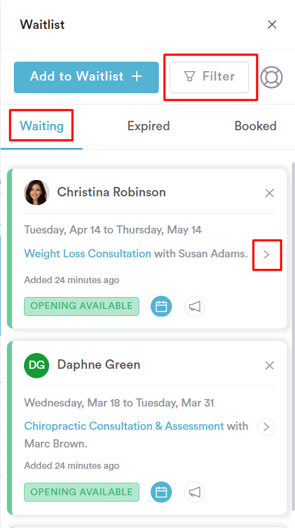
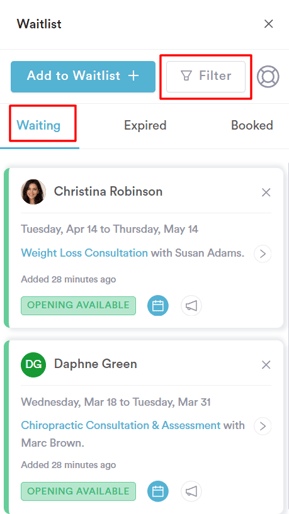
In the waitlist panel, you can view all clients listed under the "Waiting" tab or use the filter options to quickly find the client you wish to remove.
Step 4: Proceed with Removal
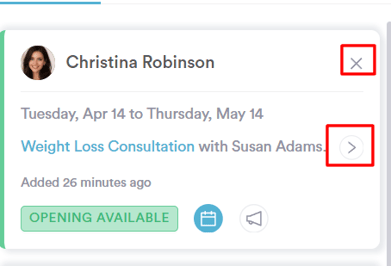
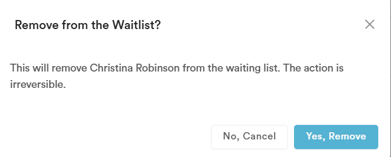
To remove a client from the waitlist, click the "X" button in the top-right corner of their entry in the waitlist panel for immediate removal, or click the arrow next to their name to open their appointment details and then click the "Remove" button in the top-right corner of the details view. You will be prompted to confirm the removal if using the detailed option.
Once confirmed, the client will be successfully removed from the waitlist.
By following these steps, you'll be able to successfully remove a client from the waitlist.
How to Send Waitlist Notifications for Self-Booking
In this guide, we'll walk you through the process of sending notifications to clients, allowing them to self-book an appointment when a slot becomes available.
Step 1: Navigate to Calendar
Log into your Pabau account and navigate to the Calendar where you manage your appointments.
Step 2: Access the Waitlist Feature
Once you open Calendar, click the "Waitlist" button on the right-hand side of the screen. A panel will then appear on the right side of your screen, allowing you to manage the waitlist feature.
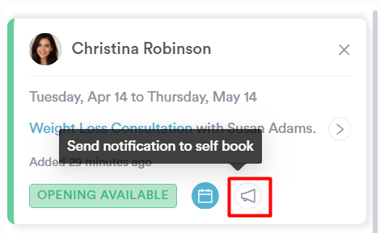
Step 3: Locate the Client
In the waitlist panel, view all clients listed under the "Waiting" tab or use the filter options to quickly find the client you wish to notify.
Step 4: Send the Self-Book Notification
Find the client for whom an opening has become available, then click the notification button to notify them that they can book the appointment.

NOTE: Before sending the notification, make sure that waitlist notifications are enabled under Client Notifications in the Setup. To customize the template that will be sent to clients when there is a slot available, follow the steps in this guide.
Once the notification is sent, the client will receive an email to inform them that they can book the available appointment slot.
Now that you know how to send notifications to clients, you can easily manage the waitlist and ensure clients are notified when an appointment slot becomes available.
How to Edit the Waitlist Notification
Step 1: Navigate to Setup
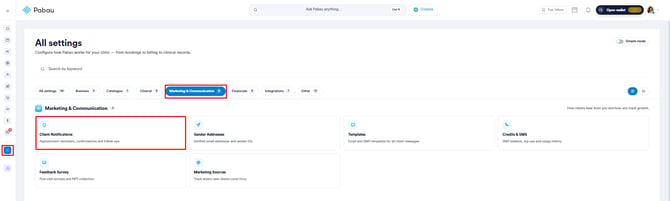
Start by logging in to your Pabau account using your login credentials. Then, navigate to the Setup page. Under the Marketing & Communications section, you will find ''Communications.'' Click to expand, and it will reveal the Client Notifications tab.
Step 2: Select the Waitlist Notification
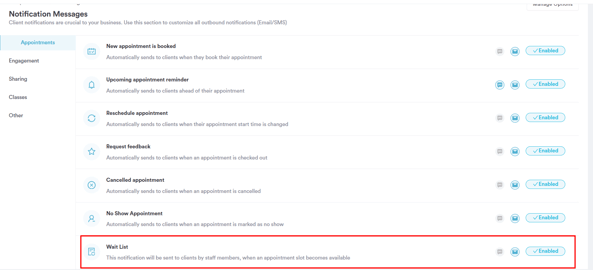
On the Client Notifications page, you’ll see all the automated communication templates sent to clients. To edit the standard template for the ''Waitlist'' Notification, simply click on it.
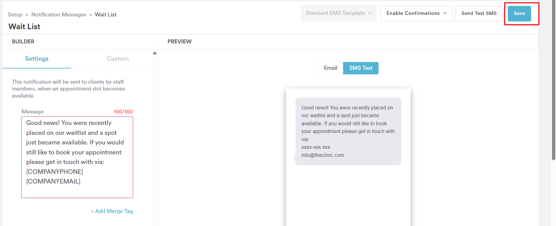
Step 3: Edit Notification
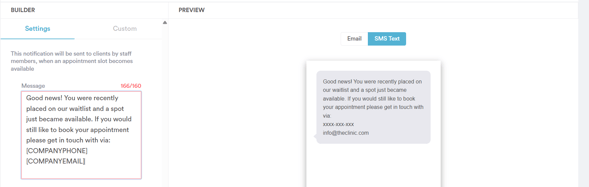
All your editing options are listed on the left-hand side in the Builder section. You can make adjustments there and preview your changes in the ''Preview'' section.
You can edit the background, text, and button colors. You can also add additional text to the notification, adjust the logo size, and include your social media icons.
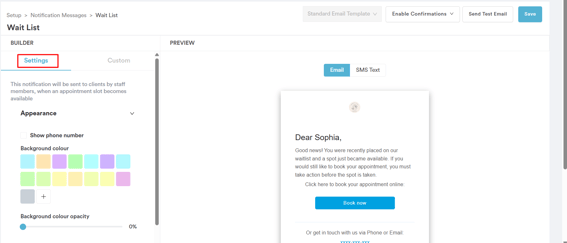
To edit the SMS notification, switch to the SMS Text tab and update the text in the message box. You can also add merge tags to include details like client information, appointment specifics, date, time, and more.
Step 4: Save Changes
After making the adjustments, click the ''Save'' button on the top right corner to finalize the changes.
By following these steps, you can customize your waitlist notification template.
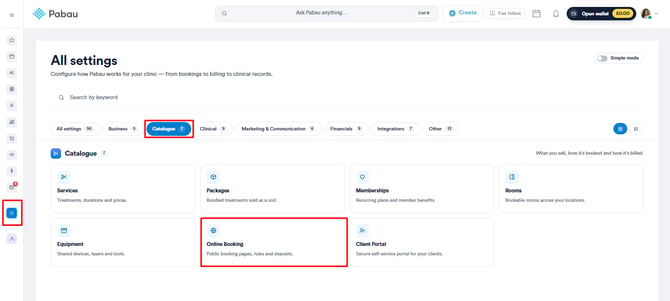
How to Enable Waitlist in Online Bookings
In this article, you will learn how to enable the Waitlist feature in Online Bookings. This feature allows your clients to add themselves to a waitlist when no appointment slots are available.
Step 1: Navigate to Setup
Start by logging into your Pabau account using your login credentials. Then, navigate to the Setup button located at the bottom left corner of the screen.
Under the ''Catalogue'' section you'll find the ''Online Booking'' tab.
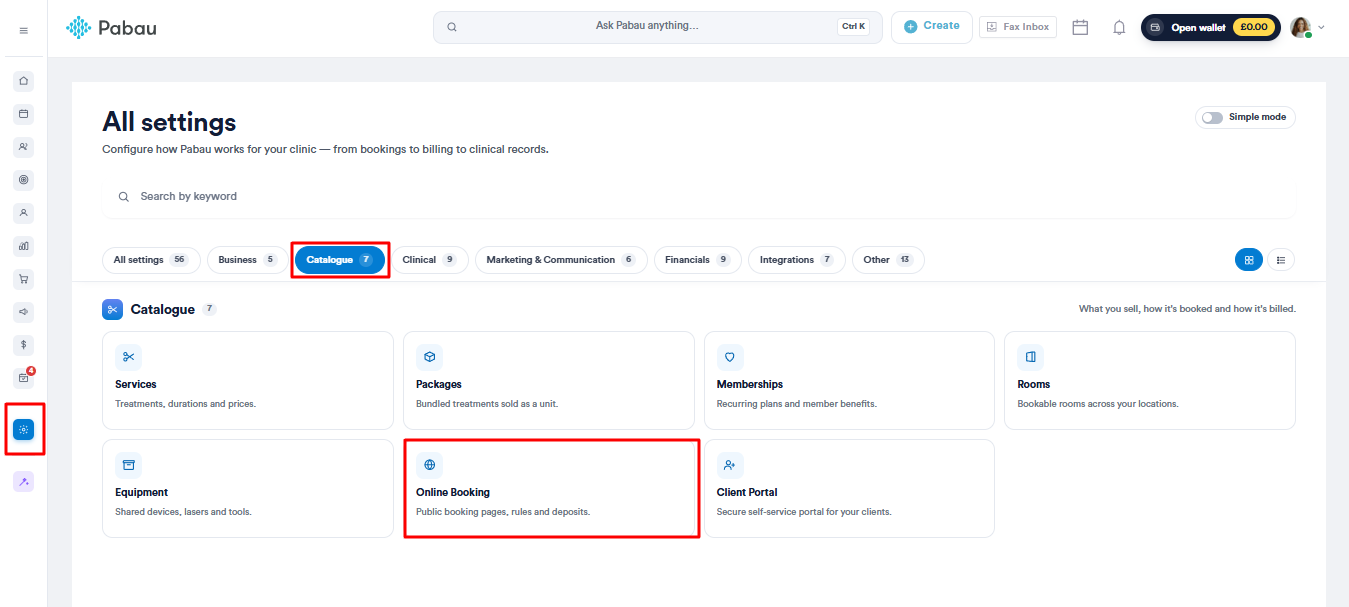
Step 2: Customize Online Booking
Click the ''Customize'' button located on the bottom right side of the screen to access available settings.

Step 3: Enable Waitlist
In the Online Bookings customization section, go to the ''General'' tab and scroll down slightly to find the ''Allow Waitlist'' option. Check the box to activate the waitlist feature.

Step 4: Save the Changes
Next, click ''Save changes'' in the top right corner to apply your settings.

Make sure Online Bookings are enabled by toggling the switch at the top, then click ''Save changes'' to apply.
To learn more about how to enable Online Bookings please refer to this article.
Once the waitlist is enabled, this is how it will appear to your clients in Online Bookings.
Enabling the Waitlist feature allows your clients to join a waitlist when appointments are fully booked, helping you manage demand more effectively. By following the steps above, you can easily activate or deactivate this feature to suit your clinic’s needs.
How to Join the Waitlist via Online Bookings
This article explains how clients can join the waitlist from the online booking portal.
Step 1: Navigate to Your Online Booking Portal
Access your online booking portal to get started with the process. You can either access it by clicking on the ''Book Now'' button from your website, or you will be able to locate the portal link in your Pabau account in the Online Booking tab.

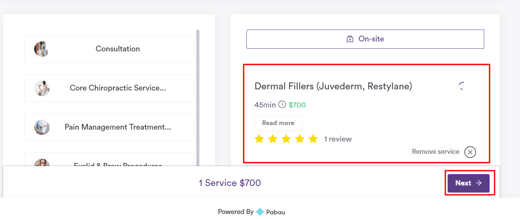
Next, they should select a service from the chosen category and click "Next" at the bottom right to proceed with the booking.
NOTE: For more information about the waitlist, please refer to this article.
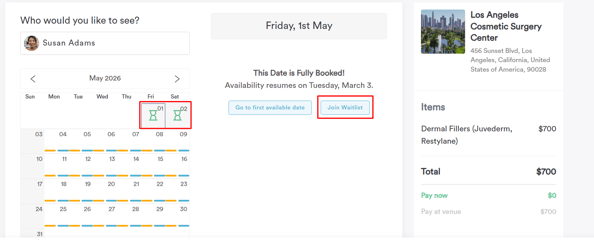
Step 3: Choose a Date and Time
After selecting a service, clients will be redirected to the calendar to view available time slots. A waitlist notification will always be present, prompting clients to join the waitlist if needed.
If the desired slot is fully booked, a sand clock icon will appear next to the date, indicating that the slot is unavailable.
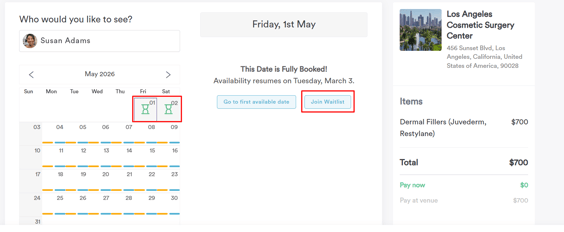
Step 4: Join the Waitlist
If the client clicks the ''Join Waitlist" button, the following will occur based on their account status:
-
If not logged in: They will be redirected to the login screen. After logging in, they will be directed to the Waitlist Information screen.
-
If logged in: They will be immediately taken to the Waitlist Information screen to input their details.
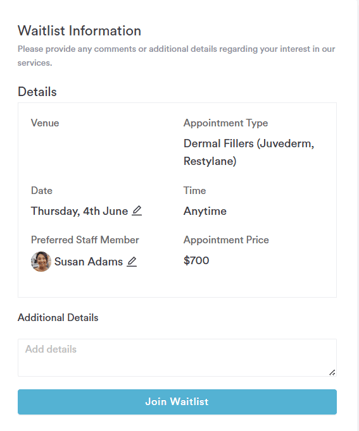
Step 5: Submit Waitlist Information
Once on the Waitlist Information screen, clients can choose a preferred staff member (if applicable), select a preferred date, and add any special comments in the text box. After completing the details, they can click "Join Waitlist."
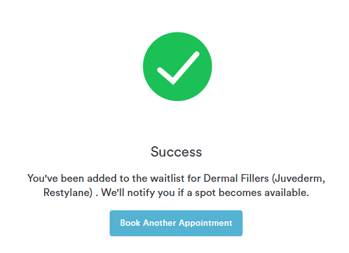
Upon submission, clients will be redirected to a success screen confirming their addition to the waitlist. A "Book Another Appointment" button will be available, allowing clients to open the online booking portal and schedule another appointment if desired.
To learn more about sending a self-book notification to a client so they can book themselves, refer to this article. If you'd like to know how to book a client from the waitlist, refer to this article.
For more guides, refer to related articles below, select additional guides, or use the search bar at the top of the page. These guides will help you get the most out of your Pabau account.
Additionally, to help you fully utilize and understand your Pabau account, we recommend exploring additional guides and resources offered at the Pabau Academy. It offers in-depth video tutorials and lessons, offering a holistic learning experience that can equip you with the essential skills for achieving success with Pabau.