
NOTE: This feature is part of the new client card version and is currently available to select users only, starting August 2026. A wider rollout to all accounts is coming soon.
Step 1: Navigate to the Activities Tab
Log in to your Pabau account and open the client card of the client whose activities you want to review.
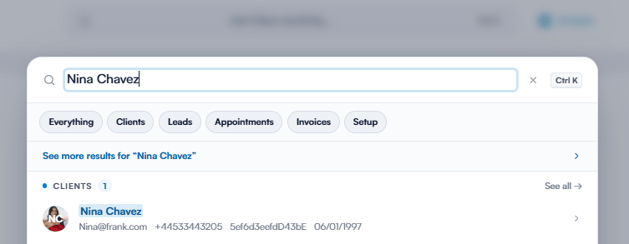
At the top of the client card, click on the "Activities" tab. The number next to the tab shows how many activities the client has, including both scheduled and completed ones.
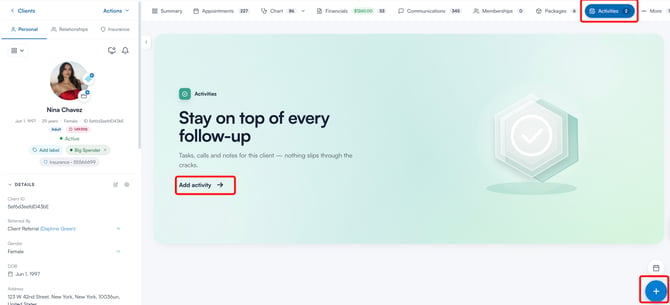
If no activities have been created for the client yet, you will see a welcome panel instead of a list. Click on "Add activity" to create the first one. You can also create activities at any time by clicking on the "+" (Create) button in the bottom-right corner of the screen and choosing "Activity".
Depending on your permission level, you may only see the activities that are assigned to you or that you created.
Step 2: Understanding the Activities Overview
Once the client has activities, the tab displays them as a list, grouped by status. Here’s a breakdown of the key elements on the page:
Filtering Activities
Along the top of the page, you will find a row of filter pills: "ALL", plus one pill for each activity type your clinic has set up, such as Email, Call, Message, or Meeting. Click on a pill to display only activities of that type.
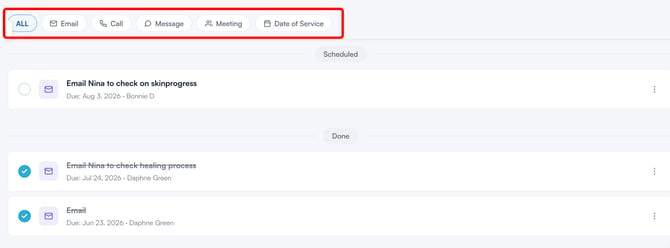
How Activities Are Grouped
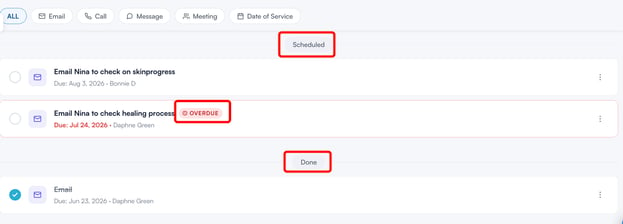
Activities are grouped under headings based on their status, shown in this order:
- Overdue - Activities whose due date has passed without being completed. These sit at the top of the list, and each one carries a red "OVERDUE" label.
- Scheduled - Upcoming activities that have not been completed yet.
- Done - Completed activities.
If the client has a long list of activities, use the pagination controls at the bottom of the list to move between pages and change how many rows are shown per page.
The Activity Row
Each row in the list represents one activity and includes:
- Completion circle - Click on the circle on the left to mark the activity as complete, or click on it again to reopen it. Completed activities are filled in with a checkmark, and their title is struck through.
- Type icon and name - The activity type icon and the activity’s name, with the "OVERDUE" label if its due date has passed.
- Due line - The date the activity is due and the employee it is assigned to.
- Three-dot menu - The available actions for the activity.

Managing Individual Activities
Click on the three-dot menu on the right side of an activity to manage it:
- Mark as complete - Complete the activity, the same as clicking on the circle. For completed activities, this becomes "Mark as pending", which reopens the activity.
- Edit - Open the activity form to make changes.
- Delete - Permanently remove the activity. You will be asked to confirm, as this cannot be undone. Activities can only be deleted one at a time.

If the "Edit" or "Delete" option is greyed out, your permission level doesn’t allow that action. Ask an account administrator to update your permissions if you need it.
Adding and Editing Activities
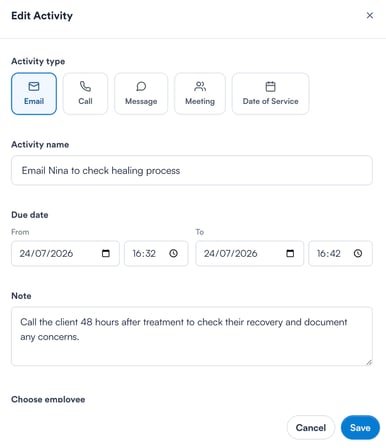
When you create or edit an activity, the activity form opens. Here, you can set:
- Activity type: Choose the type of activity by clicking on one of the type tiles.
- Activity name: Give the activity a name. The name is filled in automatically with the selected type’s name until you type your own.
- Due date: Set when the activity is due using the "From" and "To" date and time fields. The "To" date must be on or after the "From" date.
- Note: Add a note with any details, such as instructions for a colleague.
- Choose employee: Select the employee the activity is assigned to.
- Mark as done: Optionally tick this checkbox to create the activity as already completed.
The client is fixed to the client whose card you are on. The activity type, name, due dates, and employee are required fields — the "Save" button stays unavailable until they are filled in. When you are finished, click on "Save".
Tips for Getting the Most Out of the Activities Tab
- Check the Overdue group daily - Overdue follow-ups are grouped at the top, so you can catch missed calls and tasks before they become a problem.
- Assign activities to a specific employee - Every activity has an owner, so follow-ups never fall between two team members.
- Use notes to hand over context - Add the details a colleague needs to complete the activity without having to ask around.
- Log completed actions with "Mark as done" - Record a call or meeting that already happened so the client’s history stays complete.
By using these groups and filters, you can keep every follow-up for a client visible, assigned, and on time.
For more guides, refer to related articles below, select additional guides, or use the search bar at the top of the page. These guides will help you get the most out of your Pabau account.
Additionally, to help you fully utilize and understand your Pabau account, we recommend exploring additional guides and resources offered at the Pabau Academy. It offers in-depth video tutorials and lessons, offering a holistic learning experience that can equip you with the essential skills for achieving success with Pabau.