Table of Contents:
1. How to Access Team Members
2. How to Create a Team Member
3. How to Edit a Team Member
4. How to Deactivate a Team Member
5. How to Reactivate a Team Member's Account
6. How to Send a Password Reset Email to a Team Member
7. How to Set Up Your Personal Details
8. How to Set Staff Permissions
9. How to Set Up a Prescriber
10. How to Assign a Department to a Team Member
11. How to Assign Job Titles to Team Members
12. How to Add Staff Signatures
13. How to Quick Sign Medical Forms
14. How to Upload Staff Documents
15. How to Grant Super Admin Permissions
How to Access Team Members
In this article, we'll cover how you can access and manage your Pabau team members, from navigating the Team page to utilizing search, view, and filter options.
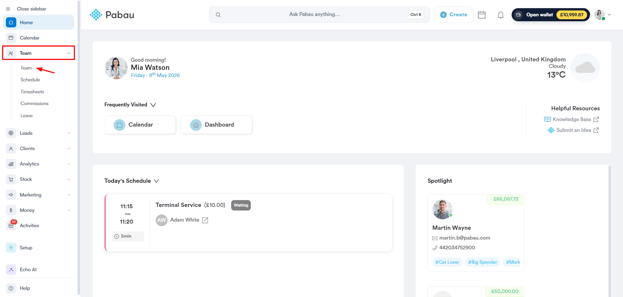
Log in to your Pabau account, and in the left sidebar menu, go to Team, then click on the "Team" button.
On the Team page, you can view all of your staff members.
To search for a specific staff member, use the search bar. In the top right corner, you can toggle between Grid and List view.


By following these steps, you can easily manage and search for staff members in Pabau, using filters and view options to organize your team efficiently.
NOTE: You can also learn about this topic by watching a lesson on Pabau Academy.
How to Create a Team Member
Do you have a new member of staff starting at your clinic? You’ll need to add them to Pabau as a new user.
Step 1: Navigate to the Team feature
Log in to your Pabau account, and in the left sidebar menu, go to Team, then click on "Team" again.

Step 2: Click on New Staff Member
Click on the "New Staff Member" in the top right corner of the page. You will first need to select the default location for this user.

If they work in multiple locations, click on "This team member works at other locations" to reveal a list of all your locations. Select all the locations where they'll be working.
Next, fill out the basic user details - first name, last name, email, and staff title.

The email you enter here will serve as the user's login email. They will receive a confirmation email to finalize the account creation process.
Step 3: Set Permissions
After you've filled out the basic user details, click on the "Set permissions" button in the top-right corner.

NOTE: To learn more about roles, read our How to Create a Role article.

Next, click on "Create staff" in the top right corner of the page. The user is now created.
NOTE: You can also learn about this topic by watching a lesson on Pabau Academy.
How to Edit a Team Member
This article covers how to edit a staff member in Pabau. Once users are created, you can easily customize and modify their profiles to fit your specific needs.
Step 1: Navigate to the Team feature
Log in to your Pabau account, and in the left sidebar menu, go to Team, then click on "Team" again.
Step 2: Edit the User Settings
Click on the user you want to edit. The user settings are organized into four tabs for ease of access:

-
Personal Details: Update the user’s name, email, bio, signature, and any additional information.
-
Services: Adjust the services this user can perform. Manage their ability to offer services, sell products, appear on the calendar, and accept online bookings. Toggles enabled will reflect as icons beneath the user name.
-
Permissions: Alter the current role or permissions of the user.
-
Locations: Select the user's primary location and any additional locations they can be booked in.
-
Timesheets & Wages: Set working hours and manage wage details.
-
Leave: View booked leave and submit leave requests on behalf of the staff member.
-
Documents: View or upload documents related to the staff member, such as certificates.
Step 3: Save changes
After making the necessary adjustments, click on "Save Changes" in the top right corner to confirm.
NOTE: You can also learn about this topic by watching a lesson on Pabau Academy.
How to Deactivate a Team Member
This article covers how to deactivate a staff member in Pabau.
Step 1: Navigate to the Team feature
Log in to your Pabau account, and in the left sidebar menu, go to Team, then click on "Team" again. Click on the user you want to deactivate.

Step 2: Access More Options
Click on the three-dot button located next to "Customize fields" in the top-right corner. From the options, select "Deactivate".

Step 3: Confirm Deactivation
In the prompt, confirm your action by selecting "Deactivate". The user is now deactivated and removed from your active staff members.
NOTE: You can also learn about this topic by watching a lesson on Pabau Academy.
How to Reactivate a Team Member's Account
This article explains how you can reactivate a staff member on your Pabau account.
NOTE: If you reactivate a staff member's account, it will be counted as a new user, which may result in an upgrade of the subscription.
Step 1: Navigate to Team
Start by logging into your Pabau account using your login credentials. Then, expand the Team tab on the left sidebar menu. Click Team to access the staff members.

Step 2: Filter Team Members
To view the deactivated accounts of staff members, navigate to the ''Filter'' button at the top right corner. Click the ''Inactive'' status and ''Apply'' to show the results.

Step 3: Reactivate Staff Member
Find the staff member's account you want to reactivate, click on their name to view the details, and then click the three dots in the top right corner. The ''Reactivate option will appear for you to select.

By following these steps, you can reactivate a staff member's account in Pabau.
How to Send a Password Reset Email to a Team Member
This article shows you how to send a password reset email to a team member in Pabau, so they can easily update or recover their password.
Step 1: Access Team Settings
Begin by logging into your Pabau account using your credentials. Once logged in, navigate to the "Team" section in the left sidebar menu. Then, click on "Team" again to access the team management features.

Step 2: Selecting the Team Member
Within the "People" tab of the Team feature, locate the profile of the team member to whom you wish to send a reset password email. Click on the profile of the team member to open their user profile.
Step 3: Sending the Reset Password Email
In the user's profile, locate and click on the three-dot icon located on the right side, next to the "Customize Fields" button.
From the dropdown menu that appears, select the option labeled "Send reset password email."

Once the email is sent, the team member can simply click on the link provided in the message to initiate the password reset process for their Pabau account.
How to Set Up Your Personal Details
Manage and customize personal details for your team members in Pabau with the following simple steps.
Step 1: Navigate to the Team feature
Log in to your Pabau account, and in the left sidebar menu, go to Team, then click on the "Team" button. Next, click on the staff member whose personal details you wish to edit.

Step 2: User Management Options
You can add a photo of the user by clicking on the avatar next to their name.

Access additional options by clicking on the three dots in the top right corner, next to "Customize Fields", where you can:
- Send a reset password email to the staff member
- Grant or revoke admin access
- Deactivate the staff member

Step 3: Customize Displayed Fields

You can create departments and job titles by going to the Setup section. Click on "Objects" under "Developer & Other", then choose Departments or Job Titles to create custom departments and job titles.
In the Signature field, you can create and save your signature to easily sign treatment forms. Just follow the steps in this article.
Key details about the Bio and Prescription Info fields:
The Bio field plays a key role in your Online Bookings portal. Any details you include here about your staff can be showcased in Online Bookings, giving clients more information about your team.

The Prescription Info field is essential for prescribers. Ensure it's completed with the prescriber's credentials, enabling them to create prescriptions in Pabau. These credentials will be visibly presented at the bottom of each prescription.
How to Set Staff Permissions
In Pabau, customizing staff permissions ensures your team has the right access. While permissions are initially set up during user creation, this article shows you how to edit them later.
Step 1: Navigate to the Team feature
Log in to your Pabau account, and in the left sidebar menu, go to Team, then click on the "Team" button. Click on the user whose permissions you wish to edit. 
Step 2: Access User Permissions
Click on the user whose permissions you want to edit, then select "Permissions."

Step 3: Set up Permissions
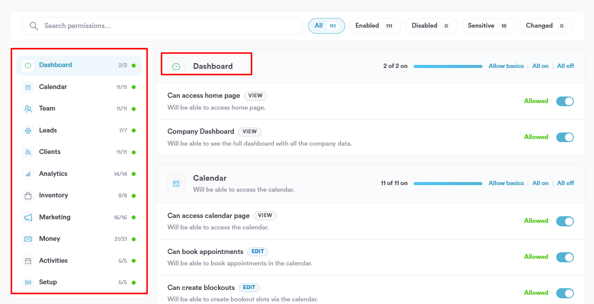
In the Permissions section, you will find a list of permission categories on the left, each corresponding to a main feature in Pabau, such as Dashboard, Calendar, Team, Leads, and more. Each category displays the number of active permissions out of the total available (e.g. 11/11).
Click on a category to view and manage its individual permissions. Each permission includes a label indicating the type of action — View or Edit — along with a short description of what it allows within the system.
To manage permissions within a category, you can use the following options:
- Allow basics — enables only the essential permissions for that category.
- All on — enables all permissions within the category at once.
- All off — disables all permissions within the category at once.
To enable or disable a specific permission individually, toggle the switch on the right. When enabled, the toggle will appear blue and display Allowed.
You can also use the search bar at the top to quickly find a specific permission by name. Use the filter buttons — All, Enabled, Disabled, Sensitive, and Changed — to narrow down the permissions list based on their current status.
Step 4: Assign a Role
For more details on setting up roles, please read this article.

Step 5: Switch to the Services Tab
Additional permissions for the staff member can be found under the Services tab. To enable a permission, simply toggle the switch. A blue toggle means the permission is active for the staff member, while a grey toggle indicates it’s disabled.
On the "What type of employee is ____?" section you have the following settings:
- Is capable of performing services or selling products
Enable this if the staff member will be actively performing treatments or selling products. This allows their name to be assigned to services and product sales in the system.
- Has a calendar available for bookings
This gives the staff member their own calendar where appointments can be booked. If disabled, they won’t appear on the calendar or be available for scheduling.
- Accepts online bookings
Toggle this on if clients should be able to book appointments with this staff member through your online booking portal. If turned off, they’ll only be bookable internally by your team. - Appear on Scheduler
This setting controls whether the staff member appears on the main scheduler where you create and manage shifts. Turn it off if the team member doesn’t need to be included in the shift scheduling view.
On the "Services" section you can select which services the employee can perform (if they perform services).

Step 6: Save Changes
Once adjustments are made, click on "Save Changes" in the top right corner to apply and save the modified permissions.
By following these steps, you can easily customize and manage user permissions in Pabau, ensuring your team has the appropriate access to the features they need.
How to Set Up a Prescriber
In Pabau, you can add your team’s prescription details, so their credentials are automatically included on prescriptions. Follow the steps below to set up a prescriber.
Step 1: Accessing Team Settings
Begin by logging into your Pabau account. Navigate to the "Team" section in the left sidebar menu and select "Team" once again.
Step 2: Adding Prescription Info & Registration Number
Click on the team member for whom you want to add prescription information. If the Prescription Info & Registration Number fields are not visible, click on "Customize Fields" in the top right corner.

You can view and rearrange all fields currently shown in the Personal Details section. Simply drag and drop to reorder them as needed.

To add additional fields, click the +Add Fields option below.

Locate and click on Prescription Info & Registration Number fields to add it to the list, then click on Save.

NOTE: For US practices, additional fields such as DEA and NPI can also be added as needed.
The newly added fields will now be visible in the Personal Details section for all team members.
Step 3: Providing Prescribing Credentials
In the Personal Details section for the selected team member, input relevant credentials such as your GMC number or any other qualifications necessary for prescribing.

Ensure all required information is accurately entered, then click on "Save Changes" in the top right corner.
Moving forward, each time you create a prescription, your prescribing credentials will automatically appear at the bottom of the prescription, providing clear verification of the prescriber's identity and qualifications.

By following these steps, you can easily add prescription information and credentials to team members' profiles, ensuring all necessary details are included for prescribing activities.
How to Assign a Department to a Team Member
In this guide, we’ll show you how to assign departments to team members.
Step 1: Navigate to the Team Feature
Start by logging into your Pabau account. Once you're in, click on Team in the left sidebar menu, then click "Team" again.

Step 2: Assign a Department to a Team Member
Once you've created your practice's departments, choose the team member to add or update their department. Navigate to the "Department" field under their Personal Details section. Choose the correct department, then click "Save Changes" in the top right corner.
-1.png?width=448&height=231&name=Screenshot%20(1)-1.png)
Step 3: Check Customize Fields
If you can't find the Department field in the Personal Details section of the team member's profile, click on Customize Fields in the top right corner of the user profile, then select "Add Fields".
Find "Department", click on it, and save the changes by clicking "Save".

That’s it! You’ve now successfully assigned a department to your team member, helping to keep your practice organized and streamlined.
How to Assign Job Titles to Team Members
In this guide, we'll show you how to assign job titles to your team members, helping to clearly define roles and responsibilities within your practice.
Step 1: Navigate to Team
Start by logging into your Pabau account. Once you're in, navigate to "Team" in the left sidebar menu, then select "Team" again.
Step 2: Assign a Job Title to a Team Member
Once you've created your job titles, select the team member you want to assign one to. In the "Staff Title" field, choose the appropriate job title, then click "Save Changes" in the top right corner.

Step 3: View the Job Title
Once you've assigned the job title to the staff member, you'll find it listed under their profile in the Team feature.

By following these steps, you can easily assign job titles to your team members.
How to Add Staff Signatures
In this guide, we'll explain how to add a signature to your staff member profile in Pabau, which can then be used to quickly sign forms.
Step 1: Navigate to Team
Log into your Pabau account with your credentials, then expand the Team tab in the left sidebar menu and click "Team" to access your staff list.

Step 2: Add Signature
On the Team page, click your name to open your profile. Scroll down to the bottom of the page to find the signature field.

Simply draw in the field, and if you make a mistake, use the options at the top to erase, undo, or redo your signature.
Step 3: Save Changes
Once you’ve added your signature, scroll to the top and click the "Save Changes" button in the top right corner to finalize.

NOTE: You can now use your saved signature to quickly sign forms by following the steps in this article.
By following these steps, you can add a signature to your profile in Pabau.
How to Quick Sign Medical Forms
In this article, we’ll show you how to quickly sign medical forms using the signature saved in your Pabau profile.
Step 1: Navigate to Medical Forms
Start by logging into your Pabau account using your login credentials. Then, navigate to the Clinical section, where you can find the Medical Form Templates feature.

Step 2: Configure Signature Field
When creating or editing a medical form template, add a signature field by dragging the signature component into the form and clicking to edit it.
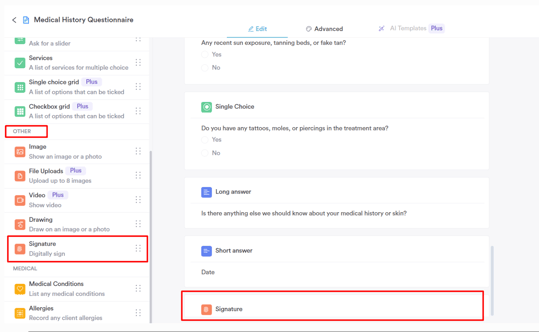
When editing the component, click the Advanced Settings button to reveal more options.

Select "Employee" or "Prescriber" to be able to quickly sign a form when prescribing or signing any form. Then, click "Save component."

Step 3: Add Your Signature
After you've added the signature component to all relevant medical forms, navigate to the "Team" feature and add your signature to your profile by following the steps provided in this guide.
Step 4: Quick-sign forms
From now on, whenever you are creating medical forms that require your signature, and they contain an employee or prescriber signature field, you can quick-sign by clicking on "Quick Sign" right above the field.
The signature saved in your staff profile will automatically populate in the field.

By following these steps, you can easily sign forms without having to manually sign each time.
How to Upload Staff Documents
Step 1: Navigate to Team
Log into your Pabau account and navigate to Team in the left sidebar menu, then click on "Team" again.

Step 2: Open the Staff Profile
Under the People tab in Team, locate and click on the user profile for the staff member you want to upload documents for. In their profile, select "Documents" from the left sidebar menu.
Step 3: Create a Document Folder
To keep documents organized, create a folder that categorizes the documents you’ll add (e.g., Certificates or Contracts). Any folder you create in one profile will appear in all staff profiles.
Click on "Create Folder", enter a name for the folder, then click "Add Folder" to save it.
Step 4: Upload the Document
Once a folder is in place, you can start uploading documents. Click on "Upload" in the top-right corner.
In the upload section, either drag and drop the file or click "Upload" to select it from your computer.
Select the folder for the file and enter a name for the document.
NOTE: The document acknowledgment, sharing, and expiration functionalities will be available soon.
Step 6: Finalize the Upload
When everything is set, click "Upload" to complete the process.
By following these steps, you can upload staff documents in Pabau.
How to Grant Super Admin Permissions
Step 1: Navigate to Team
Start by logging into your Pabau account using your login credentials. Then, expand the Team tab on the left sidebar menu. Click Team to access the staff members.

Step 2: Select a Staff Member
Find and select the staff member you want to update from the list. Click on their name to open their profile and access their permissions and settings.

Step 3: Grant Admin Permissions
Within the staff member’s profile, go to the ''Personal Details'' tab. Click the three dots in the top-right corner, then select ''Grant Admin Permissions'' from the dropdown menu to assign Super Admin access.

Step 4: Confirm Admin Access
After clicking ''Grant Admin'', a confirmation message will appear. Simply review it and confirm to apply the changes.
After confirming, the selected staff member will be granted admin access.
To revoke admin permissions, click on the three dots again — the option will now appear as "Revoke Admin."
Now that you know how to grant Super Admin permissions, you can confidently manage your team’s access and ensure the right people have the right control.
For more guides, refer to related articles below, select additional guides, or use the search bar at the top of the page. These guides will help you get the most out of your Pabau account.
Additionally, to help you fully utilize and understand your Pabau account, we recommend exploring additional guides and resources offered at the Pabau Academy. It offers in-depth video tutorials and lessons, offering a holistic learning experience that can equip you with the essential skills for achieving success with Pabau.