
Table of Contents:
1. How to Create a Shift in the Scheduler
2. How to Create a Repeating Shift in the Scheduler
3. How to Edit a Shift in the Scheduler
4. How to Delete a Shift from the Scheduler
5. Understanding the Difference Between Green and Pink Shifts
6. How to Add a New Service to a Shift
7. How to Clear the Schedule
How to Create a Shift in the Scheduler
Efficiently manage your team's schedule by following these steps to create a shift in the Scheduler.
Step 1: Navigate to the Scheduler
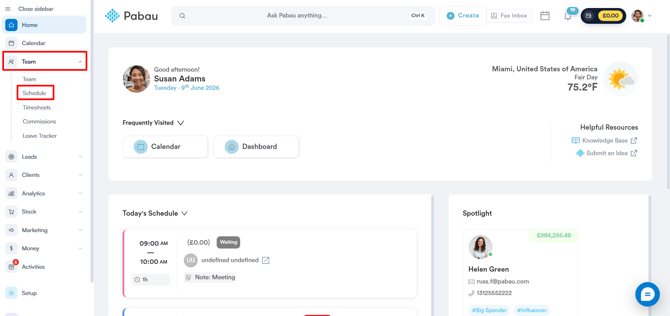
Log in to your Pabau account, and in the left sidebar menu, go to Team, then click on "Schedule".

Step 2: Select Slot for Shift
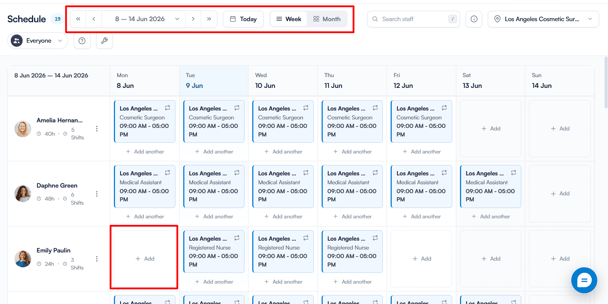
The Schedule page displays all staff members on the left, with dates across the top. You can switch between Week and Month view using the toggle in the top right, and navigate between dates using the arrows at the top.

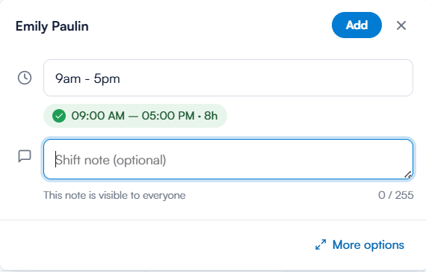
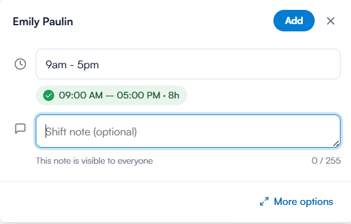
Click on the desired slot to initiate the shift creation. 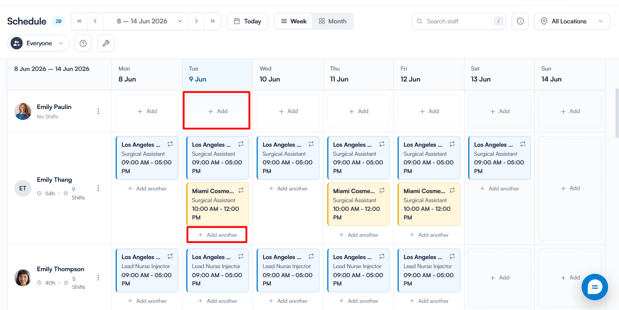
Create a shift by entering start and end times or choosing from default templates. Alternatively, click More options at the bottom for additional settings.
Step 3: Complete Shift Details
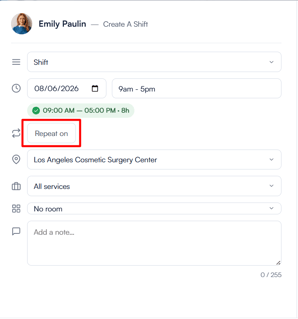
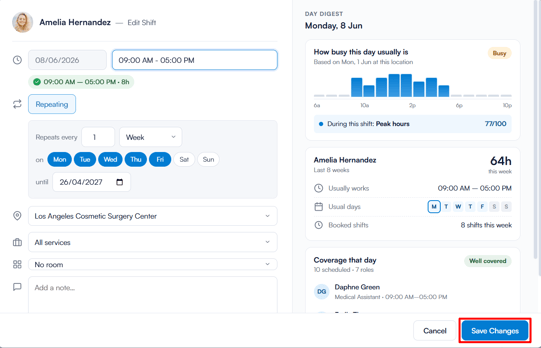
Once you click More options, the full shift details panel will open. Fill in the following:
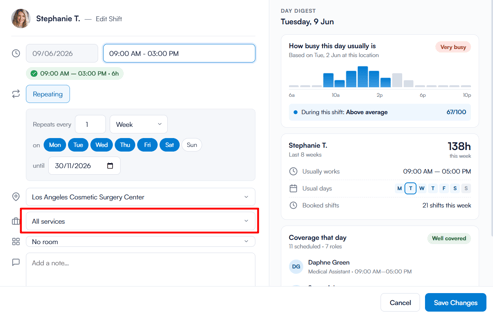
- Date and shift hours — enter the date and time range directly or select from a preset template. The confirmed shift time will appear highlighted below once selected.
- Repeating — toggle this on to set the shift to repeat. You can define how often it repeats (e.g. every 1 week), select which days it applies to, and set an end date.
- Location — select which clinic location the shift applies to.
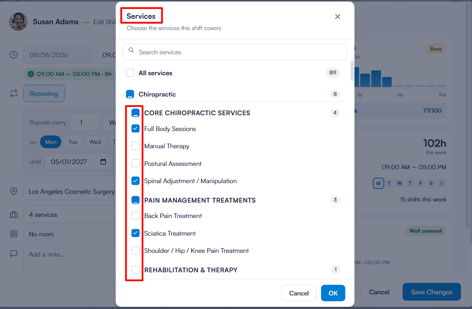
- Services — assign specific services or leave it as all services.
- Room — assign a room if applicable.
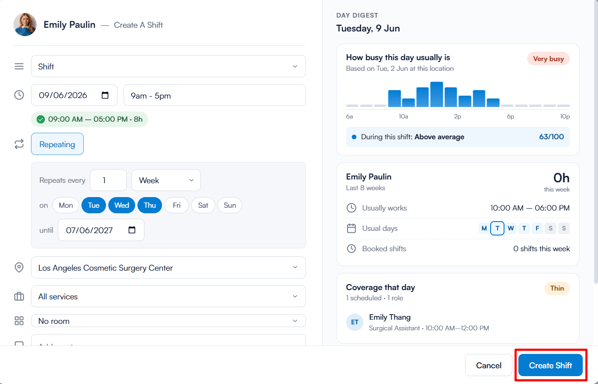
On the right side, you'll see a Day Digest panel showing useful context for that day — how busy it typically is, the staff member's usual working hours and days, and current coverage for that day so you can make informed scheduling decisions.
Once everything is filled in, click Create Shift to save.
NOTE: Shifts covering all services are displayed in blue, while shifts assigned to specific services only are displayed in yellow.
By following these simple steps, you can efficiently create and manage shifts in the Scheduler for effective team scheduling.
NOTE: You can also learn about this topic by watching a lesson on Pabau Academy.
How to Create a Repeating Shift in the Scheduler
In this article, you'll learn how to manage recurring schedules by creating repeating shifts in the Scheduler.
Step 1: Navigate to the Scheduler
Log in to your Pabau account, and in the left sidebar menu, go to Team, then click on "Schedule".

Step 2: Select Slot for Shift
The Schedule page displays all staff members on the left, with dates across the top. Click on the desired slot to initiate the shift creation.
Create a shift by entering start and end times or choosing from default templates. Alternatively, click More options at the bottom for additional settings.
Step 3: Create a Shift
In the Create a Shift menu, after choosing the start and end time, location, and services for the shift, click on "Repeat on". This will reveal the Repeat Options directly below.
Step 4: Input Repeat Options
Once expanded, fill in the following:
- Repeats every — set how frequently the shift repeats (e.g. every 1 week)
- On — select which days of the week the shift should repeat
- Until — set the end date for the repeating pattern
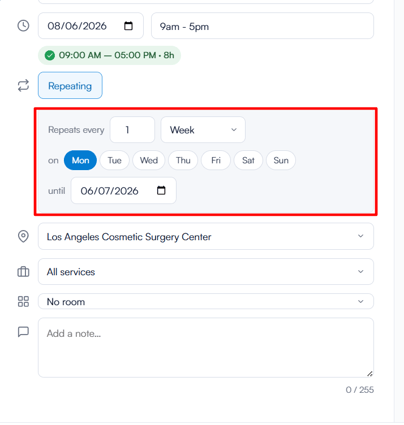
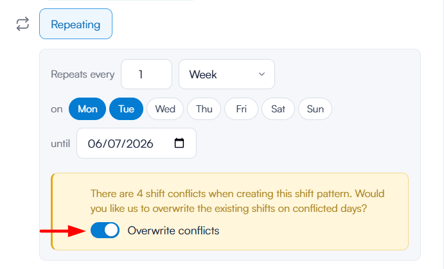
If there are any shift conflicts, you can override them by activating the toggle shown below.
Step 5: Set Repeat Option and Confirm
Click on "Set Repeat Option" when done. Click on "Create Shift" to confirm and schedule the repeating shifts.
With these steps, you can easily set up recurring shifts in Pabau.
How to Edit a Shift in the Scheduler
Manage your team's schedule by learning how to edit shifts in the Scheduler.
Step 1: Navigate to the Scheduler
Log in to your Pabau account, and in the left sidebar menu, go to Team, then click on the "Schedule".
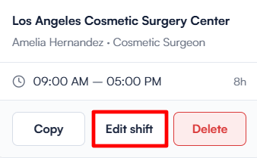
Step 2: Select Shift to Edit
In the scheduler, click on the shift you want to edit. A popup will appear showing the shift details — click Edit shift to open the full shift panel where you can make changes to the location, services, notes, and other details.
Optionally, repeat the shift if necessary. Click on ''Save Changes'' to confirm.
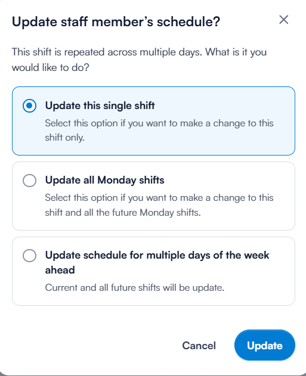
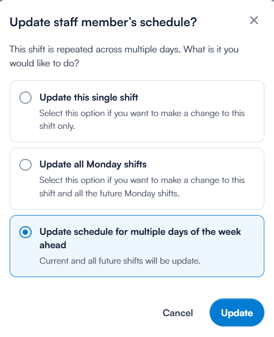
If the shift is part of a repeating pattern, an additional prompt appears before the shift is updated. Select whether to update only the current shift, all shifts on that given weekday, or all of them entirely. Click "Update" to confirm.
Step 3: Edit Shifts from the Calendar
You can also edit a shift directly from the calendar. Simply navigate to the calendar, click the three-dot icon next to the staff member whose shift you want to edit, and select Edit schedule.
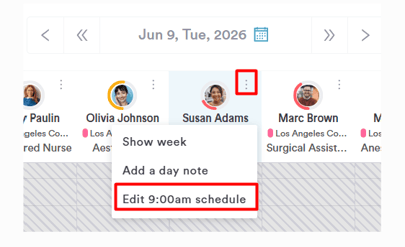
This will open the same modal where you can make the necessary changes to the shift.
By following these steps, you'll be able to easily edit shifts from the calendar and make adjustments as needed, streamlining your scheduling process.
How to Delete a Shift from the Scheduler
Manage your team's schedule and ensure it remains accurate by learning how to delete shifts from the Scheduler.
Step 1: Navigate to the Scheduler
Log in to your Pabau account, and in the left sidebar menu, go to Team, then click on the "Schedule".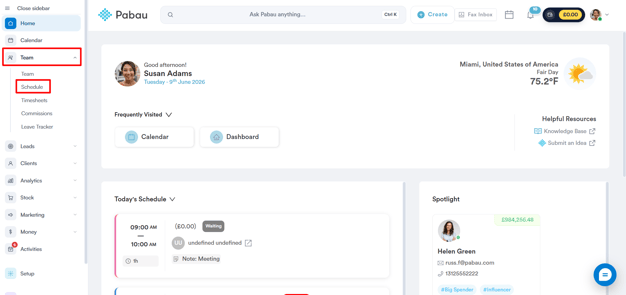
Step 2: Select the Shift You Want to Delete
In the scheduler, click on the shift you want to delete.
Step 3: Delete Shift
A popup will appear showing the shift details — click Delete to remove the shift.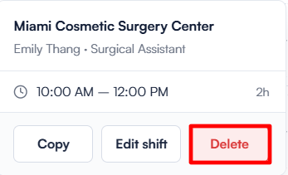
You cannot delete a shift if there are any appointments booked. You'll need to reschedule all appointments first.

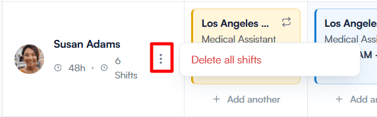
Step 4: Delete All Shifts for a Staff Member
If you want to delete all shifts for a staff member, you can click on the three dots next to the staff member's name in the scheduler. This action will reveal the option to delete all shifts.
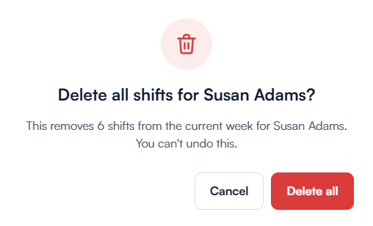
If there are appointments scheduled during any of the shifts, you'll need to cancel or reschedule them before you can delete the shifts.
Once no appointments are remaining, you'll be asked to confirm the deletion of all shifts. This action is irreversible, so click "Delete" to finalize.
By following these steps, you can easily delete shifts from the scheduler.
NOTE: You can also learn about this topic by watching a lesson on Pabau Academy.
Understanding the Difference Between Blue and Yellow Shifts
When creating shifts, you'll notice blue and yellow shifts displayed in the scheduler. We'll explain the differences between them and how to manage each type.
Step 1: Access the Scheduler
Access the menu located on the left-hand side, then click on "Team," and from there, select "Schedule."
This will open the staff list scheduler, where you can see all of the shifts created in your system.
Step 2: Edit Shifts
Click the yellow shift to open the edit panel.
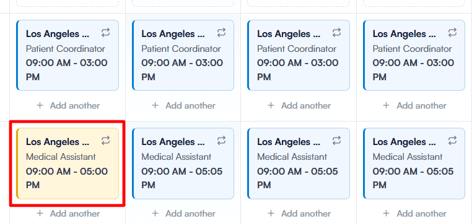
Opening the shift reveals that only specific services are selected, indicating that this shift doesn't include all the services the staff member is authorized to perform based on their service permissions in their user profile.
Clicking on a blue shift shows that all services the staff member is authorized to perform, based on their user profile permissions, are selected.
You can edit the services in a shift by checking or unchecking the options. Once you're done, simply update the shift, and your changes will be saved. The shift color will update based on the selected services.
How to Add a New Service to a Shift
Creating a new service doesn't automatically add it to existing shifts. To ensure your staff has all the necessary services in their shifts, follow these steps.
Step 1: Create a New Service
First, create the new service. Once it's created, go to the Team feature and select "Schedule".

Step 2: Add the Service to a Shift
Select the shift you want to add the new service to and click to edit it. In the editing view, click on the services section.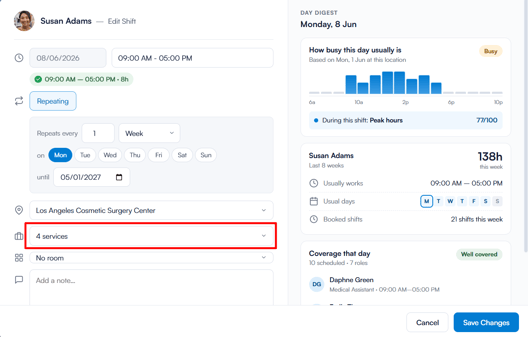
Next, select the category where the new service was added. You will see that the new service is not selected by default. Click on it to add it to the shift.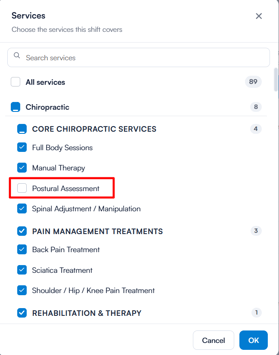
Once you've made the selection, click on "OK", and then on "Update Shift" to save your changes. If the shift is recurring, you’ll be given the option to update just this shift or all future shifts.
By following these steps, you can easily add new services to existing shifts and ensure that your team has access to the most up-to-date service offerings.
How to Clear the Schedule
In this article, we'll cover how to clear the schedule of one staff member or of all staff members at the same time.
Step 1: Navigate to the Scheduler
Log in to your Pabau account, and in the left sidebar menu, go to Team, then click on "Schedule".

Step 2: Clear Schedule
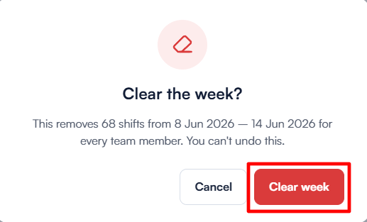
Once in the Schedule, you can view all the shifts created for the week. To clear the schedule for the entire team, click the tool icon in the top right corner and select "Clear week." This action will remove all shifts for the selected week.
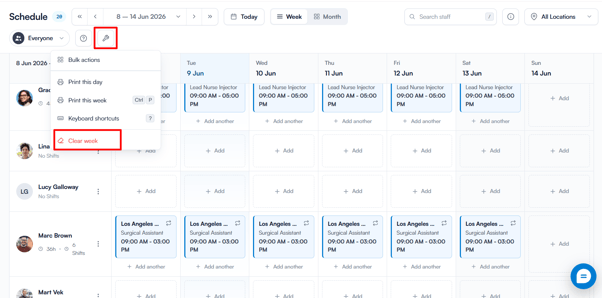
After that, a confirmation popup will appear warning that this will remove all shifts for every team member for that week and cannot be undone. Click Clear week to confirm or Cancel to go back.
Step 3: Clear Staff Member Schedule
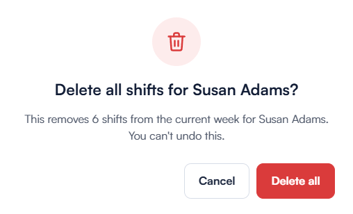
To delete only one staff member's schedule, click on the three-dots icon on the right of the staff member's row, then select "Delete all shifts".
After selecting this option, you will be prompted to confirm if you want to delete all shifts, as this action is irreversible. Click "Delete" to finalize the action.
If there are appointments scheduled with the staff member during the week you are trying to delete the shifts, a warning will appear, prompting you to reschedule or cancel the appointments before attempting to delete all shifts again.
By following these steps, you can easily clear the schedule for the week and ensure your team's shifts are managed efficiently.
For more guides, refer to related articles below, select additional guides, or use the search bar at the top of the page. These guides will help you get the most out of your Pabau account.
Additionally, to help you fully utilize and understand your Pabau account, we recommend exploring additional guides and resources offered at the Pabau Academy. It offers in-depth video tutorials and lessons, offering a holistic learning experience that can equip you with the essential skills for achieving success with Pabau.