
Table of Contents:
1. How to Create a Product
2. How to Edit a Product
3. How to Delete a Product
4. How to Create Suppliers
5. How to Build a Purchase Order
6. How to Start a New Inventory Count
How to Create a Product
Creating products in Pabau is a crucial aspect of managing your stock efficiently. Follow these detailed steps to add a new product to your inventory:
Step 1: Navigate to Products
Log in to your Pabau account and navigate to "Stock" in the left sidebar menu, then click on "Products".
Step 2: Create a Category
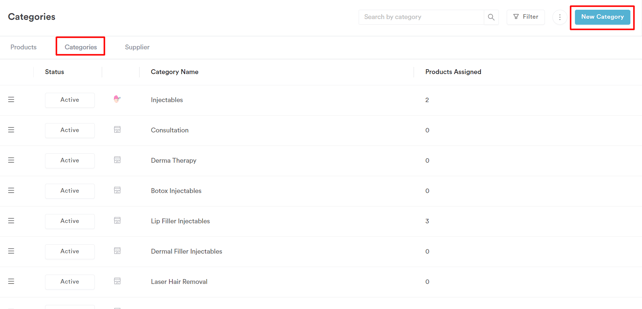
If you don't have any existing products or categories, start by creating a category. Switch to the "Categories" tab in the top left corner, then click on "New Category."
Provide a name for the category and select a category type. Other fields are optional. Click on "Create" to complete the category creation. 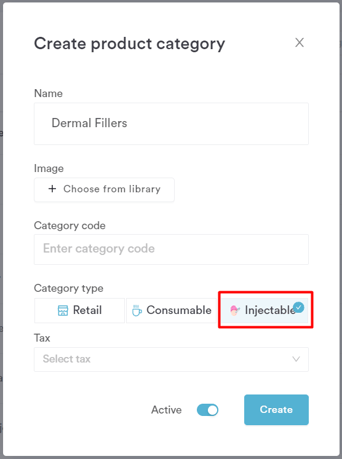
Step 3: Create a New Product
Switch to the "Products" tab, then click on "New Product" in the top right corner.
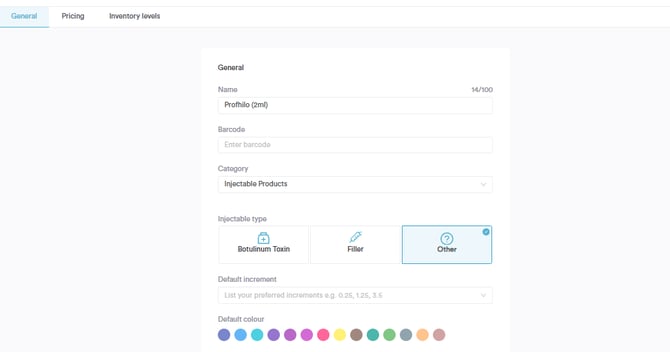
- General Tab: This is where you enter all the core details about your product. Here is a breakdown of each field:
- Name: Enter the product name. This is a mandatory field. The character counter in the top right of the field shows how many characters you have used out of the 100 character limit.
- Barcode: Enter the product's barcode if it has one. This allows you to scan the product during inventory counts instead of entering quantities manually.
TIP: Make sure that you have the same barcode on the product added in the system before scanning, and then try to scan it again. If the barcode in the system does not match the physical barcode on the product, the scanner will not recognize it.
- Category: Select the category this product belongs to — for example, Injectable Products, Retail, or Consumables. This is a mandatory field.
- Injectable type: If the product category is injectable, you will be prompted to select the injectable type — Botulinum Toxin, Filler, or Other. This helps Pabau correctly track and report on injectable usage.
- Default increment: For injectable products, set your preferred increment values for dispensing — for example 0.25, 1.25, 3.5. These appear as quick-select options when the product is used in a treatment.
- Default color: Choose a color to represent this product in the system. This is used for visual identification in charts and treatment records.
- SKU: Enter the product's Stock Keeping Unit code.
TIP: Make sure to check that the SKU is correct before saving. The SKU is the unique identifier used to track the product across the system — including inventory counts, purchase orders, and reports. An incorrect SKU can cause discrepancies in stock tracking and make it harder to reconcile your inventory accurately.
- Measure: Select the unit of measurement — for example Milliliters (ml), Units, or Grams — and enter the amount. For the example above, Profhilo is measured in ml with an amount of 2.
- Supplier name: Select the supplier this product is purchased from. Suppliers are set up separately under the Suppliers tab.
- Description (optional): Add a description of the product. You can also click Ask AI to generate a product description and hit Generate — Pabau will automatically write a clear, professional description for you based on the product name.
- Image: Upload a product image or choose one from the library to help staff identify the product visually.
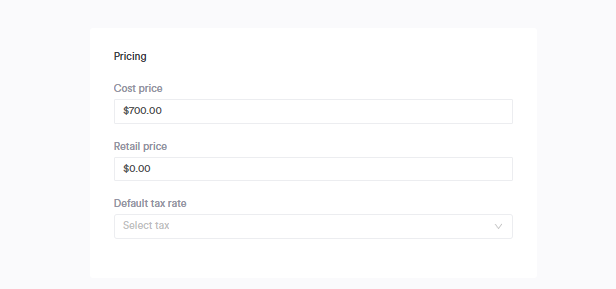
- Pricing Tab: Enter the product's cost price and retail price. Optionally, select the tax rate applied to this product.
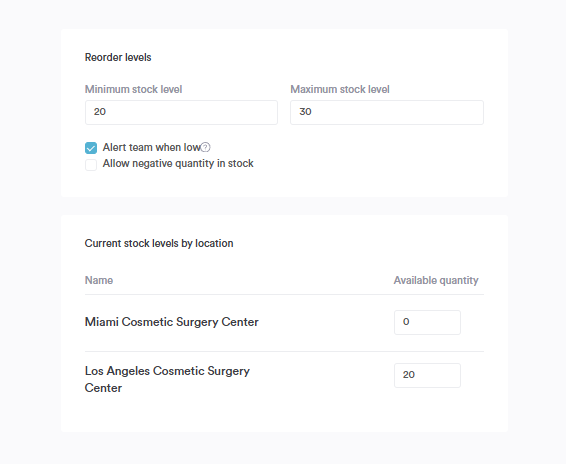
- Inventory Levels Tab: Set the minimum and maximum stock levels. Choose if you want to allow a negative quantity in stock. Decide if you want to receive alerts when the stock of the product is low.
- Current Stock Levels by Location: Input the current stock levels by location. After entering all necessary details, click on "Create" to save and complete the product creation.
By following these steps, you can efficiently add and manage products in your Pabau account.
NOTE: You can also learn about this topic by watching a lesson on Pabau Academy.
How to Edit a Product
Ensure your product details are always up-to-date by following these steps to edit a product in Pabau:
Step 1: Navigate to Products
Log in to your Pabau account and navigate to "Stock" in the left sidebar menu, then click on "Products".
Step 2: Locate the Product
Locate the product you wish to edit in the Products list and click on it.
Step 3: Edit Product Details
In the "Edit Product" page, make the necessary changes to the product's details, such as name, category, measure, supplier, pricing, or inventory. The editing process is similar to creating a new product.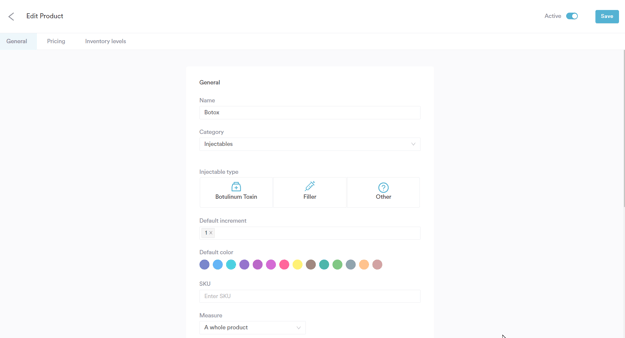
Modify the required fields as needed.
Step 4: Save Changes
Once you have made the necessary changes, click on "Save" in the top right corner to save the edits.
By following these steps, you can effortlessly update and modify product details in Pabau, ensuring your inventory management remains accurate and efficient.
How to Delete a Product
Keep your product list streamlined by following these steps to delete a product in Pabau:
Step 1: Navigate to Products
Log in to your Pabau account and navigate to "Stock" in the left sidebar menu, then click on "Products".
Step 2: Locate the Product
Locate the product you wish to delete in the Products list and click on it.
Step 3: Access Edit Product Page
In the "Edit Product" page, toggle the "Active" button located in the top right corner. This action will reveal the "Delete" button.

Step 4: Delete the Product
Click on "Delete" and confirm in the prompt to permanently remove the product from your inventory.
By following these steps, you can efficiently manage your product list in Pabau by removing any items that are no longer needed.
How to Create Suppliers
Adding product suppliers with their company details is essential for efficient purchase order management. Follow these steps to create a supplier in Pabau:
Step 1: Navigate to Products
Log in to your Pabau account and navigate to "Stock" in the left sidebar menu, then click on "Products".
Step 2: Switch to the Suppliers Tab
Switch to the "Suppliers" tab on the left side of the screen, then click on "New Supplier" in the top right corner of the screen.
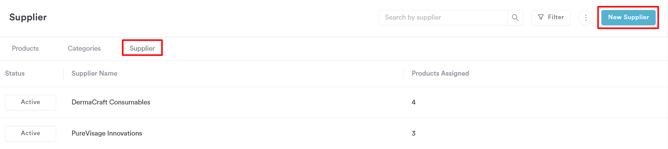
Step 3: Input Supplier Details
In the "Create Supplier" page, input the supplier's details. Note that the name and account number are mandatory fields. Additionally, enter the supplier's contact information if you plan to generate purchase orders through Pabau.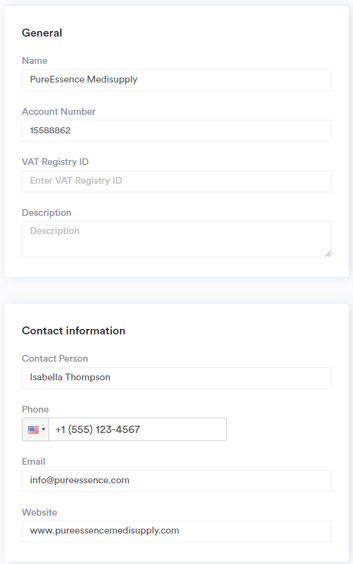
Step 4: Associate Supplier with Products
After creating the supplier, associate it with the products you purchase from them. To do so, switch back to the "Products" tab.
Click on the product you purchase from the recently created supplier.
In the General tab, select the supplier from the dropdown list that opens after clicking on the "Supplier name" field.
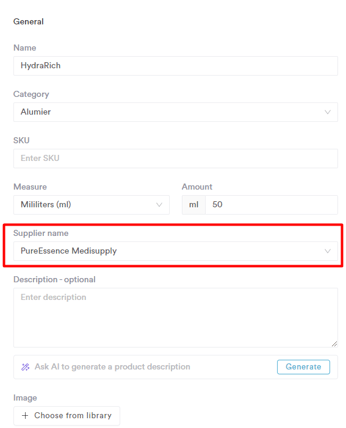
Now you've successfully created a supplier and associated it with specific products, enabling you to streamline your purchase order processes in Pabau.
How to Build a Purchase Order
Efficiently manage your inventory by creating purchase orders in Pabau. Follow these detailed steps:
Step 1: Navigate to Orders
Log in to your Pabau account and navigate to "Stock" in the left sidebar menu, then click on "Orders".
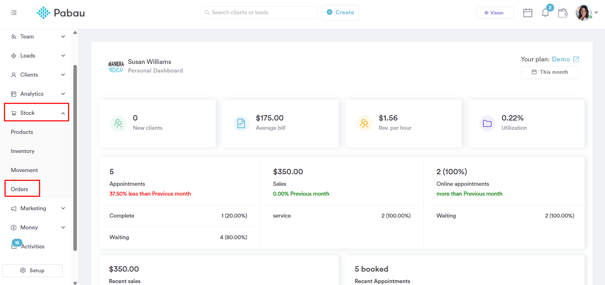
Step 2: View Purchase Orders
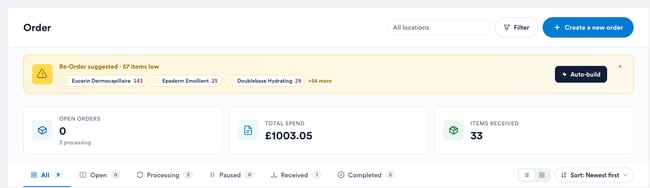
On the Orders page, you can view all of your orders. Use the status tabs – "All," "Open," "Processing," "Paused," "Received," and "Completed" – to filter the list, and the stat cards above it to see your open orders, total spend, and items received at a glance. You can also filter by location or supplier, switch between list and grid view, and sort the list. Each order card shows the order reference, the items ordered, the supplier, the total, and a status label.

Step 3: Create a New Order
To create a new order, click on "Create a new order" in the top right corner.
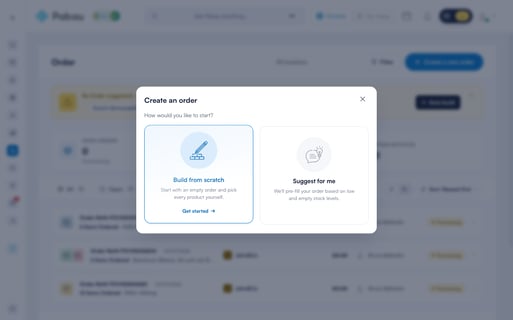
In the "Create an order" window, choose "Build from scratch" to pick every product yourself, or "Suggest for me" to have Pabau pre-fill the order based on your low and empty stock levels, then click on "Get started."
NOTE: If your account has more than one location, "Suggest for me" will first ask which location the order is for and use that location's stock levels to build the suggestions.
Step 4: Build Order from Scratch
The order builder opens in full screen. Use the filters on the left to narrow down the product list – pick a category, a supplier, or "Below par stock" to see only the products that are running low. Each product row shows its current stock level, unit cost, and supplier.
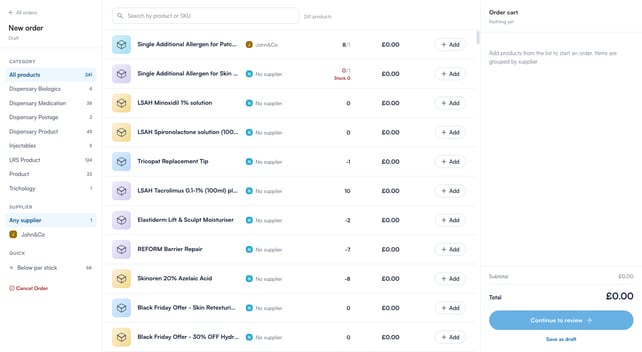
You can also use the "Search by product or SKU" bar to quickly find specific products – typing an exact SKU narrows the list down to just that product.
Step 5: Select Products and Quantities
Click on "Add" next to each product to add it to the order, then use the quantity stepper to enter the desired quantity. Added products appear in the "Order cart" on the right, grouped by supplier, with a running subtotal, VAT, and total. If you are not ready to place the order yet, click on "Save as draft" – the order will be saved under the "Paused" tab on the Orders page so you can pick it up later.
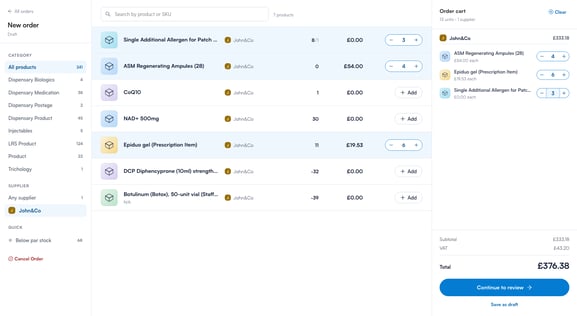
Step 6: Review and Place the Order
After selecting products and quantities, click on "Continue to review." On the "Review your order" screen, check the items for each supplier, choose the delivery location, and add any notes for your suppliers. Tick "Email purchase order to supplier" for each supplier you would like Pabau to email the order to, then click on "Place order."
NOTE: Pabau creates one purchase order per supplier, so an order containing products from several suppliers will generate several purchase orders, each with its own reference number. If any product in your order has no supplier yet, you will be asked to assign one before reviewing – the supplier you pick is saved on the product for future orders.
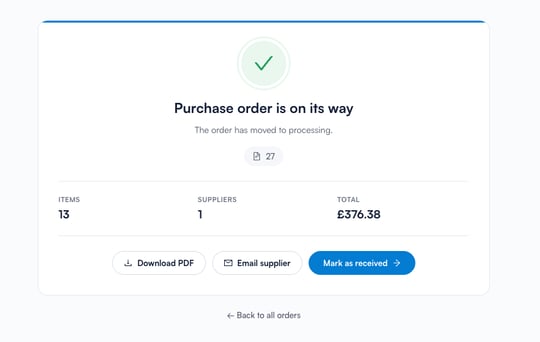
Once placed, the order moves to "Processing" and a confirmation screen appears. From there, you can download the order as a PDF, email it to the supplier, or click on "Mark as received" to go straight to the "Receive items" screen and book the delivery into stock.
Step 7: Receive and Complete the Order
The order will be displayed in Stock > Orders with a status of "Processing." When the delivery arrives, click on the order to open the "Receive items" screen. Enter the received quantity for each product, or click on "All as ordered" to fill in every line at once. You can also adjust the cost per unit if the delivery invoice differs from the ordered price, and add a note, a discrepancy reason, or a photo against any line.
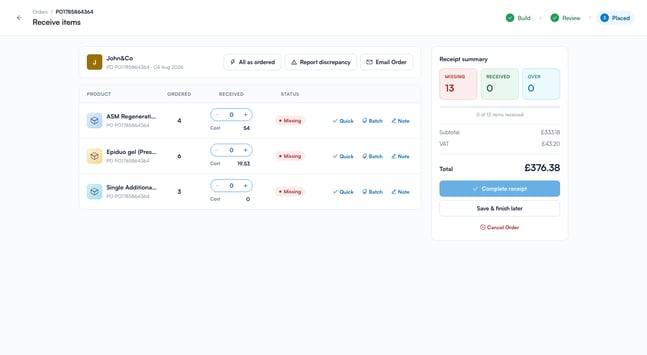
Each line shows a status label – "Missing," "Partial," "Received," or "Over" – and the receipt summary on the right tracks how many items have been received. If anything arrived damaged or short, click on "Report discrepancy" to email a discrepancy report to the supplier.
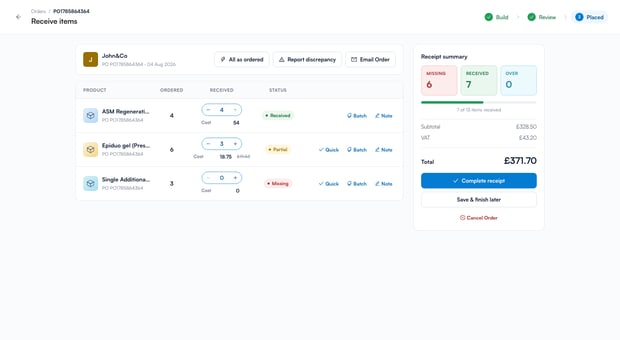
To finish, click on "Complete receipt" and confirm – the received items are added to your stock, and once every item has been received the order is marked as "Completed." Any items still outstanding when you complete the receipt are flagged as missing, and the order is marked as "Part Received." If you are still waiting on part of the delivery, click on "Save & finish later" instead – the items received so far are booked into stock and the order stays under the "Received" tab as "Part Received" until the rest arrives.
How to Start a New Inventory Count
In this article, you will learn how to maintain precise inventory levels by initiating a new inventory count in Pabau.
Step 1: Navigate to Inventory Count
Log in to your Pabau account and navigate to "Stock" in the left sidebar menu, then click on "Inventory".
Step 2: Review Inventory Status
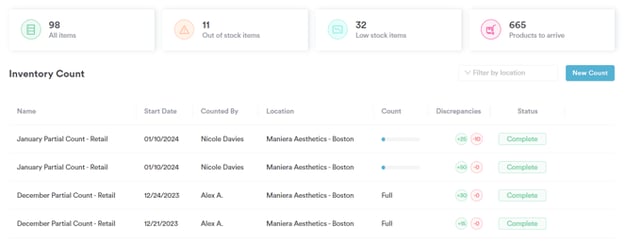
At the top of the Inventory Count page, get an overview of your inventory, including total items, out-of-stock items, low-stock items, and products awaiting arrival.
Step 3: Start a New Count
To start a new count, click on "New Count" in the center of the page, then select "New Stocktake."
Step 4: Choose Count Type
Choose the type of count: retail, consumables, or injectables. Click on "Start Count" to proceed.
Step 5: Fill out Count Information
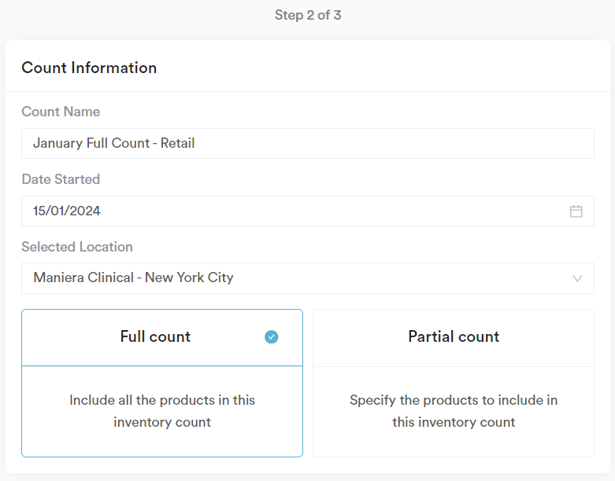
Provide information in the Count Information fields. Choose between a full count (includes all products of the selected type) or a partial count (specify included products), then click on "Start count" in the top right corner.
Step 6: Perform Count
At the top of the screen, you can search for products by name. You can also filter products by category, with color-coded indicators: gray for fully counted categories, light blue for partially counted, and dark blue for the currently selected category.
Choose to use a barcode scanner or input stock levels manually by toggling the "Use barcode scanner" button.
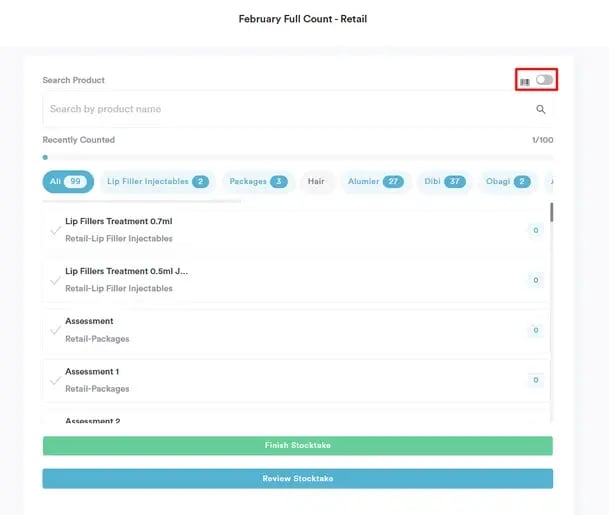
If manual, enter quantities for each product, click "Count," and repeat for all products. You can search for product by name, or you can click on "Review Stocktake", then on the "Uncounted" tab, to select the next product to count.
Click on "Finish Stocktake" when done.
Step 7: View Inventory Count Details
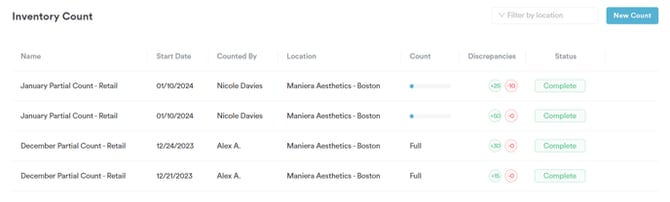
The completed count will appear in your Inventory Count list. Details such as Count Start Date, performing staff member, location, count result, and any discrepancies will be visible.
By following these steps, you can perform inventory counts in your Pabau account.
For more guides, refer to related articles below, select additional guides, or use the search bar at the top of the page. These guides will help you get the most out of your Pabau account.
Additionally, to help you fully utilize and understand your Pabau account, we recommend exploring additional guides and resources offered at the Pabau Academy. It offers in-depth video tutorials and lessons, offering a holistic learning experience that can equip you with the essential skills for achieving success with Pabau.