
Table of Contents:
1. How to Create a Prescription
1.1. How to Edit a Prescription
1.2. How to Delete a Prescription
1.3. How to Repeat a Prescription
2. How to Print a Prescription
3. How Pabau Checks Drug Safety for Prescriptions
4. How to Submit a Prescription to CloudRx
5. Managing Centralized Prescriptions
This article covers the new Client Card, available to selected clinics from August 2026. If your Client Card looks different, see the Prescriptions (Classic) guide instead.
How to Create a Prescription
Step 1: Insert Prescription Info for Prescribers
Prescription information should be added to the profiles of staff members who will be creating prescriptions.
This information includes credentials that enable your staff members to create prescriptions, such as GMC numbers, DEA numbers, or NPI numbers.
To add prescription info to the relevant staff members, follow the steps provided in this article.
Step 2: Navigate to the Client Card
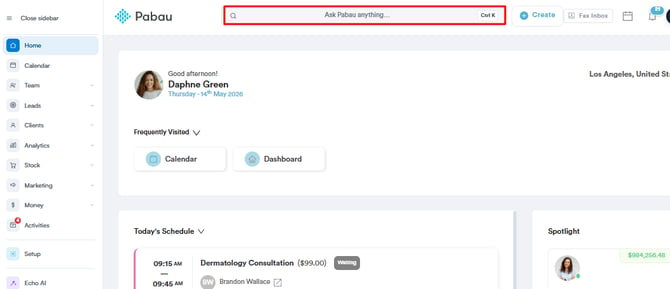
Navigate to the search bar at the top of the page and proceed to type at least three letters of the client's name for whom you wish to create a prescription.
Step 3: Create a Prescription
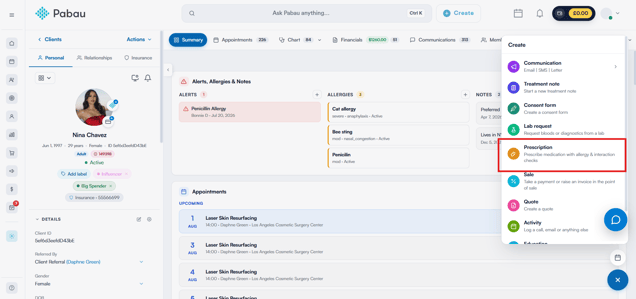
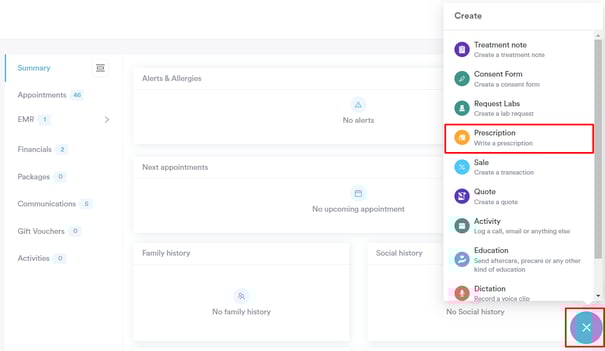
Once you are viewing the client’s profile, click the Create button — the blue plus sign at the bottom right corner of the page — and choose Prescription from the menu.
Step 4: Select a Template
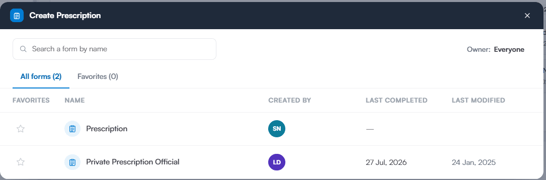
Select the form you want to use from your existing templates. If you haven't created a prescription form template yet, read our article on how to create a prescription form.
Step 5: Complete the Prescription form
After selecting the template, you will be prompted to complete the fields in the form.
Choose the prescriber in the top bar of the prescription window. If you are a prescriber yourself, you are selected automatically; otherwise, pick the prescriber before continuing. You can also adjust the issue date, and the client’s recorded allergies are shown alongside.
Search for the drug you need to prescribe by name, brand or active ingredient. Use the source tabs to search everything, just your Favourites (including drugs that you have created previously), or a specific drug database such as BNF.
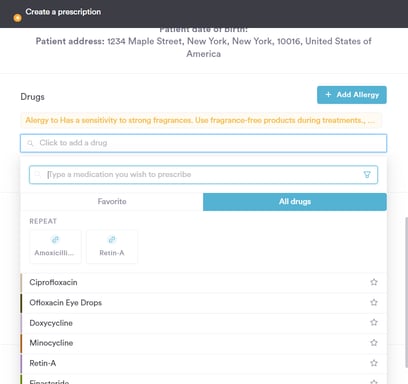
After selecting the drug, you will need to add the dosage. Hover over the medication card and click the pencil icon (Edit medication).
This opens a pop-up window where you can build the instructions — dose, strength, format, quantity, frequency, route and duration — mark the item as a repeat prescription, and add a note to the pharmacy.
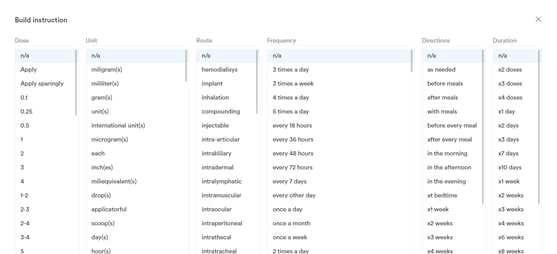
Where the formulary includes standard dosing, suggested dosages appear inside the same pop-up — click one to apply it.
After selecting a drug, you can preview its clinical reference on the right side of the window, under the Knowledgebase tab — Side Effects, Cautions, Allergy & cross-sensitivity, and Indications.
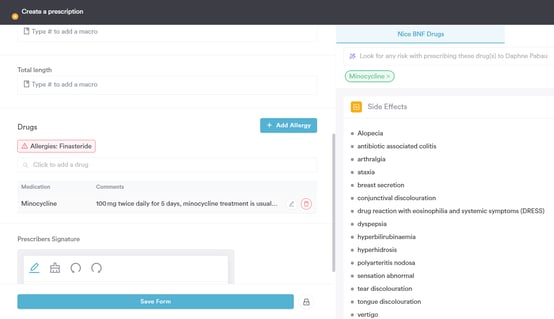
The signature is added at the end, when you issue the prescription.
Step 6: Issue and Sign the Prescription
Click Issue & sign prescription at the bottom right. If the template includes fillable fields (for example, confirming the client’s date of birth), complete them and click Continue to sign. Then sign in the Sign prescription window — draw your signature, or use Quick Sign to stamp the prescriber’s name — and click Sign & continue.
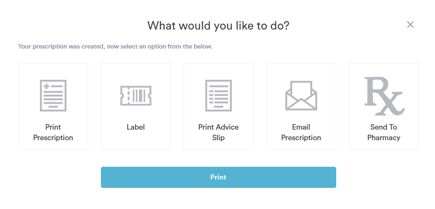
Once the prescription is created, a window appears asking what you would like to do next: print the prescription, download it as a PDF, print a label, email it, or send it directly to the pharmacy. Each option runs as soon as you click it, and you can run more than one — click Done when you are finished.
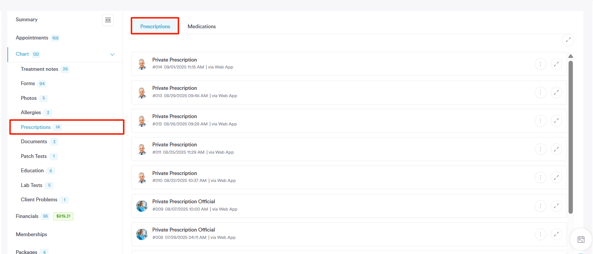
You will be able to locate the created prescription by opening the EMR section and clicking the Prescriptions tab in the specific client card where you can review the details of the prescription, make any necessary edits, or print it for your records.
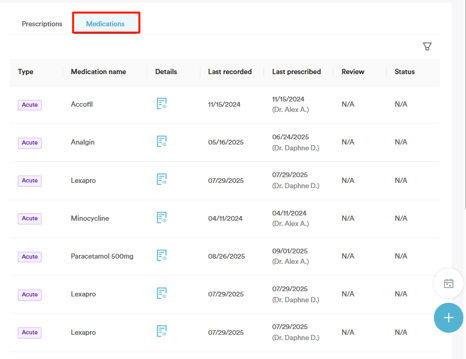
On the Medications tab, you can view all the medications that were prescribed to the client.
By following these steps, you will be able to create prescriptions in Pabau efficiently, ensuring accurate records and effective patient care management.
How to Edit a Prescription
Step 1: Navigate to the Client Card
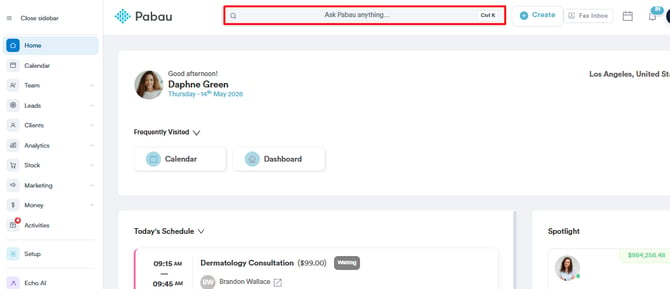
Start by logging in to your Pabau account using your login credentials. Then navigate to the search bar at the top of the page and proceed to type at least three letters of the client's name. Pabau will filter the results as you type.
Step 2: Switch to the Prescriptions Tab
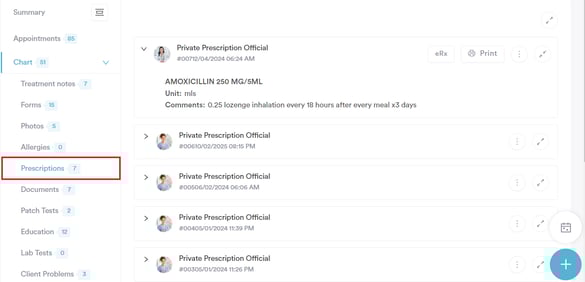
Open the "EMR" section and click the "Prescriptions" tab. Here, you will find a list of all prescriptions associated with the client.
Step 3: Select the Prescription to Edit
Hover over the prescription you’d like to edit — a toolbar of actions appears in the top-right corner of the row. Click the pencil icon (Edit prescription). The Edit Prescription window opens with the medications loaded.
NOTE: To learn how to safely and securely share prescriptions with clients, please refer to this article.
Step 4: Edit the Prescription
Once you've selected the prescription to edit, you can make the necessary changes. The process is much the same as when creating a prescription, allowing you to adjust dosage, instructions, and other details as needed.
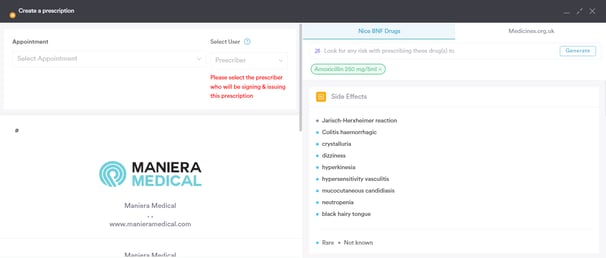
Safety checks run automatically while you edit — the Safety tab flags any medication that clashes with the client’s recorded allergies.
Step 5: Update and Sign
After making the desired changes, click Update & sign prescription at the bottom right, then sign to save your edits.
Step 6: Print the Prescription (Optional)
In the window that appears once the prescription is updated, you can choose to print it — the printout opens in another tab with your browser’s print dialogue. If you do not wish to take any action, click Done.
By following these steps, you can easily edit prescriptions in Pabau, ensuring that the information is up-to-date and accurate for your clients.
How to Delete a Prescription
Step 1: Navigate to the Client Card
Start by logging in to your Pabau account using your login credentials. Then navigate to the search bar at the top of the page and proceed to type at least three letters of the client's name. Pabau will filter the results as you type.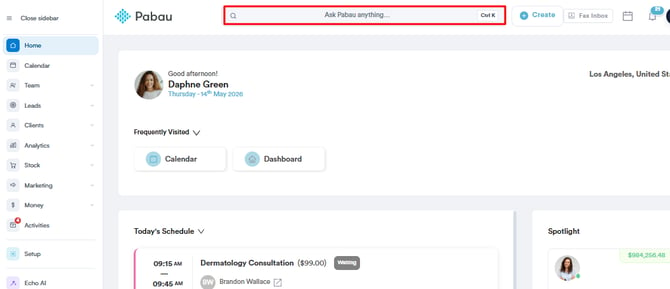
Step 2: Switch to the Prescriptions Tab
Click on the "Prescriptions" tab under the "EMR" section to view the client's prescriptions.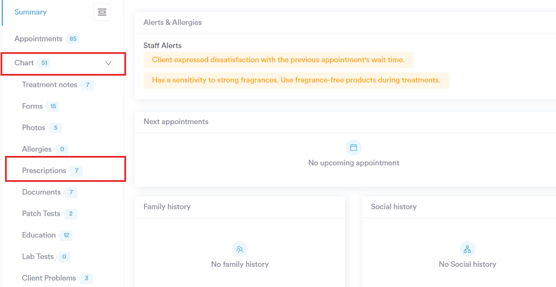
Step 3: Select the Prescription to Delete
Hover over the prescription you want to delete, click the three dots in the toolbar that appears in the top-right corner of the row, and select "Delete".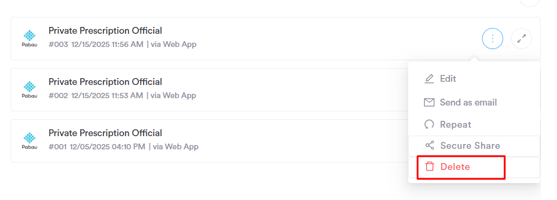
Step 4: Delete the Prescription
After selecting "Delete", a prompt asks you to confirm that you want to permanently delete the prescription. Click "Delete" to confirm — this action cannot be undone. The delete option is only available to staff with the relevant permission.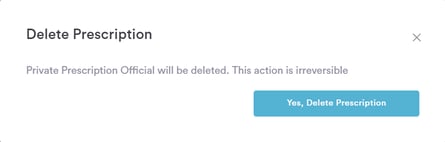
By following these steps, you can easily delete a prescription in Pabau, ensuring that your records are up-to-date and accurate.
How to Repeat a Prescription
Step 1: Navigate to the Client Card
Start by logging in to your Pabau account using your login credentials. Then navigate to the search bar at the top of the page and proceed to type at least three letters of the client's name. Pabau will filter the results as you type.
Step 2: Switch to the Prescriptions Tab
Click on the "Prescriptions" tab under the "EMR" section to access the list of prescriptions associated with the client. 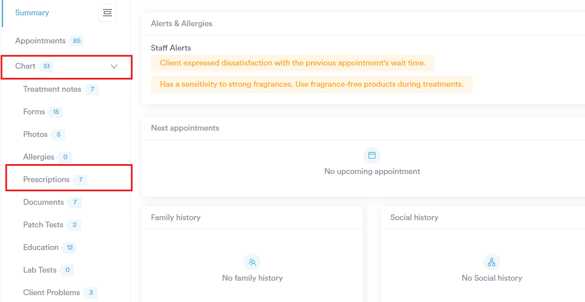
Step 3: Select the Prescription to Repeat
Hover over the prescription you want to repeat and click the circular-arrows icon (Repeat prescription) in the toolbar that appears in the top-right corner of the row.
Step 4: Repeat the Prescription
The Repeat Prescription window opens with the medications pre-filled. Review them, then click Issue & sign prescription and sign as usual. Repeated prescriptions are marked with a "Repeat" badge next to the prescription’s name in the list.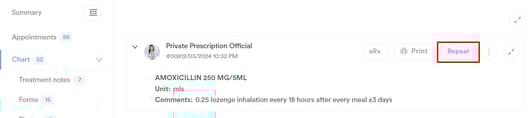
By following these steps, you can easily repeat a prescription in Pabau.
How to Print a Prescription
Step 1: Navigate to the Client Card
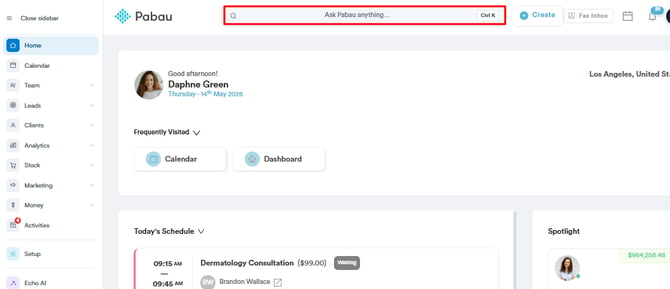
Start by logging in to your Pabau account using your login credentials. Then navigate to the search bar at the top of the page and proceed to type at least three letters of the client's name. Pabau will filter the results as you type.
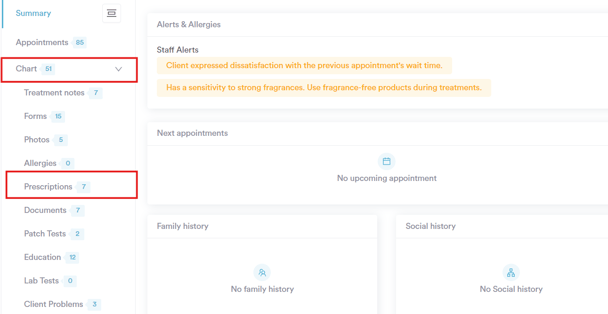
Step 2: Switch to the Prescriptions Tab
Open the "EMR" section and click the "Prescriptions" tab. Here, you will find a list of all prescriptions associated with the client.
Step 3: Select the Prescription to Print
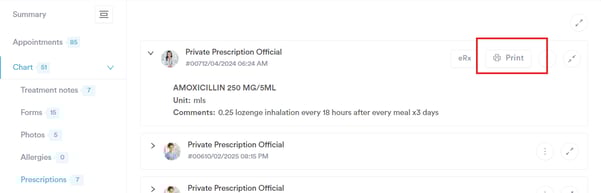
Hover over the prescription you’d like to print — a toolbar of actions appears in the top-right corner of the row.
Step 4: Print the Prescription
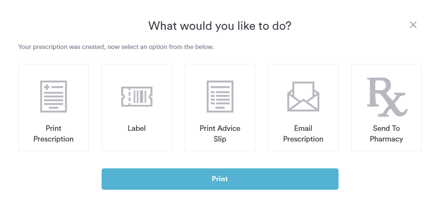
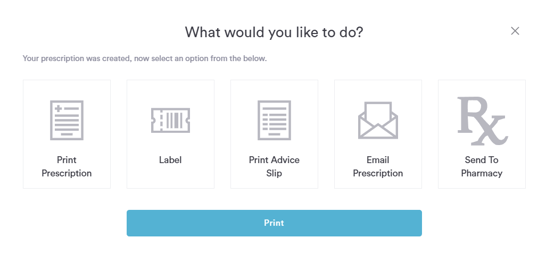
Click the printer icon ("Print prescription"). A window titled "What would you like to do?" appears.
Select Print Prescription and click Print — the printout opens in another tab and your browser’s print dialogue appears. You can also choose Download to save it as a PDF, print a Label, email it, or send it to a pharmacy. Prescriptions containing controlled drugs print on the FP10 layout.
By following these steps, you can easily print a prescription in Pabau. This allows you to provide a physical copy to your clients or keep a record of your files.
How Pabau Checks Drug Safety for Prescriptions
While you build a prescription, Pabau automatically checks it for safety issues and shows the clinical reference for each medication — there is nothing to run manually.
On the right side of the prescription window you will find two tabs:
- Safety — cross-checks every medication on the prescription against the client’s recorded allergies. Conflicts are counted and described (for example, "1 allergy conflict"), and the affected medication card is flagged with an "Allergy" badge; when nothing matches, the tab confirms "No allergy conflicts". Important safety information from the formulary (such as MHRA/CHM advice) is pinned to the top of the panel.
- Knowledgebase — the clinical reference for the selected medication: Side Effects (grouped by how common they are), Cautions, Allergy & cross-sensitivity, and Indications.
Always review the flagged information clinically before issuing the prescription.
How to Submit a Prescription to CloudRx
Please note that this process is specifically designed for UK clinics. If you are a US clinic seeking guidance on sending prescriptions to pharmacies, please take a look at this article.
If you need to become more familiar with creating prescriptions, please read our article on how to create a prescription. Additionally, make sure you've enabled your CloudRx integration.
Step 1: Navigate to the Client Card
Start by logging in to your Pabau account using your login credentials. Then, navigate to the search bar at the top of the page and type at least three letters of the client's name. Pabau will filter the results as you type.
Step 2: Create a Prescription
Once you are viewing the client’s profile, click the Create button — the blue plus sign at the bottom right corner of the page — and choose Prescription from the menu.
Step 3: Select a Template
Select the form you want to use from your existing templates. If you still need to create a prescription form template, read our article on how to create a prescription form.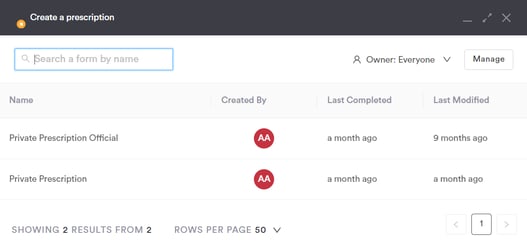
Step 4: Complete the Prescription Form
After selecting the template, search for the medication and choose the SignatureRx tab above the search results to see the drugs available via CloudRx. Each result shows its price and whether it is in stock.
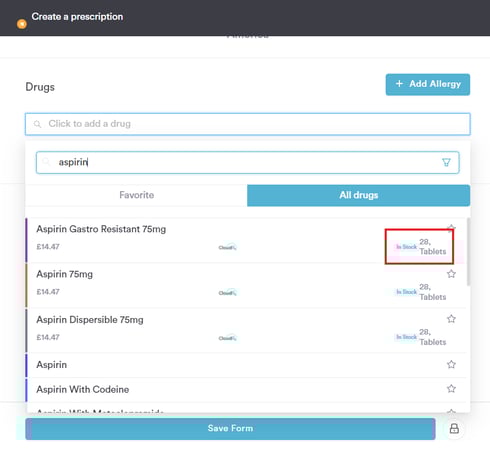
After selecting the drug, you will need to add the dosage.
Hover over the medication card and click the pencil icon (Edit medication) to open a pop-up window where you can build the instructions.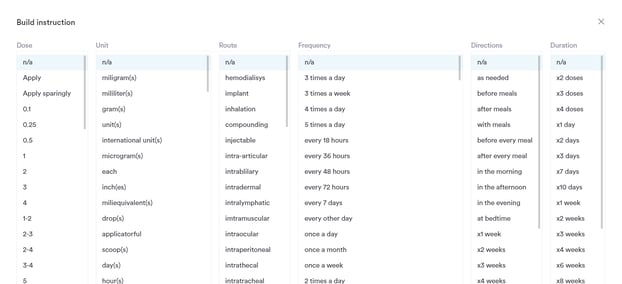
On the right side of the window, the Knowledgebase tab shows the clinical reference for the selected drug.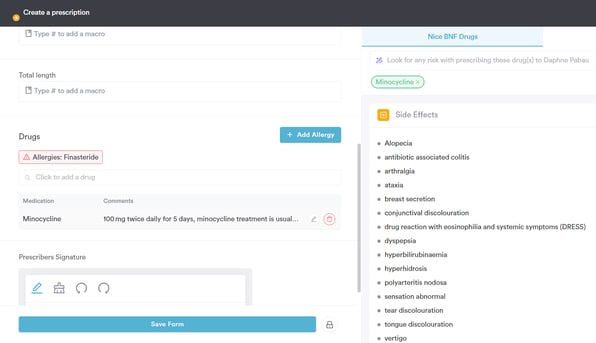
Step 5: Issue and Sign the Prescription
Click Issue & sign prescription at the bottom right, complete any remaining form fields, and sign.
Once the prescription is created, a window appears asking what you would like to do next — print it, download it as a PDF, print a label, email it, or send it to the pharmacy. Click Done when you are finished.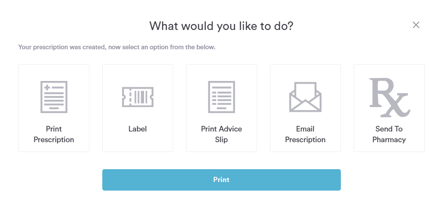
To verify the status of the prescription, open the EMR section within the client’s profile, go to Prescriptions, and click the prescription to expand it.
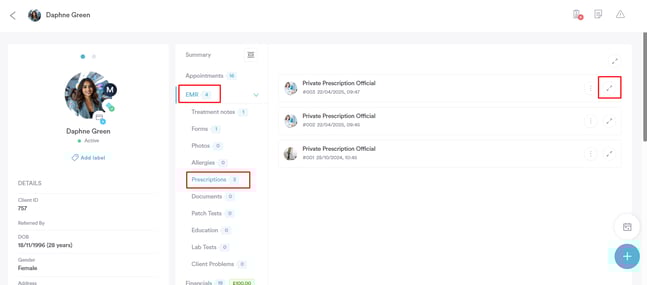
Hover over the prescription and click the Send icon in its toolbar, then choose Send to CloudRx to submit it. Once submitted, a green "Sent" badge appears against the CloudRx option in the Send menu, together with the date it was sent.
By following these steps, you will be able to submit a prescription to CloudRx efficiently.
Managing Centralized Prescriptions
The Prescription Page in Pabau helps you keep track of every individual medication prescribed, across all prescriptions in your clinic. This is especially useful for auditing, reviewing medication history, and ensuring every detail is accurate before sending prescriptions to pharmacies.
NOTE: For detailed information on the Prescription Report, refer to this article.
Step 1: Navigate to the Prescription Page
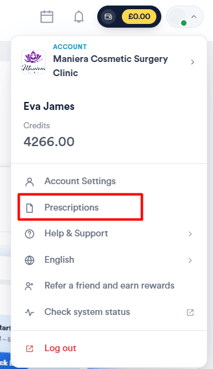
Start by logging into your Pabau account using your login credentials. Then, navigate to your avatar located at the top right corner of the screen and click to open the available options.
Click Prescriptions in the menu to open the Prescription page.
Step 2: Manage Prescriptions
On the 'Prescription' page, you can find and manage every prescription you have created. Each entry in the list provides key information about the prescriptions you have written.
NOTE: Each row represents one prescription. When a prescription contains several medications, the first is shown with a count of how many more it includes.
You can identify each prescription by its unique Rx #, which serves as a reference for tracking. The Date column shows when each prescription was created, and the Client and Prescriber columns show who it is for and who wrote it.
A key feature of this page is the validity icon on each row. It provides an "at-a-glance" check, telling you whether a prescription is complete and ready to be sent to a pharmacy.
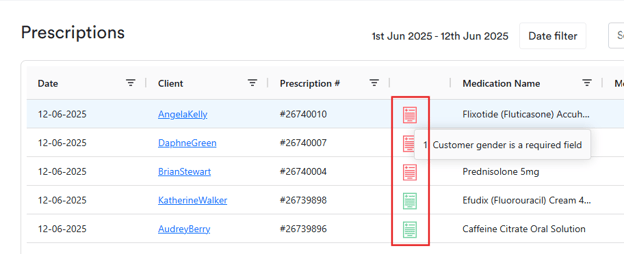
- The icon will appear green if all necessary checks are passed. This includes ensuring that the patient's details are complete, the dosage and quantity are set, all required prescription fields are filled out, and the prescriber is authorised.
- If any of this information is missing or incomplete, the icon signals that the prescription needs your attention before it can be finalised and sent. Hover over the icon to see exactly what is missing.
The medication details are also clearly laid out: the Medication column shows what was prescribed, alongside its Dosage and Frequency, and the Status column shows where each prescription is in its lifecycle (for example, draft or sent).
Step 3: Send Prescription to Pharmacy
Before a prescription can be sent to a pharmacy, it must pass a validity check. To initiate this check, first click the 'Approve' button. If the prescription is valid, the 'Send' button will become active, allowing you to click it.

After clicking the 'Send' button, the Send to pharmacy page opens, where you can finalise the details. Before sending, you will need to:
- Choose where to dispense from: under Dispense from, pick a connected pharmacy or in-house dispensary, or click Find a pharmacy to search.
- Review the medications: untick any that should not be sent this time, and click + Note to add instructions for the pharmacist about a specific medication.
- Choose the fulfilment method: Deliver to patient or Collect from pharmacy.
Once you have configured these options, click Send to pharmacy in the top right corner to transmit the prescription to the selected pharmacy.
By following these steps, you can confidently prepare, approve, and send prescriptions directly to pharmacies through the Centralized Prescriptions feature in Pabau.
Was this guide helpful? Let us know by voting below - your feedback helps us write clearer articles.
For more guides, browse the related articles below or use the search bar at the top of the page. You can also watch our video learning series, the Pabau Academy, or visit the Support page for additional help.