
Table of Contents:
1. Export Data via Reports
1.1. Data You Can Export With Reports
1.2. Data You Can't Export With Pabau Reports
2. Export Services/Products
3. Manage Full Data Export
4. Free Export Option
Export Data via Reports
Exporting data from Pabau by yourself involves several detailed steps to ensure accuracy. This is a step-by-step guide to navigating this process.
To initiate the data export, you first need to generate a report containing all relevant information. This involves compiling data across various modules. Follow these steps to get started:
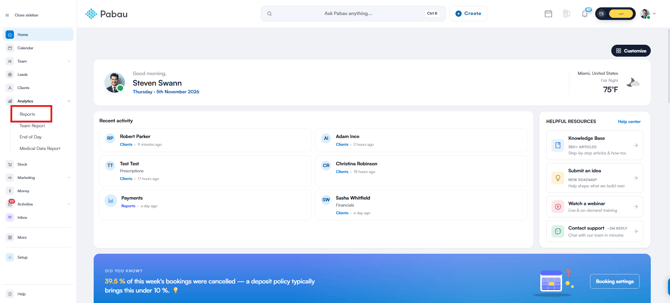
- Navigate to Analytics on the left sidebar menu.
- Select the "Reports" tab.
- Select the type of report you need or generate a custom report depending on the data you wish to export.
- Apply the necessary filters to customize the report.
- The filtered results will show right away.
- Navigate to the three dots on the right corner of the screen.
- Click "Export."
- In the pop-up window, select which file format (XLS or CSV) you want to export the data to.
- Click the "Export" button to finalize the action.
NOTE: For additional information on generating reports, refer to this master article.
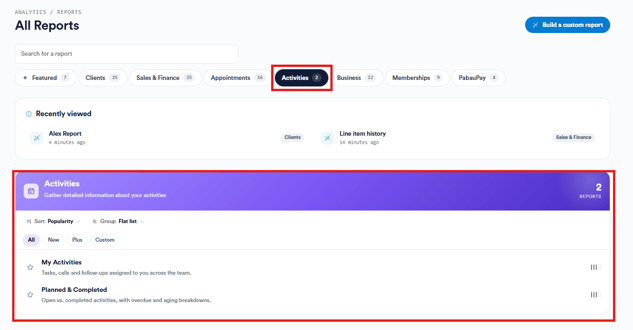
The pre-defined reports are all listed in the middle of the page, divided into different sections such as Clients, Leads, Sales, Appointments, Activities, Business, and Financials.
Each section includes specific filters designed to generate targeted information.
If you need information not covered by the predefined filters, you can generate a custom report and apply your own filters.
Data You Can Export With Pabau Reports
Reports allow you to export various data from Pabau. These reports can be customized with filters and targeted searches to generate the specific data you need.
Step 1: Locate Reports
Start by locating the pre-created reports in the system and checking if the report you need is already available.
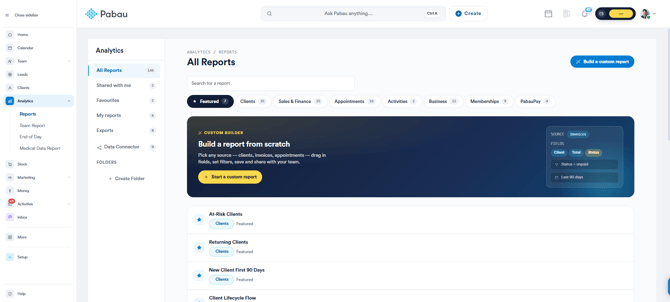
Step 2: Create Custom Report
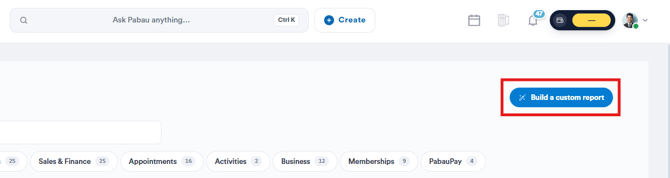
If the data you need isn't available in a pre-created report, click the "Create Custom Report" button at the top right corner of the page to generate a new report.
You will be prompted to choose what you would like to report on. Once you select the object, proceed to enter the filters to retrieve the data you need.
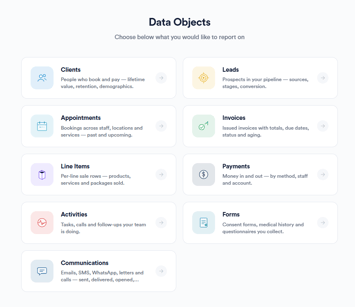
Some examples of data you can export via reports include:
- Appointments
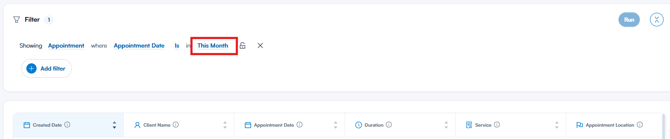
To export your appointments, you can use the predefined filters under the Appointments section, or you can start from scratch and apply the filters you will need, for example, "Showing Appointment where Appointment date is _______."
- Payments
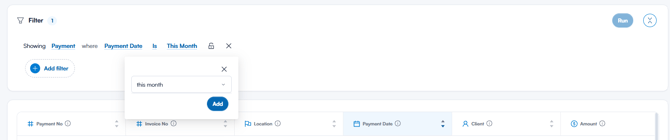
To export invoices, payments, or any financial data, review the Financials section to check if there are any predefined filters that could generate the data that you need or generate a report from scratch and apply the filters you need, for example, "Showing Payment where Date is in _____."
- Sales
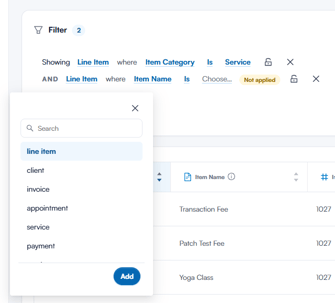
If you want to export any data related to your sales, review the Sales section for predefined filters. You can also generate custom reports by focusing on "Line Items" to generate product sales, service performance, voucher purchases, packages redeemed, money on account added, etc.
- Stock
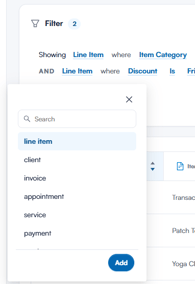
If you want to export your products or any data related to your products, you can search for predefined reports in the Sales section, such as Product Performance, or generate a report by applying filters from scratch. Ensure to focus on "Line Items" when trying to pull data for products.
- Clients
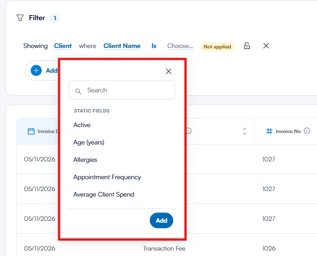
To export your clients, you have all predefined filters in the Clients section in the reports. If you want to export all active clients, you can generate a report from scratch, focus on clients, and select these filters "Showing Client where Active is Active."
How do I export every client with their name and mobile number?
The Clients list itself has no export — its bulk actions are for editing, deleting and printing labels. Use a client report instead:
- Go to Analytics → Reports and click Create Custom Report.
- Choose Client as the object to report on.
- Remove any date filter (for example Client created date), so the only condition left is Active is Active — or no condition at all if you also want inactive clients.
- Add the client name and mobile columns, then click the three dots and Export.
IMPORTANT: An export contains exactly the rows the report's filters return. A pre-made client report with a date filter (such as clients created this month) only exports the clients matching that date, so it can return far fewer clients than you have. Check the filters before exporting.
- Tasks
To export tasks, you can generate reports using the predefined filters in the Activities section. Additionally, you can generate custom reports using your filters of choice.
- Leads
To export your leads, scroll down to the Leads section of the Reports page, or search for the report by name. You’ll find predefined reports such as Converted Leads, Leads by Source and Open Leads. If none of these covers what you need, you can create a custom report using your own filters. 
Data You Can't Export With Pabau Reports
- Electronic Medical Records (EMR)
- Medical Form Templates
Export Services/Products
You can also export your services and products directly from their pages. Click the three-dot menu (⋯) in the top-right corner, next to the New Service button, and choose Excel or CSV. Follow these steps:
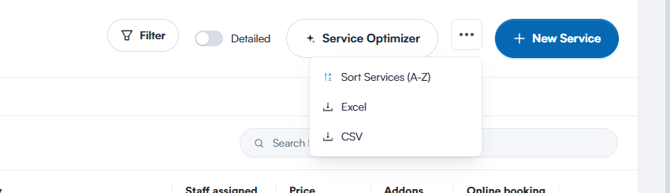
1. When going to the Services or Products page, you will find the Export button at the top right corner.
2. Upon clicking, you can select whether you want the services/products exported in Excel or CSV format.
3. Once you select the format type, the download will start automatically on your device and the products and/or services will be successfully exported.
Manage Full Data Export
If you want us to export the data for you, we offer a managed export, in which our experienced developers will handle the downloading and organization of all your data on your behalf. This can be arranged at a date and time specifically selected by you.
This is a chargeable service and the cost of completing the managed export is £450+VAT.
The process of performing a full data export from Pabau includes the following steps:
To initiate a full data export, contact support or get in touch with someone who can connect you with the finance team.
Data Export by Developers: Once the developers export the data, it will be organized into three folders: Meta Data, EMR, and Export. Each folder will contain different spreadsheets for various types of data.
Meta Data Folder: This folder includes spreadsheets for clients, attachments, appointment notes, client notes, and more.
Export Folder: This folder contains the Electronic Medical Records (EMR) for clients in PDF format. (Consent forms, questionnaires, and treatment notes)
The most crucial step is linking the attachments to the corresponding clients. To do this:
1. Navigate to the Meta Data folder and find the Attachments folder.
2. In the Attachments folder, search for the photo you need and copy the photo name.
3. Use Ctrl+F to open the search function and paste the copied photo name. The photo name will be highlighted when you find it in the link field.
4. Once you locate the row, note the client it is associated with.
5. Copy the client ID and go to the client spreadsheet.
6. Search for the system ID of the client to identify which attachment belongs to which client.
NOTE: Although the developers handle the export process, your cooperation is required to link attachments to clients. This task can be done either by you or your new software. You will need to carefully match the attachments to the corresponding clients to ensure that all records are accurately organized.
Once the export begins, any new data added to the system will not be included. If you need this new data, you will need to download it manually or request another paid export.
Free Export Option
This option requires you to give us a 30 days notice to cancel your Pabau account.
After this period, you will no longer be a Pabau customer, and your data export will commence on the last day of your Pabau account.
Depending on the size of the data, it may take up to 5 business days to complete. Once completed, we will send you all your exported data.
By following these steps, you can successfully export your data from Pabau.
Was this guide helpful? Let us know by voting below - your feedback helps us write clearer articles.
For more guides, browse the related articles below or use the search bar at the top of the page. You can also watch our video learning series, the Pabau Academy, or visit the Support page for additional help.