
Step 1: Navigate to Analytics
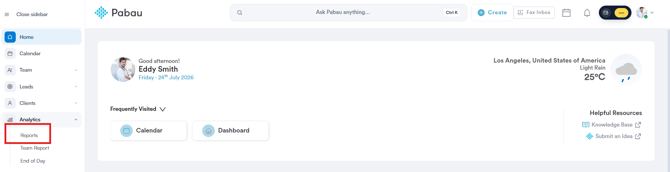
Start by logging into your Pabau account using your login credentials. Then, navigate to the left sidebar menu, where you can find the Analytics tab. Click to expand it, and it will reveal Reports.
Step 2: Open the Open Leads Report
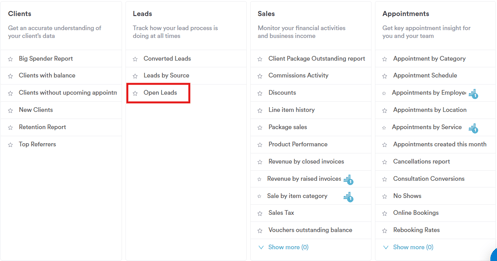
Under the Leads section, you will find the Open Leads.
Step 3: Review the Default Filters
The Open Leads report opens with 2 filters applied, stacked together with "and," meaning both must be true for a record to appear:
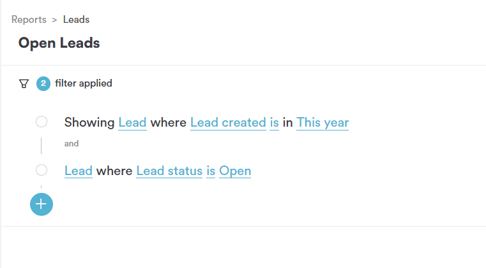
- Lead where Lead created is in This year — restricts the report to leads created within the current calendar year
- and Lead where Lead status is Open — narrows the report down to leads that are still active, excluding any that have been won or lost
Each part of a filter — object, field, operator, and value — can be clicked and changed independently, which is what the rest of this article walks through.
Step 4: Change the Object
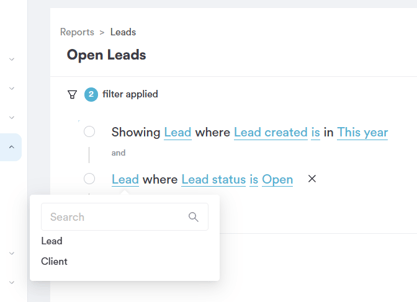
Clicking on the object (e.g. "Lead") opens a dropdown of everything you can build a filter around:
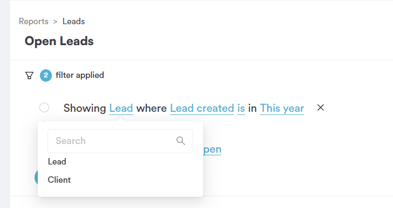
- Lead — an individual lead record; use this for anything relating to the lead itself
- Client — the person the lead relates to, once converted or matched to a client record
Step 5: Change the Field
Clicking on the field opens a scrollable list, since a lead carries a lot of detail. This is where you choose exactly what aspect of the lead you want to filter on.
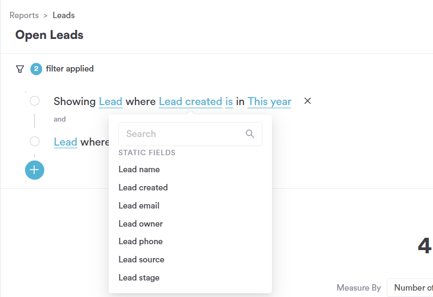
The static fields available for the Lead object include:
- Lead name — the name recorded against the lead
- Lead created — when the lead was first created, which is what controls the reporting period by default
- Lead email — the email address recorded for the lead
- Lead owner — the team member the lead is assigned to
- Lead phone — the phone number recorded for the lead
- Lead source — where the lead originated from
- Lead stage — the pipeline stage the lead currently sits in
- Won time — when the lead was marked as won, if applicable
- Lead status — whether the lead is Open, Won, or Lost, which is what powers the default filter
- Lead location — the clinic/site the lead is associated with
- Lead done activities — activities already completed against the lead
- Pipeline name — the pipeline the lead belongs to
- First activity time — when the first activity on the lead took place
- Lead last activity date — when the lead was last actioned
- Lead last activity (Days) — how many days since the lead was last actioned
- Lead lost reason — the reason recorded if the lead was marked as lost
- Lead total activities — the total number of activities logged against the lead
- Won by — the team member who won the lead
- Activities to do — outstanding activities still to be completed
- Lead creator — the user who created the lead record
- Date of entering stage — when the lead entered its current pipeline stage
- Email messages count — number of emails exchanged with the lead
- Last email sent — the date of the most recent email sent
- Next activity date — the date of the next scheduled activity
- Pipeline stage — the current stage within the pipeline
- Update time — when the lead record was last updated
- Title — the lead's title
- Capture form name — the form the lead was captured through, if applicable
- Lead ID — the unique identifier for the lead
- Lead first name / Lead last name — the lead's first and last name
- Lead date of birth — the lead's recorded date of birth
- Lead service — the service the lead is interested in
- Lead active — whether the lead record is active
- Lead Labels — any labels applied to the lead
- Lead description — free-text notes recorded against the lead
- Lead mobile — the lead's mobile number
- Lead Phone Opt In / Lead SMS Opt In / Lead Letter Opt In / Lead Email Opt In — the lead's marketing consent preferences by channel
Below the static fields sits a Custom Fields section, listing any additional fields your account has configured, such as:
- City
- Client Id
- Country
- DOB
- First Name
- Last Name
- Mobile
- Salutation
- System Id
Picking a field here decides what the operator and value in the next steps will actually test.
Step 6: Change the Operator (Date-Style Fields)
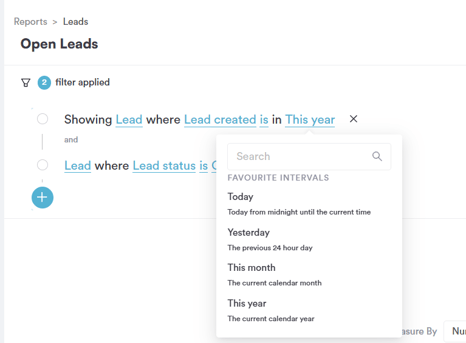
For a field like Lead created, which is a date, the operator list is:
- is — only leads created on an exact date
- is not — excludes leads created on an exact date
- is later than — only leads created after a given date
- is earlier than — only leads created before a given date
- is exactly or later than — includes the date itself plus everything after it
- is exactly or earlier than — includes the date itself plus everything before it
- is now until — only leads created between now and a date you specify
- is empty — only leads with no creation date recorded
- is not empty — only leads that do have a creation date recorded
Step 7: Choose the Value
Clicking on the value for Lead created opens the Favourite Intervals list — rolling date ranges that update automatically each time the report runs:
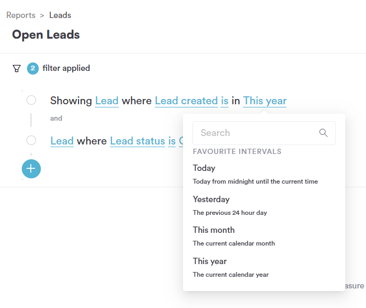
- Today — from midnight until the current time
- Yesterday — the previous 24 hour day
- This month — the current calendar month
- This year — the current calendar year, and the default for this report, useful for tracking leads created so far this year
Step 8: Adjust the Second Filter — Lead Status
The second filter row uses the same object/field logic. Clicking on the object shows the same list from Step 4 (Lead or Client), so you can repoint this row at a different object entirely if needed.
Clicking on the field opens the same scrollable list of Lead fields covered in Step 5. For the Lead status field, the operator list is:
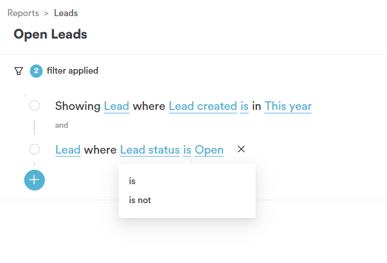
- is — only include the exact status chosen, which is how the default filter isolates Open leads
- is not — exclude the status chosen
Clicking on the value opens a search box along with every status available:
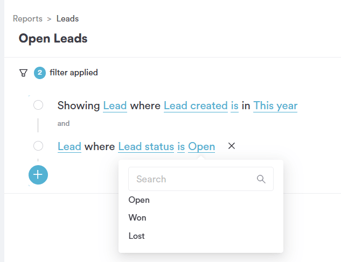
- Open — leads still active in the pipeline, and the default for this report
- Won — leads that have converted
- Lost — leads that didn't convert
Step 9: Review the Data
Once your filters are set the way you want, the report updates automatically, listing every lead that matches your rules, along with columns like Lead name, Lead created, and Lead status.
By following these steps, you can easily generate and customize the Open Leads report.
Was this guide helpful? Let us know by voting below - your feedback helps us write clearer articles.
For more guides, browse the related articles below or use the search bar at the top of the page. You can also watch our video learning series, the Pabau Academy, or visit the Support page for additional help.