
This feature is part of the new client card version and is currently available to select users only, starting August 2026. A wider rollout to all accounts is coming soon.
AI Studio is an AI-powered photo analysis and treatment simulation tool built into the Photos section of the client card. It allows you to analyse a client’s photo for treatable concerns, review AI-generated recommendations, and create a photorealistic “after” preview of a proposed treatment to share with the client. This turns a static clinical photo into a starting point for a consultation — helping clients visualise what is treatable and what their results could look like.
Before you start:
- Each photo analysis uses 7 credits, and credits are only charged when the analysis completes successfully — running a simulation does not use any additional credits.
- AI results are indicative and intended as a consultation aid; they are not a clinical diagnosis, and actual treatment results may vary.
Step 1: Navigate to AI Studio
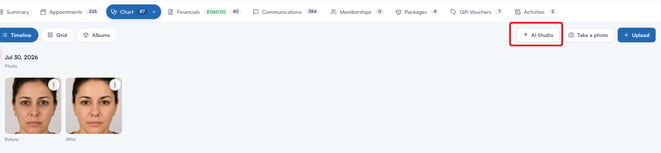
Start by logging in to your Pabau account. Open the client card of the client you want to work with, then open the EMR section (labelled Chart on US accounts) and select the Photos card.

In the toolbar at the top of the gallery, click the AI Studio button.
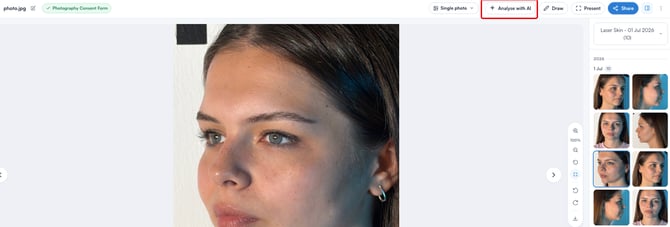
Alternatively, open any single photo in the full-screen viewer and click Analyse with AI. This opens the same tool with that photo already loaded.
Step 2: Select a Photo
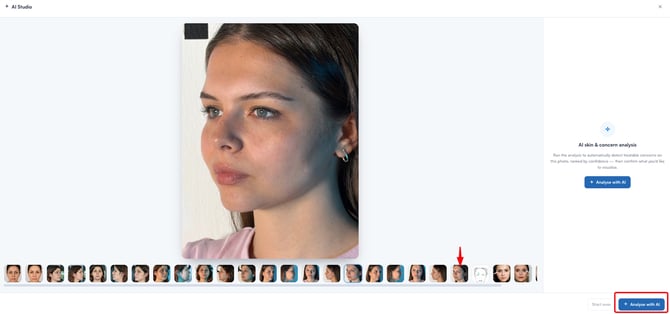
If you opened AI Studio from the gallery toolbar, select the face or body photo you want to analyse from the photo strip. Choose a clear, well-lit photo (JPG, PNG, or WebP), as photo quality directly affects the accuracy of the analysis.
Step 3: Choose Focus Areas
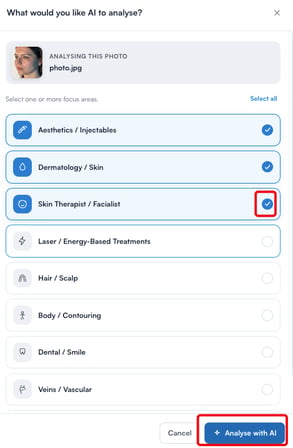
Next, select one or more focus areas to scope the analysis. You can choose from nine areas:
Aesthetics / Injectables, Dermatology / Skin, Skin Therapist / Facialist, Laser / Energy-Based Treatments, Hair / Scalp, Body / Contouring, Dental / Smile, Veins / Vascular, and Mole / Lesion Removal — or use Select all to include everything.
Only concerns relevant to the selected focus areas will be included in the analysis. When you have made your selection, click Analyse with AI.
Step 4: Review the AI Analysis
The AI returns a ranked list of concerns detected in the photo. Each concern is tagged as a Problem or an Opportunity and includes the category, the affected area, a priority level, a confidence level, a plain-language description, treatment options to discuss, and a suggested next step. For vein and lesion concerns, the AI also draws a traced outline directly on the photo.
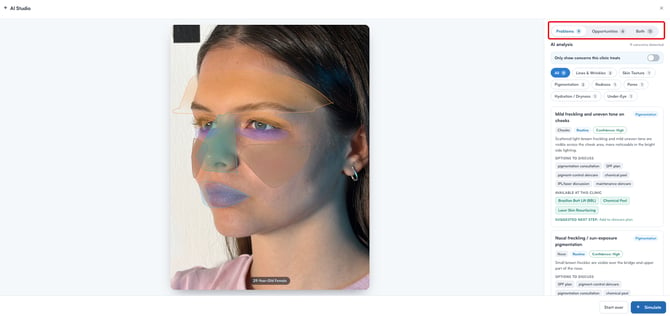
The results view includes several tools to help you review the findings:
- Problems / Opportunities / Both: use the tabs at the top to switch between viewing detected problems, potential opportunities, or both at once.
- Category filters: filter the list of concerns by category, such as Skin Texture, Pigmentation, or Moles.
- Highlighted regions: hover over the highlighted regions on the photo to see the concern detected in each area.
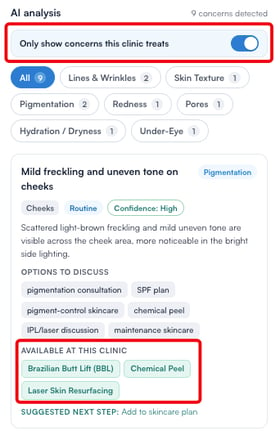
- “Only show concerns this clinic treats”: enable this toggle to filter the results down to concerns that match your clinic’s bookable services. Each concern card also lists the matching services under “Available at this clinic”.
- Demographic chip: the estimated age and sex of the person in the photo is displayed on the image. If the estimate does not match the details on the client’s record, a warning appears prompting you to verify the record.
Step 5: Select Recommendations to Simulate
Once you have reviewed the analysis, click the Simulate button in the bottom-right corner of the screen. On the Simulate results screen, tick the recommendations you agree with and want to visualise. For each selected recommendation, set how the treatment should be simulated:
- Treatment technique: choose the treatment to simulate. Depending on the concern, you may instead see technique-specific controls such as filler or augmentation technique, removal technique, number of hair grafts, or toxin unit count.
- Intensity: set how far to take the result. For most concerns, this is an intensity dial with Subtle, Natural, and Bold options, while for others you can choose between steps such as 1 session, 2 sessions, or Full clearance.
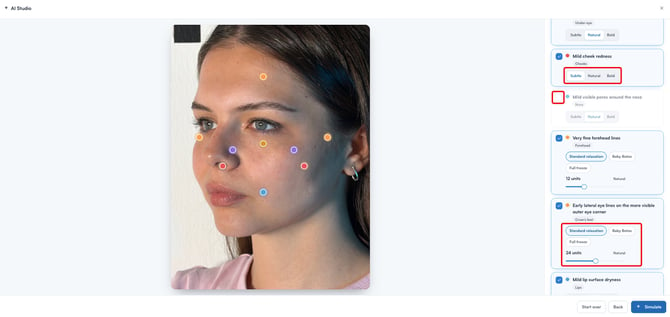
When you are ready, click Simulate.
Step 6: Generate the Simulation
The AI generates a photorealistic “after” image based on your selections. While the simulation is being created, you will see the Magic touch-up progress screen listing the refinements being applied. The AI edits only the regions related to the selected concerns — the rest of the photo remains unchanged.
Step 7: Review and Adjust the Simulated Result
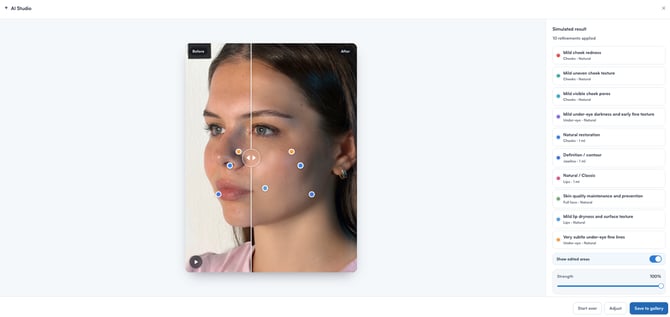
As soon as the simulation is ready, the result opens in a before/after view. Drag the slider across the image to compare the original photo with the simulated result. On the right side of the screen, you can see a list of all refinements applied.
Use the following controls to fine-tune the preview:
- “Show edited areas”: enable this toggle to highlight exactly which parts of the photo were changed.
- Strength: use the slider to blend the simulated result over the original photo at any opacity — from a subtle change to the full simulated effect.
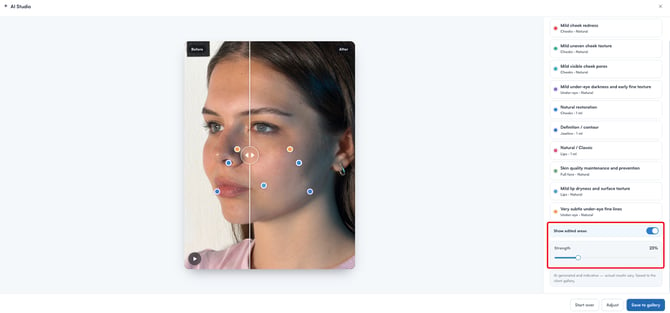
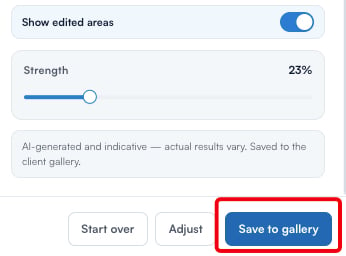
If you want to change the selected treatments or intensity, click Adjust. To discard the result and begin again with a different photo or focus areas, click Start over.
Step 8: Save the Result to the Gallery
When you are happy with the result, click the Save to gallery button in the bottom-right corner of the screen. The image is saved back into the client’s photo gallery and is clearly labelled as an AI simulation, so it can never be mistaken for a real clinical photo.
NOTE: simulated images are AI-generated and indicative — actual treatment results vary. Always present the preview to clients as an illustration of a possible outcome, not a guaranteed result.
You can now use the saved before/after preview during consultations to discuss treatment options with your client.
Was this guide helpful? Let us know by voting below - your feedback helps us write clearer articles.
For more guides, browse the related articles below or use the search bar at the top of the page. You can also watch our video learning series, the Pabau Academy, or visit the Support page for additional help.