
Pabau gives you two ways to price a product kit: setting a fixed price manually, or letting the system calculate the price automatically based on the per-item discounts you apply. For a guide on how to create a product kit from scratch, read our How to Create a Product Kit article.
Step 1: Navigate to Product Kits
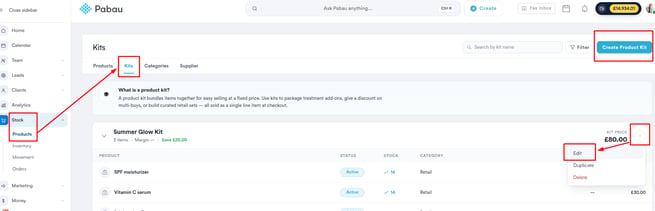
Log in to your Pabau account and in the left sidebar menu, navigate to Stock, then Products. From there, select the "Kits" tab at the top of the page. Open an existing kit via the three-dot menu and select "Edit," or click "Create Product Kit" to set pricing on a new kit.
Step 2: Set the Kit Price
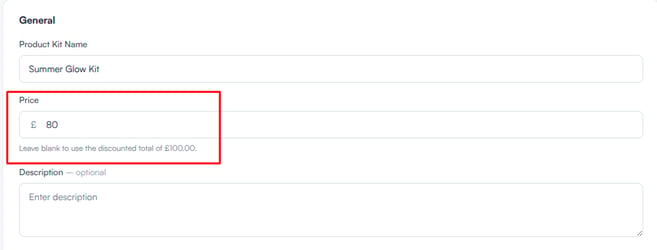
In the General section of the kit form, locate the Price field. You have two options:
-
Manual price: Enter a specific price in the field. This sets a fixed amount that the client will pay at checkout, regardless of the individual retail prices or discounts applied to the products inside the kit.
-
Auto-calculated price: Leave the price field blank. The system will automatically calculate the kit price by adding up the discounted subtotals of all product lines. A hint below the field will show you what the auto-calculated total would be, for example "Leave blank to use the discounted total of $35.00."
Step 3: Apply Per-Item Discounts
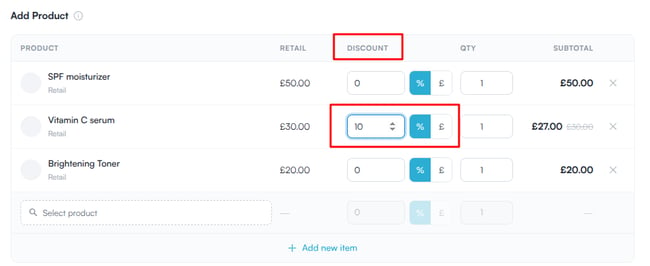
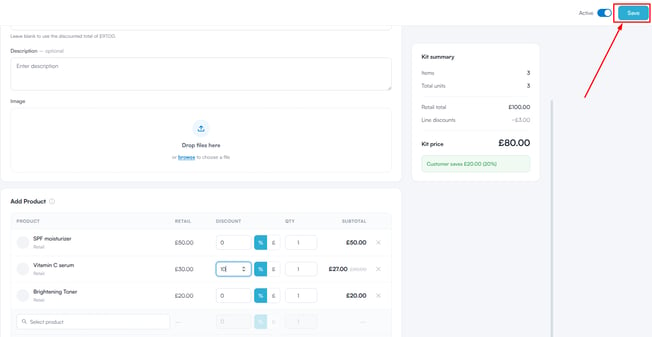
In the Add Product section, you can apply an optional discount to each individual product within the kit. For each product row, locate the Discount field and enter the discount amount. Use the toggle button next to the field to switch between:
-
% - a percentage off the product's retail price.
-
$ - a flat amount off the product's retail price.
Once a discount is applied, the Subtotal column will update to show the discounted line total, with the original retail price shown struck through next to it.
NOTE: Per-item discounts affect the auto-calculated kit price when the Price field is left blank. If you've entered a manual kit price, the client will always pay that fixed amount at checkout, regardless of the per-item discounts set.
Step 4: Review the Kit Summary
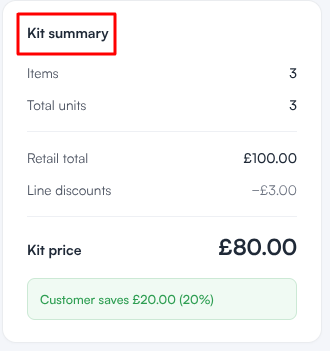
As you configure pricing and discounts, the Kit Summary panel on the right side of the screen updates in real time. Use this to verify your pricing before saving:
-
Retail total: The sum of all products at their standard retail prices.
-
Line discounts: The total discount value applied across all product lines.
-
Kit price: The final price the client will pay, either the manual price or the auto-calculated discounted total.
-
Customer saves: Shown in green when the kit price is below the retail total, displaying the saving in both amount and percentage.
Step 5: Save the Kit
Once you're happy with the pricing and discounts, click "Save" to apply the changes. The updated kit price will be reflected immediately at the Point of Sale.
With your pricing and discounts configured, clients will always be charged the correct kit price at checkout, whether that's a fixed price you've set or a total calculated from your per-item discounts.
Was this guide helpful? Let us know by voting below - your feedback helps us write clearer articles.
For more guides, browse the related articles below or use the search bar at the top of the page. You can also watch our video learning series, the Pabau Academy, or visit the Support page for additional help.