
A mock inspection lets you rehearse a CQC, GDPR or HIPAA inspection using your own records. Pabau samples recent completed appointments, checks the records and your clinic’s supporting evidence, and turns every gap into an issue you can assign, track and close. It’s a practical way to find and fix problems before a real inspector does.
NOTE: Mock inspections are available to clinic administrators. They simulate an evidence review only. A CQC mock inspection is not an official CQC inspection or rating, a GDPR inspection is not legal advice or an audit by the ICO or another data protection authority, and a HIPAA inspection is not an audit by the US Department of Health and Human Services. Findings always need professional review.
Step 1: Open the Compliance Dashboard
- Go to Setup, and under Business click Clinic readiness. The Dashboard tab opens first.
- Click New inspection (or Set up an inspection on the Overview).
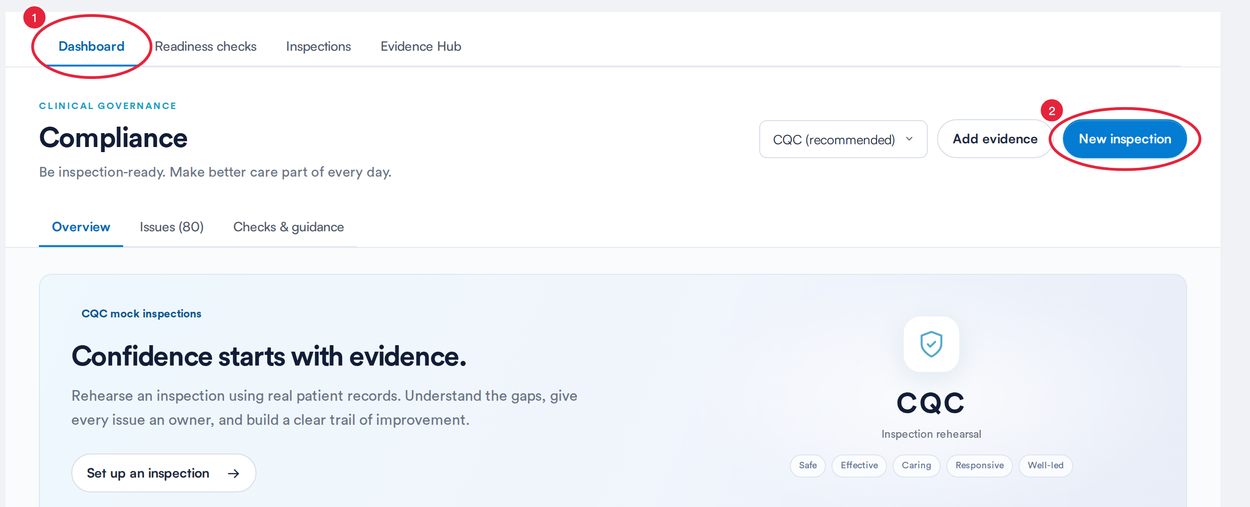
The Dashboard tab of Clinic readiness
TIP: The drop-down beside Add evidence shows the framework that fits your clinic, marked (recommended). Change it to view your issues and evidence for another framework.
Step 2: Choose the Framework
The Inspection studio opens and walks you through four steps.
- Choose the framework to inspect against: CQC mock inspection (England, CQC-regulated services: Safe, Effective, Caring, Responsive and Well-led), GDPR inspection (UK and EU data protection) or HIPAA inspection (United States, protected health information). The one that suits your clinic is marked Recommended for your clinic.
- Check the Inspection name. Pabau fills in the framework and today’s date, and you can change it.
- Under Location, keep All locations or pick one location. Then click Continue.
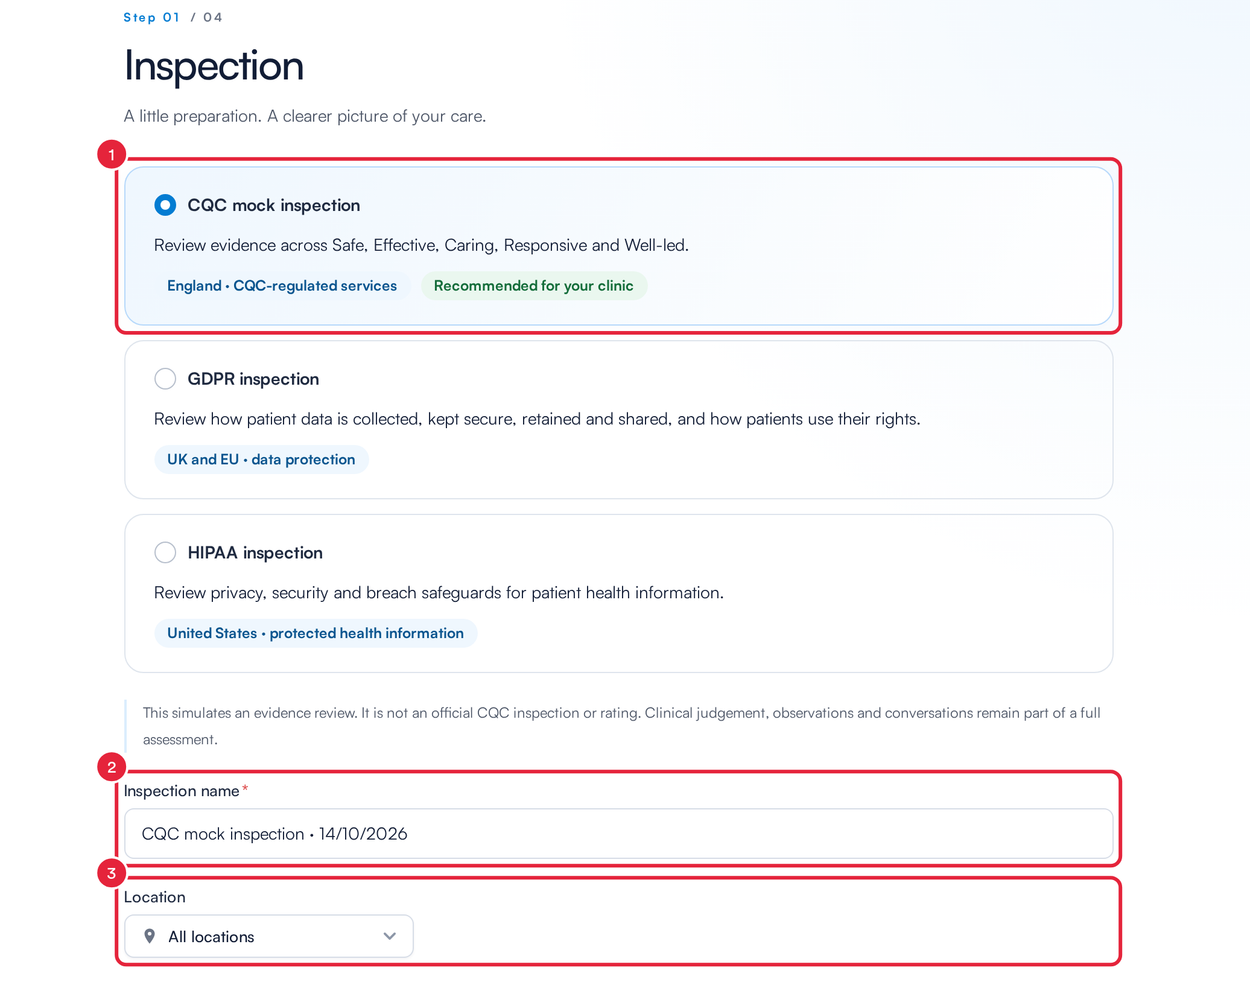
Choose the framework, name and location
Step 3: Choose Which Patients to Review
Pabau reviews one recent completed appointment per patient within the dates you choose.
- Choose how patients are picked: Random sample (recommended, patients are chosen when the inspection starts), Choose specific patients (search for patients and select them) or All patients (every patient matching your dates and filters).
- Set the Appointment dates.
- For a random sample, choose the Maximum patients: 10, 25 or 50. You can also narrow the sample to one Practitioner or Service.
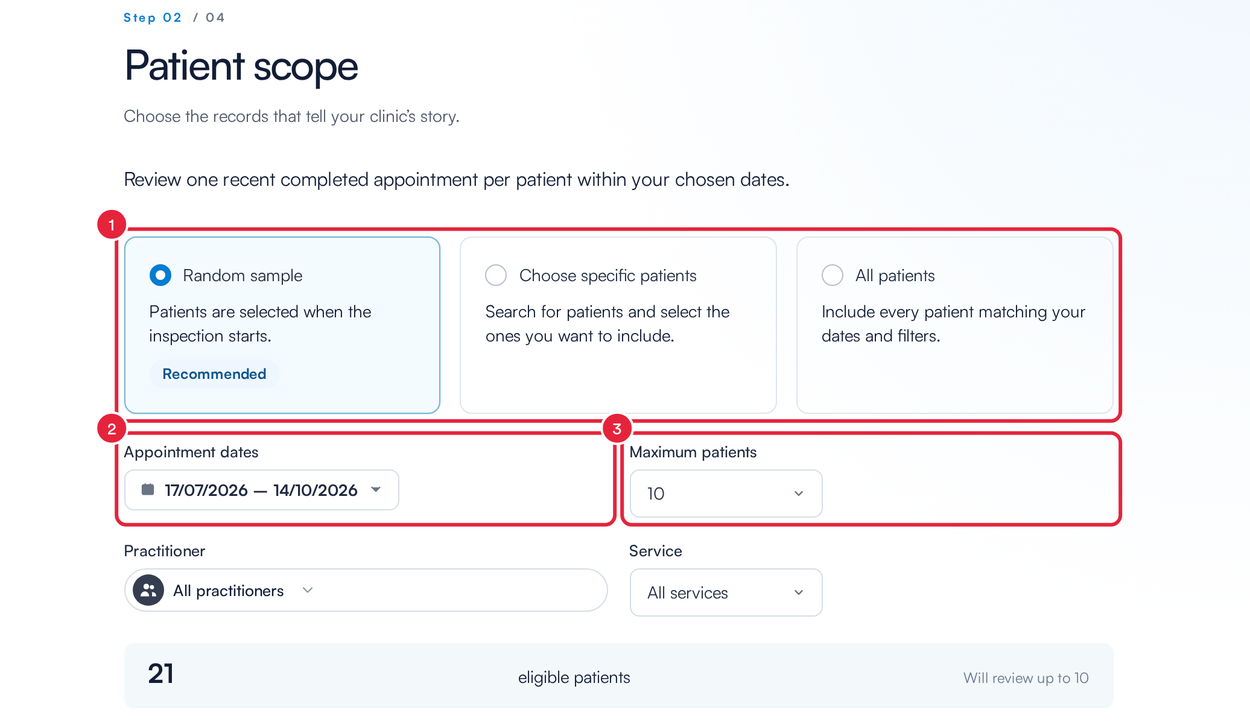
The count at the bottom shows how many eligible patients match
Click Continue.
Step 4: Check Your Supporting Evidence
The Supporting evidence step lists the checks that rely on clinic-wide evidence, such as policies, staff records and feedback, and shows whether each one has Evidence linked or is Not added. You can add evidence now with Add supporting evidence, or work through the gaps after the inspection. Click Continue.
Step 5: Review and Start the Inspection
- Check the summary of the framework, location, sampling, appointment dates and coverage, then tick I understand this is a mock inspection and findings need professional review.
- Click Start mock inspection.
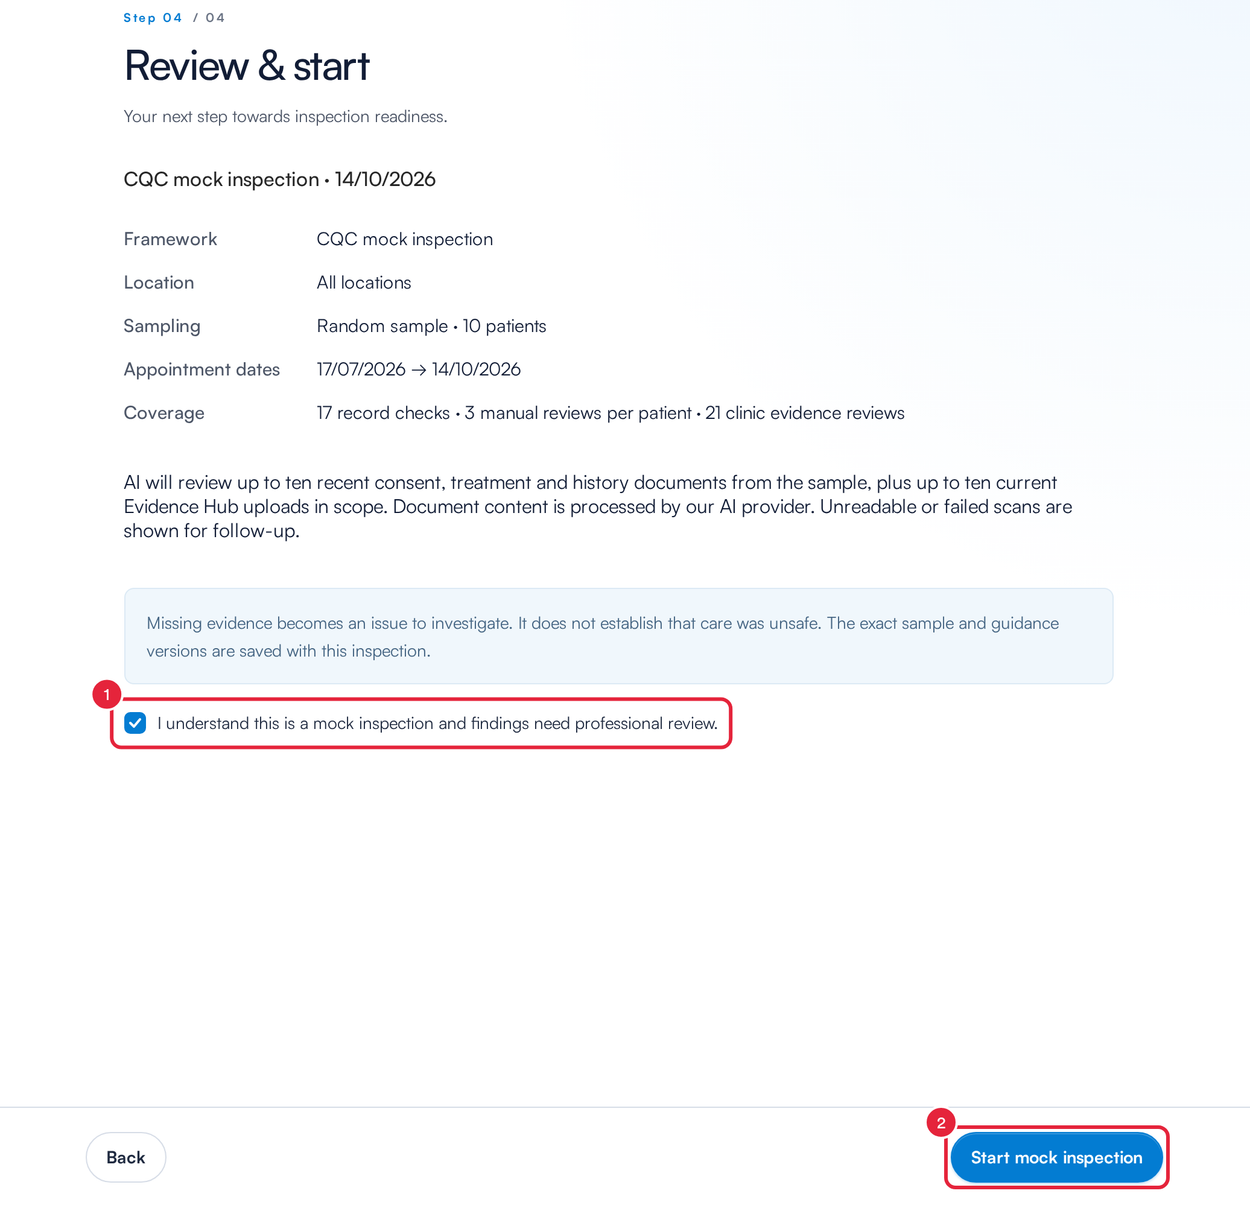
Confirm and start the inspection
The inspection runs in the background while Pabau reviews the records and saves the results. You can minimise it and keep working: progress appears in the bottom-right corner of the screen.
IMPORTANT: As part of the inspection, AI reviews up to ten recent consent, treatment and medical history documents from the sample, plus up to ten current documents from your Evidence Hub. Document content is processed by our AI provider. Documents it can’t read are listed for follow-up.
Step 6: Read the Inspection Report
When the inspection finishes, its report opens. The tiles at the top show how many checks were completed, how many found evidence (Positive checks), how many have gaps (Needs attention) and how many are Awaiting review by a person.
- Use the report tabs to move between the Report summary, Positive checks, Checks needing follow-up, All checks and your current Clinic readiness. The summary breaks the evidence down by area and lists What is working well and Where to focus next.
- After you’ve fixed some gaps, click Recheck this sample to run the checks again on the same sampled appointments.
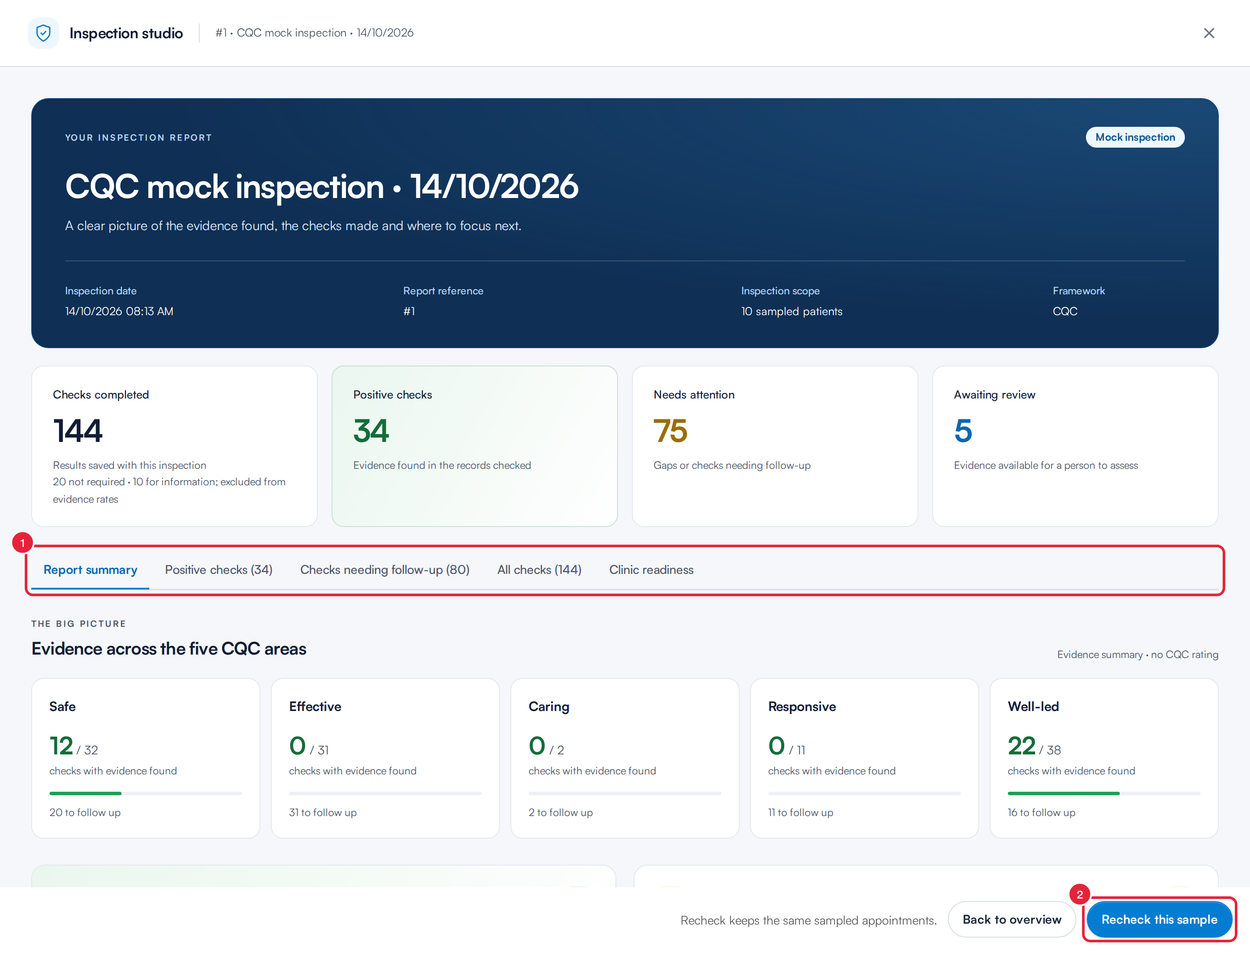
A finished CQC mock inspection report
Every inspection is saved. To open an earlier one, go to the Inspections tab and click View inspection beside it in Inspection history.
NOTE: A missing record becomes an issue to investigate. It does not mean care was unsafe, and finding a record does not confirm it is clinically adequate.
Step 7: Work Through the Issue Register
- On the Dashboard tab, open Issues. The tiles show your grouped issues by priority, plus how many are Ignored, New and Solved.
- Switch the Issue register between Grouped (one row per issue type, with every affected record underneath) and Single (every affected record on its own row, with its own status).
- Search for an issue, or filter by status (for example Open issues, Snoozed or Solved), area and priority.
- Click an issue to open it.
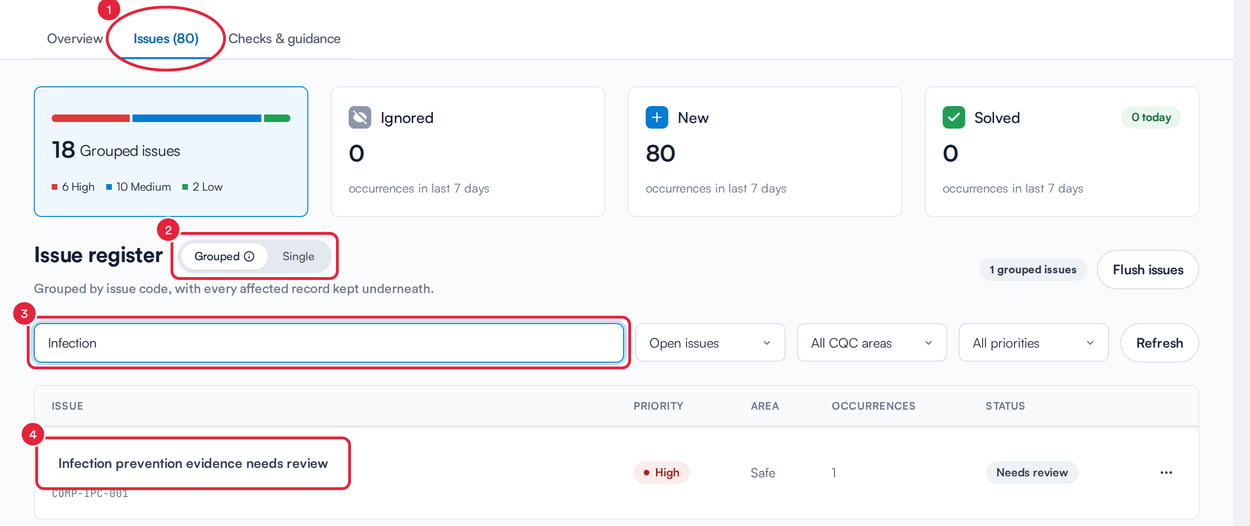
The issue register, filtered to one issue
Step 8: Update an Issue
The issue panel explains What did we find?, How do I fix it?, the Evidence to close this issue and how to Help prevent it happening again. Under Affected records, click a patient’s name to open their record, or click Review to choose the record you’re updating. Then fill in Review record:
- Set the Status: New, In progress, Awaiting verification, Resolved, Not applicable or False positive.
- Choose an Owner from your team.
- Set a Due date.
- Write a Review note / evidence of the decision: what was checked and why the status is right (at least 10 characters).
- Click Save issue update.
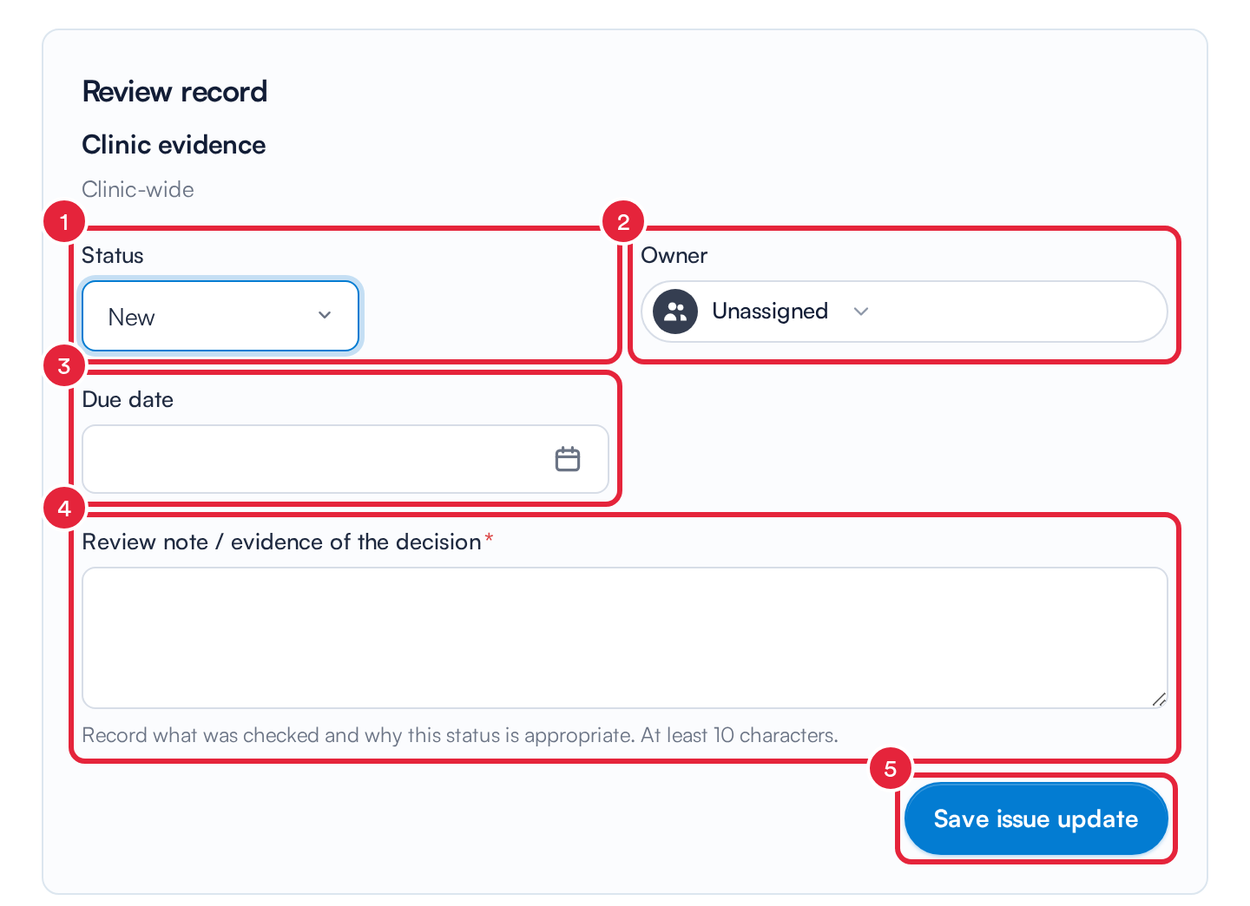
Give each issue an owner, a due date and a recorded decision
Every change, with the name of the person who made it, is kept in the issue’s Activity history. Before you close an issue as Resolved, Not applicable or False positive, confirm the source evidence and clinical context.
TIP: The … menu on each row of the register lets you Scan again (re-check this issue against the same affected records once you’ve fixed them), Snooze it for 1, 7 or 30 days, Copy link to share it with a colleague, or Adjust severity.
Step 9: Keep Your Evidence in the Evidence Hub
The Evidence Hub tab keeps your policies and supporting documents together, grouped by area, ready for your next inspection.
- Click a document tile (or drag a file onto it) to upload a PDF, DOC or DOCX file of up to 20 MB. The counter at the top shows how many of the required document types you’ve added.
- Click Configure to choose which documents your clinic needs in its checklist. All of them are turned on by default.
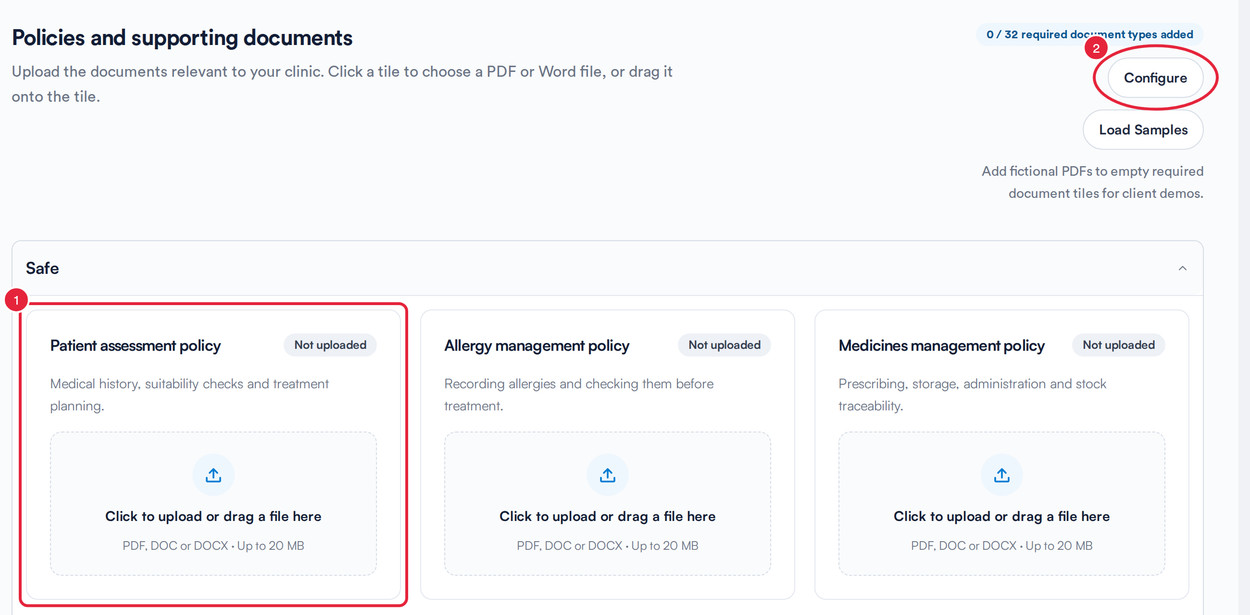
Upload your policies to the Evidence Hub
NOTE: Load Samples adds fictional demonstration PDFs, labelled Demo sample. They are never used as evidence in an inspection.
What's next?
- How Pabau Assists with CQC Compliance
- How Pabau Assists with HIPAA Compliance
- How to Create a Consent Form
Was this guide helpful? Let us know by voting below - your feedback helps us write clearer articles.
For more guides, browse the related articles below or use the search bar at the top of the page. You can also watch our video learning series, the Pabau Academy, or visit the Support page for additional help.