Table of Contents:
1. How to Raise an Invoice for an Appointment from the Calendar
2. How to Raise an Invoice from the Point of Sale
2.1. How to Raise an Invoice for a Product
2.2. How to Raise an Invoice for a Package
2.3. How to Raise an Invoice for Gift Vouchers
2.4. How to Raise an Invoice for Memberships
2.5. How to Raise an Invoice for a Walk-in Client
2.6. How to Raise an Invoice for a Third Party
3. How to Raise an Invoice from the Client Card
3.1. How to Raise an Invoice for an Appointment From the Client Card
How to Raise an Invoice for an Appointment from the Calendar
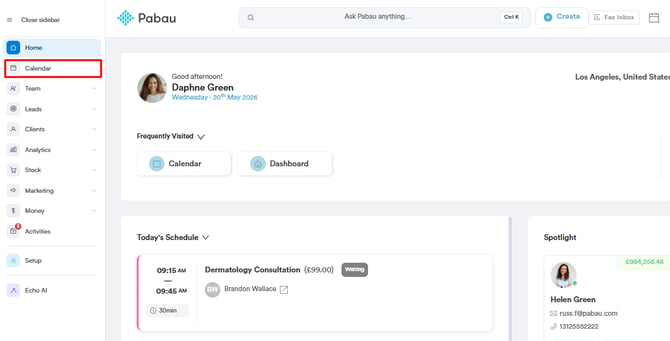
Step 1: Navigate to Calendar
Log in to your Pabau account, and in the left sidebar menu, click on Calendar.
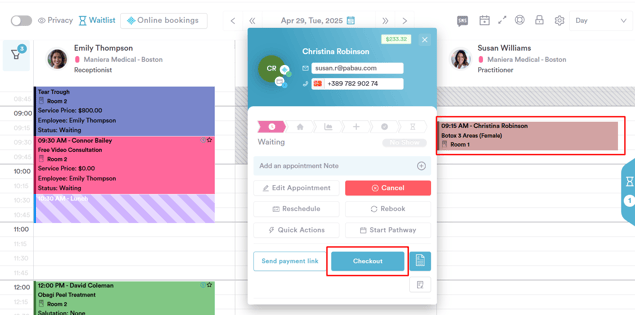
Step 2: Choose an Appointment
From the calendar, choose the appointment for which you wish to raise an invoice and click on it. From the appointment functionalities, click on "Checkout". This will redirect you to the Point of Sale.
Step 3: Create the Invoice
On the right-hand side of the Point of Sale, the client name will be prepopulated, and the cart will automatically include the service(s) booked, based on the appointment details. You can also add additional items from the available categories on the left-hand side:
- Services
- Products
- Packages
- Consumables
- Gift vouchers
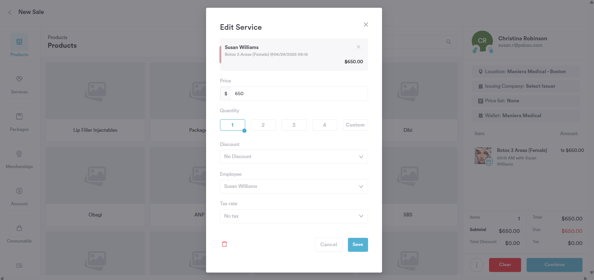
You can modify the price, quantity, apply discounts, or set tax rates for individual items by clicking on them and adjusting the details as needed.
Once all the items are added to the cart, click "Continue" to move on to the next step.
Step 4: Choose Payment Method
- If the full amount is covered, click "Confirm Payment" to finalize the transaction.
- If the invoice will be paid later, click "Save Unpaid" to complete the process.
- If the client has paid part of the invoice, click "Save Part-Paid" to save the invoice as partially paid.

Step 5: Checkout Complete
On the Checkout Completed screen, you’ll see the transaction details and the invoice status.

You can also view the invoice under the Financials tab in the client card.

By following these steps, you will be able to raise an invoice for an appointment from the calendar.
How to Raise an Invoice from the Point of Sale
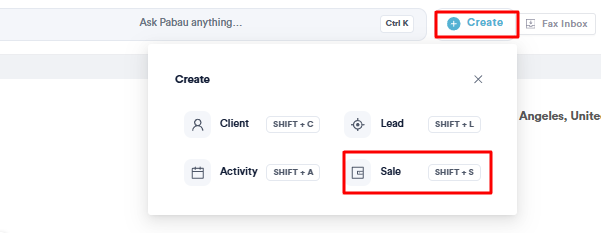
Step 1: Create a Sale
Log in to your Pabau account at the top of the screen next to the search bar, and click on the 'Create' button. Then choose 'Sale' to be directed to the Point of Sale.
Step 2: Select Client
The first step is to select the client. To do this, type your client's name into the main search bar, which is located at the top right corner. Once the search results appear, select the correct client from the list.

Step 3: Select Service
Next, on the left-hand menu, click "Services." Browse through the service categories and click on the service(s) you want to sell.

You can add multiple services, and they’ll appear in the client’s cart on the right-hand side of the screen. Once you've added all the services, review the total below the cart. Click 'Continue' to proceed to the payment options.

Step 4: Finalize Payment
At this stage, you can either select a payment method for the invoice or leave it as unpaid. The button in the bottom right corner will change based on your choice:
- If you do not add a payment method (leaving the invoice unpaid), the button will be labeled 'Save as Unpaid'.
- If you add a payment method (e.g., by entering card information, recording a cash payment, or selecting another available option), the button will be labeled 'Confirm Payment'.
Click this button in the bottom right corner to proceed with the chosen action.

On the Checkout Completed screen, you’ll see the transaction details and the invoice status. You can access the client card by clicking the client name on the checkout completed screen.

You can also view the invoice under the Financials tab in the client card.

By following these steps, you can successfully raise an invoice from the point of sale.
How to Raise an Invoice for a Product
Step 1: Accessing the Point of Sale
To begin, log into your Pabau account and navigate to the Point of Sale by clicking on the "Create" button located at the top of the screen. From the options provided, select "Sale."
Step 2: Add Product
From the menu on the right, search for the client by typing their name on the search bar.

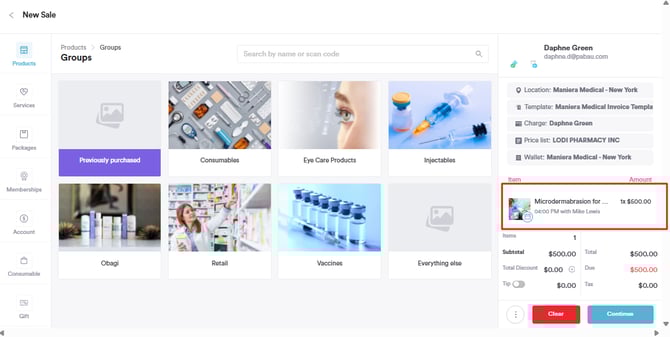
To begin adding products, select 'Products' from the main menu, typically found on the left-hand side. From the categories displayed, browse to find the specific product you'd like to sell, and then click on it to add it to the current sale. Each item you add will appear in the client's cart, which is visible on the right-hand side of the checkout section.
Once you've finished adding all the desired products, the total amount due will be displayed below the items in the cart. To move to the next step, click the 'Continue' button, and you'll be taken to the payment method selection screen.

At this stage, you can either select a payment method for the invoice or leave it as unpaid. The button in the bottom right corner will change based on your choice:
- If you do not add a payment method (leaving the invoice unpaid), the button will be labeled 'Save as Unpaid'.
- If you add a payment method (e.g., by entering card information, recording a cash payment, or selecting another available option), the button will be labeled 'Confirm Payment'.
Click this button in the bottom right corner to proceed with the chosen action.

On the Checkout Completed screen, you’ll see the transaction details and the invoice status. You can access the client card by clicking the client name on the checkout completed screen.

You can also view the invoice under the Financials tab in the client card.

By following these steps, you can sell products to clients who have had appointments or visited your clinic.
How to Raise an Invoice for a Package
Step 1: Accessing the Point of Sale
To begin, log into your Pabau account and navigate to the Point of Sale by clicking on the "Create" button located at the top of the screen. From the options provided, select "Sale."
Step 2: Add Package
From the menu on the right, find the client you want to sell the package to and click on their name.

Next, on the left-hand side, go to the menu and select "Packages." Choose the package you'd like to sell and click on it.

You can add as many packages as needed; they will be added to the client's cart, which you can view on the right-hand side of the checkout screen. Once you've finished adding the packages, you'll see the total amount listed below them. Click "Continue," and you'll be prompted to select the payment method.

Step 3: Finalize Payment
At this stage, you can either select a payment method for the invoice or leave it as unpaid. The button in the bottom right corner will change based on your choice:
- If you do not add a payment method (leaving the invoice unpaid), the button will be labeled 'Save as Unpaid'.
- If you add a payment method (e.g., by entering card information, recording a cash payment, or selecting another available option), the button will be labeled 'Confirm Payment'.
Click this button in the bottom right corner to proceed with the chosen action.

On the Checkout Completed screen, you’ll see the transaction details and the invoice status. You can access the client card by clicking the client name on the checkout completed screen.

You can view the invoice under "Financials" and "Invoices" when you open the client's profile. Packages will be stored under the "Packages" section within the client's profile. This allows the client to use their package to pay for their next appointment, which will deduct a session from the package balance.

By following these steps, you can efficiently sell packages to clients who have had appointments or visited your clinic.
How to Raise an Invoice for Gift Vouchers
Step 1: Access the Point of Sale
Start by logging in to your Pabau account using your login credentials. Click the Create button at the top of the page next to the search bar and select "Sale" to access the Point of Sale.
NOTE: For more details on the Point of Sale, please review this article.
Initially, you should select the client at the top right corner of the page for the features to become available for selection. Otherwise, they will remain greyed out until you select the client.
The Gift Voucher option appears in the bottom left corner of the page.

NOTE: If you have created vouchers in Pabau and the Gift Voucher option does not appear at the point of sale, check your POS Configuration to see if this option is disabled. Refer to this article on POS configuration for more information.
Step 2: Sell Gift Voucher
When you click "Gift," the gift vouchers you have created in Pabau will appear. You can then select the voucher to proceed with the purchase. Details of the gift voucher will be displayed underneath the client's name.

Clicking on the Gift Voucher line item in the cart will open the Edit Voucher pop-up, where the following components are present:
-
Voucher code - you can generate unique 9-digit codes or can manually input a code, ensuring there are no duplicate voucher codes in the system.
-
Quantity - allows you to choose the voucher quantity
-
Employee - allows you to select the employee under whom they want to record the voucher sale
-
Purchase this voucher for - This defaults to the client being charged for the voucher. However, you can select any client from their client base, allowing the voucher to be assigned to someone other than the paying client
-
Tax rate - allows you to add a tax rate if necessary
-
Trash can icon - remove item from cart
-
Cancel - cancel the edit voucher changes
-
Save - apply the edit voucher changes

If everything looks correct, click the "Continue" button to proceed to the payment page.
On the payment page, you can select the payment method that the client wants to use and click the "Confirm Payment" button to complete the transaction.

Once the payment is confirmed, you will view all invoice details, where you can select the client name to direct you to their client card to view the voucher.

Step 3: Navigate to the Client Card
Once you access the client card, switch to the Gift Vouchers tab to view all vouchers the client has purchased. Pabau also categorizes vouchers into Active and Expired vouchers.

NOTE: To review how you can use a gift voucher to pay for an appointment, please review this article.
By following these steps, you can sell a gift voucher to a client from the checkout.
How to Raise an Invoice for Memberships
Step 1: Navigate to the Point of Sale
To access the Point of Sale, click the "Create" button at the top right corner of the screen and then "Sale."
Step 2: Select Membership
Proceed as you would when performing a sale. Memberships will be displayed on the left-hand side. Clicking on Memberships will show all the memberships you have created in Pabau.

NOTE: You're not able to add anything else to the cart once you've selected a membership.
Step 3: Select Payment Method
At the payment stage, when purchasing a membership, the only available payment option is "Setup Subscription."

The membership amount will be displayed by default (but can be adjusted), along with the subscription start date. Lastly, input the client's card details to complete the setup.

Once the subscription is set up and the payment is successful, the following will occur:
- An invoice and payment under the item category "Membership" will be created.
- The employee listed on the invoice will be the one who sold the membership.
- The item name will match the name of the membership.
- The unit price will reflect the membership’s cost.
- Quantity will always be set to 1.
- No discount will be applied.
- Tax will follow the settings defined when the membership was created.
- The total price will include the membership cost after tax.
The invoice date and the associated payment will correspond to the date the membership is activated, which may differ from the actual sale date.
An invoice and payment will be generated each time the membership is due, whether weekly or monthly. Future invoices will be tied to the same location where the membership was originally sold.
By following these steps, you will be able to sell memberships successfully.
How to Raise an Invoice for a Walk-in Client
Step 1: Create a Sale
Log in to your Pabau account at the top of the screen next to the search bar, and click on the 'Create' button. Then choose 'Sale' to be directed to the Point of Sale.
Step 2: Choose a Walk in Client
Once in the Point of Sale, go to the right-hand side of the window and select 'Walk In'. When selecting a 'Walk-In' client, you don't need to have a client card or their information in your system. However, their details will be saved as a 'Walk-In' client.

After clicking on 'Walk-In', go to the left-hand side to choose their purchase. You can select from services and products or add consumables used during the appointment. Other options are only available for clients you've added to the system before.

Step 3: Raise an Invoice
Once you've selected the item from the menu, such as a service, and clicked on it, it will be added to the cart on the right-hand side. Then, proceed to the 'Continue' button to proceed with the payment.

Next, choose the payment method and click 'Confirm Payment'. Once done, you'll be able to view the invoice for that walk-in client.

By following these steps, you can raise an invoice for walk-in clients visiting your clinic.
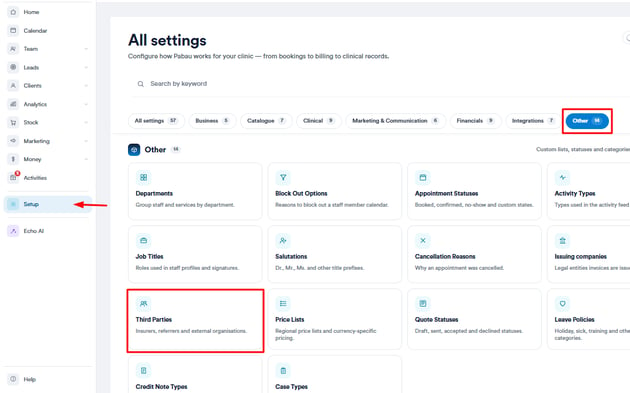
How to Raise an Invoice for a Third-Party
Step 1: Navigate to Objects
Start by logging in to your Pabau account using your login credentials. Then, navigate to the setup page by clicking on the Setup tab in the left sidebar menu. Under the Other section you'll find the "Third Parties" sub-tab.
Step 2: Create and Assign Third Parties
If you don't have a third party created, start by creating a third party. Refer to this article to view step-by-step instructions on creating a third party and linking them with clients.
Navigate to the client card to verify if the third party has been linked before raising the invoice. For instructions on how to add a relationship to a client card, review this article.

Step 3: Access the Point of Sale
Navigate to the "Create" button at the top of the page next to the search bar and proceed to click "Sale." For more details on how to perform a sale, refer to this article.
Search for your client on the search bar at the top right side of the page. Write the first three letters of the client's name so it appears.

After selecting the client, a list of options will appear under the client's name, including who you want to charge the service/product to. In this step, you can modify the responsible party for paying the invoices. Clicking on the "Charge" option will display a list of third parties linked to the client, allowing you to select the appropriate party.
NOTE: The "Charge" option only appears when clients have relationships (Third parties) added to their client card.

After selecting the service and who you will charge the service to, click the "Continue" button at the bottom right side of the page to continue to the payment page.

On the payment page, select the respective payment method and add the amount the third party paid or save the invoice as unpaid if they have yet to pay. Once you click the "Save as Unpaid" or the "Confirm Payment" button, you will be directed to the checkout page, where you can view the invoice details, email it, print it, add credit notes, and many other options.
The invoice will state that it is billed to the third-party company name.

The invoice will be visible on the client card under the "Invoices" tab in the "Financials" section. Click on the invoice number to view its details.
Upon opening the invoice, click the "Details" tab at the top left corner of the page. This tab displays key information regarding the invoice, including to whom the invoice is issued.

By following these steps, you can raise an invoice for a third party.
How to Raise an Invoice from the Client Card
Step 1: Navigate to the Client Card
Start by logging in to your Pabau account using your login credentials. Then navigate to the search bar at the top of the page and proceed to type at least three letters of the client's name. Pabau will filter the results as you type.
Step 2: Create a Sale
After opening the client card, navigate to the "Create" button located in the bottom right corner and click on it. From the menu, choose "Sale."
This will redirect you to the point of sale.

Step 3: Select Service(s)
When raising an invoice from the client card, the client field located at the top right corner of the screen is already populated. Navigate to the left-hand side menu and choose "Service."
Browse through the service categories and click on the service(s) you want to sell.
You can add multiple services, and they’ll appear in the client’s cart on the right-hand side of the screen. Once you've added all the services, review the total below the cart. Click 'Continue' to proceed to the payment options.
NOTE: During checkout, you can also sell Products, Memberships, Gift Vouchers, and Consumables, as well as add funds to a client's account.
Step 4: Finalize Payment
At this stage, you can either select a payment method for the invoice or leave it as unpaid. The button in the bottom right corner will change based on your choice:
- If you do not add a payment method (leaving the invoice unpaid), the button will be labeled 'Save as Unpaid'.
- If you add a payment method (e.g., by entering card information, recording a cash payment, or selecting another available option), the button will be labeled 'Confirm Payment'.
Click this button in the bottom right corner to proceed with the chosen action.
On the Checkout Completed screen, you’ll see the transaction details and the invoice status. You can access the client card again by clicking the client name on the checkout completed screen.
Alternatively, click the 'Back to Start' option, found in the top left corner of the screen, to return to the beginning of the current process or section.

By following these steps, you can easily raise an invoice from the Client Card.
How to Raise an Invoice for an Appointment From the Client Card
Step 1: Access the Client Card
Start by logging into your Pabau account using your login credentials. Then, navigate to the search bar at the top of the screen and start typing the client's name. Their profile will show on the search results.
Step 2: Switch to Appointments Tab
Once you access the client card, switch to the "Appointments" tab to view all scheduled appointments for the client.

Find the relevant appointment and click on the three dots on the far right side of the appointment to show all available options, one of which is "Raise Invoice."

-
If no invoice exists, the “Raise Invoice” button will be active.
-
If an invoice already exists, the button will be greyed out and unclickable.
Step 3: Raise an Invoice
Click the “Raise Invoice” button; this will open the Point of Sale (POS). All of the client’s appointments for that day will be automatically loaded into the POS. Complete the invoice as usual in POS.
Once the invoice is successfully raised, the “Raise Invoice” button will become unclickable. If the invoice is later voided, the button will become active again, allowing you to raise a new invoice.

By following these steps, you can easily raise invoices for appointments directly from the client card.
For more guides, refer to related articles below, select additional guides, or use the search bar at the top of the page. These guides will help you get the most out of your Pabau account.
Additionally, to help you fully utilize and understand your Pabau account, we recommend exploring additional guides and resources offered at the Pabau Academy. It offers in-depth video tutorials and lessons, offering a holistic learning experience that can equip you with the essential skills for achieving success with Pabau.