
This feature is part of the new client card version and is currently available to select users only, starting August 2026. A wider rollout to all accounts is coming soon.
Once a lab request has been created, you may need to print paperwork for the lab, print labels for the sample, or send results to the client. All of this is managed from the same menu on the request itself.
Step 1: Navigate to the Client Card
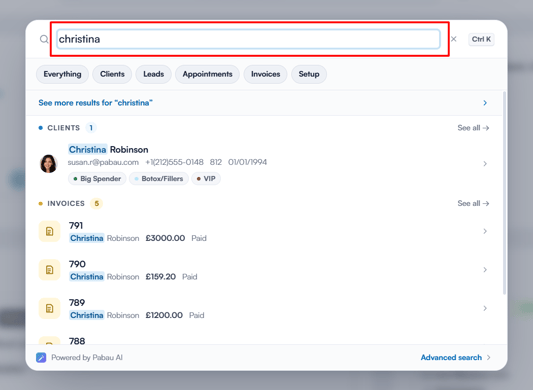
Start by logging in to your Pabau account using your login credentials. Then navigate to the search bar at the top of the page and type at least three letters of the client’s name. Pabau will filter the results as you type.
Step 2: Navigate to Lab Tests
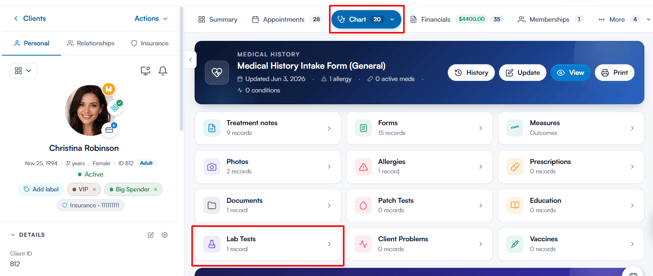
Once you’ve opened the client card, open the EMR tab (labelled Chart for US businesses), then select Lab Tests to view all of the client’s lab requests and results.
Step 3: Open the Options Menu
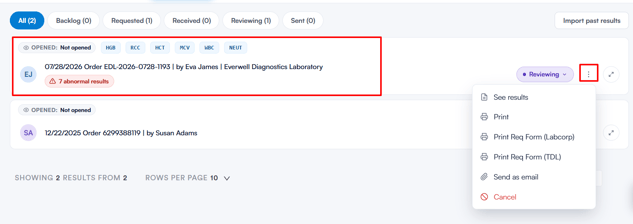
Find the relevant lab request in the list, and click the three-dot menu next to it. From here, you can choose to print or send the request or its results. You can also hover over the request and use the quick Print icon that appears.
Step 4: Print the Request or Results
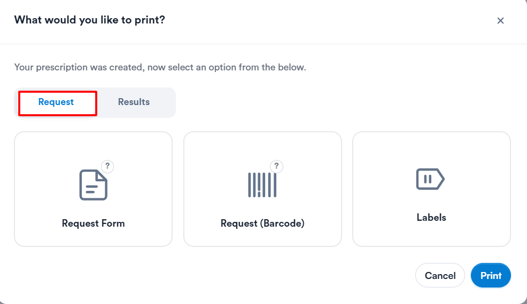
Click Print to open the print options, organised into two tabs - "Request" and "Results". (The "Results" tab only appears once a result has been saved against the request.)
"Request" tab - the order paperwork the lab needs:
- "Request Form" - The standard lab request (requisition) form detailing the tests being ordered.
- "Request (Barcode)" - The same request form, with a barcode the lab can scan to pull up the order.
- "Labels" - Printable specimen labels for the sample tubes or containers.
"Results" tab - only available once results have been added to the request. When a result is saved, the modal opens straight on this tab with the best option pre-selected:
- "Results (Raw)" - The results exactly as received, without any added interpretation.
- "Results & Insights" - The results plus Pabau’s added insights, such as trends and flagged values, to make them easier to read. Requires the Lab Trends & Insights feature to be enabled, and becomes selectable once the raw result has been converted to a lab result.
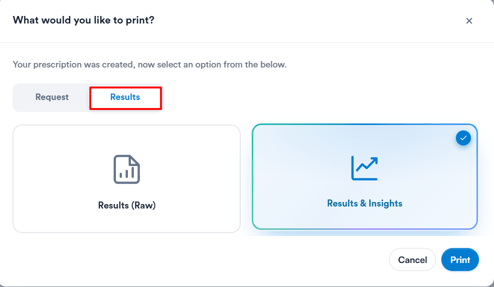
Select what you need, then click Print.
NOTE:
Labcorp - If the lab is Labcorp, skip the print options above and select "Print Req Form (Labcorp)" directly from the three-dot menu to print the request form in Labcorp’s required format.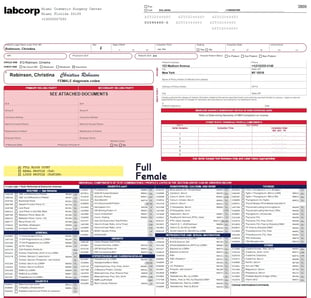
TDL - If the lab is TDL, skip the print options above and select "Print Req Form (TDL)" directly from the three-dot menu to print the request form in TDL’s required format.
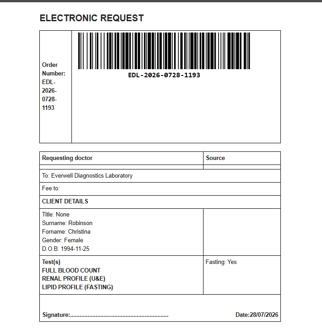
Step 5: Send the Request or Results by Email
Click Send as email to send the request or results to the client as an attachment. Just like printing, you’ll be able to choose between the "Request" and "Results" tabs and select what to attach, before clicking Send.
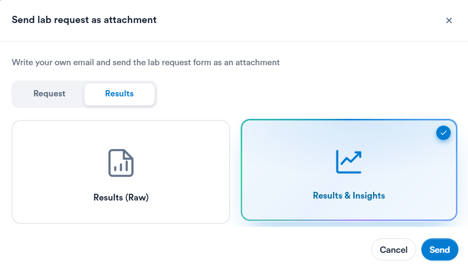
By following the steps above, you can quickly print or send any lab request or result in the right format, whether it’s for the lab, the client, or your own records.
Was this guide helpful? Let us know by voting below - your feedback helps us write clearer articles.
For more guides, browse the related articles below or use the search bar at the top of the page. You can also watch our video learning series, the Pabau Academy, or visit the Support page for additional help.