Table of Contents:
1. How to Enable Insurance Billing
2. How to Create Third Parties
3. How to Create Price Lists
4. How to Link Insurance With Clients
5. How to Raise an Invoice for a Third Party
6. How to Integrate Healthcode
7. How to Submit an Invoice to Healthcode
8. How to Manage Claims
How to Enable Insurance Billing
Step 1: Navigate to Business Details
Start by logging into your Pabau account. Once you're in, click on Setup in the left sidebar menu, then choose "Business Details" under Business.
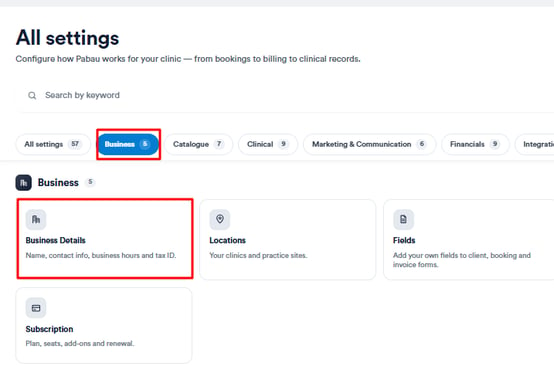
Step 2: Navigate to Features
Look for the "Features" tab on the left side of the "Business Details" section. Click on it to see a list of features.

Step 3: Turn on Insurance Billing
Scroll down to the bottom of the Features tab. There, you'll find "Insurance Billing." Click on the toggle to turn it on. Now, the Insurance Billing option is enabled.

By following these steps, you can successfully enable insurance billing in your Pabau account.
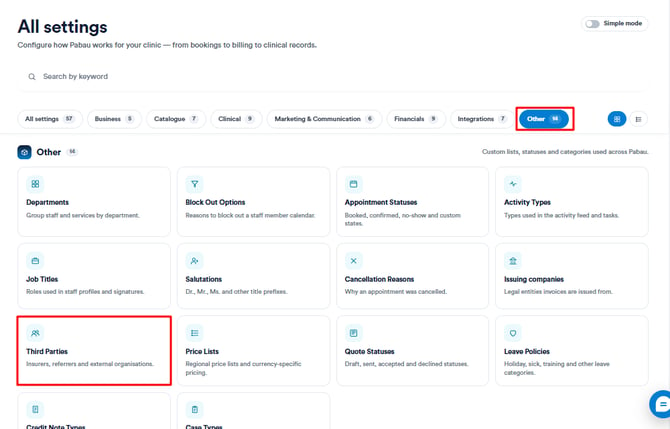
How to Create Third Parties
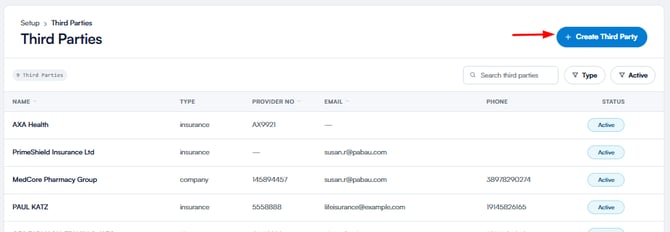
Step 1: Navigate to Third Parties
Start by logging into your Pabau account. Click on Setup in the left sidebar menu, then click on "Other", and select Third Parties.

Step 2: Create a Third Party
Click the Create Third Party button in the top-right corner.
In the window that appears, select the type of third party you want to create — Company, Insurance Provider, or Pharmacy.
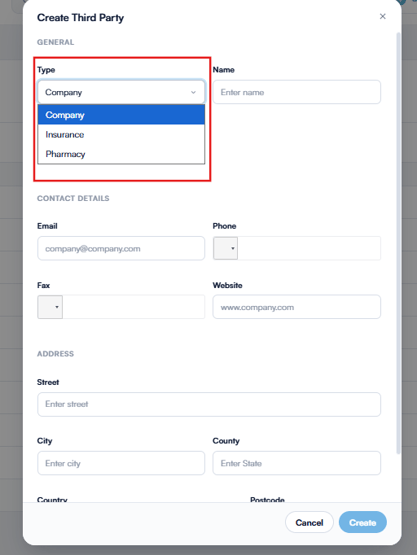
Then, enter the required information such as the name, provider number (if applicable), contact details, and address.
Once completed, click Create in the top-right corner to save the third party.
Step 4: Link Third Parties with Clients
To associate a third party — like a pharmacy, insurer, or employer with a client:
-
Go to the client’s Client Card and click on the ''Insurance tab'' to access and manage the client’s insurance details.
-
Choose the type of relationship you'd like to add.
-
Search for the third party and click Add to link it to the client.
NOTE: The button may say "Link" or another term based on the type of third party.
Linking third parties to clients helps you manage workflows more efficiently. For example:
-
Send prescriptions directly to the client's preferred pharmacy.
-
Bill an insurance provider or employer on behalf of the client.
By following these steps, you can successfully create and manage third parties in your Pabau account.
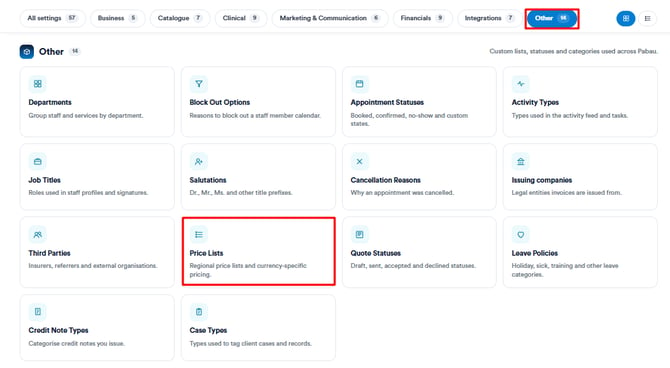
How to Create Price Lists
Step 1: Navigate to Price Lists
Start by logging into your Pabau account. Click on Setup in the left sidebar menu, then click on Other, and then on Price Lists.
Step 2: Create a Price List
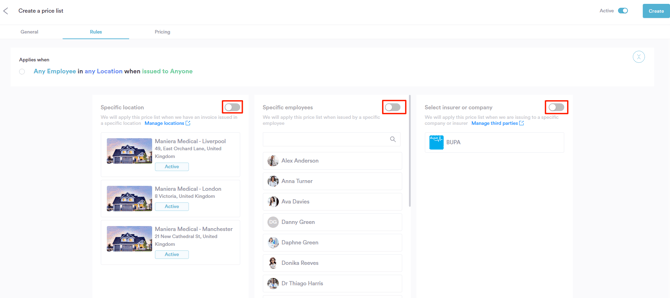
Click on the New Price List button in the top right corner. In the General tab, enter a name for the price list.
In the Rules tab, you can define when this price list should be applied. You can choose to apply it:
-
Only when an invoice is created at a specific location
-
Only when issued by a specific staff member
-
Only when billing a specific company or insurance provider
If you don’t want to set any restrictions, simply toggle off the options for location, employee, or company.
NOTE: To create insurance providers or companies, please refer to the related article on managing third parties.
In the Pricing tab, assign the correct price for each service, based on the rules you set in the previous step. When you add a price, a green line will appear next to the service, confirming that it’s been added to the price list.

When booking an appointment in the calendar, you can choose a payer for the service and apply the correct price list. This ensures the invoice reflects the agreed-upon rates for that insurance company or third-party organization.

NOTE: For details on how to bill third-party payers, check out the article on invoicing third parties.
By following these steps, you can easily create and manage price lists in your Pabau account, making it simple to bill insurance and third-party payers accurately.
How to Link Insurance With Clients
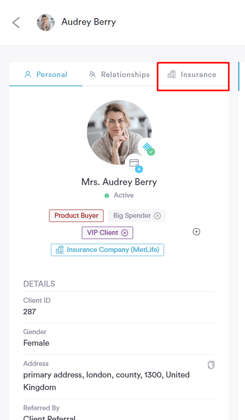
Step 1: Access the Client Card
Start by logging into your Pabau account using your login credentials. Then, navigate to the Client Card of the client you want to update by using the search bar at the top of the screen.
At the top of the client card, click on the ''Insurance'' tab to access and manage the client’s insurance details.

Step 2: Add a New Relationship
Click Add, then select Third Party > Insurance Provider from the options.
This will open a window where you can link an insurance company to the client.

Step 3: Select the Insurance Company
You’ll see a list of insurance companies already added to your system.
- Use the search bar if needed to quickly find the correct one.
- If you want to manually create a new insurance provider, click the +Add Insurance Provider button below the search bar and you will be redirected to create a new third party.
- If the insurance company is already created in the system, then click on the insurance company you want to assign and click Set as Insurance Provider to confirm your choice.

Once you select the "Set as an insurance provider" button, you will be prompted to add the membership number of the client. Click "Save" to finalize.

Step 4: Confirmation
The insurance company will now show on the client’s profile and will be used during billing when applicable.

By following these steps, you can successfully link clients with their insurance company.
How to Raise an Invoice for a Third Party
Step 1: Navigate to Objects
Start by logging in to your Pabau account using your login credentials. Then, navigate to the setup page by clicking on the Setup tab in the left sidebar menu. Under the Other section, click on the "Third Parties" tab.
Step 2: Create and Assign Third Parties
If you don't have a third party created, start by creating a third party. Refer to this article to view step-by-step instructions on creating a third party and linking them with clients.
Navigate to the client card to verify if the third party has been linked before raising the invoice. For instructions on how to add a relationship to a client card, review this article.

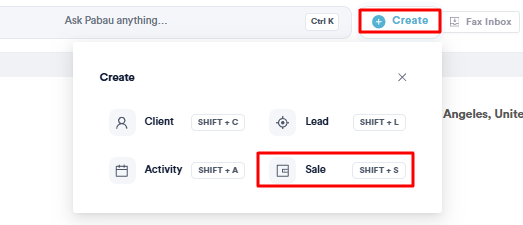
Step 3: Access the Point of Sale
Navigate to the "Create" button at the top of the page next to the search bar and proceed to click "Sale." For more details on how to perform a sale, refer to this article.
Search for your client on the search bar at the top right side of the page. Write the first three letters of the client's name so it appears.

After selecting the client, a list of options will appear under the client's name, including who you want to charge the service/product to. In this step, you can modify the responsible party for paying the invoices. Clicking on the "Charge" option will display a list of third parties linked to the client, allowing you to select the appropriate party.
NOTE: The "Charge" option only appears when clients have relationships (Third parties) added to their client card.

After selecting the service and who you will charge the service to, click the "Continue" button at the bottom right side of the page to continue to the payment page.

On the payment page, select the respective payment method and add the amount the third party paid or save the invoice as unpaid if they have yet to pay. Once you click the "Save as Unpaid" or the "Confirm Payment" button, you will be directed to the checkout page, where you can view the invoice details, email it, print it, add credit notes, and many other options.
The invoice will state that it is billed to the third-party company name.

The invoice will be visible on the client card under the "Invoices" tab in the "Financials" section. Click on the invoice number to view its details.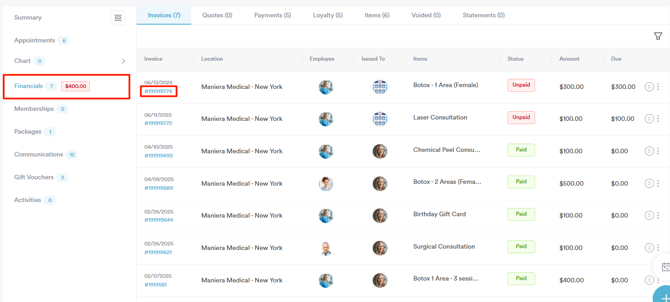
Upon opening the invoice, click the "Details" tab at the top left corner of the page. This tab displays key information regarding the invoice, including to whom the invoice is issued.

By following these steps, you can raise an invoice for a third party.
How to Integrate Healthcode
Healthcode serves as the central hub for the electronic processing of health insurance claims in the UK. Owned by various insurance companies, it streamlines the invoice submission process, allowing practitioners to submit claims electronically rather than manually. Notably, certain insurers, including Vitality, exclusively accept invoices submitted through the Healthcode platform.
Fees
Pabau does not charge anything to use Healthcode via Pabau, but Healthcode levies fees for all users. As of February 2024, these are:
- £6.99 + VAT per month as a subscription fee
- If the submitted invoice is under £100, 23p per invoice transmitted
- If the submitted invoice is between £100-250, 32p per invoice transmitted
- If the submitted invoice is over £250, 45p per invoice transmitted
These are billed to the Healthcode account holder on a monthly basis.
Creating a Healthcode Account
Visit Healthcode's website to create a new account or adjust your existing account. You may need to apply to be recognised by the insurance companies. Once you have your site ID, username, and password from Healthcode, you can enter them securely into Pabau to begin sending insurance invoices electronically.
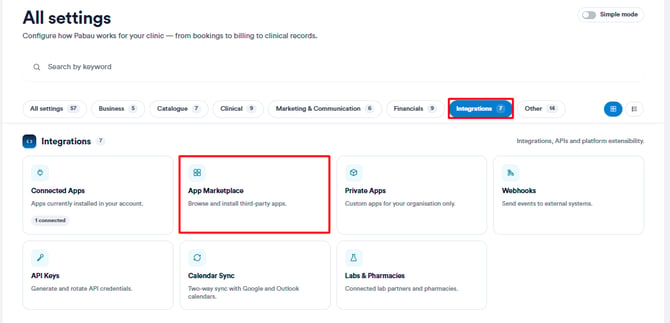
Step 1: Access the App Marketplace
Log into your Pabau account. Navigate to Setup from the left sidebar menu. Click on App Marketplace under the Integrations section.
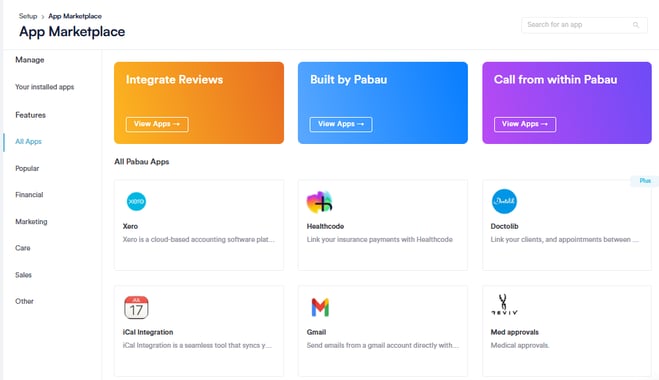
Step 2: Install the Healthcode Integration
On the App Marketplace page, find the Healthcode banner and click on it. Click "Install" to open the Healthcode integration modal.

Step 3: Obtain and Enter Healthcode Credentials
Start by registering on the Healthcode website: Healthcode Registration. Make sure to select Pabau as your Practice Management System. Upon registration, you will receive your Site ID, Web Services ID, and Password.
NOTE: Your registration must be specific to Pabau. Registrations from previous providers are not valid.

Enter your Healthcode credentials in the Credentials tab of the Healthcode integration modal and click "Check credentials". The status should change to "Enabled." Proceed to the Insurers tab.
Step 4: Match Insurers
In the Insurers tab, you will see a list of insurers from your Healthcode account on the left and insurers from your Pabau account on the right.
Match each insurer by selecting the corresponding option from the dropdown menu.

NOTE: To create insurance companies as third parties in Pabau, follow the steps in this article.
Click "Save" in the bottom left corner of the Insurers tab to confirm the configuration.
Step 5: Configure Locations
Go to the Locations tab. Open each location and enter the location-specific payee code for each insurer. Click "Save" to save the changes.
It is preferred that this step be completed but not mandatory.
Step 6: Configure Employees
Navigate to the Employees tab. Ensure that you have added a GMC number to each clinician in Team > Personal Details as this is transmitted to Healthcode for each invoice and is required by Healthcode to allow them to identify the clinician.
If you don't have a GMC number, you can choose to enter a different number like a HCPC number instead, and turn the 'Use GMC Numbers' off.

NOTE: Ensure each employee is registered with Healthcode to receive their payee code if not using GMC number
Click "Save" to save the configuration.
It is preferred that this step be completed but not mandatory.
Step 7: Set Default Values
In the Defaults tab, aside from certain components unique to your practice, such as PayeeProviderName and TreatingHospital, the rest should be set as follows:
- ControllingSpecialistSignatureIndicator: H
- ClaimFormSignatureIndicator: H
- ClaimSource: S
- DoubleInsuranceFlag: N
- EpisodeSetting: O
- PackageDealIndicator: N
- ThirdPartyInvolvementFlag: N
- Currency: GBP
- ServiceCode: @[sc]
- ServiceSetting: O
Click "Save" to apply these settings.
Step 8: Complete the Integration
After configuring all settings, click OK. Now, adjust your service settings to make them compatible with Healthcode.
Step 9: Add ISC & CCSD Codes
Go to Setup and select Services under Services. Select 'Bulk Edit' in the top right corner. Proceed to enter the ISC code and CCSD code.
For each service that will be invoiced via Healthcode, click on the service name. In the General tab, input the Service Code under the Service settings. The service code field is located in the General tab, right below the service name field.
The service code is unique to each insurance company, which is why we recommend creating services specific to each company if your practice uses multiple insurers.
For example, you might have "BUPA Derm Initial Consultation," "AXA Derm Initial Consultation," and "WPA Derm Initial Consultation."
You can obtain these service codes from either Healthcode or the insurance company itself, as Pabau does not provide this information.
For CCSD codes, if they don't exist within Pabau, you may search here
Step 10: Set Price Lists
Create price lists to enable raising invoices for specific companies under different contracts. Follow the steps provided in this article to create price lists.
Your Pabau account is now ready to send invoices to Healthcode.
How to Submit an Invoice to Healthcode
Step 1: Integrate Your Pabau Account with Healthcode
Start by integrating your Pabau account with Healthcode. Follow the steps outlined in this guide.
Step 2: Raise an Invoice for Healthcode Submission
To raise an invoice for submission to Healthcode, navigate to the Calendar and book an appointment as usual. In the appointment creation modal, set the "Charge" field to the client's insurer instead of the client.

If necessary, select the appropriate price list in the "Price List" field. Make sure that the chosen price list includes the insurer set in the "Charge" field under its rules; otherwise, the invoice cannot be submitted to Healthcode. Once all the appointment details are filled out, confirm the booking.
After the appointment is completed, navigate to the calendar, locate the appointment, and click "Checkout."

In the Point of Sale, review the services added to the invoice and verify their prices. Then click "Continue" in the bottom right corner to proceed.
On the payment method step, leave the payment method unselected and click "Save unpaid" in the bottom right corner. This action finalizes the creation of the invoice.
Step 3: Submit the Invoice to Healthcode
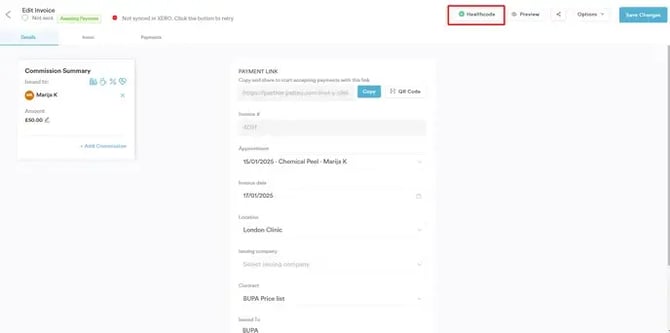
Once the invoice is created, the Checkout Completed screen will appear. Click the "Healthcode" button to access the Healthcode invoice submission page.

You will now see the invoice submission page.
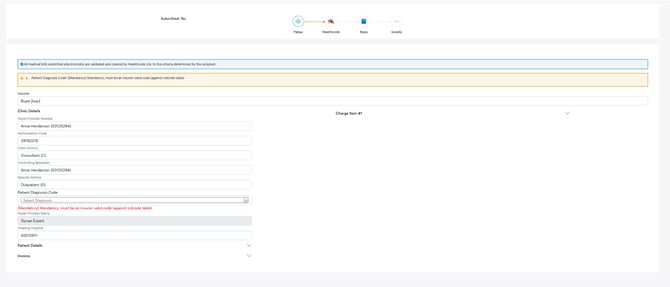
If there are any errors, they will be displayed at the top of the page, and the relevant fields will be highlighted in red. Ensure all required information is corrected.
Additionally, provide a Patient Diagnosis Code by entering the relevant ICD9 code in the designated field.
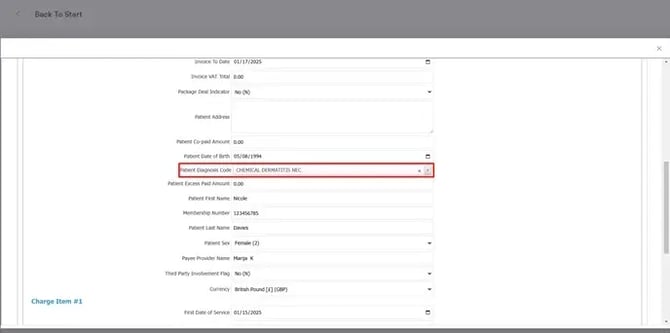
Once everything is complete, click "Submit" at the bottom of the screen. The invoice will then be submitted to Healthcode.
Step 4: Check Invoice Status
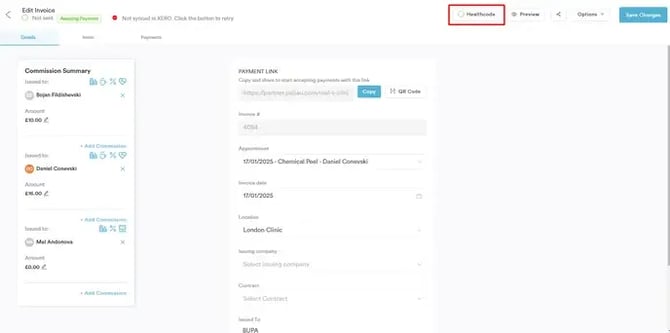
You can verify the status of the invoice in your Healthcode account. Alternatively, in Pabau, navigate to the client card, select the "Financials" tab, and click on the invoice number to open the editing modal. From there, click the "Healthcode" button located in the top right corner next to the "Preview" button.
If you need to submit an invoice to Healthcode after it has already been created, open the invoice editing modal and click the "Healthcode" button. The submission process remains the same as described above.
By following these steps, you can submit invoices to Healthcode.
Healthcode errors
When submitting invoices from Pabau to Healthcode, it's not uncommon to encounter errors. If an error occurs, you can find details on the specific invoice along with helpful guidance for resolution. Below are some of the most frequently encountered errors.
Access Denied
This is likely because you have not started paying for a Healthcode subscription yet. Please contact Healthcode.
Invalid UserName / Password
- Your existing Healthcode account may need changing by Healthcode to work with Pabau. Healthcode can update this for you over the phone.
- Your API key may need changing to an 'old style' password. Healthcode can update this for you over the phone.
- You have not started paying for a Healthcode subscription yet. Please contact Healthcode.
RegistrationNo - no matching membership details can be found
This means Healthcode cannot locate the patient's demographics/details given the information on Pabau. To resolve, please check with the insurance company. Note that this does not mean that their details are wrong, just that they don't match what the insurance company has on record the patient. It could be something like Susie vs Susan or a different address.
ServiceCode - The insurer you’re billing requires an agreed fee for this service prior to billing
You may experience this error message on invoices for Vitality Health insurance patients. Vitality Health requires Guideline Pricing in Healthcode. You can update this information in your Healthcode account from Accounting > Guideline Pricing. If you need assistance please contact Healthcode as this isn't a change Carebit can make for you.
-7 - Processing Error
Your Healthcode details entered in Pabau may be incorrect. Make sure your site ID entered in Pabau is a code beginning with HC0 and isn't an email address.
Contacting Healthcode
If you need to contact Healthcode for support, you can reach them using 0330 900 4900 or custserv@healthcode.co.uk.
How to Manage Claims
Claims is a powerful new feature in Pabau built to give you direct control over your third-party invoicing. It provides a fully trackable system to manage your billing with insurance companies, the NHS, or corporate partners.
With Claims, you can expertly monitor all outstanding and paid invoices from a single, centralized dashboard.
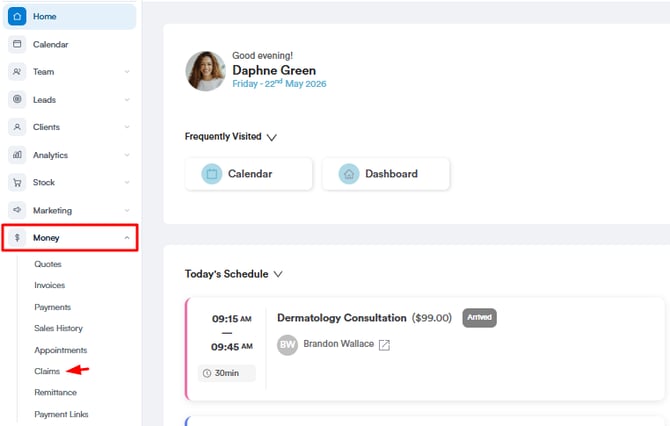
Step 1: Navigate to the Money Tab
Start by logging into your Pabau account using your login credentials. Then, navigate to the "Money" tab located on the left sidebar menu. Click to expand it and it will reveal the "Claims" sub-tab.
Step 2: Access Claims
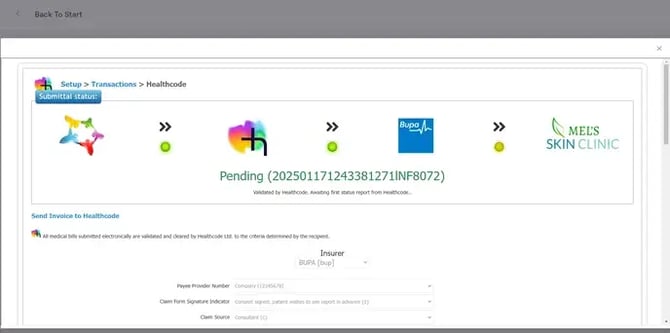
The Claims page provides a complete list of all invoices issued to an insurer. You can instantly filter this list by clicking the interactive tiles at the top of the page, each representing a specific claim status.

The statuses are:
- Pending: The claim is created but has not been submitted to Healthcode.
- Submitted: The claim has been sent to Healthcode and is awaiting processing.
- Processing: Healthcode has received the claim and is actively reviewing it.
- Paid: The claim has been approved and payment has been issued.
- Error: The claim submission failed and requires your attention to correct it.
You can also easily narrow down the list of invoices by selecting a date range. Simply set the 'From' and 'To' dates using the fields at the top-left, and the view will update accordingly.

Step 3: Send Invoice to Healthcode
To send an invoice to Healthcode navigate to the far right side of the invoice and click the "Send" button. You will be redirected to the Submit Claim modal.

The invoice details will be pre-filled. Review the information, make any necessary changes, and then click the "Send Invoice To Healthcode" button in the top-right corner to submit.

By following these steps, you can easily manage your third-party billing process using the Claims feature.
For more guides, refer to related articles below, select additional guides, or use the search bar at the top of the page. These guides will help you get the most out of your Pabau account.
Additionally, to help you fully utilize and understand your Pabau account, we recommend exploring additional guides and resources offered at the Pabau Academy. It offers in-depth video tutorials and lessons, offering a holistic learning experience that can equip you with the essential skills for achieving success with Pabau.