
Print Templates lets you control how your clinic's printed medical forms look - including the layout, margins, colours, logo, and which details appear on the page. Instead of adjusting formatting each time a form is printed, you create the template once, and it applies automatically to every form printed for the clinic, including medical history, consent forms, treatment notes, and prescriptions.
This makes it easy to keep printed documents consistent with your clinic's branding, ensure the right information is always included, and save time by removing the need to format each form individually.
Step 1: Navigate to Print Templates
From the main dashboard, click on ''Setup'' in the left-hand navigation menu, then select ''Print Templates'' from the Clinical section.
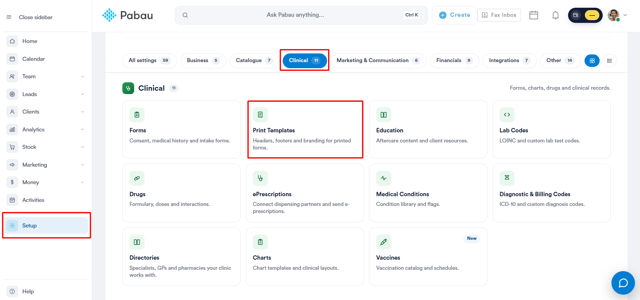
You can also type "print template" into the Setup search bar to find it directly.
Step 2: Set the Page Layout
At the top of the builder, configure:
- Page size - choose A4, Letter, or A5. The preview resizes to match.
- Margins - pick from 10, 15, 20, or 25 mm of white space around the page.
- Preview form type - switch the preview between a sample Medical History, Consent, Treatment Form, or Prescription to check the layout on each. This only changes what you're previewing - it doesn't affect what's saved.
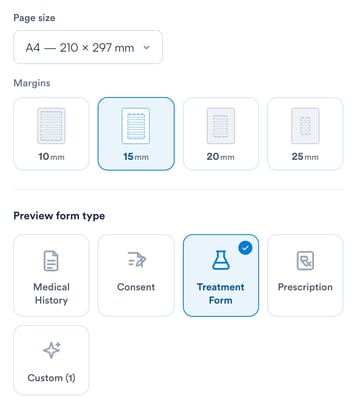
NOTE: Alongside the standard form types, you'll also see a Custom card. This opens per-form custom templates — a drag-and-drop designer for building a bespoke layout for one specific form. That's separate from the clinic-wide print template this article covers.
Step 3: Choose What Appears on the Form
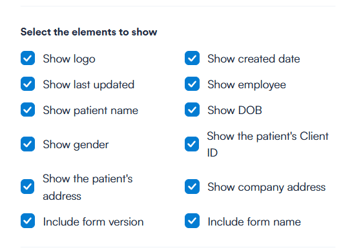
On/off toggles control which blocks show on the printout. All are on by default - untick anything you don't want printed:
- Branding - show logo, show company address.
- Patient details - patient name, date of birth, gender, Client ID, and the patient's address.
- Form details - employee (shown as "Practitioner"), created date, last updated, form version, and form name.
NOTE: If no logo is uploaded, the logo area will print blank - there's no default placeholder. For instructions on adding a logo , see our How to Upload Your Logo article.
Step 4: Customize Colours & Branding
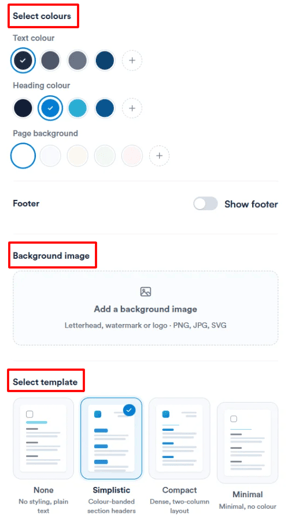
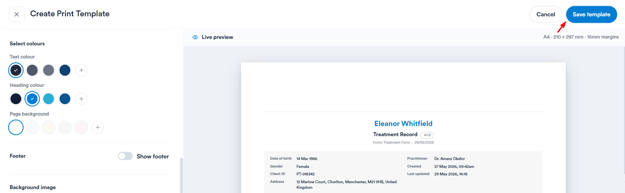
- Colours - set the text colour, heading colour, and page background, either from the quick swatches or by entering an exact colour. Defaults are dark navy text, a blue heading, and a white page.
- Footer - off by default. Turn on Show footer to add three free-text lines that print along the bottom of every page: Line 1 (clinic & address, in your heading colour), Line 2 (contact line, muted), and Line 3 (registration & legal text, small print).
- Background image - add a letterhead, watermark, or logo (PNG, JPG, or SVG). Once added, an opacity slider lets you fade it behind the text, and you can Replace or Remove it. Uploads are saved to Pabau's file storage.
- Templates - preset starting points you can click to apply a ready-made look, then fine-tune from there.
Step 5: Save the Template
Click "Save template" to close the builder. From then on, every printed form for the clinic uses these settings. Click Cancel or the ✕ to close without saving.
Good to know
- One template per clinic - there's a single, company-wide template. Saving changes applies to everyone and to every form type. There are no separate per-form or per-user versions, and no version history, so it's worth previewing carefully before saving.
- Who can edit it - anyone who can open the Setup page can edit the print template. There's no separate permission for it.
- Desktop only - the builder isn't available in the mobile app view.
- The preview patient is a sample - the preview uses your real clinic name, logo, and address, but a made-up patient so you can see the layout. Real forms print the real patient's details.
By following these steps, you'll be able to create a print template that reflects your clinic's branding and controls exactly what appears on every printed form.
What's next?
Was this guide helpful? Let us know by voting below - your feedback helps us write clearer articles.
For more guides, browse the related articles below or use the search bar at the top of the page. You can also watch our video learning series, the Pabau Academy, or visit the Support page for additional help.