
Step 1: Navigate to Orders
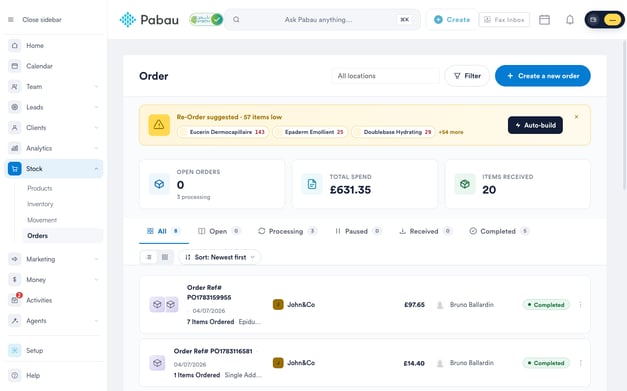
Log in to your Pabau account and navigate to "Stock" in the left sidebar menu, then click on "Orders".
Step 2: View Your Orders
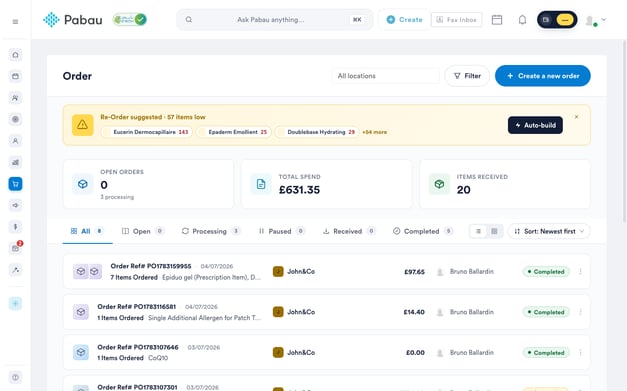
On the Orders page, you can view all of your orders, organized into status tabs: "All," "Open," "Processing," "Paused," "Received," and "Completed." The cards at the top of the page give you a quick summary of your open orders, your total spend, and the items you have received.
You can filter the list by location or supplier, switch between list and grid view, and sort orders by newest, oldest, or supplier.
Step 3: Create a New Order
To create a new order, click on "Create a new order" in the top right corner.

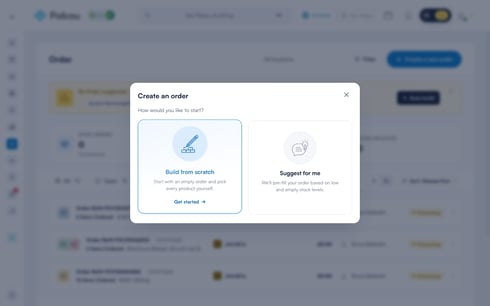
Next, choose how you would like to start. Select "Build from scratch" to start with an empty order and pick every product yourself, or "Suggest for me" to have Pabau pre-fill the order based on your low and empty stock levels. If you have more than one location, "Suggest for me" will first ask which location the order is for, so it can use that location's stock levels.
TIP: When products fall below their stock alert level, a "Re-Order suggested" banner appears at the top of the Orders page. Click "Auto-build" to jump straight into a new order pre-filled with the suggested products and quantities.
Step 4: Add Products to the Order
Whichever option you choose, the order builder opens. It lists all of your products, with filters on the left to narrow the list by category or supplier — or click "Below par stock" to show only the products that are running low. You can also use the search bar to find a product by name or SKU.
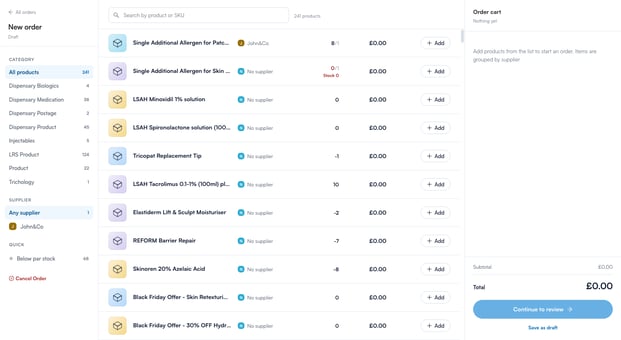
Click the plus (+) button next to a product to add it to the order, then use the quantity stepper to set how many units you want to order. Everything you add appears in the "Order cart" on the right, grouped by supplier, with a running subtotal, VAT, and total.
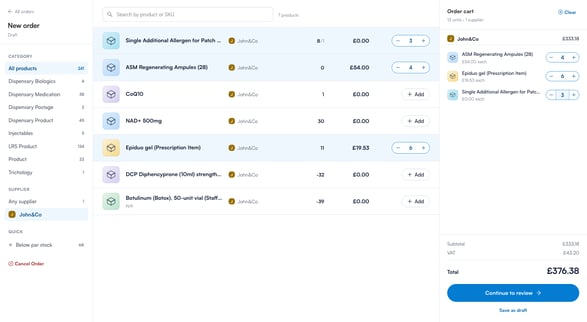
NOTE: Not ready to place the order yet? Click "Save as draft." The order is saved under the "Paused" tab on the Orders page, so you can pick up where you left off at any time.
Step 5: Review and Place the Order
Once you have added everything you need, click "Continue to review." If any product in the order does not have a supplier yet, you will be asked to assign one before continuing — pick an existing supplier or create a new one on the spot, and Pabau remembers your choice for future orders.
On the review screen, check the items and quantities for each supplier, choose the delivery location, and add any notes for your suppliers. Tick "Email purchase order to supplier" for each supplier you would like Pabau to email the order to automatically, then click "Place order."
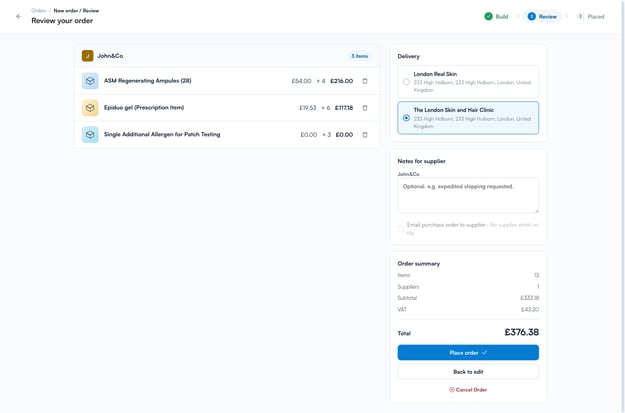
NOTE: Pabau creates one purchase order per supplier. If your order contains products from two suppliers, placing it creates two purchase orders, each with its own order number.
After placing the order, a confirmation screen lets you download the purchase order as a PDF, email it to the supplier, or click "Mark as received" as soon as the delivery arrives.
Step 6: Receive the Order
Placed orders appear on the Orders page with the status "Processing." When the delivery arrives, click on the order to open the "Receive items" screen, then enter the quantity received for each product. Click "Quick" on a line to fill in everything still outstanding on that line, or "All as ordered" at the top to fill every line at once. If the price on the delivery invoice differs from what you ordered at, you can update the cost next to each product.
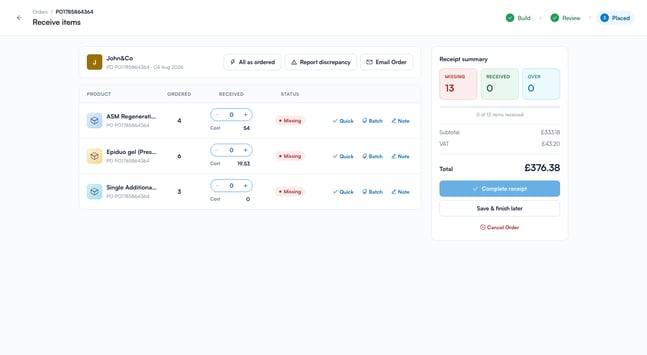
As you enter quantities, each line shows a status — "Received," "Partial," "Missing," or "Over" — and the "Receipt summary" panel on the right tracks your progress. You can add a note to any line, record a reason such as "Damaged" or "Short-shipped," and attach a photo. Then click "Report discrepancy" at the top to email the details to your supplier.
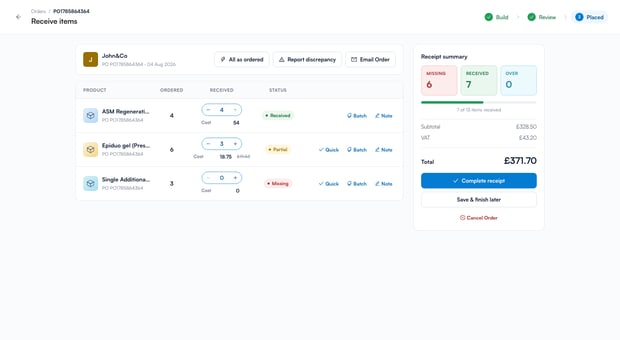
TIP: If only part of the delivery has arrived, click "Save & finish later." The quantities you entered are added to your stock, the order moves to "Part Received," and you can come back to receive the rest later.
Step 7: Complete the Receipt
Once everything is recorded, click "Complete receipt," then "Yes, complete receipt" to confirm. The received quantities are added to your stock at the delivery location. If every item arrived, the order is marked as "Completed"; if some items were missing, it is marked as "Part Received" so you can receive the remainder when it arrives.
NOTE: You can also learn about this topic by watching a lesson on Pabau Academy.
In addition, we suggest reading our Products and Stock article for a more in-depth exploration of this topic.
For more guides, refer to related articles below, select additional guides, or use the search bar at the top of the page. These guides will help you get the most out of your Pabau account.
Additionally, to help you fully utilize and understand your Pabau account, we recommend exploring additional guides and resources offered at the Pabau Academy. It offers in-depth video tutorials and lessons, offering a holistic learning experience that can equip you with the essential skills for achieving success with Pabau.