
The Theme tab in the notification studio lets you make your client emails look like your clinic: your brand colour on buttons, a coloured banner with your logo, your choice of email-friendly font and a footer with your tagline or registration details. You can set it all by hand, or let Pabau read the colours and style from your website and apply them in one click.
NOTE: This feature is being rolled out to clinics gradually. If you don't see it in your account yet, message us via the in-app chat.
NOTE: The Theme tab is available for standard email templates. It is turned off for custom (“Your own design”) templates and for SMS.
Step 1: Open the Email You Want to Brand
- Go to Setup and, under Marketing & Communication, click Client Notifications. Under Your message collection, find the message you want, for example New appointment is booked, and click Edit template.
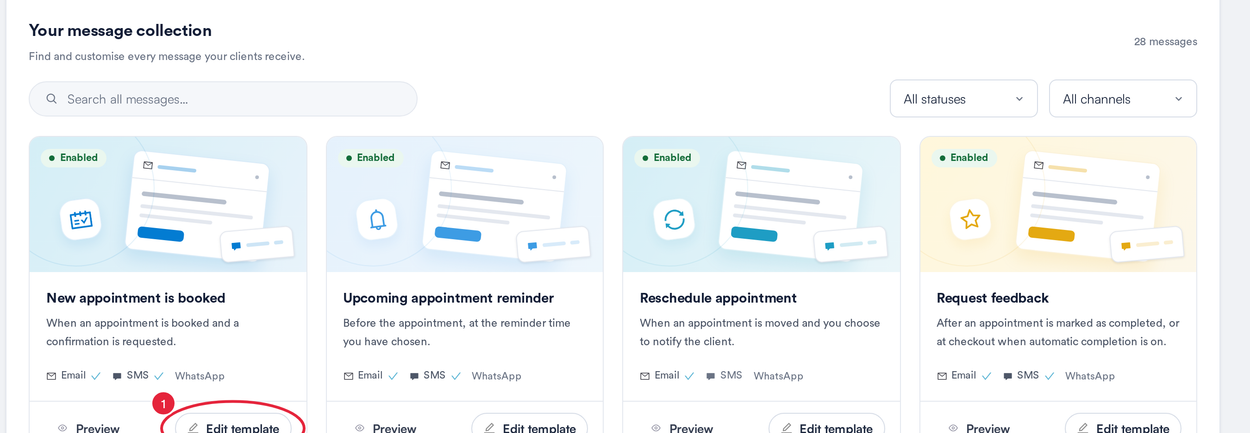
Open a message in the notification studio
Step 2: Open the Theme Tab
- Make sure Standard is selected under Template type, then click the Theme tab. The Live preview on the left updates as you change each setting.
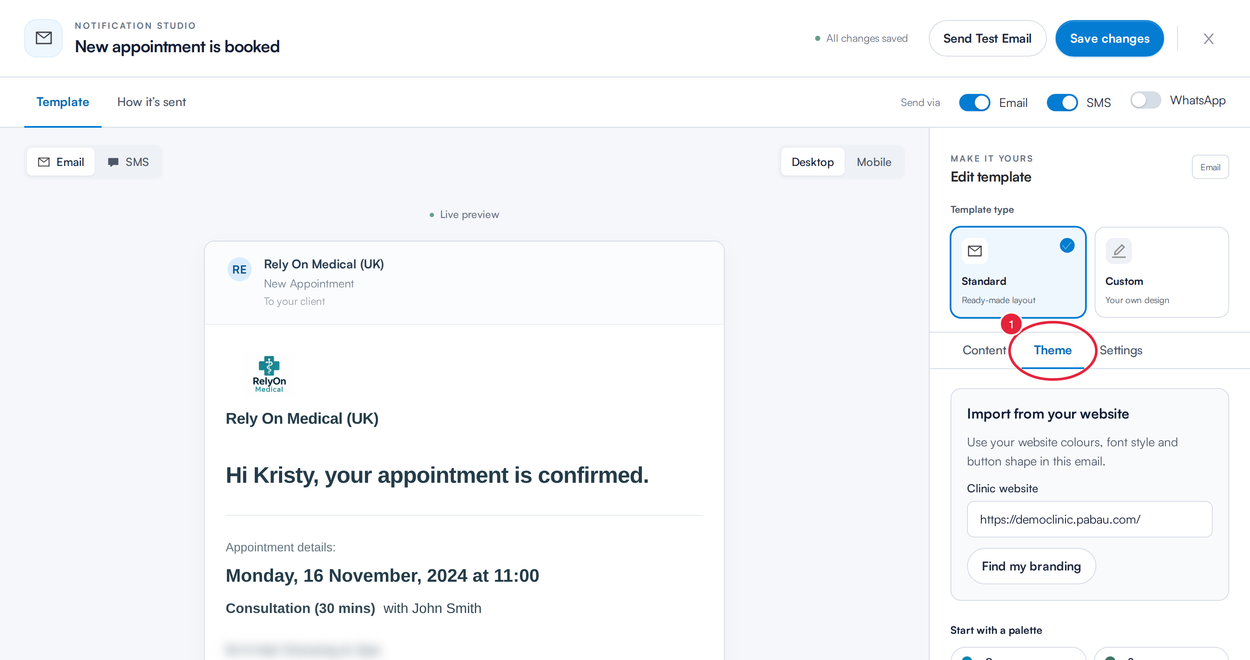
The Theme tab, with the live preview beside it
Step 3: Import Your Branding From Your Website (Optional)
- Under Import from your website, check the Clinic website address. Enter your own if it’s blank or different.
- Click Find my branding. Pabau reads the website and shows Your website branding: a Brand, Background and Text colour, and the font style and button corners where it can find them. If it finds several possible brand colours, it asks you to choose the one you use.
- Check the colours, then click Apply to this email.
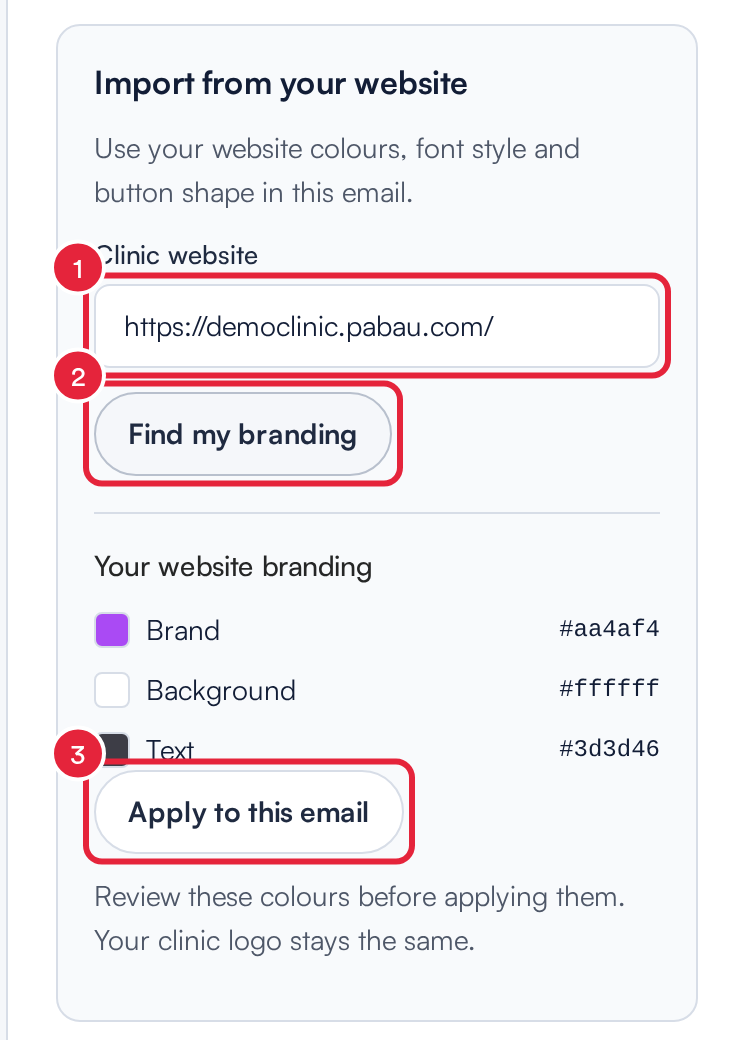
Pabau suggests colours from your website
Applying the import fills your buttons with the brand colour, adds a coloured banner behind your logo and colours the footer to match. It also sets the background and text colours, and the font and button corners when your website provides them. Your clinic logo stays the same. If Pabau can’t read the website, choose your colours by hand instead (Step 4).
Step 4: Choose Colours, Text and Buttons
- Click a palette under Start with a palette (Ocean, Sage, Rose or Midnight) to set matching button, background and text colours in one go.
- Fine-tune Buttons & Attachments colour, Background colour (and its opacity) and Text colour: pick a swatch or type a colour code. Below them, Logo size sets how large your logo appears.
- Under Text and spacing, choose the Font (Arial, Georgia, Verdana, Tahoma or Trebuchet, which all work reliably in email apps), the Text size and the Space around the message.
- Under Buttons, choose a Button style: Standard, Filled with brand colour (you can then set the Button text colour) or Brand colour outline. Use Rounded corners to make buttons square or rounded.
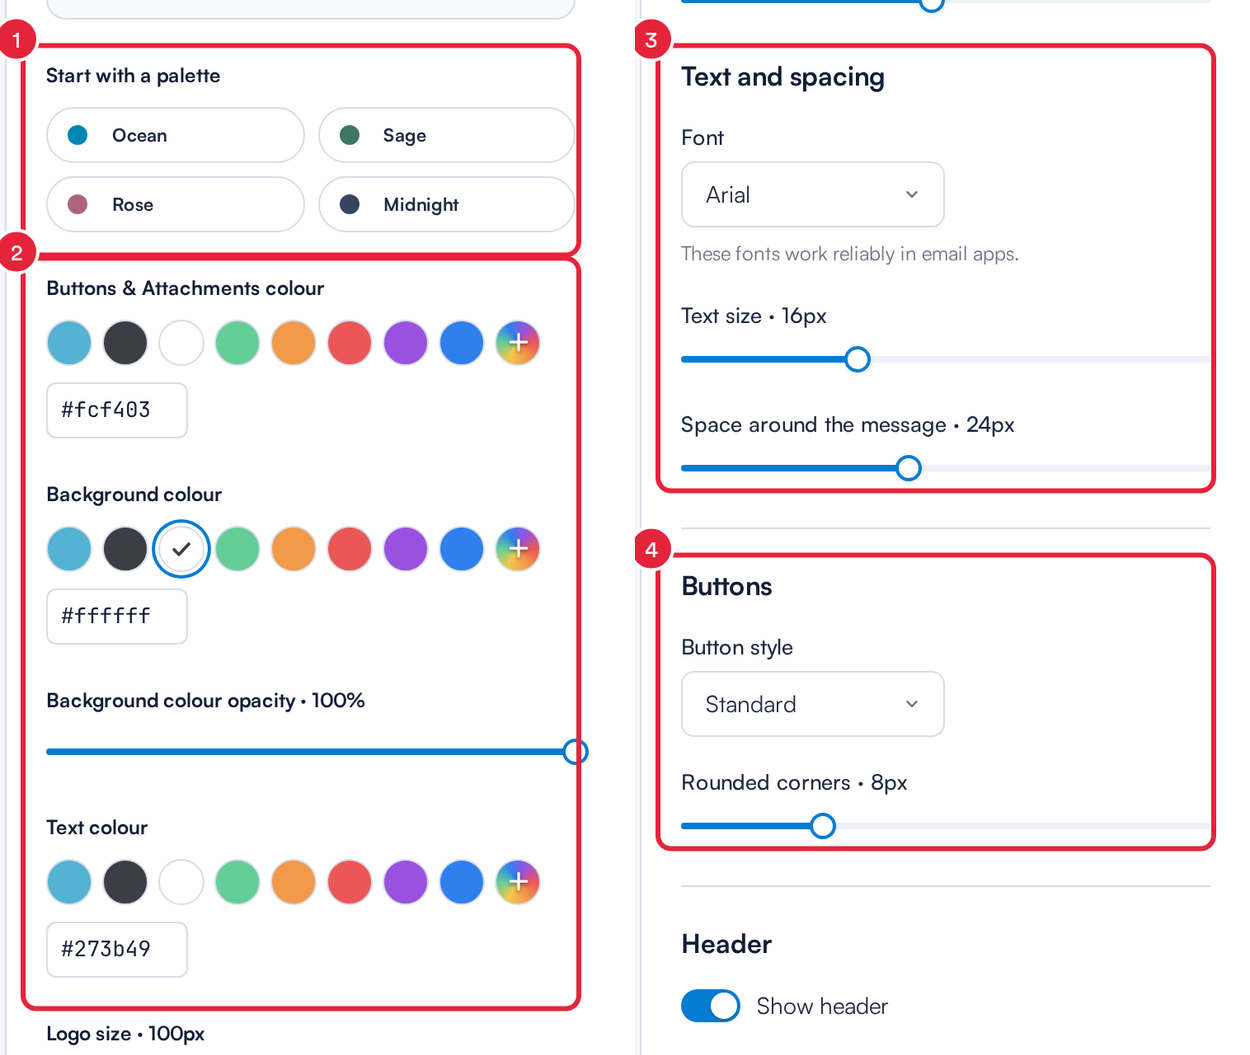
Colours, text and button settings
Step 5: Set Up the Header and Footer
- Under Header, keep Show header on and choose a Header style: Simple logo, or Coloured banner with its own Header background colour. Then set the Logo position, whether to Show clinic name below the logo, and the Clinic name colour.
- Under Footer, keep Show footer text and social links on to show a footer. Write a Footer message, such as your tagline or registration details (line breaks are kept), then choose the Footer background colour, Footer text colour and Footer text position.
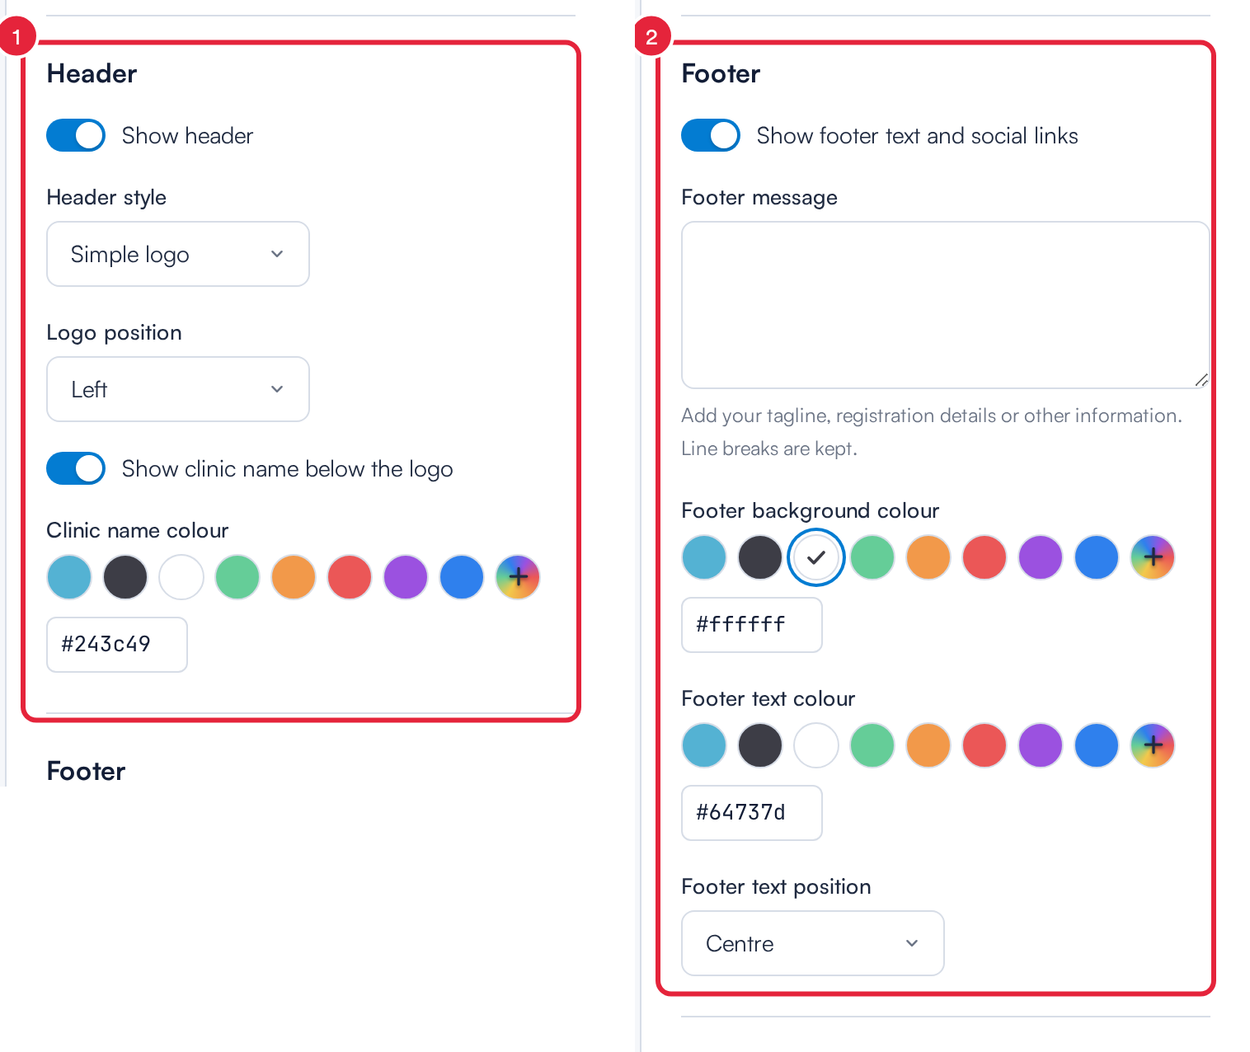
Header and footer settings
Step 6: Save Your Theme
- Check the Live preview. You can switch it between Desktop and Mobile, or click Send Test Email to see the email in your own inbox.
- Click Save changes. Until you do, the studio shows Unsaved changes.
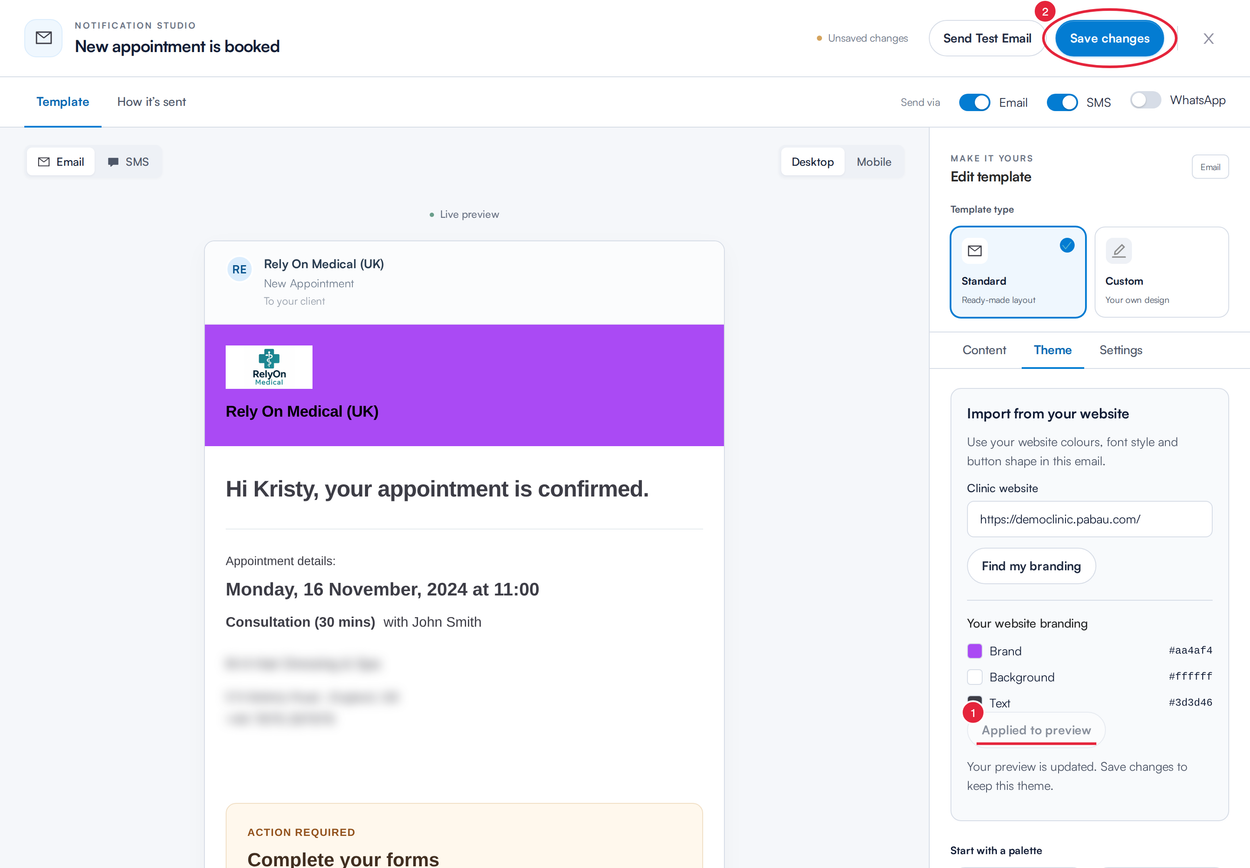
Website branding applied to the preview, ready to save
Step 7: Apply Your Branding to Every Email (Admins)
If you imported branding from your website and you are an administrator, Pabau asks Apply this branding to all templates? after you save.
- Click Apply to all standard templates to copy the colours, fonts, logo layout and button styling to every standard email template. Each template keeps its own wording, footer text, social link choices, attachments and sending settings. Custom templates are not changed.
- Click Keep on this template to use the new look on this email only.
TIP: Changing colours by hand, without the website import, only affects the email you’re editing. To brand every email the same way, import your website branding once on one template, save it, and then choose Apply to all standard templates.
What's next?
- How to Edit Email Notifications
- How to Upload Your Logo
- How to Add Attachments to Client Notifications
- Email Client Notifications Best Practices
Was this guide helpful? Let us know by voting below - your feedback helps us write clearer articles.
For more guides, browse the related articles below or use the search bar at the top of the page. You can also watch our video learning series, the Pabau Academy, or visit the Support page for additional help.