
The booking panel opens on the right of the Calendar when you click a free time. From one place you choose the client, add one or more services, set the team member, time, duration and room, choose which messages the client gets and book, without leaving the diary.
NOTE: This feature is being rolled out to clinics gradually. If you don't see it in your account yet, message us via the in-app chat.
Step 1: Open the Booking Panel
- In the Calendar, click a free time in the column of the team member you're booking with. A Draft card appears in the diary where the appointment will go. It reads New appointment and Choose a client and service until you fill it in.
- The panel opens on the Appointment tab, with the date, time and location at the top. To book a class instead, click Class. To block out time, click one of your block-out reasons, such as Lunch or Meeting (more are under …).
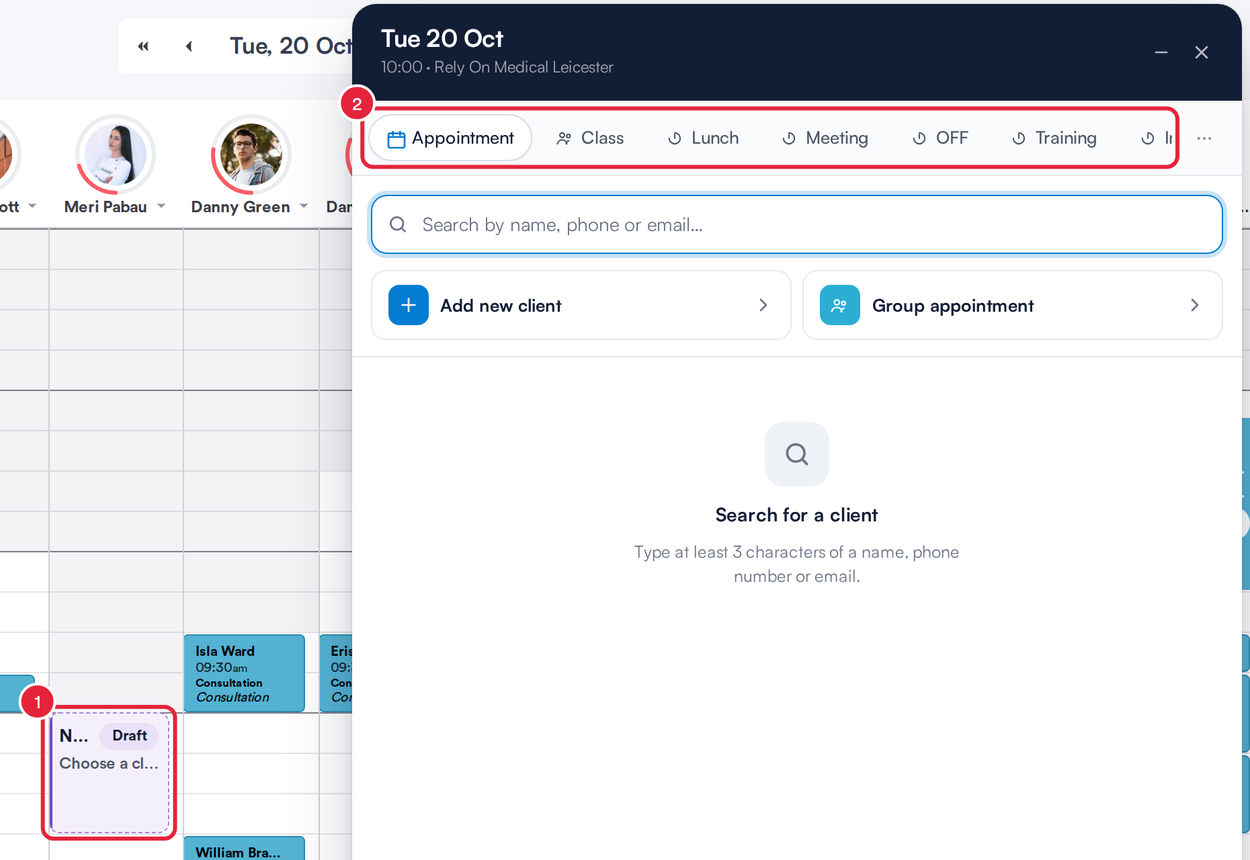
Clicking a free time opens the booking panel and places a Draft card in the diary
TIP: Click – (Minimise) to shrink the panel to a small bar while you check the diary, then click the bar to carry on. If you close the panel with × after you've started filling it in, Pabau warns that the Appointment has unsaved changes and asks whether to Discard the draft or Go back to it.
Step 2: Choose the Client
- Type at least 3 characters of the client's name, phone number or email into the search box.
- Click the client. Their client card opens beside the panel, so you can check their balance, upcoming visits and notes while you book.
- New client? Click Add new client. To book several clients together, click Group appointment.
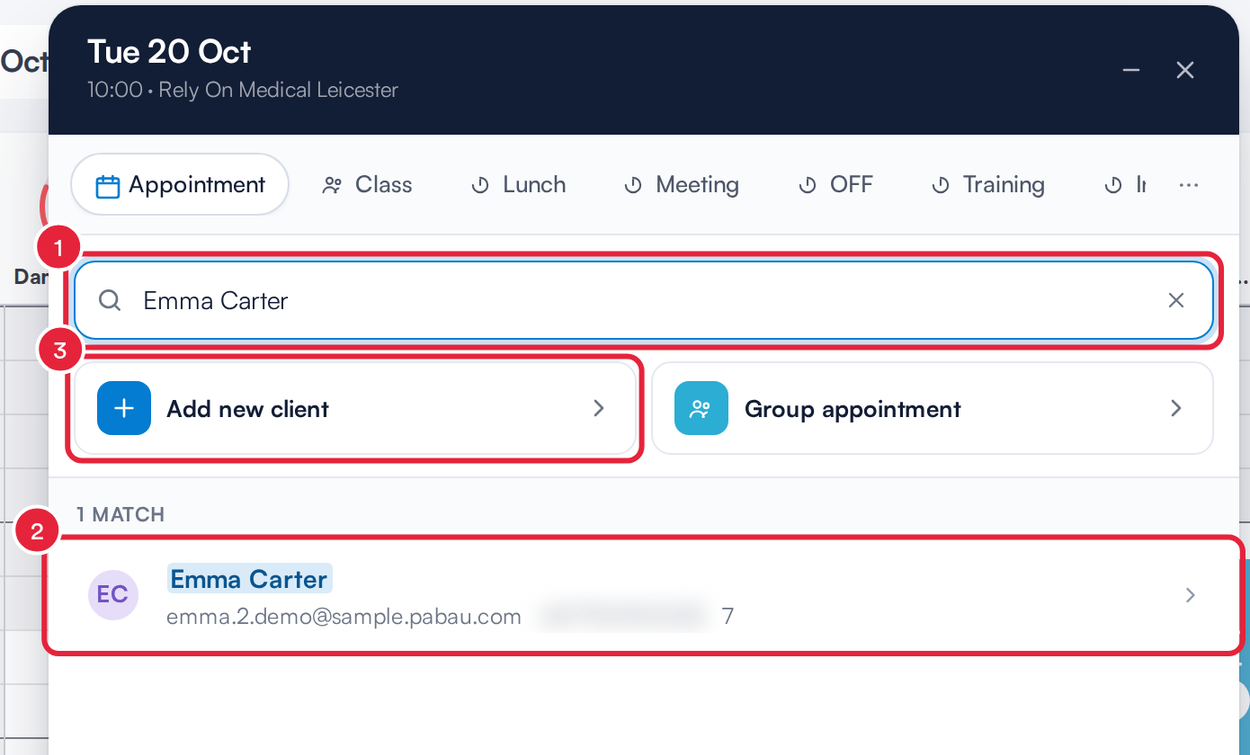
Search for the client, or add a new one
NOTE: If your clinic uses insurance billing and the client has an insurer saved, Pabau first asks Insurance policy: Choose how this appointment will be paid for. Pick one of their saved policies, New policy or Self-pay. Your choice sets the service prices for the booking.
Step 3: Add a Service
- The list shows the services the team member offers (for example Meri’s Services), grouped by category. Search by service name or code, or click a category to narrow the list.
- To see every service in the clinic, click All services. Click My services to go back.
- Click a service to add it. Recommended at the top suggests services the client has a package for (From package · 2 left), services their membership covers (Membership) and services they booked recently (Last booked).
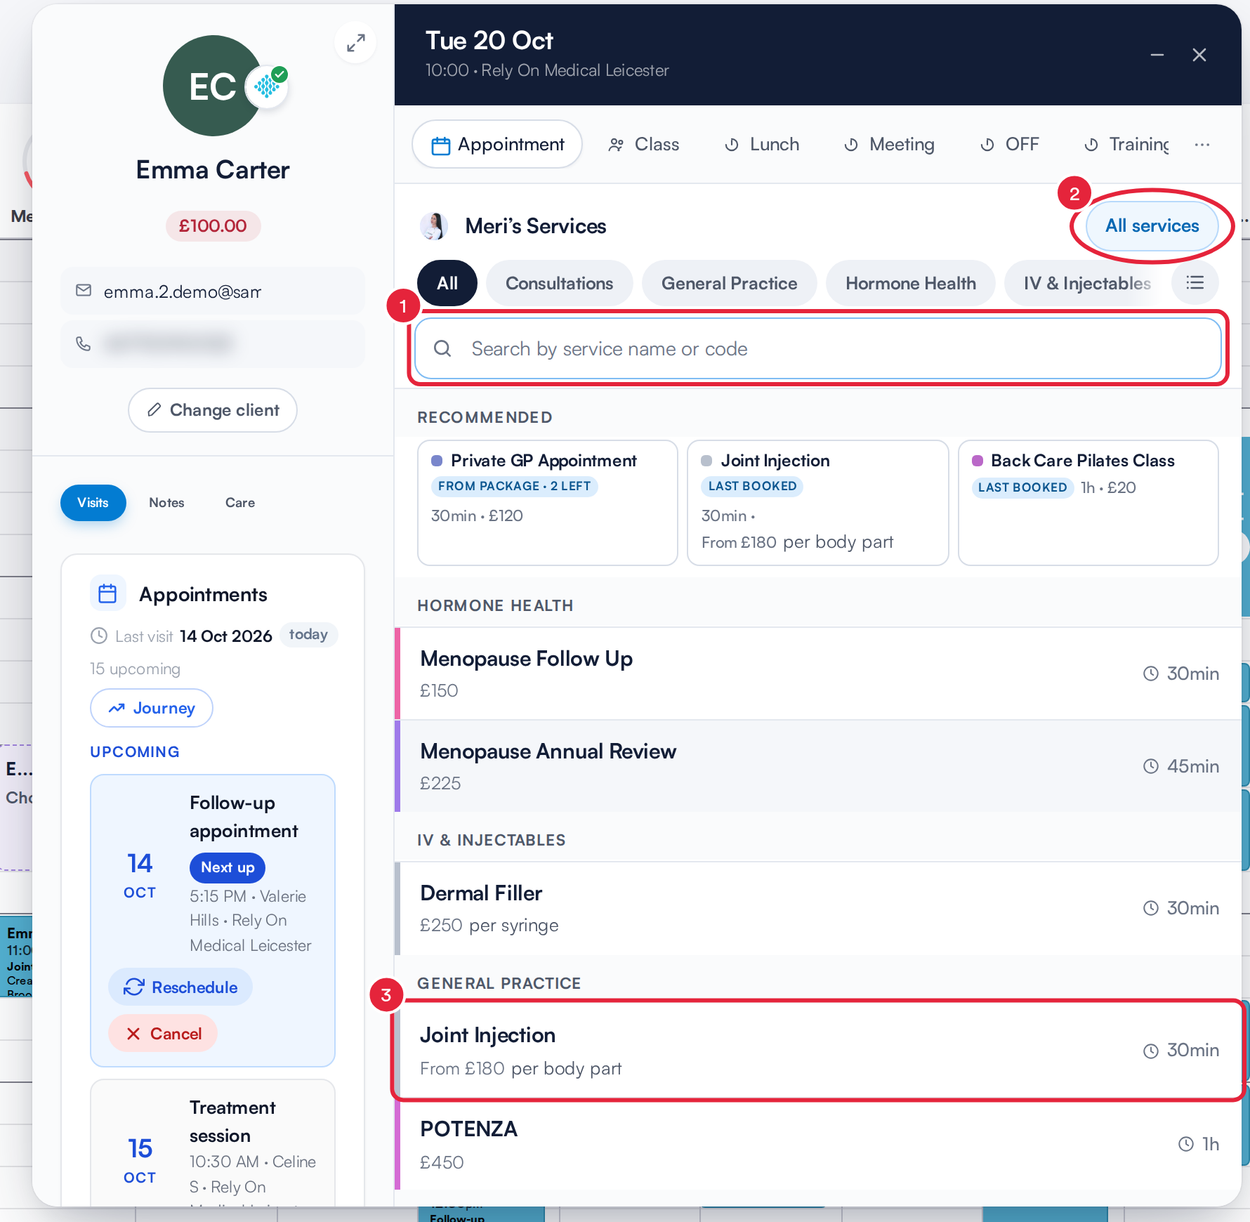
Search, filter or pick a recommended service
If the service has add-ons, the add-on picker opens as soon as you add it. See How to Select Add-ons When Booking on the Calendar.
Step 4: Check the Service Details
Each service gets a card showing its start time, duration, team member, price and the room or equipment it will use.
- Hover over the card and click the pencil to change the details. The bin removes the service.
- Click Add another service to add a second service to the same visit. The icon beside it, Add with another employee, adds a service with a different team member.
- To book a series, switch on Repeat appointment.
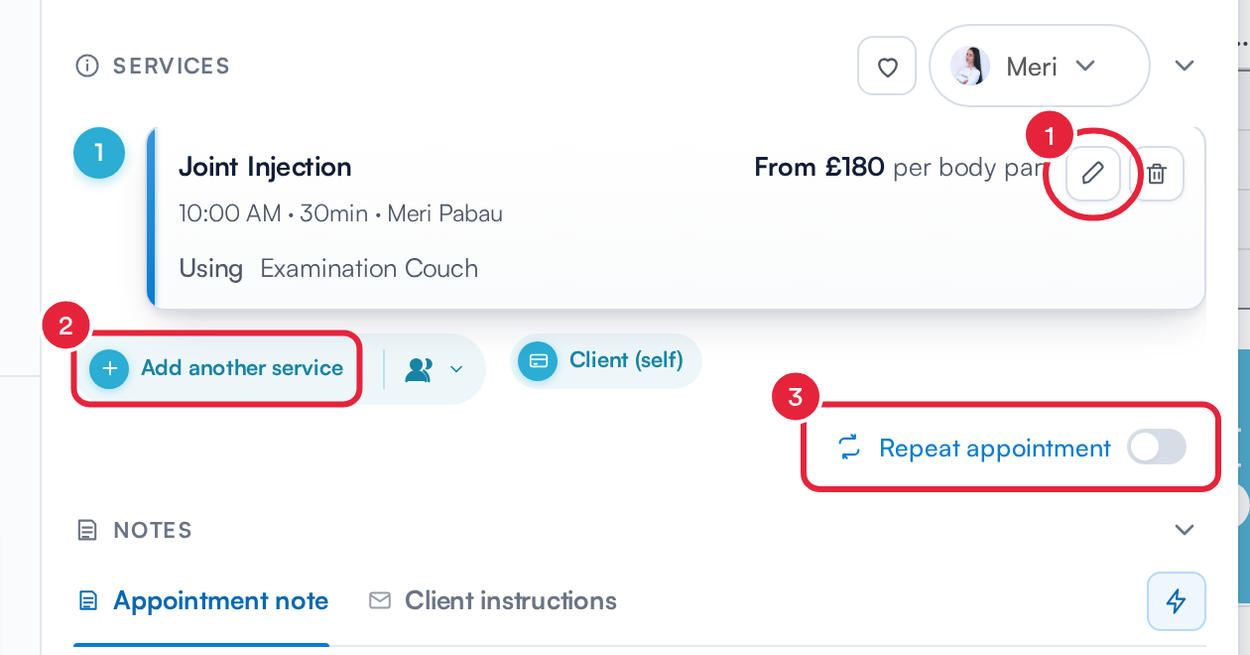
The service card, with the options to edit, add another service or repeat
When you click the pencil, the card opens:
- Click the service name to swap it for a different service.
- Staff: choose the team member.
- Start time and Duration: the times on offer follow the team member's working hours. A red dot marks a time that's taken (hover it to read Unavailable: employee, room or equipment is busy or outside working hours).
- Resource: the room or equipment. Leave it on Any available resource and Pabau gives the appointment a free room and equipment when you book, or pick a specific one.
- Click Done.
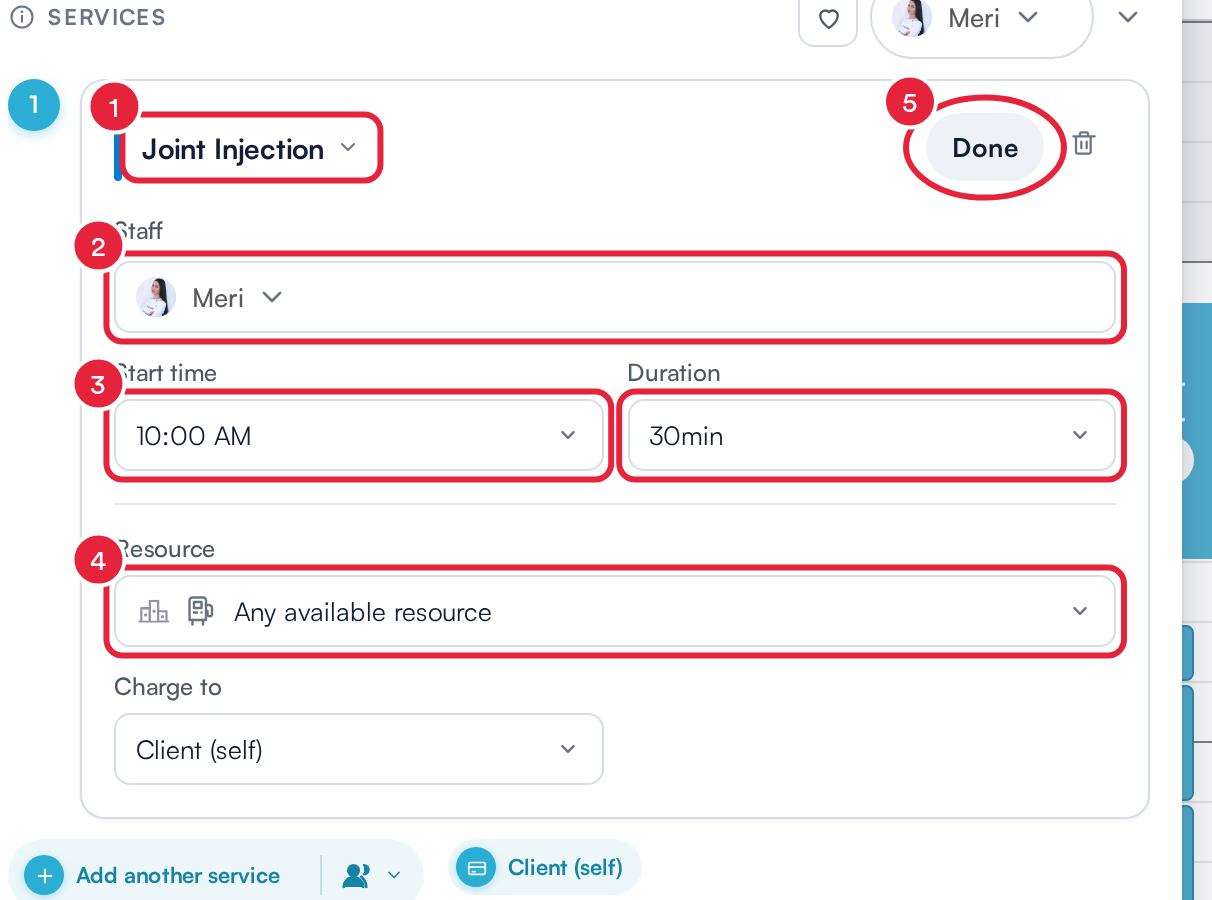
Change the team member, time, duration or room, then click Done
Step 5: Add Notes and Choose Notifications
Under Notes, add an Appointment note (a private note for your team) or Client instructions.
Under Notifications, each chip is a message Pabau sends the client: Confirmation (sent as soon as the booking is made), Reminder (sent before the appointment), Forms, Precare, Aftercare, Pay request and Review (sent after the appointment). They start from your clinic's notification settings, and the number on a chip shows how many channels or forms are switched on. Precare and Aftercare go out automatically when the chosen services have care instructions linked, so they have nothing to open.
- Click Confirmation, Reminder or Review to open it.
- Switch Email and SMS on or off for this booking.
- Click Preview message to see what the client will receive.
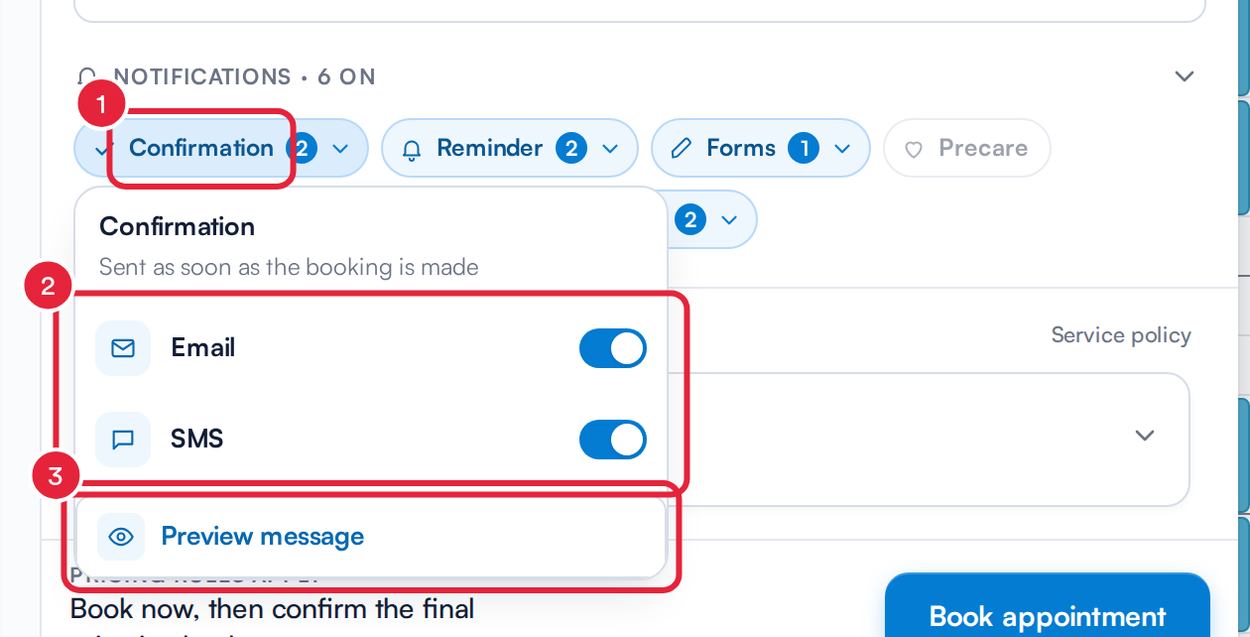
Choose how each message is sent for this booking
NOTE: Forms are sent with the confirmation, so turning on Forms also turns on Confirmation. If a chip is greyed out, hover over it to see why, for example Client is missing a mobile number.
Step 6: Book the Appointment
- Check the Payment Policy near the bottom. It shows No policy applied unless the service asks for a deposit, a payment or a card, in which case the button changes, for example to Take deposit followed by the amount.
- Click Book appointment.
- A card appears at the bottom right of the Calendar. It shows Sending confirmations…, then All confirmations sent (or Some notifications failed if a message couldn't be sent) with each message and how it went: the Confirmation, the Reminder (Scheduled), the Forms with the name of each form sent, and the Review request. The card closes by itself a few seconds later.
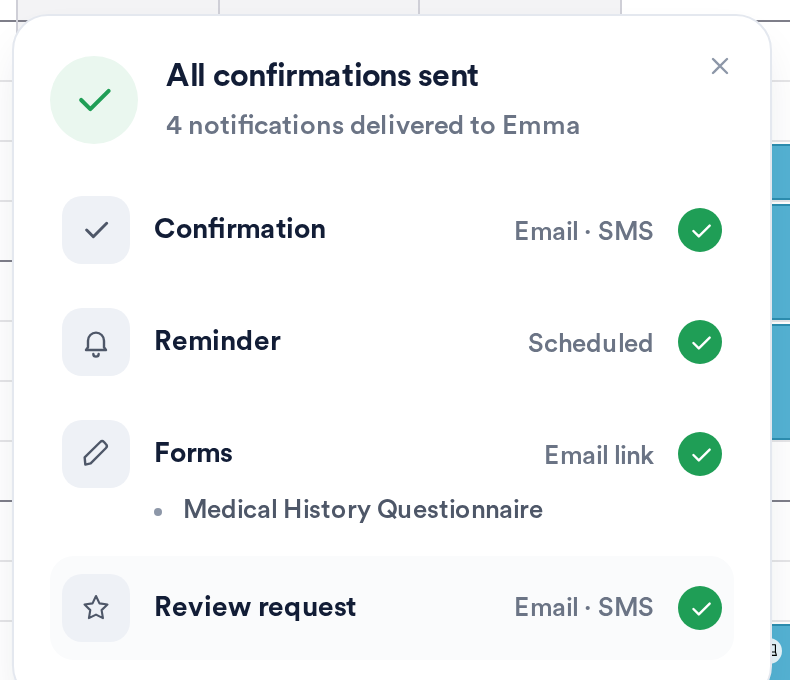
Pabau confirms what was sent to the client
NOTE: A form the client has already completed and that is still valid is not sent again. The card says so, for example Medical History Questionnaire skipped: already completed, valid until and the date.
What's next?
- How to Select Add-ons When Booking on the Calendar
- How to Edit the New Appointment is Booked Notification
- How to Manage Client Notifications in the Appointment Booking Menu
Was this guide helpful? Let us know by voting below - your feedback helps us write clearer articles.
For more guides, browse the related articles below or use the search bar at the top of the page. You can also watch our video learning series, the Pabau Academy, or visit the Support page for additional help.