Table of Contents:
1. Overview of the Calendar
2. How to Book an Appointment
3. How to Edit an Appointment
4. How to Reschedule an Appointment
5. How to Cancel an Appointment
6. How to Book an Appointment From a Package
7. How to Use a Package to Pay for an Appointment
8. How to Block Time Off in the Calendar
9. How to Edit, Reschedule, and Delete a Blockout
10. How to Lock and Unlock Your Calendar Screen
Overview of the Calendar
First, log in to your Pabau account, and in the left sidebar menu, click on Calendar.

The calendar page displays available shifts for today's date. If shifts are not set up yet, refer to our guide on creating shifts.
Grey areas represent hours outside of shifts, while white areas signify the shift itself. Appointments can only be booked within existing shifts.
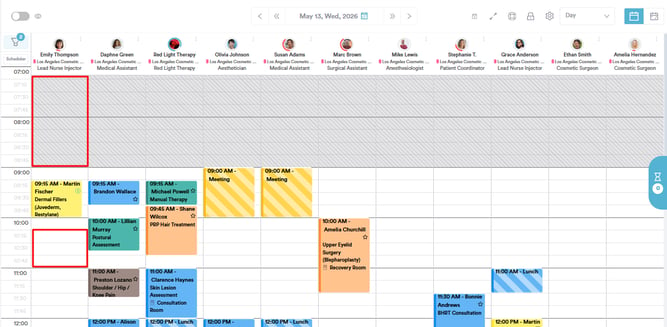
Shifts listed show details at the top, with an indicator if related to a room.
A line indicates the current time, visually separating past and upcoming appointments.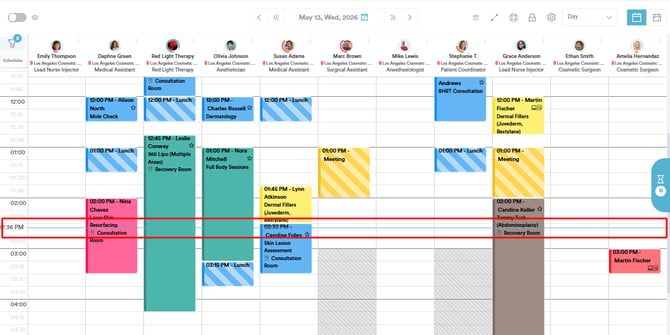
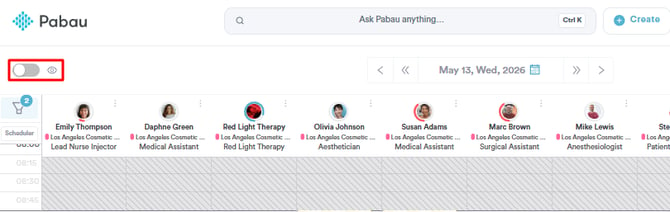
In the top left corner, toggle the privacy setting to hide client details from appointments.
The date is in the center. Hovering over it will allow you to choose a different date, while clicking on it takes you to today’s date.

Under the privacy toggle, find the calendar filter. Click to open filter options on the right.

You can filter the calendar by locations, employees, appointment statuses, and services. After you're done selecting the elements you wish to see in the calendar, click on "Apply Filters".

NOTE: To choose multiple locations or employees, click on the checkmark circle beside each respective location or employee's name.
Next to the privacy button, you’ll find the Waitlist button. By clicking the button you can add clients to the waitlist if their desired time slot is unavailable, or book them directly if a slot becomes available.

Note: To learn more about how to operate a waitlist, please refer to this article.
There are various options in the top right corner:

- Confirmation Manager: Lists daily appointments and their confirmation status.

- Full-Screen Mode: Enables a larger view.
- Legend: Opens an icon legend for appointment information. These icons will appear on the appointments themselves to give you important appointment information at a glance.

- Settings: Adjust zoom, edit schedule, re-order columns, or access calendar settings.

In the "Configuration" tab under "Calendar settings", you can choose the calendar starting day, time slot size, and start and end time.
You can also:
-
Enable auto-lock to secure the calendar after inactivity, using the last logged-in user's passcode.
-
Set auto-complete rules to automatically mark an appointment as “completed” after you’ve created an invoice for it.
-
Adjust resource view time slots to decide how time is shown for rooms, equipment, or staff in your calendar.

In the "Appointment settings" tab, you can set the calendar to automatically have your communication checkboxes selected as well as allowing your appointments to overlap.

In the "Appearance" tab, you can choose to only display staff members' initials, hide appointment times, and hide clients' last names.

Calendar View Mode:
-
Day, Week, or Month – Choose how you want to view your calendar.
-
Working Days Only – Hide weekends if your business runs Monday to Friday.
-
Canceled Appointments – Choose to show or hide any canceled bookings.
-
Employee View – See the schedule for each team member.
-
Room View – View bookings by treatment rooms.
-
Resource View – See availability for shared resources like equipment or rooms.
-
Schedule View – Get a clear list of all upcoming appointments in one place

By following these steps, you'll be well-equipped to navigate and make the most of your Pabau calendar.
How to Book an Appointment
In this article, we'll see how you can book appointments within an existing shift.
Step 1: Navigate to Calendar
Log in to your Pabau account, and in the left sidebar menu, click on Calendar.
Step 2: Select Timeslot
Click on the desired timeslot to open the "Create new appointment" menu. Appointments can only be booked within an existing shift, so make sure to first create a shift.
Step 3: Choose Client
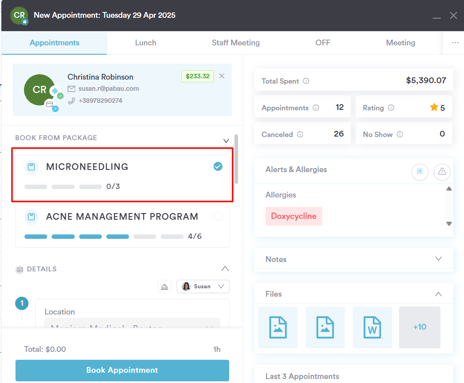
Select the client from the search bar or create a new client by clicking on "Add new client".

After selecting a client, you will see the following information in the top-right corner of the appointment booking modal:
- The client’s total sales (including both paid and unpaid invoices)
- The total number of completed appointments
- The last review score left by the client
- The total number of cancelled appointments
- The total number of no-shows

In the Alerts & Allergies section, you can view any allergies and staff alerts recorded for the client, if applicable.

In the Notes section, you can see any appointment and client notes and also add a new appointment note.

In the Files section, you can preview the last three files uploaded to the client’s card.

In the Last 3 Appointments section, you can view the client’s last three appointments and switch between them using the arrows. To rebook an appointment, click the “Rebook” button.

NOTE: This data will only be displayed if it is available in the client card. If certain information is not recorded, those fields will remain empty.
In the Client Created section, you can see the date the client was created and the staff member who created the profile.
Step 4: Service Selection
Choose the service for the appointment. Start time is pre-populated based on your selection, and duration is auto-filled based on the service set duration. Optionally, add appointment notes.

Start time is pre-populated based on your time slot selection, and duration is auto-filled based on the service set duration. Optionally, add appointment notes.
Step 5: Notification Preferences
In the "Notifications" section, you will find several tiles representing different client notification options.
Confirmation
The "Confirmation" tile indicates whether a standard confirmation will be sent to the client. If both the email and the SMS icons are blue, a confirmation will be sent through both channels. If one or both icons are greyed out, no confirmation will be sent via that method. These settings are automatically pulled from your Client Notification settings.

Reminder
The "Reminder" tile shows whether a reminder will be sent to the client. If both icons are blue, the client will receive reminders via email and SMS. If one or both icons are grey, reminders won’t be sent through that channel. These reminder settings are also pulled from your Client Notification settings.

NOTE: Reminders will not be sent if the appointment is scheduled to start sooner than the "Reminder advance notice" setting. For instance, if reminders are set to be sent two days before the appointment, a booking for tomorrow will not trigger a reminder.
Medical History
The "Medical History" tile indicates whether a medical history questionnaire will be sent to the client. The form sent will be the one marked as the default in your account.
If the tile is greyed out with an error icon, you’ll need to set up a questionnaire and mark it as default.
Forms
The "Forms" tile will show any additional forms linked to the service you are booking. By hovering over this tile, you can see which forms will be requested from the client before the appointment.
If the tile is greyed out with an error icon and you want to request additional forms from the client, you can set this up by following the steps in this guide.

Precares
The "Precares" tile will display any pre-care templates associated with the services you are booking, as set up in the service settings under "Client Pathway."
If the tile is greyed out with an error icon and you'd like to send precare instructions to clients, you can set this up by following the steps in this guide.

Feedback
Finally, the "Feedback" tile shows if a feedback request will be sent to the client. As with other notifications, if both the email and SMS icons are blue, the request will be sent through both channels. If one or both icons are grey, no feedback will be requested through that channel. These settings also pull from your Client Notification settings.

If you see an error icon and you want to send feedback requests to clients, ensure that the feedback request client notification is enabled by following the steps outlined here.
Payment
The "Payment" tile shows whether a notification will be sent to the client once a payment is made. If both the email and SMS icons are blue, the client will receive a confirmation via both channels. If one or both icons are grey, the notification won’t be sent through that method.
These notifications are controlled by your Payment Policy settings. For example, if you’re using Express Booking, clients can automatically receive a secure payment link via email right after booking. This helps ensure timely payments and keeps clients informed about their transactions.

To learn more about payment policy and how you can enable it, please refer to this article.
NOTE: If your client notifications are set to send email and/or SMS confirmations, reminders, or feedback requests, but the tiles are still greyed out, ensure that these notifications haven't been disabled in your Calendar Settings.
Step 6: Confirm Booking
Click the Book Appointment button. Preview the total cost and duration above it. The appointment is now scheduled.
NOTE: You can also learn about this topic by watching a lesson on Pabau Academy.
In addition, we suggest reading our Calendar article for a more in-depth exploration of this topic.
How to Edit an Appointment
In this article, you'll learn how to manage your appointments by editing details as needed.
Step 1: Navigate to Calendar
Log in to your Pabau account, and in the left sidebar menu, click on Calendar.
Step 2: Access Edit Options
Click on the appointment you want to edit. In the menu that opens, click on "Edit appointment."

This expands the menu, enabling you to edit the appointment details.

Make the desired changes and click on "Save Changes" to confirm.
NOTE: While you can reschedule the appointment by changing the start time, there are easier ways to reschedule. Refer to our How to Reschedule Appointments article for more details.
If you only need to adjust the appointment duration, drag the bottom of the appointment to increase or decrease the duration. Pabau will indicate the change in minutes. When done, in the prompt, click on "Reschedule anyway" to confirm.
By following these steps, you can easily edit appointment details.
How to Reschedule an Appointment
This article covers how to reschedule an appointment in the calendar.
Step 1: Navigate to Calendar
Log in to your Pabau account, and in the left sidebar menu, click on Calendar.
Step 2: Locate the Appointment
Locate the appointment you want to reschedule. Depending on whether you're moving it to a different time on the same day or to a different day, there are two options to choose from.
Option 1: Drag and Drop
Drag and drop the appointment to the desired slot. Confirm by selecting either "Reschedule" or "Reschedule & Notify" in the prompt. If you choose "Reschedule & Notify," the client will receive a notification about the rescheduled appointment, based on your Client Notification settings.
NOTE: This method only applies when rescheduling on the same day.
Option 2: Reschedule Through Context Menu
- Click on the appointment and in the context menu, select Reschedule.

- The appointment is "stored" in the Reschedule Appointments modal. You're free to navigate through the calendar, and select a different date - the modal will not go away.
- After you choose a different date, drag and drop the appointment from the modal onto the desired slot.
- Select if you'd like to notify the client - via email or SMS - and click on Proceed.
- Confirm by selecting Reschedule or Reschedule & Notify in the prompt.
If there are any conflicts with the desired slot, such as the room or staff member being unavailable, you will receive a warning. However, you can choose to ignore the warning and proceed with rescheduling the appointment.
The appointment has now been successfully rescheduled.
How to Cancel an Appointment
In this article, you'll learn how to manage appointment cancellations and maintain an organized and up-to-date schedule in Pabau.
Step 1: Navigate to Calendar
Log in to your Pabau account, and in the left sidebar menu, click on Calendar.
Step 2: Initiate Cancellation
Click on the appointment you want to cancel. In the appointment context menu, click on "Cancel".

In the following modal, select a cancellation reason from the dropdown menu. You cannot cancel an appointment without a cancellation reason.

NOTE: To learn how to manage cancellation reasons, please follow the steps provided in this guide.
Step 3: Confirm Cancellation
If necessary, adjust how you'd like to notify the client. Click on "Proceed" to confirm the cancellation.
The appointment is now successfully canceled.
If you wish to display canceled appointments in your calendar, click on "Calendar view mode" in the top right corner of the calendar.
Tick the "Show canceled" button to include canceled appointments in your calendar view.

By following these steps, you can easily cancel appointments and keep your calendar up to date.
How to Book an Appointment From a Package
After successfully selling a package to a client, follow these steps to efficiently schedule appointments from a package.
Step 1: Navigate to the Calendar
Log in to your Pabau account, and in the left sidebar menu, click on Calendar.
Step 2: Choose the Desired Timeslot
Select the timeslot where you intend to book an appointment, then search for the client to whom you've previously sold a package by using the client search bar.

NOTE: Follow the steps provided in this article to sell packages to clients.
Step 3: Select the Package
After clicking on the client's name, a "Book from package" section will appear in the appointment creation modal. Click on the name of the package. This action will automatically populate the service name in the Service field.
Step 4: Add Appointment Details and Confirm the Booking
Input appointment notes, choose notification preferences, and click on "Book Appointment" to complete the booking.
After the appointment, you can check out the client using a package session as the payment method by following the steps outlined in this article.
By following these steps, you can book appointments from a package.
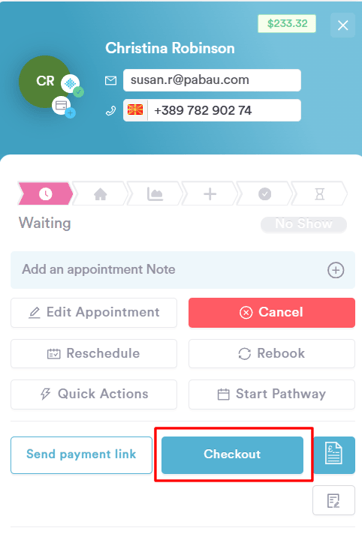
How to Use a Package to Pay for an Appointment
In this article, we’ll walk you through checking out a client using a package session as the payment method.
Step 1: Navigate to Calendar
Log in to your Pabau account, and in the left sidebar menu, click on Calendar.
Step 2: Access Appointment Checkout
Click on the specific appointment you wish to check out, then select "Checkout."
Step 3: Select Package as Payment Method
In the Point of Sale, confirm that the service in the cart matches a service included in the package the client previously purchased; otherwise, a package session cannot be applied as payment. Once confirmed, click "Continue" to proceed to the payment method selection.

On the payment method step, select "Packages" from the pre-paid payment methods. A small package icon will then be added to the item in the cart. If you hover over it you can see the name of the package being used.

NOTE: The Packages option will only be available if the client has a valid package.
Step 4: Apply Package Session
Click on "Confirm Payment" to complete the checkout process.
The appointment has been successfully checked out using a package session. By clicking on the appointment in the calendar, you can view the details of the package used to pay for the appointment.

By following these steps, you can use package sessions to pay for appointments.
How to Block Time Off in the Calendar
This article covers how to create a block out in the calendar. Block outs are used to block time off in the calendar. They can only be created within a shift, so make sure to first create a shift.
Step 1: Navigate to Calendar
Log in to your Pabau account, and in the left sidebar menu, click on Calendar.
Step 2: Choose Timeslot for Blockout
Click on the desired timeslot for the blockout.
Step 3: Select Blockout Type and Input Details
At the top of the appointment creation modal, you will find the Blockout types created in your account. Click on the desired blockout type and input the blockout details.
The start time is based on the selected timeslot.

Each blockout type has a default duration, prepopulating the end time and duration field. You can adjust the duration as needed.
NOTE: To create more blockout types, please follow the steps provided in this guide.
For an all-day blockout, use the "All day" toggle to cover the entire shift. Optionally, add a note with important information.
Step 4: Invite Guests
You can add other staff members to the blockout in the Guests section. This duplicates the blockout in their respective shifts. Skip this step if not applicable.

Step 5: Confirm and Book
At the bottom of the modal, click on "Book" to confirm. The blockout has now been successfully created.
NOTE: To create more blockout types, go to Setup, then click on Objects under Developer & Other, and finally, click on Block Out Options.
How to Edit, Reschedule, and Delete a Blockout
In this article, we'll guide you through the steps of editing, rescheduling, and deleting blockouts in Pabau.
Step 1: Navigate to Calendar
Log in to your Pabau account, and in the left sidebar menu, click on Calendar.
Step 2: Edit a Blockout
To edit a blockout, click on the blockout you want to edit and select "Edit Blockout" from the available options.

Make desired changes in the Blockout Details section and click on "Save Changes" to confirm.
To adjust the blockout duration, you can also drag the bottom of the blockout and click on Reschedule to confirm.
NOTE: Edits to blockouts with guests can only be done by the host. Changes will be reflected for all participants.
Step 3: Reschedule a Blockout
To reschedule a blockout, locate the blockout you want to reschedule.
Choose one of the following options:
Option 2: Through the context menu, select Reschedule. The blockout is now "stored" in the Reschedule Blockout modal. You're free to navigate through the calendar, and select a different date - the modal will not go away. Drag and drop the blockout from the modal onto the desired slot and click on "Proceed".
Confirm by selecting "Reschedule".

NOTE: Rescheduling a blockout with guests can only be done by the host. Changes will be reflected for all participants.
Step 4: Delete a Blockout
To delete a blockout, click on the blockout you want to delete.

Choose "Cancel" from the available options. The blockout has now been successfully deleted.
NOTE: If a host cancels a blockout with guests, it's canceled for all participants. Participants can cancel only their own iteration of the blockout.
By following these steps, you can easily edit, reschedule, or delete blockouts in your calendar, ensuring smooth management of your schedule in Pabau.
How to Lock and Unlock Your Calendar Screen
Locking and unlocking the calendar with a user-specific passcode enhances security by ensuring only authorized staff can access scheduling information. This feature also simplifies staff transitions on shared devices.
Here’s how it works: if the calendar screen is locked (either manually or automatically) and a different staff member enters their passcode, the previous user will be logged out, and the new user will be logged in.
To enable or disable automatic locking, go to Calendar Settings by clicking the cogwheel icon in the top right corner of the calendar, then select "Settings".

Under the Configuration tab, set the "Auto lock" time or choose "Disabled" to turn off auto-lock.

For added security, enable the "Accept last user’s passcode only" option to restrict access to the currently logged-in user's passcode.
Click "Save changes" in the top right corner.
NOTE: To lock and unlock your Calendar, you'll need your Pabau passcode. If you do not have a passcode set up, you will not be able to lock the calendar. Review this article to find out how you can set a passcode.
Step 1: Navigate to Calendar
Start by logging into your Pabau account using your login credentials. Then, navigate to the Calendar in the left sidebar menu.
Step 2: Lock Calendar
In the top right corner of the calendar, click the lock icon.

NOTE: The calendar will lock automatically if no mouse movement is detected on the calendar page for the period set in your Calendar Settings.
Step 3: Insert Your Passcode
After clicking the lock icon, a modal will appear, prompting you to enter a passcode. All activities will remain blocked until you enter the passcode.

The passcode accepted will depend on whether the "Accept last user’s passcode only" option is enabled in your account under Calendar Settings.

- If "Accept last user’s passcode only" is enabled, only the passcode of the staff member who was logged in before the calendar was locked will be accepted.
- If "Accept last user’s passcode only" is disabled, passcodes from other staff members will also be accepted, and the logged-in user will change based on the passcode entered.
Step 4: Review Calendar
Once you enter your passcode, you'll regain access to the calendar.

By following these steps, you can lock and unlock your calendar in Pabau.
For more guides, refer to related articles below, select additional guides, or use the search bar at the top of the page. These guides will help you get the most out of your Pabau account.
Additionally, to help you fully utilize and understand your Pabau account, we recommend exploring additional guides and resources offered at the Pabau Academy. It offers in-depth video tutorials and lessons, offering a holistic learning experience that can equip you with the essential skills for achieving success with Pabau.