
The Stock page brings your inventory counts, stock movement, batches, purchase orders and stock transfers together on one screen. It opens on an Overview dashboard that shows the state of your stock at a glance, and each area has its own tab, so you can check a low-stock warning, build an order and look up a delivery without leaving the page.
NOTE: The tabs you see depend on your permissions. Inventory, Movement, Batches and Transfers need Can access inventory page, and Orders needs Can access orders page. The Batches tab is part of Batch Management, which is being rolled out to clinics gradually. If you don't see it in your account yet, message us via the in-app chat.
Step 1: Open the Stock Page
- Click Stock in the sidebar.
- The page opens on the Overview tab. The tabs beside it take you to Inventory, Movement, Batches, Orders and Transfers.
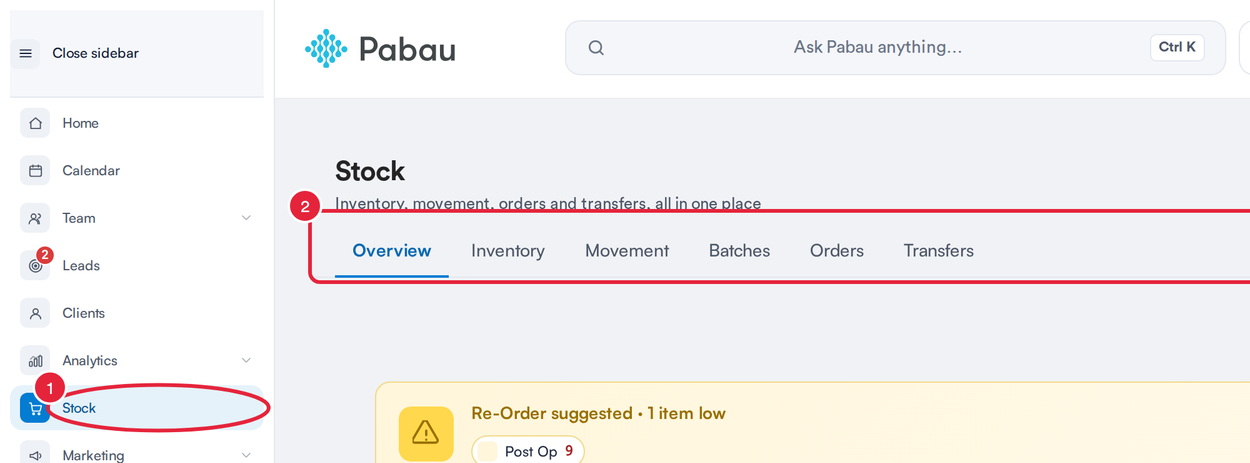
Stock in the sidebar opens the Overview
TIP: Saved links and bookmarks to the old Inventory, Inventory Movement, Batch Management, Orders and Stock Transfers pages still work. They now open the matching tab of the Stock page. Your product list itself lives in Setup: under Catalogue, click Products.
Step 2: Read the Stock Tiles
Four tiles across the top sum up your stock right now:
- All items: the number of active products across all your locations. Underneath, Last count shows the date your most recent inventory count was started (or No inventory counts yet).
- Out of stock: products with no stock left. Click View report to open the Stock Reconciliation report, filtered to out-of-stock products.
- Low stock: products at or below their alert level. Click Build an order to open the order builder with a suggested order for the products that are running low.
- Arriving soon: stock on order from suppliers. Click View orders to jump to the Orders tab.

The four stock tiles and their shortcuts
When products have dropped below their alert level, a Re-Order suggested banner above the tiles names them and shows how many are left. Click Auto-build to start an order for them, or the × to hide the banner.

The Re-Order suggested banner
NOTE: The Build an order and Auto-build shortcuts only appear for staff with the Can create orders permission. A product's alert level is its minimum stock level.
Step 3: Check Stock Movements and Purchase Orders
- Pick 7 days, 30 days or 90 days at the top right. The Stock movements chart shows how many stock movements (such as sales, deliveries received, stock counts and adjustments) happened each day in that range, with the total above it.
- The Purchase orders card counts your orders by status (Open, Processing, Received and Complete) and shows Items received and your Total spend. Click View all orders to open the Orders tab.
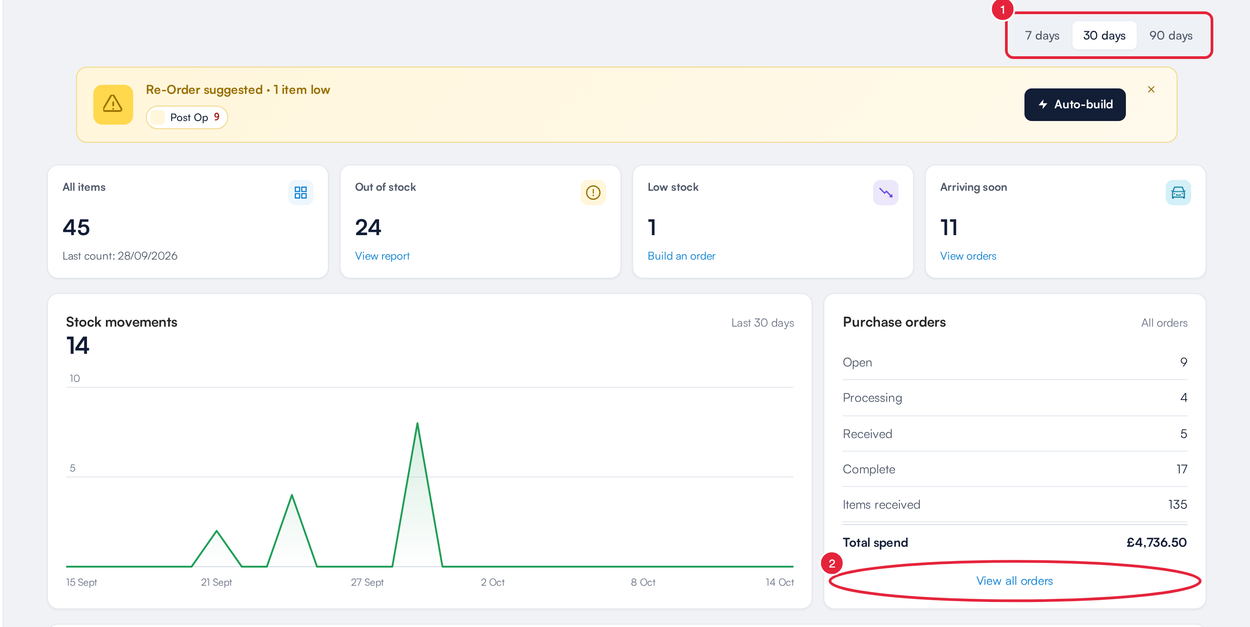
Movements per day beside your purchase order summary
NOTE: The range only changes the Stock movements chart and the Recent movements list. The tiles and the Purchase orders card always show where things stand today, across all orders.
Step 4: Review Recent Movements
Below the chart, Recent movements lists the latest stock movements in the range you picked. Each row shows the product, the date and time, the location, the type of movement (such as Sale) and the change in quantity.
- Click View all to open the Movement tab, where you can filter every movement by product, movement type, location and date, and export it.
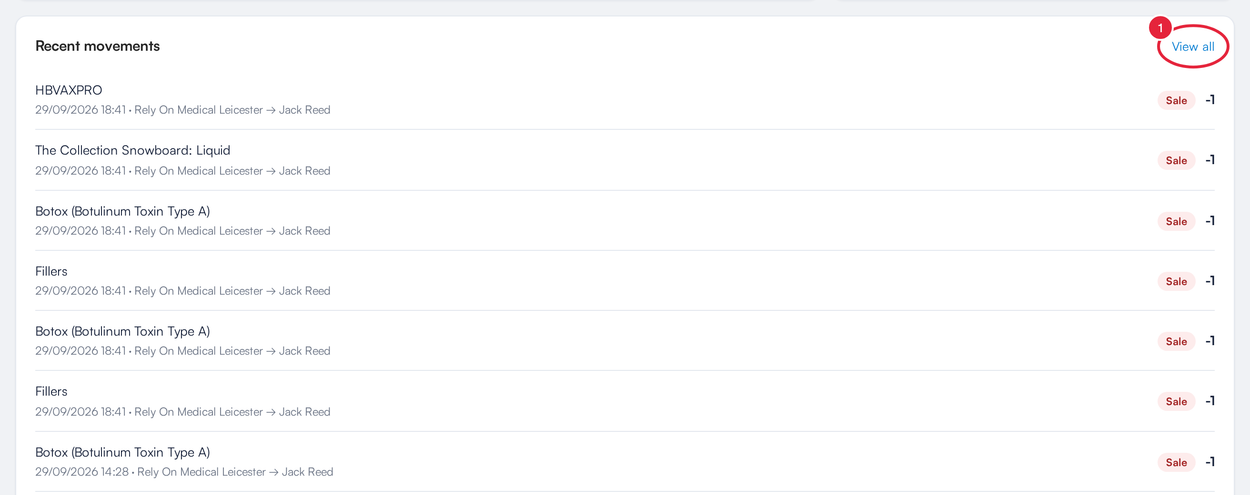
The latest stock movements
Step 5: Work in the Tabs
- Click a tab to open that area. Each tab keeps its own controls:
- Inventory: your inventory counts. Click New Count to start a stocktake.
- Movement: the inventory movement report, with Export and a Stock Transfers shortcut.
- Batches: Batch Management, for batch numbers, doses left and expiry dates.
- Orders: your purchase orders. Click Create a new order to build one.
- Transfers: stock moved between your locations. Click Create Transfer to start one.
- The button for each tab sits on the right, above its list. For example, New Count on the Inventory tab.
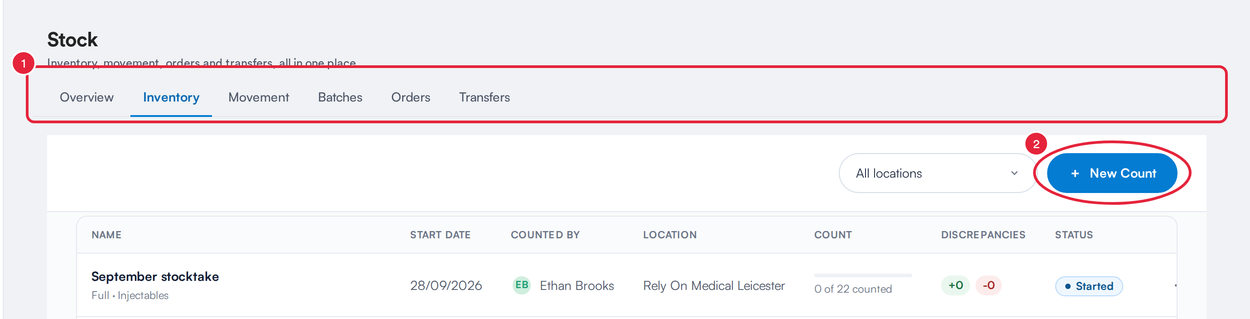
The Inventory tab with its New Count button
NOTE: Create Transfer needs at least two locations. With a single location the button is greyed out and reads Add more locations to enable stock transfers when you hover over it.
What's next?
- How to Start a New Inventory Count
- How to Build a Purchase Order
- How to Receive a Purchase Order
- How to Use Inventory Movement Report
- How to Transfer Products Between Locations
- How to Generate a Stock Report
Was this guide helpful? Let us know by voting below - your feedback helps us write clearer articles.
For more guides, browse the related articles below or use the search bar at the top of the page. You can also watch our video learning series, the Pabau Academy, or visit the Support page for additional help.