Table of Contents:
1. How to Enable the Timesheets and Wages Feature
2. How to Use the Time Tracking Feature
3. How to Manage Timesheets as an Admin
4. How to Edit a Timesheet as an Admin
5. How to Submit a Timesheet as an Admin
6. How to Set Up Wages
7. How to Configure Timesheet Settings
8. How to Report on Wages
How to Enable the Timesheets and Wages Feature
In this guide, we’ll walk you through how to enable the Timesheets and Wages feature.
Enabling this feature is necessary to access clock-in and clock-out functionality for staff members, set their wages, and allow the system to calculate wages automatically.
Step 1: Navigate to Team
Log into your Pabau account, navigate to the left-side menu, click on "Team," and then select "Team" again from the submenu.
Step 2: Open the Staff Member's Profile
Click on the profile of the staff member for whom you want to enable the Timesheets and Wages feature.
Step 3: Access the Timesheets & Wages Tab
Once inside the staff member's profile, click on the "Timesheets & Wages" tab.

Step 4: Enable the Timesheets & Wages Feature
Turn on the toggle next to "Timesheets & Wages" to enable the feature for the selected staff member.

Step 5: Save Your Changes
Click on "Save Changes" on the right side of the screen to confirm and save your updates.
Once the feature is enabled, a clock icon will appear beneath the names of the staff members it is activated for on the Teams page and within their user profiles.


Now that you've enabled timesheets and wages, learn How to Manage Timesheets as an Admin and How to Set Up Wages.
By following these steps, you’ve successfully enabled the Timesheets and Wages feature.
How to Use the Time Tracking Feature
In this article, we'll cover how you and your team members can track time spent working and on breaks using our time-tracking feature.
The time-tracking feature enables you and your staff members to record when you arrive at work, take breaks, and leave. It also serves as the basis for calculating hours worked and wages, should you wish to use that feature.
NOTE: Please note that the time tracking functionality is only available to staff members if the Timesheets and Wages feature is enabled individually for each staff member. To enable this feature, simply follow the steps outlined in this guide.
Clocking In
Step 1: Log into your Pabau account and click on your avatar in the top right corner of the screen.
![]()
Step 2: In the avatar menu, locate the clock-in section, which shows the time remaining before your shift starts based on your schedule. Click on "Clock in" to mark the start of your workday. If you don’t have a shift scheduled for the day, you can still clock in, and a timesheet will be created.
![]()
Step 3: Once clocked in, the timer begins counting the time passed since you clicked the clock-in button. It also shows the time remaining until the end of your shift, based on the shift's end time in the Scheduler.
![]()
If you clock in late, a warning will display the amount of time you are late.
Taking a Break
Step 1: Click on "Start break" when you need to take a break or attend a meeting/training. In the pop-up window, select the relevant event type.
![]()
Step 2: The available break types depend on the Blockout Options you’ve created. By default, options like Lunch, Meeting, and Training are available if set to active, but custom options can also be added by following the steps provided in this guide.
![]()
Step 3: Once a break type is selected:
- The counter stops, as it only tracks active working hours.
- The selected blockout type (e.g., "Lunch") is displayed.
- The remaining minutes for the break are shown, calculated from the current time minus the blockout duration.
- An "End Break" button appears.

NOTE: Whether a break is paid or unpaid depends on the settings for that blockout option.
If you took paid breaks, the timesheet will reflect them, making you eligible for compensation; otherwise, you won’t be.
Ending a Break and Resuming Work
Step 1: Click "End Break" when you're ready to resume work. The timer will restart from where it left off before the break began.
Step 2: You can take multiple breaks, even if the daily allowance has been used up. For example, if you took a 20-minute lunch and then want another lunch break, the timer will show 0 minutes remaining, but the timesheet will accurately reflect the total break time.
Clocking Out
Step 1: Click on "Clock Out" to end your workday. If your shift isn’t over, you’ll need to confirm your clock-out in a pop-up. If your shift has ended, clocking out will happen automatically.
![]()
Step 2: After clocking out, your timesheet for the day will display:
- The location where you worked.
- The total hours worked, including any breaks taken.
![]()
Step 3: If you accidentally click "Clock Out" instead of taking a break, and then clock back in later, another break will be created (unpaid and not counted as work time). The timesheet’s final clock-out value should reflect the time when you truly finished work for the day.
Step 4: Even after clocking out, you can still clock in again if needed. The system will continue counting your shift time from that point.
Important Notes:
-
Location Tracking: The time-tracking feature monitors your location regardless of the browser used. Only manually clicking the button will stop it—browser refreshes or clearing cache/cookies won’t affect it.
-
Location Storage: Your current location (based on IP address) is stored when you click Clock In. If location permissions are granted, your location is logged whenever you clock in or out and is retrievable for audits.
-
Timer Reset: The timer resets at midnight. For example, if you work 5 hours until 11:59 PM, these hours will be displayed in Today’s timesheet. At midnight, the timer resets. If you forget to clock out or continue working after midnight, the counter keeps running, and a new timesheet starts for the next day from 00:00.
- Time Zone: The time zone is always determined by the time zone selected in your Business Details under Setup.
By following the steps outlined above, you and your team can easily track your working hours and breaks, ensuring accurate timesheets and better time management.
How to Manage Timesheets as an Admin
In this article, we’ll guide you through the process of managing the timesheets for staff members at your clinic.
Who can manage timesheets?
Before we dive into the steps, it’s important to note that only admins within your Pabau account—those defined as such through the Team feature—have the authority to view, edit, and delete the timesheets of all employees. If you’re not an admin, you’ll have more limited access, meaning you can only view and submit your own timesheets.
What you can do on the Timesheets page:
The timesheets page pulls information directly from the time-tracking feature. This page allows for the following:
Submitting your own timesheets: If you forgot to clock in, clocked in late, or accidentally clocked out early, you can manually submit a timesheet to ensure accurate records.
Editing colleagues' timesheets: As an admin, you can fix any errors in the timesheets of other staff members, ensuring that the records reflect the correct hours worked.
Viewing an overview of employee time management: If you’re an admin, you can access an overview that displays how each employee has spent their time, helping you monitor productivity and ensure compliance with scheduled hours.
NOTE: Please note that the Timesheets and Wages feature needs to be enabled individually for each staff member. To enable this feature, simply follow the steps outlined in this guide.
Now, let’s walk through the process of accessing and managing timesheets.
Step 1: Accessing the Timesheets Page
Start by logging into your Pabau account. On the left sidebar menu, locate and click on the "Team" option. From the dropdown menu that appears, select "Timesheets." This will take you to the main timesheet management page, where all timesheet data is housed.

The view of this page will differ slightly based on your role in your Pabau account (admin or non-admin).
-
- As an admin, you’ll see your own timesheets as well as the timesheets of all staff members who work in the locations to which you have access.
- Non-admins will only see their own timesheets.
At the top of the timesheet page, you’ll find navigation options that allow you to switch between different days, or to view timesheets by day, week, or month. 
As an admin, you can also apply filters by employee and location to narrow down the displayed information.

NOTE: You will only be able to see and select the locations you're authorized to access, as set in the Locations tab of your user profile under the Team feature.

Step 2: Viewing and Understanding Timesheets
After accessing the timesheets page, you can begin reviewing and managing the timesheets of your staff.

Viewing Timesheet Activity: To get a detailed view of an employee's activity for a particular day, click on the row corresponding to that staff member in the timesheet table. This action will open a preview where you can see a chronological list of actions taken by the employee during their shift, including clock-in times, break times, and clock-out times.

Even if an employee hasn’t been scheduled or hasn’t clocked in, there will still be a row for them in the timesheet table.
To gain more insight into specific events during the shift, such as clock-ins, breaks, or clock-outs, simply hover over the icon within the timesheet. This will display a tooltip with additional details about the event.

Ongoing Shifts: If a staff member is actively clocked in, the timesheet’s time indicator will increment in real-time as the day progresses, showing the elapsed time leading up to the scheduled end time.
Completed Shifts: For shifts that have already ended, you’ll see the total number of hours and minutes worked. If the staff member is still clocked in, the system will continue to update this information until they clock out.
Multiple Timesheets per Day: It’s important to note that a staff member can have one timesheet per day for the same location. However, they can have multiple timesheets for different locations on the same day, as long as the clock-in/out hours do not overlap.
No Scheduled Shift: If an employee doesn’t have a scheduled shift for the day but clocks in any way, a timesheet will automatically be generated for their primary location, as defined in their user profile under the Team settings.
Timesheet Labels
There are several labels you may encounter on the timesheet page:
Closed: This label appears when the location is closed, based on the location's opening hours set in Setup > Locations.
Off: This label indicates that the employee does not have a scheduled shift for the day.
Absent: This label is used when the end of the day has been reached, and the employee has not clocked in. The end of the day is determined by the closing time of the location.
Step 3: Adding a Timesheet
If you need to add a timesheet for yourself or another staff member, follow these steps:
-
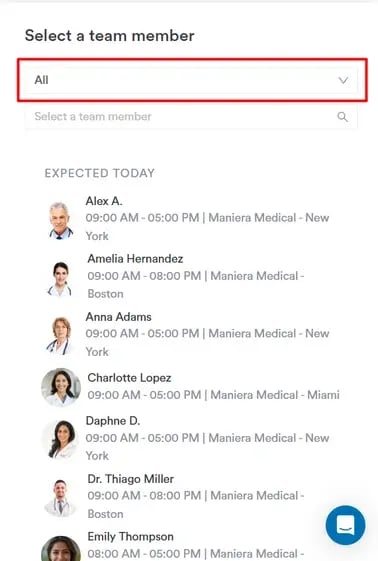
Start Adding a Timesheet: Begin by clicking on the "Add Timesheet" button located on the timesheet page.

-
Select a Location: You’ll then be prompted to select the location where the employee works. You’ll only be able to choose from your primary and allowed locations, which will display only the team members from those specific locations. If you choose the “All Locations” option, it will display all team members from your primary and allowed locations.

-
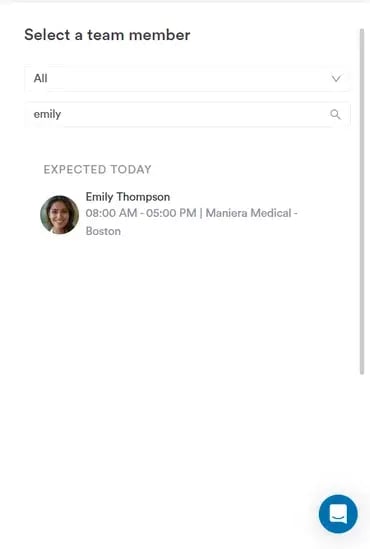
Search for Employees: Use the search bar to easily find the staff member you’re adding a timesheet for by typing in their name.

-
Location Assignment:
If the selected employee only has access to one location, that location will be pre-selected.
If the employee has access to multiple locations but is scheduled to work at one on the selected date, that location will be selected and non-editable.
If the employee doesn’t have a shift scheduled on the selected date, you’ll be able to choose from the employee’s primary and allowed locations.
Selecting a location is mandatory. -
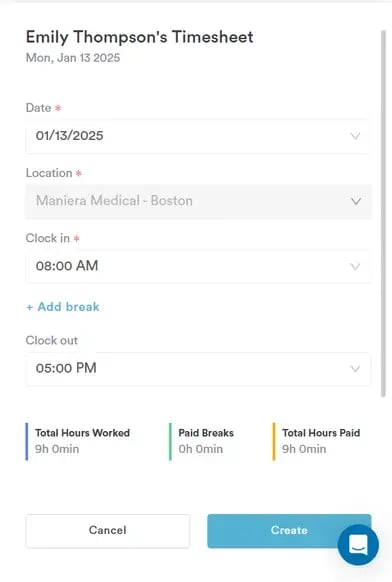
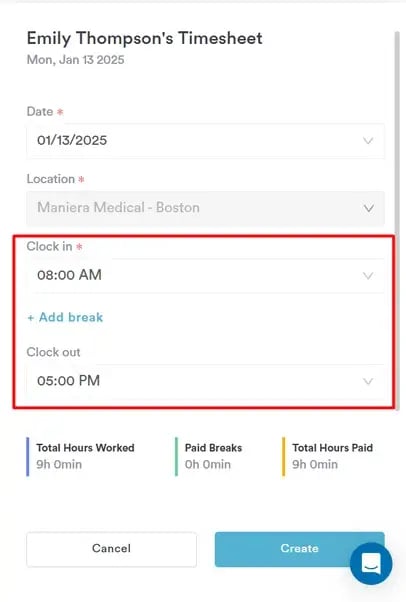
Set Clock In Times:
If the team member had a scheduled shift at the selected location, the clock-in time will automatically reflect the team member’s scheduled shift start time.
If the team member does not have a scheduled shift, the system will display the location's standard working hours.
You can either accept the default time or edit it by clicking on the field and selecting a new time. -
Adding Breaks:
You can manually enter the break duration, or you can use the hourglass icon to set the break duration.
To add a break, click on the “Add Break” button. This will display a list of break types as defined in the Blockout Options settings. After selecting a break type, it will appear on the create timesheet modal.
-
Set Clock Out Time:
If the team member had a scheduled shift, the clock-out time will default to the scheduled end time, though it can be edited.
If the team member did not have a scheduled shift, the clock-out time field will be empty, and you’ll need to select an end time. -
Calculate Total Hours:
Total Hours Worked: This field will display the total number of hours worked, calculated as the time between clock-in and clock-out, including paid breaks but excluding unpaid breaks.
Paid Breaks: This field calculates the time spent on paid breaks.
Total Hours Paid: This field displays the total number of hours worked minus the time spent on unpaid breaks.
Once all the details have been entered, click “Create” to save the timesheet. The new timesheet will now appear on the timesheet listing page.
Step 4: Editing a Timesheet
If you need to correct an error or update details for an ongoing shift, you can edit a timesheet.
To edit a timesheet, click on the specific timesheet you wish to modify. This will open the Activity sidebar. From here, you can choose to edit or delete the timesheet using the three dots menu.

Editing Permissions:
Admins can edit timesheets that are ongoing, as well as timesheets that have already been completed (where the staff member has clocked out).
Non-admins cannot edit their timesheets after they have been submitted.
What Can Be Edited:
You can change the clock-in time, add or remove breaks, and adjust the clock-out time. However, you cannot change the date or location of timesheets that are not in draft status and have already been completed.
Once you’ve made your desired changes, click “Save” to update the timesheet.

Step 5: Deleting a Timesheet
Sometimes, a timesheet might need to be removed entirely—whether it was submitted in error or for some other reason.
Admins have the ability to delete any timesheet for any employee, with the exception of active timesheets (i.e., those where the clock-in feature is currently active).
You can delete timesheets through two different options:
-
Activity Sidebar: In the timesheet's Activity sidebar, clicking on the three-dot men will provide a "Delete" option.

-
Edit Timesheet Page: On the "Edit Timesheet" page, there is a dedicated "Delete" button available for removing the timesheet.

Upon selecting the delete option in either location, a confirmation popup will appear to ensure you want to proceed with the deletion. Confirm your choice to permanently remove the timesheet.
By following these steps, you can effectively manage timesheets within Pabau, ensuring accurate tracking of work hours and smooth time management for your team.
How to Submit a Timesheet as an Admin
In this article, we'll cover how you can submit a timesheet as an admin.
Whether you, as an admin or a non-admin team member forgot to clock in, clocked in late, or accidentally clocked out early, you can manually submit a timesheet to ensure accurate records are maintained.
Step 1: Access Timesheets
Start by logging into your Pabau account. On the left sidebar menu, locate and click on the "Team" option. From the dropdown menu that appears, select "Timesheets." This will take you to the main timesheet management page, where all timesheet data is housed.

Step 2: Add a New Timesheet
If you need to add a timesheet for a staff member or yourself, click on the "Add Timesheet" button located on the Timesheet page.

Step 3: Select a Location
You’ll then be prompted to select the location where the employee works. You’ll only be able to choose from your primary and allowed locations, which will display only the team members from those specific locations.
If you choose the “All Locations” option, it will display all team members from your primary and allowed locations.
Step 4: Search for Employees
Use the search bar to easily find the staff member you’re adding a timesheet for by typing in their name.
Step 5: Assign a Location
If the selected employee only has access to one location, that location will be pre-selected.
If the employee has access to multiple locations but is scheduled to work at one on the selected date, that location will be selected and non-editable.
If the employee doesn’t have a shift scheduled on the selected date, you’ll be able to choose from the employee’s primary and allowed locations.
Selecting a location is mandatory.
Step 6: Set Clock-In Time
If the team member had a scheduled shift at the selected location, the clock-in time will automatically reflect the team member’s scheduled shift start time.
If the team member does not have a scheduled shift, the system will display the location's standard working hours. You can either accept the default time or edit it by clicking on the field and selecting a new time.
Step 7: Add Breaks
To add a break, click on the “Add Break” button. This will display a list of break types as defined in the Blockout Options settings.
After selecting a break type, it will appear on the create timesheet modal. You can manually enter the break duration, or use the hourglass icon to set the break duration.

Step 8: Set Clock-Out Time
If the team member had a scheduled shift, the clock-out time will default to the scheduled end time, though it can be edited.
If the team member did not have a scheduled shift, the clock-out time field will be empty, and you’ll need to select an end time.
Step 9: Total Hours Section
After entering the clock-in time, breaks, and clock-out time, in the Total Hours section you can see the following:
- Total Hours Worked: This field will display the total number of hours worked, calculated as the time between clock-in and clock-out, including paid breaks but excluding unpaid breaks.
Paid Breaks: This field calculates the time spent on paid breaks.
Total Hours Paid: This field displays the total number of hours worked minus the time spent on unpaid breaks.

Step 10: Save the Timesheet
Once all the details have been entered, click “Create” to save the timesheet. The new timesheet will now appear on the timesheet listing page.

By following these steps, you can easily submit a timesheet as an admin, ensuring accurate and complete time records for your team.
How to Edit a Timesheet as an Admin
In this article, we'll cover how you can edit timesheets, whether they are yours or those of other team members.
As an admin, you have the ability to correct any errors in the timesheets of your staff, ensuring that the records accurately reflect the hours worked.
Step 1: Select the Timesheet to Edit
Start by logging into your Pabau account. On the left sidebar menu, locate and click on the "Team" option. From the dropdown menu that appears, select "Timesheets." This will take you to the main timesheet management page, where all timesheet data is housed.

On the timesheets page, click on the specific timesheet you want to modify, which will open the Activity sidebar. From there, you can use the three-dot menu next to the timesheet entry to either edit or delete it.

Step 2: Understand Editing Permissions
As an admin, you can edit timesheets that are currently ongoing, as well as those that have already been completed (i.e., when the staff member has clocked out).
Non-admins cannot edit any timesheets, including their own.
Step 3: Make the Necessary Edits
After clicking on the three-dot icon, select "Edit".

Within the Activity sidebar, you can modify the clock-in time, add or remove breaks, and adjust the clock-out time as needed. However, please note that you cannot change the date or location of timesheets.

Step 4: Save Your Changes
After making your desired changes, click “Save” to update the timesheet.
By following these steps, you can efficiently edit timesheets as an admin, ensuring accuracy and completeness in your team's time records.
How to Set Up Wages
In this article, we'll cover how to enable and set up wages for your employees within Pabau.
The Wages feature is powered by the time tracking function and allows you to determine how much each staff member should be paid based on their working hours and other criteria.
With this feature, you can:
- Define if a staff member should receive a wage through Pabau.
- Specify the working hours the staff member should be paid for.
- Set the wage amount the staff member should receive.
- Decide whether the staff member is eligible for overtime pay.
- Set how much they should be paid for overtime.
NOTE: The Wages functionality is only accessible to staff members when the Timesheets and Wages feature is enabled individually for each of them. To activate this feature, follow the steps outlined in this guide.
Step 1: Access the Team Section
Log into your Pabau account and navigate to the "Team" option in the left sidebar menu. Then, select "Team" again to open the team management section.
Step 2: Select an Employee
Click on the employee whose wages you wish to set up. This will open their profile page. On the left-hand side of the profile, click on the "Timesheets & Wages" tab.

NOTE: Only staff members with permission to edit staff details will see this option.
Step 3: Define Compensation Type
In the "Compensation Type" field, select how the staff member will be paid. You can only select one option at a time:
- None: No wage will be calculated or paid.
- Hourly pay: The staff member will be paid per hour worked.
- Weekly pay: The staff member will receive a set amount of money at the end of each week.
- Monthly pay: The staff member will receive a set amount at the end of each month.
- Yearly pay: The staff member's yearly salary will be divided by 12, and a monthly amount will be paid out.
Step 5: Set the Rate
In the "Rate" field, enter the amount to be paid to the staff member according to the compensation type selected.
Step 6: Define Regular Working Hours
In the "Regular Working Hours" field, input the expected number of hours the staff member is required to work.
Step 7: Define the Timeframe
In the "Type" field, specify whether the "Regular Working Hours" apply per day or per week.

Step 8: Set Up Overtime Pay
If the staff member is eligible for overtime pay, enable the "Overtime Pay" checkbox. When enabled, you will need to define the following:
- Overtime Type: Choose whether the staff member will be paid for overtime by the hour or using a multiplier.
- Hourly Rate: If the overtime type is set to hourly, input the hourly rate for overtime. If using the multiplier option, enter a decimal number to multiply the regular wage.

Step 9: Save the Changes
Once you’ve completed the wage setup, click on the "Save" button in the top-right corner of the page to apply your settings.
From now on, wages for the selected employee will be automatically calculated based on the hours tracked through the time tracking feature and reflected in the Team report. This ensures accurate payroll based on the predefined rates, hours, and overtime settings.
For more details on reporting on wages, please refer to this guide.
By following these steps, you can effectively manage your staff's wage settings.
How to Configure Timesheet Settings
In this guide, we’ll walk you through the steps to configure timesheet settings in your Pabau account. These settings allow you to automate clock-ins, clock-outs, and scheduled breaks for your staff, streamlining your time-tracking process.
Step 1: Navigate to Timesheets
Log into your Pabau account and navigate to Team in the left-side menu, then select "Timesheets."

Step 2: Access Timesheet Configuration
On the Timesheets page, click the "Configure" button in the top-right corner.

Step 3: Understand the Timesheet Settings
The Timesheet Settings page is divided into two sections:
Scheduled Shift
- To enable Auto Clock In, select the checkbox in front of this option. This ensures staff members with scheduled shifts and timesheets enabled are clocked in automatically.
- To enable Auto Clock Out, select the checkbox in front of this option. This ensures staff members are clocked out automatically at the end of their scheduled shift.

If the checkboxes are not selected, these features will remain disabled.
Scheduled Breaks
- To enable the automatic start and end of breaks, select the checkbox in front of Auto Start and End Scheduled Breaks. This will link breaks to blockouts in the staff member’s calendar, starting and ending them automatically based on the blockout schedule.

If the checkbox is not selected, breaks will not be automated.
Step 4: Save Your Settings
Once you've adjusted the settings, click "Save" in the top-right corner to apply your changes.
Your timesheet settings are now configured, ensuring smooth and automated time-tracking for your team!
How to Report on Wages
In this guide, we’ll cover how you can use the Team Report to get an accurate view of the wages earned by your staff members.
Employee wages are automatically calculated based on the hours tracked through the time tracking feature and reflected in the Team Report. This ensures accurate payroll based on predefined rates, hours, and overtime settings.
To learn how to use the time-tracking feature, please refer to this guide.
Step 1: Access the Team Report
Log into your Pabau account and open the Team Report by clicking on Analytics in the left sidebar menu, then selecting Team Report.

Step 2: Locate Wage Data
All wage-related data for your employees is displayed in the Earnings section of the Team Report, specifically under Wages.

Step 3: Understand Wage Components
The Wages section consists of two components:
- Hourly Pay – Represents the regular working hours of each staff member.
- Overtime Pay – Displays any additional earnings if Overtime Pay is enabled.
You can click on each component to expand it further and view detailed breakdowns.

For more details on setting up wages, please refer to this guide.
Step 4: Filter the Report
You can refine the report by adjusting the employees shown and the timeframe in the top right corner. This allows you to focus on specific team members or pay periods for a more detailed analysis.

By following these steps, you can easily track and report on staff wages, ensuring accurate payroll management.
For more guides, refer to related articles below, select additional guides, or use the search bar at the top of the page. These guides will help you get the most out of your Pabau account.
Additionally, to help you fully utilize and understand your Pabau account, we recommend exploring additional guides and resources offered at the Pabau Academy. It offers in-depth video tutorials and lessons, offering a holistic learning experience that can equip you with the essential skills for achieving success with Pabau.