Table of Contents:
1. How to Create and Manage Teams
2. How to Add Staff Members to Teams
3. How to Filter by Teams in the Calendar
4. How to Create and Manage Visibility
5. How to Configure Default Client Card Access
6. How to Set the Default Homepage for Staff Members
How to Create and Manage Teams
The Teams feature in your Pabau account lets you group employees by role, making it easier to set up their default homepage, notification preferences, calendar and online booking availability, and assigned services — all in one place, rather than configuring each staff member individually.
Teams can also be used for calendar management and filtering, setting client access permissions, tracking leads, and generating reports.
Step 1: Navigate to Teams
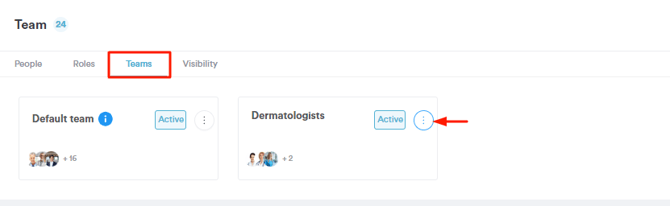
Log in to your Pabau account, and in the left sidebar menu, go to Team, then select "Team" again, and click on the Team tab.
Step 2: Create Team
When you go to the Teams tab, you’ll see a default team that includes all employees not yet assigned to specific teams.
To create a new team, click the "New Team" button in the top right corner. Keep in mind that each person can only be part of one team.
Here, you can enter the team name, choose their default homepage and notification settings, and add the staff members who will be part of it.

If the team is supposed to have a calendar available for bookings, you'll also need to select the services they’ll provide.
Step 3: Edit Teams
To edit an existing team, click the three-dot icon next to the team name, then select "Edit."
From the team editing modal, you can change the team name, the staff members who will be part of the team, the default homepage they will see upon logging into the system, and the notifications they will receive.
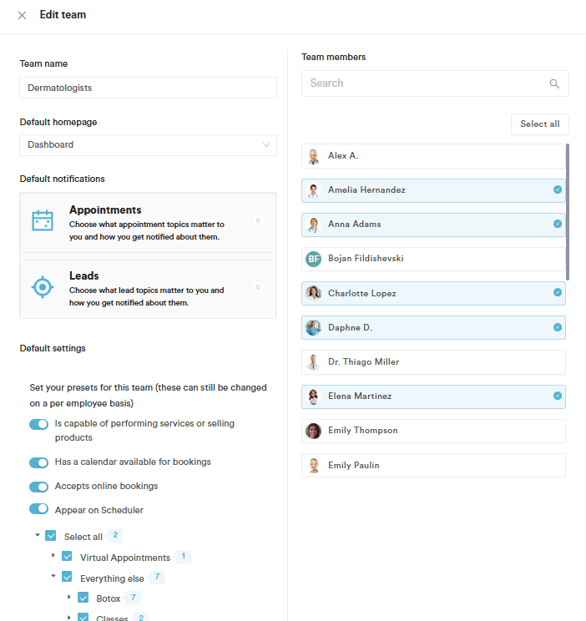
Additionally, from the dropdown menu in the last section, you can select which services the team will provide.
You can use the steps provided to create and manage teams within the system whenever necessary, enabling you to create as many teams as required.
Step 1: Navigate to Teams
Log in to your Pabau account, and in the left sidebar menu, go to Team, then select "Team" again, and click on the Team tab.
Step 2: Access Team
When you go to the Teams tab, you’ll see all of the teams you've created in your account. Click the three-dot icon next to the team you wish to edit, then select "Edit."
Step 3: Team Configurations
From the team editing modal, you can change the team name, add or remove the staff members who are part of the team, the default homepage they will see upon logging into the system, and the notifications they will receive.
To add a new team member, navigate to the search bar at the top right corner of the screen and search for the staff member. Then, click on their name to include them in the team

Alternatively, you can create a team from scratch and decide which staff members will be part of that team and which services they can provide. To save the changes, click the "Save" button located in the bottom right corner of the screen.

By following these steps, you can effectively add staff members to a team.
How to Filter by Teams in the Calendar
NOTE: To filter your calendar by teams, make sure you've previously created teams in your system. To create teams, follow the steps provided in this article.
Step 1: Navigate to Calendar
Log in to your Pabau account, and in the left sidebar menu, click on Calendar.
Step 2: Manage Calendar Filters
In the calendar, click on the filter icon in the top left corner of the screen.

Step 3: Filter Teams
In the filter menu under "Employees," you’ll find your existing teams. Select the team(s) you want to display on the calendar, then click "Apply Filters."

After applying the filter, you will only see the selected team and the shifts of the team members within that specific team.
How to Create and Manage Visibility
The Visibility feature grants you control over the client information accessible to various staff members in your clinic. By configuring visibility groups, you can restrict access to specific areas excluded in the visibility settings. These settings will uniformly apply to all client and lead cards, ensuring privacy and security.
Step 1: Navigate to the Team Feature
Log in to your Pabau account, and in the left sidebar menu, go to Team, then select "Team" again, and click on the Team tab.
Step 2: Navigate to Visibility
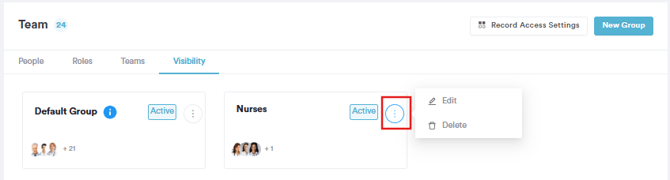
From the Team menu, navigate to the Visibility tab, where you can find the automatically created default group. To create a new visibility group, click on the "New group" button located in the top right corner.

Step 3: Create Visibility Group
On the Create Group page, under the Visibility tab, you can choose between Clients and Leads.
From here, you can add the name of the group (at the top of the page) and adjust the settings accordingly.
The visibility settings allow you to set which areas of the client or lead card can be seen by users of this visibility group.

Step 4: Configure Users Tab
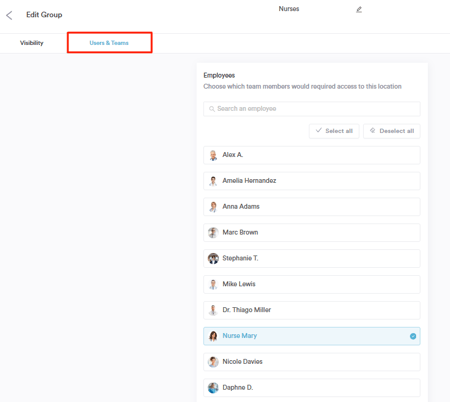
NOTE: Keep in mind that one person can be part of only one visibility group. So, if you want to change staff within the visibility group, you need to remove them from the previous one and add them to the new one.
Step 5: Manage Visibility Groups
You can manage the visibility group by clicking on the three vertical dots on the right next to the active button. From there, you can edit or delete that particular group.
By following these steps, you can create and manage visibility groups in your Pabau account.
How to Configure Default Client Card Access
Step 1: Navigate to Team
Start by logging into your Pabau account using your login credentials. Then, navigate to Team, located on the left sidebar menu.
Step 2: Switch to the Visibility Tab
Once you're on the Team page, switch to the Visibility tab located at the top row. Then, navigate to the "Record Access Settings" button on the top right corner.

Step 3: Configure Client Card Access Settings
To set up the default client card access navigate to the 'Clients' section and click on the field to configure the settings.
-
Public: All staff members can view and edit client details.
-
Owner Only: Only admins and the owner can view and edit client details.
-
Team: Only staff members in the client owner's team can view and edit client details.
- Anyone with Appointment: Only the staff member with an appointment with the client can view and edit their details.
-
Primary Location: Staff members at the client’s preferred location can view and edit their details.

Step 4: Save Changes
Once you've configured the default settings, click the Save button in the top-right corner to apply the changes to all users.

NOTE: If you need to make changes for a specific client, you can override the default settings. For more information on adjusting access settings for individual clients, check out this article.
By following these steps, you can configure the default client card access settings in Pabau.
How to Set the Default Homepage for Staff Members
Step 1: Navigate to Teams
Log in to your Pabau account, and in the left sidebar menu, go to Team, then select "Team" again, and click on the Team tab.
NOTE: If you would like to learn more about the Team feature and explore all of the available options, please refer to the following guide
Step 2: Create Team
When you go to the Teams tab, you’ll see a default team that includes all employees not yet assigned to specific teams.
To create a new team, click the "New Team" button in the top right corner. Keep in mind that each person can only be part of one team.

Step 3: Select the Default Homepage and Enter Team Details
In this step, you can select the default homepage for your staff members and enter the necessary team details. You'll also have the option to decide which staff members will see the selected homepage.

Note: When creating a new team to set the default homepage, be aware that other settings, such as client access permissions, calendar availability, and reporting, will also apply to that team. If the team is meant to have a calendar available for bookings, you'll also need to select the services they’ll provide.
Step 4: Save changes
Once you're finished, make sure to save your changes by clicking the "Save" button in the bottom right corner.
This way, you can set the default homepage for your staff members, and upon logging into Pabau, they will be directed to it automatically.
Additionally, to help you fully utilize and understand your Pabau account, we recommend exploring additional guides and resources offered at the Pabau Academy. It offers in-depth video tutorials and lessons, offering a holistic learning experience that can equip you with the essential skills for achieving success with Pabau.