
Table of Contents:
1. How to Integrate with Stripe
2. Process Card Transactions
3. How to Refund Payments
4. How to Handle Disputes
NOTE: To set up the Stripe integration, your Pabau account must be registered in a country and currency (configured in Setup > Business Details) that Stripe supports.
How to Integrate with Stripe
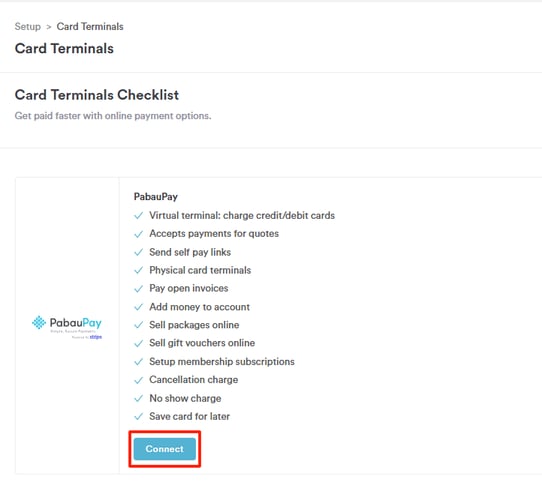
Step 1: Navigate to Setup
To activate the Stripe integration in Pabau, open your account using your login credentials and go to Setup, then Card Terminals. Click the Connect button to begin linking your Stripe account.
Step 2: Enter Details
After clicking Connect, a pop-up window will appear. Enter the details requested by Stripe, including Email (your business email address), Country, and Website, then click the "Connect Account" button.
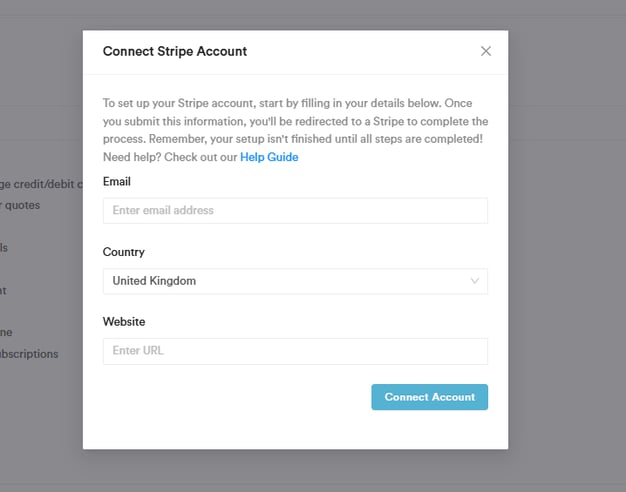
NOTE: At this stage, only a Stripe username is set up, so the integration is partially completed and cannot yet be used.
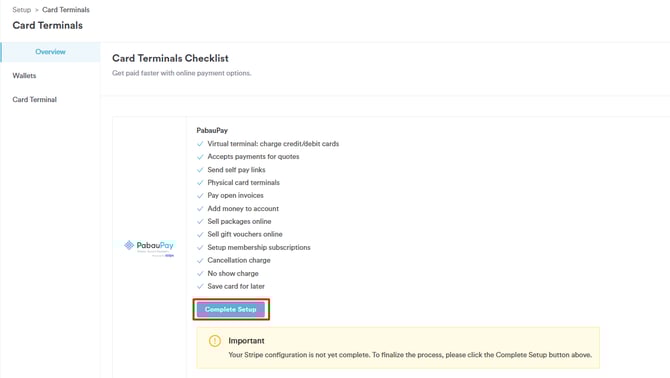
Step 3: Complete Setup
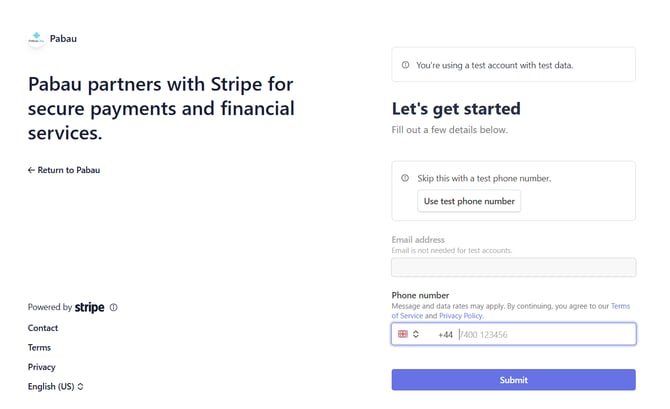
The Connect button will now display Complete Setup. Click Complete Setup to open a Stripe-hosted page, where you will provide all required business details. You can complete this step immediately or in multiple stages, as Stripe saves your progress automatically.
On the Stripe page, start by providing the following information:
- Phone Number
Then click the "Submit" button to proceed to the next step.
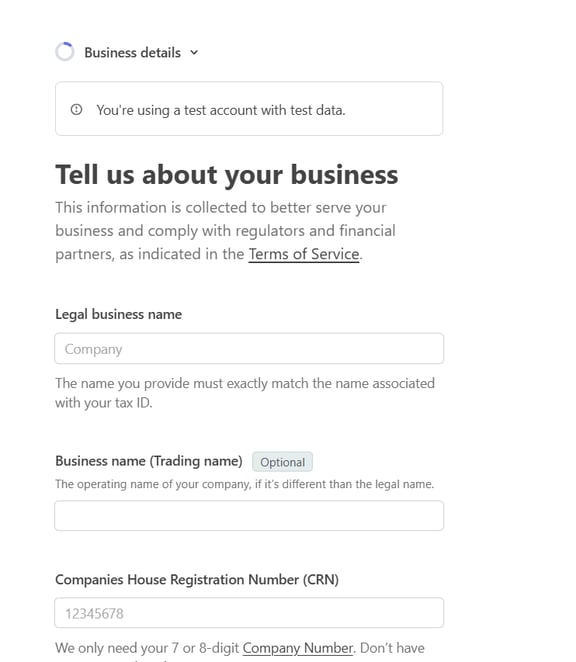
Step 4: Enter Business Details
On this step, provide your business information to complete the Stripe setup. The details you’ll need to enter include:
-
Legal Business Name – The official name of your company as registered with the relevant authorities.
-
Business Name (Trading Name) – The name your business operates under publicly, if different from the legal name.
-
Companies House Registration Number (CRN) – Your official registration number (UK only) if applicable.
-
Business Address – The official address of your business.
-
Business Phone Number – A contact number for your company.
-
Industry – The sector or type of business you operate.
-
Business Website – Your website URL, if available.
Step 5: Verify Your Personal Details
On this step, confirm or add your personal information to verify your identity with Stripe. The details you’ll need to provide include:
-
Legal Name – Your full name as it appears on official documents.
-
Legal First Name – Your given name.
-
Legal Last Name – Your family or surname.
-
-
Email Address – Your professional or personal email.
-
Job Title – Your role in the company, such as CEO, Manager, or Partner.
-
Date of Birth – Enter your date of birth in the format MM/DD/YYYY.
-
Home Address – Your residential address, including:
-
Country – The country you reside in.
-
Street Address – House number and street name.
-
Apartment, Unit, or Other – Optional unit or apartment details.
-
Post Town – Your city or town.
-
Postal Code – Your area postal code.
-
-
Phone Number – Include country code and number (e.g., +44 7400 123456).
Additionally, confirm your role in the company by ticking any that apply:
-
I own 25% or more of the company.
-
I’m a director of the company or a member of the governing board.
-
I have significant management control over the company.
After selecting one or more of the checkboxes about your role in the company, additional questions will appear depending on your choice:
-
I own 25% or more of the company – A follow-up question will appear:
“Are you the only person who owns 25% or more of the company?”
Select Yes or No. -
I’m a director of the company or a member of the governing board – A follow-up question will appear:
“Are you the only person on the governing board of the company?”
Select Yes or No. -
I have significant management control over the company – A follow-up question will appear:
“Are you the only person with significant management control over the company?”
Select Yes or No.
Click "Continue" to proceed to the next step.
Step 6: Add Missing Directors, Owners, or Account Information
In this step, you provide any additional information required based on your selections from the previous personal details step.
-
If you selected “I own 25% or more of the company”, you may be prompted to add a director if one is not already listed.
-
If you selected “I’m a director of the company or a member of the governing board”, you may need to add the company owner.
-
If you selected all three options, you will be redirected to a step to add your bank account or debit/credit card information to complete the setup.
Step 7: Review & Submit
The final step in completing the Stripe integration is to review all the information you’ve provided in the previous steps.
Take a moment to check that all personal, business, and account details are correct. You can make any necessary edits before proceeding.
Once everything is verified, click Submit to finalize the integration.

After submission, your Stripe account will be fully connected and ready to use with Pabau.
How to Process Card Transactions
You can collect payments via several locations within Pabau, each offering multiple payment methods.
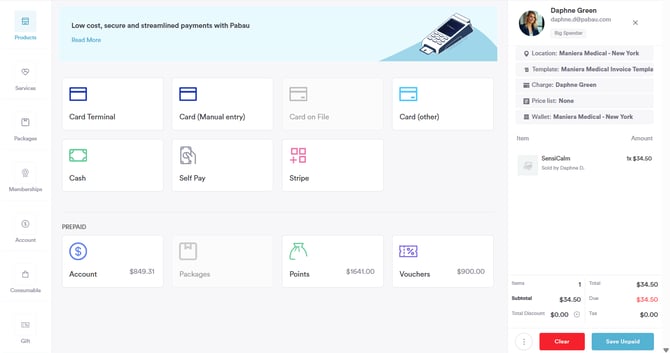
1. Pabau
Point of Sale (POS)
Take payments directly at the POS using:
Client Card – Edit Invoice Screen
Process payments for invoices using:
-
Card terminal
-
Manual card entry
-
Saved card methods
NOTE: For more information on how to pay for unpaid invoices from the client card, refer to this guide.

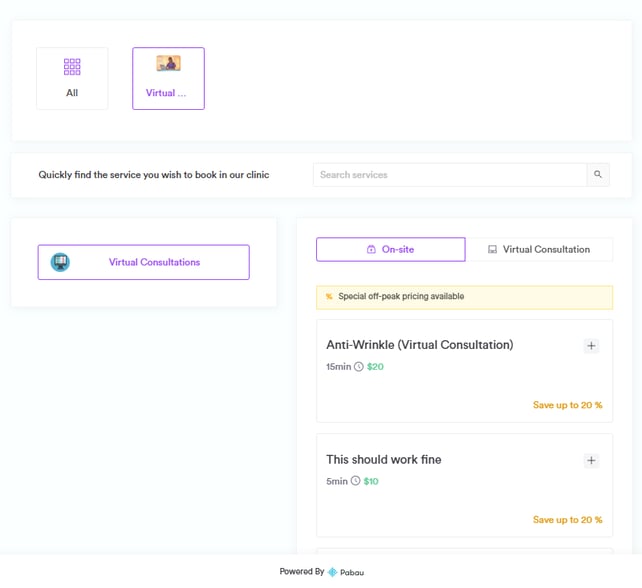
2. Online Bookings
Clients can pay when booking online for:
3. Pabau Connect
Clients can use Pabau Connect to:
How to Refund Payments
Step 1: Navigate to the Client Card
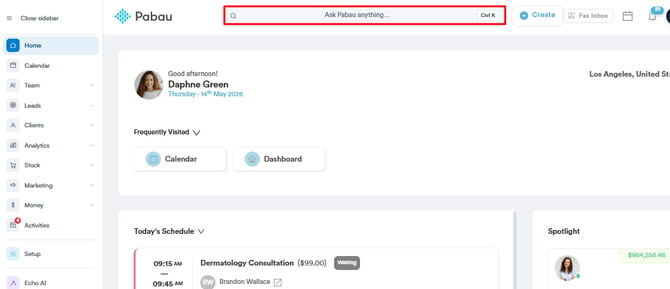
Log in to your Pabau account using your credentials. Use the search bar at the top of the page to find the client you need to issue a refund for. Click on their name to access their client card.
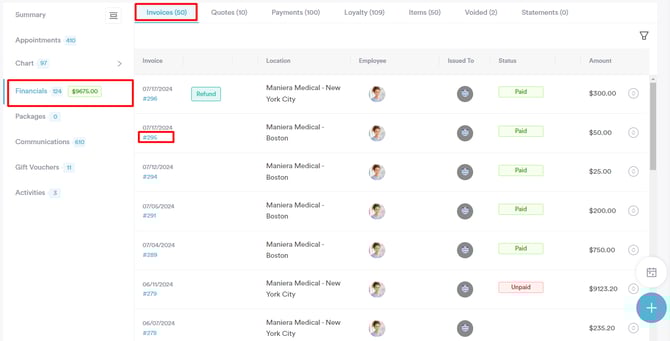
Step 2: Locate the Invoice
Once on the client card, locate and select the "Financials" tab. This tab provides a detailed record of all payments made by the client.
Within the Financials tab, click on the "Invoices" sub-tab to view a list of all issued invoices. Find the invoice you wish to refund and click on its number to see the details.
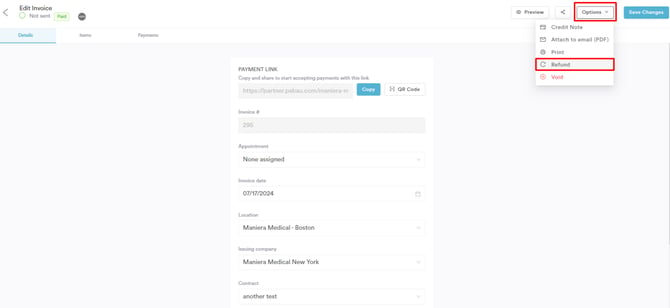
Step 3: Navigate to Options
On the Edit Invoice page, hover over the "Options" button located in the top right corner. A menu will appear with various actions, including the "Refund" option.
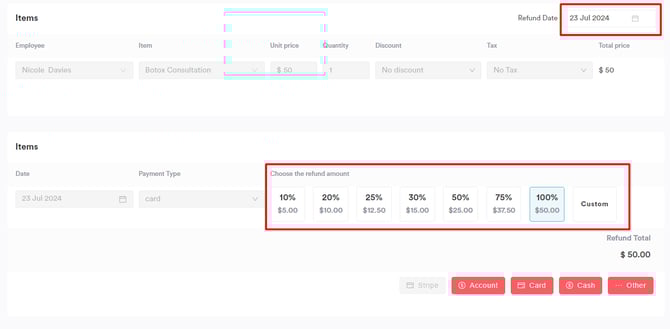
Step 4: Refund Configuration
On the Refund page, adjust the refund date as needed. Choose whether to refund a percentage of the invoice amount or specify a custom refund amount.
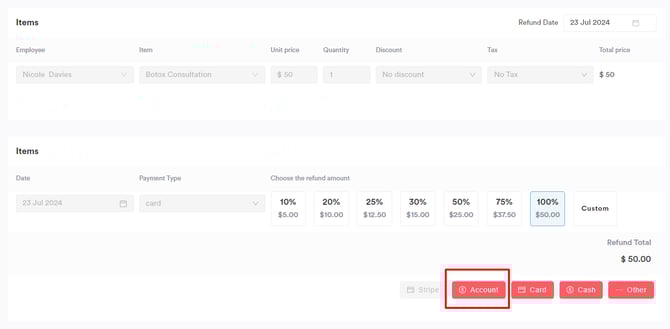
Step 5: Choose a Payment Method
Select "Account" as the method for the refund. In the pop-up window, confirm the refund by clicking on "Refund Now."
Post-Refund Actions
After processing the refund, the following will occur:
- A refund entry will appear in the Financials tab.
- An account balance entry, reflecting the refunded amount, will be recorded in the Payments tab. This entry will use the payment method originally used to process the payment.
- The refunded amount will be added to the client's On Account balance.

This refunded amount can now be used for future payments within the system, just like any other account balance.
How to Handle Disputes
Understanding Disputes
A dispute, commonly known as a chargeback, arises when a cardholder raises concerns about a payment with their card issuer. Processing a chargeback involves the issuer initiating a formal dispute on the card network, resulting in an immediate reversal of the payment. This action retrieves the payment amount, along with one or more network dispute fees, from Pabau Pay, powered by Stripe. Subsequently, Pabau Pay debits the payment amount and dispute fee from your balance.
NOTE: Pabau and Stripe do not participate in the dispute process and have no influence or control over the final decision. Nonetheless, we are here to assist you through every step of the process.
Accessing Disputes
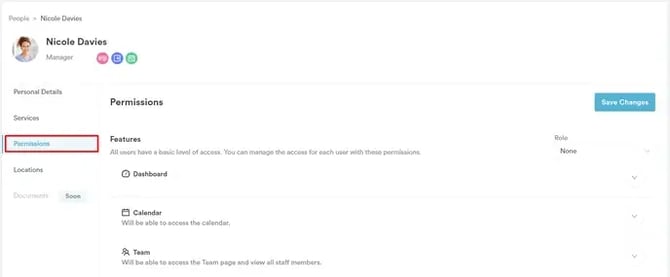
To view and manage disputes within your Pabau account, you must first ensure that you have the necessary permissions enabled. To do so, navigate to the "Team" section in the left sidebar menu, select "Team" again, and click on the user for whom you wish to enable access to the Wallet feature.

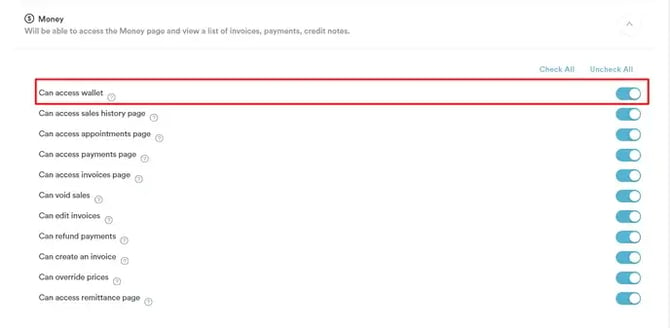
Within the user's profile, go to the "Permissions" tab, expand the "Money" category of permissions, and toggle the "Can access wallet" permission to "on." Save the changes by clicking the "Save Changes" button in the top right corner.
Once you've enabled the Wallet permission, you can access the Wallet feature by clicking on the Wallet icon located in the top right corner of the screen, next to your avatar.

Viewing Disputes
In the Wallet modal, click on "Disputes" on the left-hand side.

On the right side, you'll see a section displaying the number of open disputes and a button labeled "View all disputes."
Click on "View all disputes" to open a new page containing a list of all disputes.

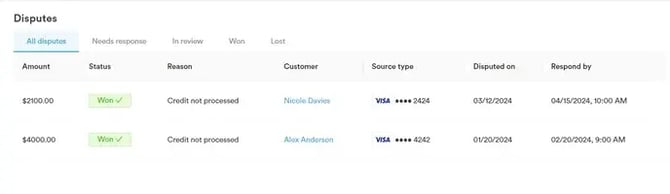
Disputes List
The disputes list comprises a table with the following columns:
-
Amount: The amount of the disputed transaction.
-
Status: The current status of the dispute.
-
Reason: The reason for the dispute (e.g., Fraudulent, Not as described, etc.).
-
Customer: The email of the customer involved in the dispute.
-
Source Type: The payment type used for the transaction (with only the last 4 digits of the card number visible).
-
Disputed On: The country flag and the date when the dispute was initiated.
-
Respond By: The deadline to respond to the dispute.
Dispute Reasons
-
Canceled: This reason applies when a cardholder cancels or returns merchandise, or cancels services, and the merchant fails to process a credit or void a transaction receipt.
-
Duplicate: This reason covers processing error dispute types, including instances of duplicate transactions, incorrect amounts charged, payments made by other means, and similar errors.
-
Fraudulent: Disputes categorized under this reason indicate that the cardholder's details were compromised, and the transaction was not authorized by the legitimate cardholder.
-
Not as Described: When a cardholder receives merchandise or services that do not match what was presented at the time of purchase, or if the received items were damaged or defective, this reason applies.
-
Not Received: This reason is selected when the cardholder participated in the transaction but did not receive the merchandise or services as expected.
-
Other: Any dispute scenario that does not clearly fit into any of the aforementioned categories is categorized under "Other."
Dispute Statuses
The status of a dispute may change based on its progress and resolution. Here are the possible statuses:
- Days to Respond: This status indicates the time frame given to respond to the dispute. This period typically ranges from 7 to 21 days, contingent on the card network's policies. Following the submission of evidence, it is forwarded to the cardholder’s bank, which has a restricted timeframe, usually between 60 to 75 days, to provide a response, with variations based on the card network.
- Deadline Missed: Indicates that the deadline to respond has passed without submission of evidence, resulting in a resolution in favor of the cardholder.
- Won: The dispute was resolved in favor of the merchant, and the disputed amount (minus any applicable fees) is returned.
- Lost: The dispute was resolved in favor of the cardholder, and the disputed amount, along with the dispute fee, will not be returned.
Managing Disputes
You can hover over each dispute status to view relevant explanations. Additionally, the "Won" status contains a link to Stripe's Pricing & Fees webpage for further information.
Dispute Details and Management
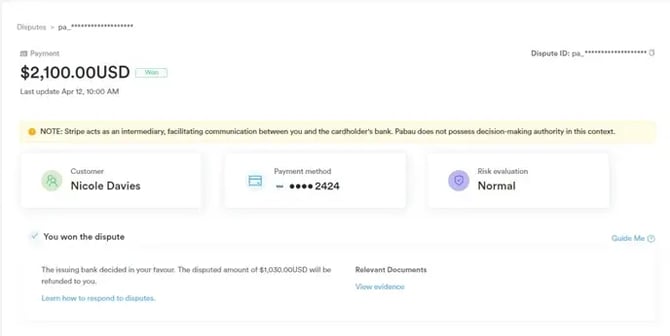
In the "This payment was disputed" section, you'll find key dispute details such as the disputed amount, reason, and suggested steps for resolution. At the bottom right corner, you can choose to either Accept Dispute or Counter Dispute, depending on your preferred course of action.
Utilize the "Guide Me" button for recommendations on handling disputes. Click "Next" to proceed to the next page of recommendations or "Skip to dispute details" to bypass the guide and view the dispute details directly.
Beneath the "This payment was disputed" section, you'll find a Timeline displaying changes in dispute status over time.
In the "Checkout Summary" section, you'll find comprehensive client information.
Additionally, details on the payment method, metadata, connections, events, logs, and all activity related to the payment are available for your reference.
Proactive monitoring and addressing of disputes are crucial for maintaining positive customer relations and financial stability.
For more guides, refer to related articles below, select additional guides, or use the search bar at the top of the page. These guides will help you get the most out of your Pabau account.
Additionally, to help you fully utilize and understand your Pabau account, we recommend exploring additional guides and resources offered at the Pabau Academy. It offers in-depth video tutorials and lessons, offering a holistic learning experience that can equip you with the essential skills for achieving success with Pabau.