
NOTE: This guide covers the new Online Bookings and Client Portal, which are being rolled out to clinics in phases. If your screens look different, your account may still be on the classic version — message us via the in-app chat and we will help.
A well set-up booking page brings in more bookings and protects your calendar from awkward gaps and last-minute surprises. This guide collects the settings we recommend for most clinics in the new Online Bookings, with a link to the step-by-step guide for each one.
Best Practice Checklist
| Setting | Our recommendation | Where |
|---|---|---|
| Readiness checks | Get every check to ready before you share your page | Overview tab |
| Brand colours and background | Your brand colours on a soft, light background | Studio → Branding |
| Landing page wording | A short, friendly welcome | Studio → Book Type → Wording |
| Prices, durations and descriptions | Show all three | Studio → Services list |
| Service reviews | Off until each service has 5–10 good reviews | Studio → Services list → Show reviews |
| Category photos | On, with a good photo on each category | Studio → Categories |
| Provider photos, job titles and bios | On, with a photo for everyone | Studio → Team cards |
| Provider review score | Off until each provider has a strong review base | Studio → Team cards |
| Time interval | 15 or 30 minutes | Studio → Date & time → Rules |
| Minimum notice | 4 hours or more | Studio → Date & time → Rules |
| Room and equipment checks | On, if treatments need a specific room or device | Studio → Date & time → Rules |
| Waitlist | Optional — on if your team will follow up | Studio → Date & time → Layout |
| Online cancellations and reschedules | Follow cancellation policy, not Always allow | Setup → Client Portal → Essentials |
| Terms and privacy policy | Add both | Setup → Client Portal → Content |
| Deposits | Take a deposit on high-value or high-no-show treatments | See Part 4 |
| Promo codes | On, if you run campaigns | Switch on in Studio → Payment; create codes in Setup → Discounts (guide) |
| Google Reserve | On, if you have a Google Business Profile | Google Reserve tab |
Step 1: Get Ready Before You Share
Go to More → Online Bookings (or Setup → Online presence → Online Bookings) and check the Make a great first impression card on the Overview tab.
- The counter shows how many checks are ready. Click any check that is not ready to see how to fix it.
- Click View checklist to see every check in one place.
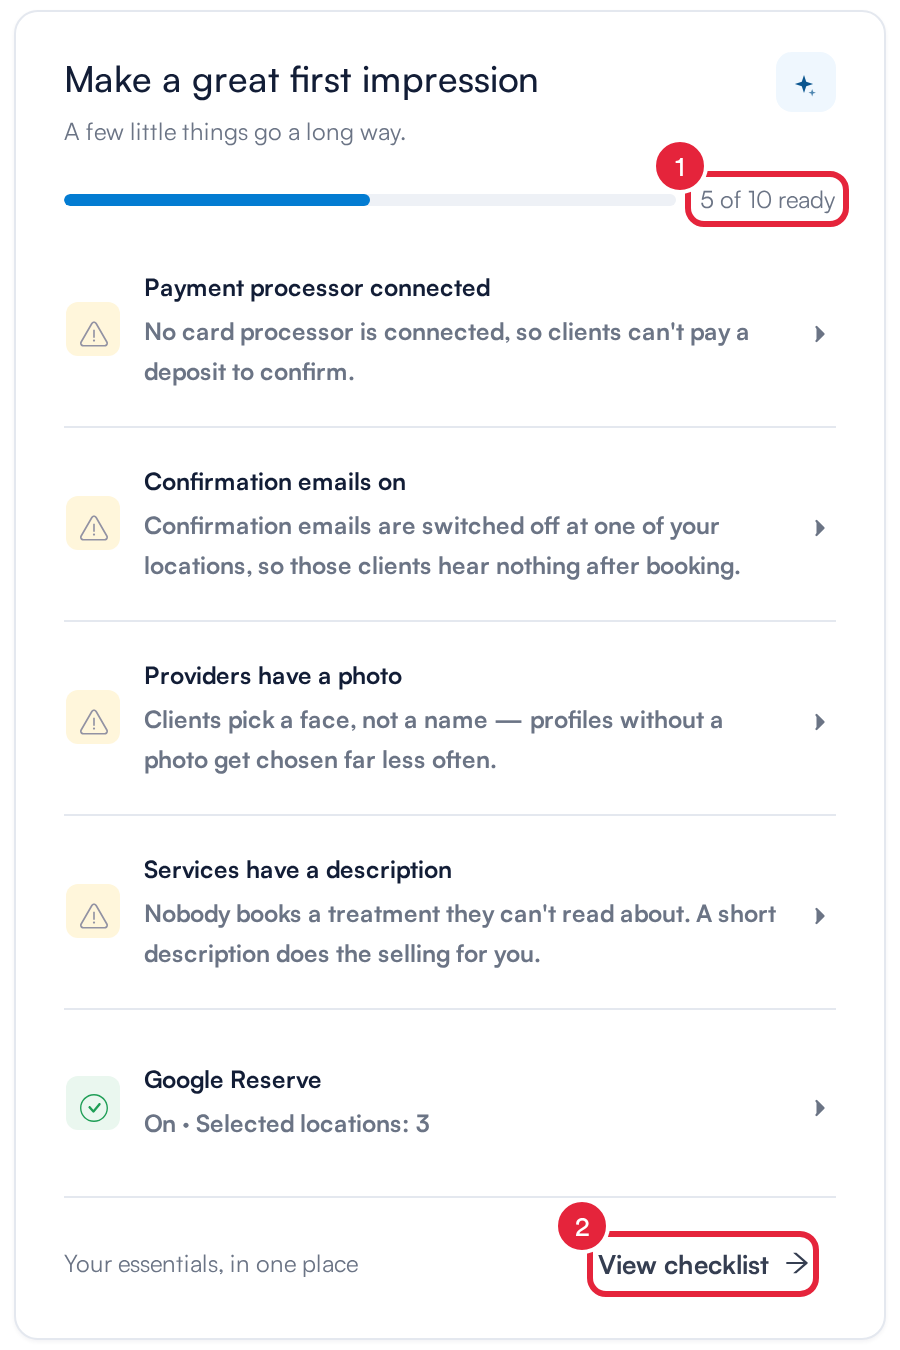
The readiness card on the Overview tab
Then click Preview as a client and book a test appointment the way a client would — on your phone as well as your computer. The full list of checks is in Preconditions for Online Bookings: Your Readiness Checklist.
Step 2: Make It Look Like Your Clinic
Click Customise page to open Pabau Studio.
- Click Branding at the top.
- Under Colors, set your brand colours.
- Under Background, choose a soft, light colour — it keeps text easy to read and looks consistent with your emails.
- Short on time? Import from your website reads your website’s colours, font and buttons and applies them for you.
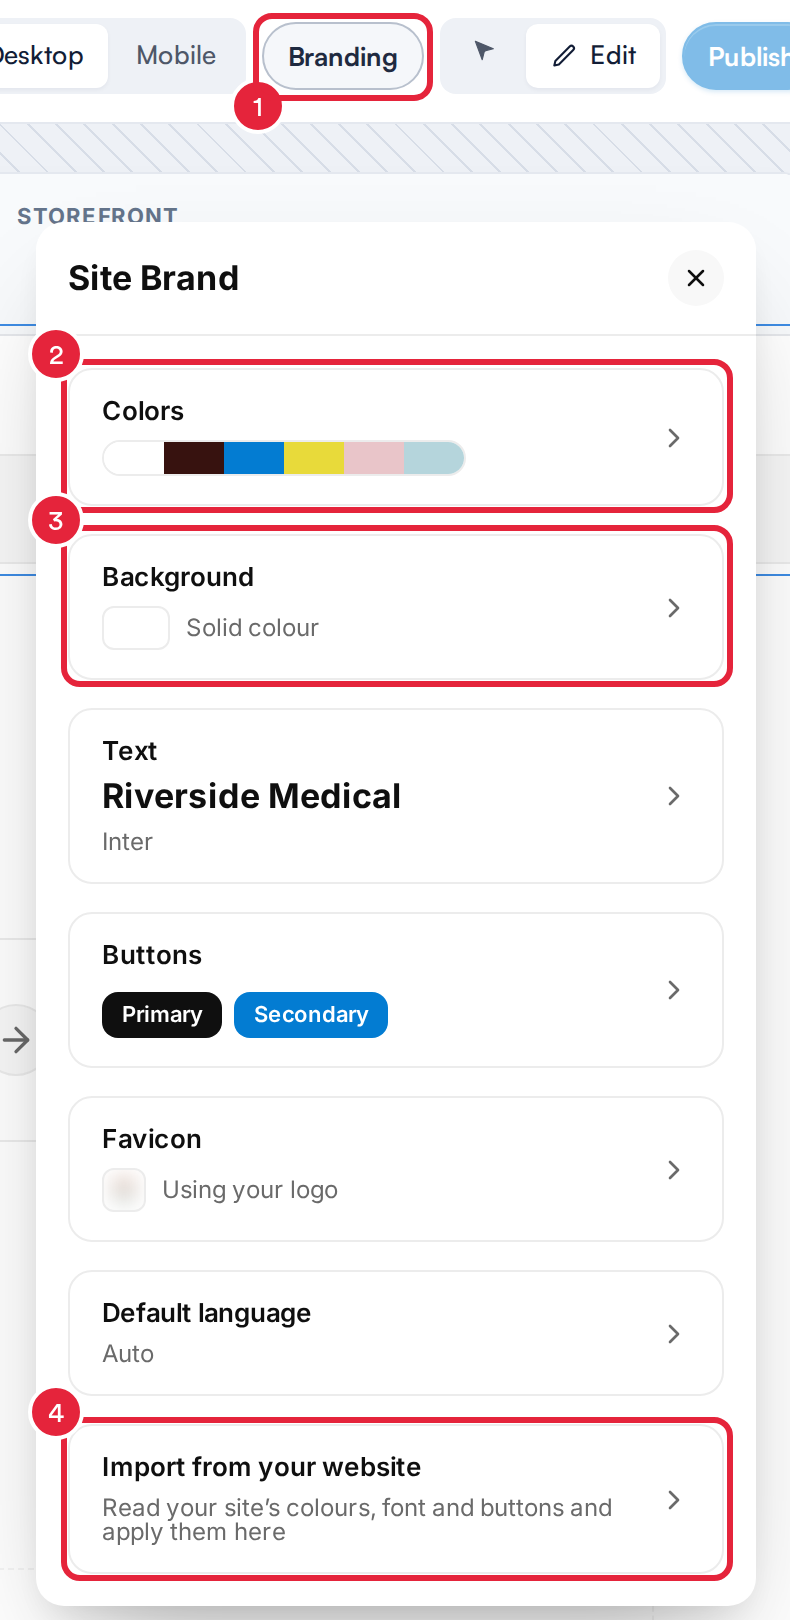
Site Brand in Pabau Studio
Then change the welcome wording on the Book Type page — see How to Customise the General Online Booking Settings. Click Publish when you are happy.
Step 3: Help Clients Choose the Right Treatment
- Show prices and durations — clients know what to expect before they reach checkout.
- Write a short description for every service — or use Generate on the service’s Online Booking tab to draft one.
- Hold back service reviews until each service has 5–10 good reviews. A handful of ratings can put clients off.
- Use category photos — they make the treatment list easier to scan.
See How to Customise the Services and Categories Online Booking Settings.
Step 4: Show Your Team at Their Best
- Add a photo, job title and short bio for everyone who takes online bookings — clients pick a face far more often than a name.
- Leave Show review score off until each provider has a strong review base.
See How to Customise the Team Online Booking Settings.
Step 5: Protect Your Calendar
In Studio, open the Date & Time page, hover over the calendar and click the Date & Time label.
- Open the Rules tab.
- Set the Time interval to 15 or 30 minutes to match your usual appointment lengths.
- Set a Minimum notice of at least 4 hours so your team has time to prepare. Use Maximum advance if you do not want bookings too far ahead.
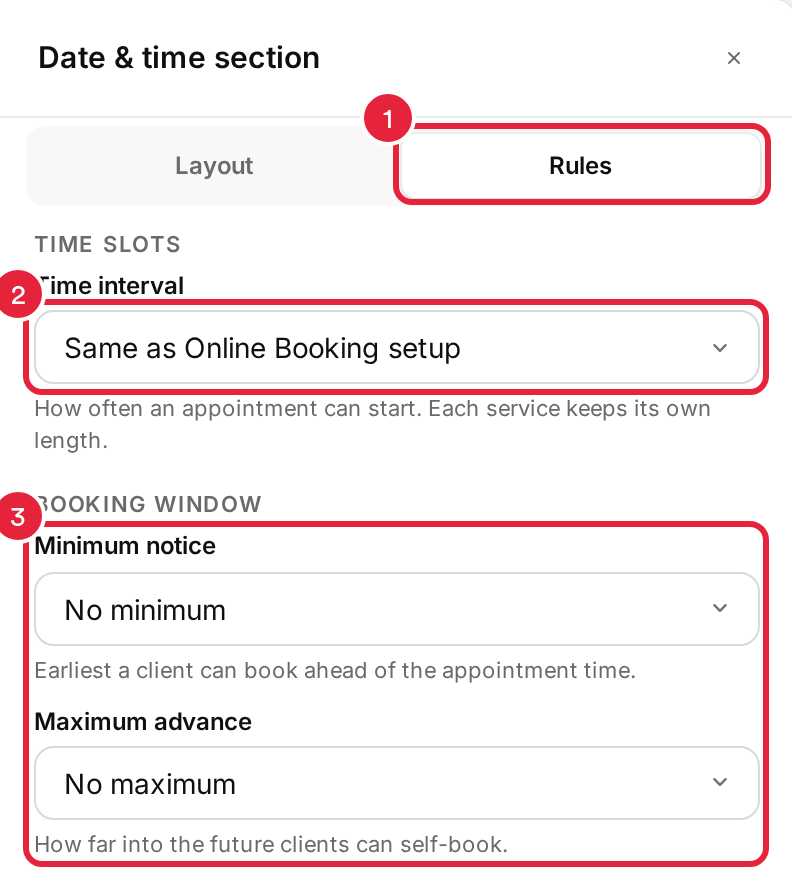
The Rules tab of the Date & time section
Further down the same tab, switch on Don’t allow booking if room in use and Don’t allow booking if equipment in use if your treatments need a particular room or device. The gap rules help you avoid small, unbookable gaps in the day — see New Online Bookings Part 3: Set Booking Steps and Availability Rules.
IMPORTANT: If you switch on the waitlist, Pabau does not contact waitlisted clients automatically. Check your waitlist regularly and contact clients when a time becomes free.
Step 6: Set Clear Policies
- Cancellations and reschedules — in Setup → Client Portal → Essentials → Appointments, choose Follow cancellation policy so clients can only make changes outside your notice window.
- Terms and privacy policy — add both under Setup → Client Portal → Content → Policies. They show in the footer of your booking page and client portal.
- Deposits — taking a deposit on longer or high-value treatments reduces no-shows. See New Online Bookings Part 4: Take Payments and Deposits Online.
Step 7: Make It Easy to Find
- Add a booking button to your website — see How to Add Online Booking to Your Website.
- Share tailored links on social media and in emails, so you can see which ones bring in bookings — see How to Create a Custom Link for Online Bookings.
- Turn on Google Reserve on the Google Reserve tab so clients can book from your Google listing.
- Promote packages and offers while clients book — see How to Promote Your Packages Online.
TIP: Check the Analytics tab once a month. It shows where clients drop out of the booking journey, so you know what to improve next.
What’s next?
New to the new Online Bookings? Start with Online Bookings: An Overview of the New Booking Page. If something is not working, see Troubleshoot Online Bookings Issues.
Questions? Reach us any time via the in-app chat — we’re happy to help.
Was this guide helpful? Let us know by voting below - your feedback helps us write clearer articles.
For more guides, browse the related articles below or use the search bar at the top of the page. You can also watch our video learning series, the Pabau Academy, or visit the Support page for additional help.